通过JavaScript遍历树
Trees are basically just fancy linked lists and creating and deleting nodes on a tree is incredibly simple. Searching on the other hand is a bit more tricky when they’re unsorted, so we’re going to look into a few different ways to handle searching through an entire tree.
树基本上只是花哨的链表 ,并且在树上创建和删除节点非常简单。 另一方面,当未排序时,搜索会有些棘手,因此我们将研究几种不同的方式来处理整个树的搜索。
先决条件 (Prerequisites)
You will need a basic understanding of what trees are and how they work. Our particular example with be utilizing a Binary Search Tree, but these are more of techniques and patterns than exact implementations and can be easily adapted for any type of tree.
您将需要对什么是树以及它们如何工作有基本的了解。 我们使用Binary Search Tree的特定示例,但是这些比确切的实现更多的是技术和模式,并且可以轻松地适用于任何类型的树。
概念 (Concepts)
With binary search trees we could use the same system to create a new node as to find one. Standard trees, like your file system, don’t follow any particular rules and force us to look at every item through a tree or subtree to find what we want. This is why running a search for a particular file can take so long.
使用二叉搜索树,我们可以使用相同的系统来创建一个新节点,就像找到一个一样。 标准树(如文件系统)不遵循任何特定规则,因此迫使我们通过树或子树查看每个项目以查找所需内容。 这就是为什么对特定文件进行搜索可能需要这么长时间的原因。
There aren’t many ways to optimize past O(n) but there are two main “philosophies” for searching through the entire tree, either by searching breadth-first (horizontally between siblings) or depth-first (vertically between parents and children).
优化过去的O(n)方法并不多,但是有两种主要的“哲学”可用于搜索整棵树,方法是:首先搜索广度优先(在兄弟姐妹之间水平),或者深度优先(在父母与孩子之间垂直) 。
树 (Tree)
Since a binary search tree is the easiest to set up, we can just throw together a quick one that can only add nodes.
由于二叉搜索树最容易建立,因此我们可以将仅添加节点的快速树放在一起。
class Node {
  constructor(val) {
    this.val = val;
    this.right = null;
    this.left = null;
  };
};

class BST {
  constructor() {
    this.root = null;
  };
  create(val) {
    const newNode = new Node(val);
    if (!this.root) {
      this.root = newNode;
      return this;
    };
    let current = this.root;

    const addSide = side => {
      if (!current[side]) {
        current[side] = newNode;
        return this;
      };
      current = current[side];
    };

    while (true) {
      if (val === current.val) return this;
      if (val < current.val) addSide('left');
      else addSide('right');
    };
  };
};

const tree = new BST();
tree.create(20);
tree.create(14);
tree.create(57);
tree.create(9);
tree.create(19);
tree.create(31);
tree.create(62);
tree.create(3);
tree.create(11);
tree.create(72);
广度优先搜索 (Breadth-First Search)
Breadth-first search is characterized by the fact that it focuses on every item, from left to right, on every level before moving to the next.
广度优先搜索的特征在于,它着重于从左到右,在每个级别上的每个项目,然后再转移到下一个。
There are three main parts to this, the current node, our list of visited nodes, and a basic queue for keeping track of which nodes we need to look at (we’ll just use an array since it’ll never get very long).
这包括三个主要部分:当前节点,访问的节点列表以及用于跟踪需要查看哪些节点的基本队列 (我们将使用数组,因为它永远不会很长) 。
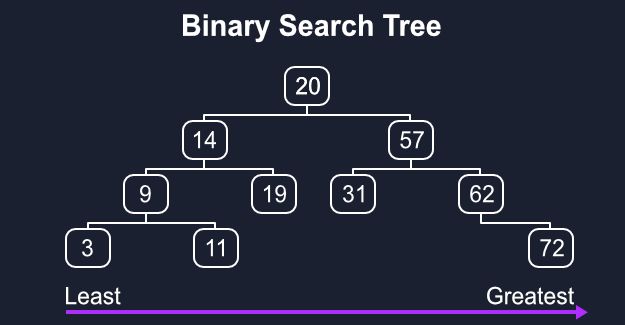
Let’s work through how it would look on this tree.
让我们研究一下它在这棵树上的外观。
Whatever is our current, we’ll push its children (from left to right) into our queue, so it’ll look like [20, 14, 57]. Then we’ll change current to the next item in the queue and add its left and right children to the end of the queue, [14, 57, 9, 19].
无论current是什么,我们都会将其子级(从左到右)推入队列,因此看起来像[20, 14, 57] 。 然后,将current更改为队列中的下一个项目,并将其左右子项添加到队列的末尾[14, 57, 9, 19] 。
Our current item can now be removed and added to visited while we move on to the next item, look for its children, and add them to the queue. This will repeat until our queue is empty and every value is in visited.
现在,当我们移至下一个项目,查找其子项目并将其添加到队列中时,当前的项目现在可以被删除并添加到已visited项目中。 这将重复进行,直到我们的队列为空并且visited每个值为止。
BFS() {
  let visited = [],
      queue = [],
      current = this.root;

  queue.push(current);
  while (queue.length) {
    current = queue.shift();
    visited.push(current.val);

    if (current.left) queue.push(current.left);
    if (current.right) queue.push(current.right);
  };

    return visited;
}

console.log(tree.BFS()); //[ 20, 14, 57, 9, 19, 31, 62, 3, 11, 72 ]
深度优先搜索 (Depth-First Search)
Depth-first searches are more concerned with completing a traversal down the whole side of the tree to the leafs than completing every level.
深度优先搜索比完成每个级别更关心完成从树的整个侧面到叶子的遍历。
There are three main ways to handle this, preOrder, postOrder, and inOrder but they’re just very slight modifications of each other to change the output order. Better yet, we don’t even need to worry about a queue anymore.
有来处理这个问题,方式主要有三种preOrder , postOrder和inOrder ,但他们只是彼此很轻微的修改,改变输出顺序。 更好的是,我们甚至不必担心队列。
Starting from the root, we’ll use a short recursive function to log our node before moving down to the left as far as possible, logging its path along the way. When the left side is done it’ll start working on the remaining right values until the whole tree has been logged. By the end visited should look like [24, 14, 9, 3, 11, 19, ...].
从根开始,我们将使用一个简短的递归函数来记录我们的节点,然后尽可能向下移动到左边,并记录其路径。 完成左侧操作后,它将开始处理剩余的右侧值,直到记录完整个树为止。 最终访问应该看起来像[24, 14, 9, 3, 11, 19, ...] 。
preOrder() {
  let visited = [],
      current = this.root;

  let traverse = node => {
    visited.push(node.val);
    if (node.left) traverse(node.left);
    if (node.right) traverse(node.right);
  };

  traverse(current);
  return visited;
}

console.log(tree.preOrder()); // [ 20, 14, 9, 3, 11, 19, 57, 31, 62, 72 ]
As you may have guessed, postOrder is the opposite of preOrder, we’re still working vertically but instead of moving from the root to leafs, we’ll search from the bottom to top.
您可能已经猜到了, postOrder与preOrder相反,我们仍在垂直工作,但不是从根到叶,而是从下到上搜索。
We’ll start from the bottommost left node and log it and its siblings before moving up to their parent. The first half of visited should look like this, [3, 11, 9, 19, 14, ...], as it works it bubbles up the tree.
我们将从最底部的节点开始,并记录其及其兄弟节点,然后再移至其父节点。 被访问的前半部分应该看起来像[3, 11, 9, 19, 14, ...] ,因为它会在树上冒泡。
We can easily achieve this by pushing our nodes into visited after both traversals are completed.
我们可以通过在两个遍历都完成之后将节点推入visited来轻松实现此目的。
postOrder() {
  let visited = [],
      current = this.root;

  let traverse = node => {
    if (node.left) traverse(node.left);
    if (node.right) traverse(node.right);
    visited.push(node.val);
  };

  traverse(current);
  return visited;
}

console.log(tree.postOrder()); // [ 3, 11, 9, 19, 14, 31, 72, 62, 57, 20 ]
Similar to postOrder, preOrder visits works from the bottom up but it just visits the parent before any siblings.
与postOrder相似, preOrder访问从下至上进行,但仅在任何同级之前访问父级。
Instead of the beginning or end we can push onto our list after we traverse the left side and before the right. Our results will look something like this, [3, 9, 11, 14, 19, 20, ...].
在遍历左侧之后,在右侧之前,我们可以推入列表,而不是开始或结束。 我们的结果将类似于[3, 9, 11, 14, 19, 20, ...] 。
inOrder() {
  let visited = [],
      current = this.root;

  let traverse = node => {
    if (node.left) traverse(node.left);
    visited.push(node.val);
    if (node.right) traverse(node.right);
  };

  traverse(current);
  return visited;
}

console.log(tree.inOrder()); // [ 3, 9, 11, 14, 19, 20, 31, 57, 62, 72 ]
总结思想 (Closing Thoughts)
Of course all of these algorithms will be O(n) since the point is to look at every node, there isn’t much room for cutting corners or clever tricks.
当然,所有这些算法都是O(n)因为要着眼于每个节点,没有什么余地可以偷工减料或巧妙的技巧。
Keep in mind that these aren’t exact implementations that need to be memorized but general patterns for solving problems and building more valuable algorithms. Once you understand the underlining concepts, they can easily be adapted for any language or framework.
请记住,这些并不是需要记住的确切实现,而是解决问题和构建更有价值的算法的通用模式。 一旦您了解了下划线的概念,便可以轻松地将其适用于任何语言或框架。
翻译自: https://www.digitalocean.com/community/tutorials/js-tree-traversal

