Context Encoder 论文及lua 代码解读
一、论文
1. Inpainting Task
图像复原研究包含两个大的方向。一是图像补全(Image Inpainting),即填充图像上由于某些原因造成的部分缺失或者remove 掉图像上的覆盖物;二是图像超分辨率(Super Resolution),即将模糊的图像变得更加清楚,更直观地理解就是增加图像的分辨率,这两种方向都可以用一个词来简单地概括:无中生有。
Image Inpainting 这个课题由来已久,传统的解决方案大多数使用数学方法利用图像待填补部分周围环境的信息推导出一堆复杂的公式,然后按照公式对图像进行迭代更新,慢慢达到一个相对较优的结果。但同时,这种解决方案只能相对简单的情况,比如像下面这幅图片。
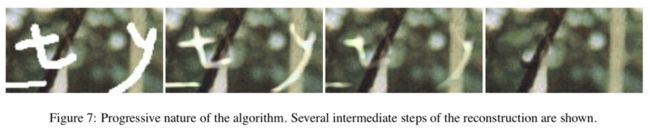
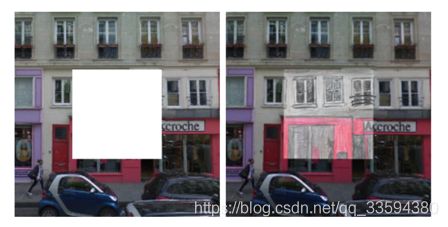
一些待填充区域较大,难度较高的任务使用传统的算法就很难取得比较好的效果。比如像下面这幅图像,图像中心存在一块很大的空白,这个区域如果让人来填充的话,大概会给出右边的结果。但是如果让电脑来做,要怎么去做,怎么给出一个还算合理的填充内容呢?
近年来随着深度学习的繁荣发展,很多研究者将神经网络应用到Image Inpainting 的领域,并取得了很不错的效果,这篇文章要讲到的Context Encoder 就是其中之一,虽然神经网络工作的原因至今没有人摸得清。
2. Encode-Decoder Pipeline
文章提出的一个主要的算法可以描述为Encode-Decoder Pipeline,将缺失的图像作为输入,走完这个pipeline 之后输出的就是缺失部分的预测内容。
(1)Encoder 是一个全卷积网络,它将输入图像从227 * 227 映射到6 * 6 * 256(9216),文章中使用的是AlexNet pool5 以前的网络层。
(2)Decoder 是一个去卷积网络,它将9216 维的向量映射为缺失内容的预测值。
(3)Channel-wise fully-connected layer 用来降低参数的数量。即中间9216 与9216 不是使用的全连接方式,而是使用的channel-wise 全连接,这个操作可以使参数数量从![]() 降到
降到![]() .
.
Context encoder trained with reconstruction loss for feature learning by filling in arbitrary region dropouts in the input.

3. Loss Function
(1)Reconstruction Loss
重建Loss 是一个L2 距离,主要用来规范重建过程中的行为,让重建结果更具结构且与周围的信息一致。
Let Mˆ be a binary mask corresponding to the dropped image region with a value of 1 wherever a pixel was dropped and 0 for input pixels. And ⊙ is the element-wise product operation.
![]()
(2)Adversarial Loss
对于一副图像中的空白区域,可能有多种填充方式符合整体结构以及可以与周围信息很好地接洽,我们称之为不同的模式,而对抗Loss 就是用来进行模式选择。

(3)Joint Loss
通过结合重建Loss 及对抗Loss,可以让生成结果即具备相当的结构性,又符合整幅图像的语义。
Currently, we use adversarial loss only for inpainting experiments as AlexNet architecture training diverged with joint adversarial loss.
![]()
4. Region Mask
文中提到的缺失图像分为三种,一是规则中心区域的缺失,二是随机规则多区域的缺失,三是随机不规则区域的缺失。通过使用以上三种情况进行模型训练,发现使用最后一种数据训练得到的模型扩展性最好,这里的扩展性是指利用相应数据进行训练学到的特征来对图像分类、检测或者分割任务进行预处理。

5. Network Architecture
除了上面提到的AlexNet 的结构以外,文中还提到了另外一种网络结构,AlexNet 结构用于处理随机不规则区域缺失的图像,而另外一种结构则用于处理中心规则区域缺失的图像。

二、代码
1. github 地址
https://github.com/pathak22/context-encoder
2. 代码解读
(1)demo.lua 代码及注释
-- image 属于torch, Torch之于Lua(LuaJIT)就像Numpy 之于Python
require 'image'
require 'nn'
torch.setdefaulttensortype('torch.FloatTensor')

opt = {
    batchSize = 1,        -- number of samples to produce
    net = '',              -- path to the generator network
    imDir = '',            -- directory containing pred_center
    name = 'demo_out',     -- name of the file saved
    gpu = 0,               -- gpu mode. 0 = CPU, 1 = 1st GPU etc.
    nc = 3,                -- # of channels in input
    manualSeed = 222,      -- 0 means random seed
    overlapPred = 4,       -- overlapping edges of center with context
}
-- 遍历opt,输出内容
for k,v in pairs(opt) do
    -- os.getenv(k) 返回当前进程的环境变量k 的值, 若变量没有定义时返回nil
    opt[k] = tonumber(os.getenv(k)) or os.getenv(k) or opt[k]
end
print(opt)

-- set seed
if opt.manualSeed == 0 then
    -- 若没有设置seed,随机初始化一个
    -- seed 的作用是什么?
    opt.manualSeed = torch.random(1, 10000)
end
print("Seed: " .. opt.manualSeed)
torch.manualSeed(opt.manualSeed)

-- load Context-Encode
-- 提醒net 取值不能为空
assert(opt.net ~= '', 'provide a generator model')
net = torch.load(opt.net)
-- 设置节点的权重和偏置为零
net:apply(
    function(m)
        if m.weight then
            -- 深度复制,返回m.weight 的副本并在副本的基础上修改
            m.gradWeight = m.weight:clone():zero();
            m.gradBias = m.bias:clone():zero();
        end
    end
)
net:evaluate()

-- initialize variables
inputSize = 128
-- 不管输入的图像是多大,resize 成128 * 128
image_ctx = torch.Tensor(opt.batchSize, opt.nc, inputSize, inputSize)
input_image_ctx = torch.Tensor(opt.batchSize, opt.nc, inputSize, inputSize)

-- port to GPU
if opt.gpu > 0 then
    require 'cunn'
    net:cuda()
    -- : 代表设么意思呢
    input_image_ctx = input_image_ctx:cuda()
else
   net:float()
end
print(net)

-- load data
for i=1, opt.batchSize do
    local imPath = string.format(opt.imDir.."/%03d_im.jpeg", i)
    local input = image.load(imPath, nc, 'float')
    -- 利用线性插值进行image resize
    input = image.scale(input, inputSize, inputSize)
    -- 为什么要做这个操作
    input:mul(2):add(-1)
    image_ctx[i]:copy(input)
end
print('Loaded Image Block: ', image_ctx:size(1)..' x '..image_ctx:size(2) ..' x '..image_ctx:size(3)..' x '..image_ctx:size(4))

-- remove center region from input image
real_center = image_ctx[{{},{},{1 + inputSize/4, inputSize/2 + inputSize/4},{1 + inputSize/4, inputSize/2 + inputSize/4}}]:clone()      -- copy by value


-- fill center region with mean value
image_ctx[{
    {},                                                                                  -- batchSize
    {1},                                                                                 -- channel
    {1 + inputSize/4 + opt.overlapPred, inputSize/2 + inputSize/4 - opt.overlapPred},    -- center region without overlap
    {1 + inputSize/4 + opt.overlapPred, inputSize/2 + inputSize/4 - opt.overlapPred}
}] = 2*117.0/255.0 - 1.0
image_ctx[{{},{2},{1 + inputSize/4 + opt.overlapPred, inputSize/2 + inputSize/4 - opt.overlapPred},{1 + inputSize/4 + opt.overlapPred, inputSize/2 + inputSize/4 - opt.overlapPred}}] = 2*104.0/255.0 - 1.0
image_ctx[{{},{3},{1 + inputSize/4 + opt.overlapPred, inputSize/2 + inputSize/4 - opt.overlapPred},{1 + inputSize/4 + opt.overlapPred, inputSize/2 + inputSize/4 - opt.overlapPred}}] = 2*123.0/255.0 - 1.0
input_image_ctx:copy(image_ctx)

-- run Context-Encoder to inpaint center
-- 输入中间缺失的图像,输出图像的缺失部分
pred_center = net:forward(input_image_ctx)
print('Prediction: size: ', pred_center:size(1)..' x '..pred_center:size(2) ..' x '..pred_center:size(3)..' x '..pred_center:size(4))
print('Prediction: Min, Max, Mean, Stdv: ', pred_center:min(), pred_center:max(), pred_center:mean(), pred_center:std())

-- paste predicted center in the context
image_ctx[{{},{},
    {1 + inputSize/4 + opt.overlapPred, inputSize/2 + inputSize/4 - opt.overlapPred},
    {1 + inputSize/4 + opt.overlapPred, inputSize/2 + inputSize/4 - opt.overlapPred}}]:copy(pred_center[{{},{},{1 + opt.overlapPred, inputSize/2 - opt.overlapPred},{1 + opt.overlapPred, inputSize/2 - opt.overlapPred}}])

-- re-transform scale back to normal
input_image_ctx:add(1):mul(0.5)
image_ctx:add(1):mul(0.5)
pred_center:add(1):mul(0.5)
real_center:add(1):mul(0.5)

-- save outputs
-- 输出真实缺失部分,预测缺失部分,和预测完整图像
-- image.save(opt.name .. '_predWithContext.png', image.toDisplayTensor(image_ctx))
-- image.save(opt.name .. '_realCenter.png', image.toDisplayTensor(real_center))
-- image.save(opt.name .. '_predCenter.png', image.toDisplayTensor(pred_center))

-- save outputs in a pretty manner
real_center=nil; pred_center=nil;
pretty_output = torch.Tensor(2*opt.batchSize, opt.nc, inputSize, inputSize)
input_image_ctx[{{},{1},{1 + inputSize/4 + opt.overlapPred, inputSize/2 + inputSize/4 - opt.overlapPred},{1 + inputSize/4 + opt.overlapPred, inputSize/2 + inputSize/4 - opt.overlapPred}}] = 1
input_image_ctx[{{},{2},{1 + inputSize/4 + opt.overlapPred, inputSize/2 + inputSize/4 - opt.overlapPred},{1 + inputSize/4 + opt.overlapPred, inputSize/2 + inputSize/4 - opt.overlapPred}}] = 1
input_image_ctx[{{},{3},{1 + inputSize/4 + opt.overlapPred, inputSize/2 + inputSize/4 - opt.overlapPred},{1 + inputSize/4 + opt.overlapPred, inputSize/2 + inputSize/4 - opt.overlapPred}}] = 1
for i=1,opt.batchSize do
    -- 左边放中心空白待填补的图像,右边放预测图像
    pretty_output[2*i-1]:copy(input_image_ctx[i])
    pretty_output[2*i]:copy(image_ctx[i])
end
image.save(opt.name .. '.png', image.toDisplayTensor(pretty_output))
print('Saved predictions to: ./', opt.name .. '.png')
(2)一个奇怪的问题
在尝试使用自己的图片运行以上代码的时候遇到一个问题,大概是在73 行
image_ctx[i]:copy(input)这一行做的事情是把input 中的内容复制到image_ctx[i] 中,报错的提示是两边的大小不一致,一边是3 * 128 * 128,一边是4 * 128 * 128,去看了一下我自己上传的图像,确实是RGB 图像。这个时候首先想到的一个问题就是会不会是多了alpha 通道,channel size 从3 变成了4. 但是去看了一下其他没有问题的图像,也是显示的RGB 图像,唯一不同的点就在于,报错的图像的信息中多了这么一行字:
![]()