基于树莓派3Beric6+PyQt5搭建步进电机控制
在之前的文章中讲述了在树莓派3B中基于python3.4搭建eric6IDE以及如何利用树莓派控制28步进电机。因此楼主搭建了简单步进电机控制界面,与大家分享。
写这篇文章的目的在于熟悉Eric6的操作以及利用PyQt5编辑软件界面的简单步骤。实现难度不大,但需要运行第二线程运行输出脉冲的程序。
首先,推荐一下PyQt5和Eric6的学习资料连接如下,一些简单的操作讲述的很细致。
https://blog.csdn.net/weiaitaowang/article/category/6334249
本文只介绍界面部即代码部分的操作,树莓派与步进电机硬件部分的连接见是一篇文章。
首先打eric6新建一个工程


然后编辑项目名称以及选择工作文件夹
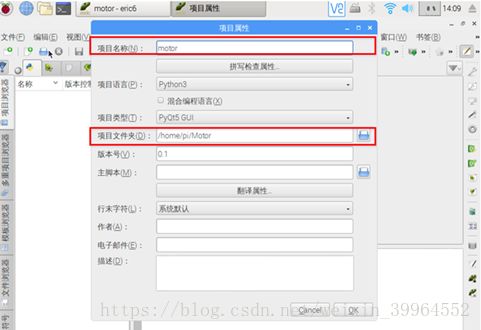
然后所有操作选择确认即可


然后点击窗体图标,选择新建窗体。
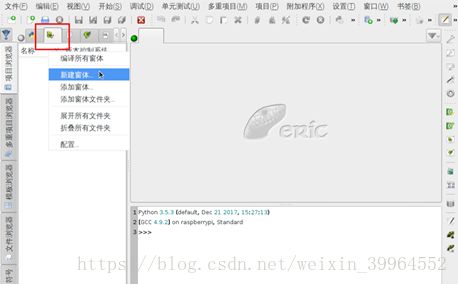
在弹出对话框中选择主窗口,然后会自动弹出QTdesigner界面

选择按钮控件拖拽到主界面中,并双击修改文字,改为“Open door”,然后点击保存。

返回Eric6界面,选择刚刚创建的界面,右键单击选择编译窗体。会显示编译成功,会自动生成显示界面的.py文件。

点击窗体图标,并右键单击刚才生成的.ui文件,选择生成对话框选项,并找到按钮触发选项,点击生成。


产生对话.py文件。生成的.py文本如下所示:
from PyQt5.QtWidgets import QMainWindow, QApplication
from PyQt5.QtCore import pyqtSlot, QThread, pyqtSignal
from Ui_motormain import .Ui_MainWindow


class MainWindow(QMainWindow, Ui_MainWindow):
    """
    Class documentation goes here.
    """
    def __init__(self, parent=None):
        """
        Constructor

        @param parent reference to the parent widget
        @type QWidget
        """
        super(MainWindow, self).__init__(parent)


    @pyqtSlot()
    def on_pushButton_clicked(self):
        """
        Slot documentation goes here.
        """
将 from Ui_motormain import .Ui_MainWindow 中的‘.’去掉
变为
from Ui_motormain import Ui_MainWindow然后在代码末尾添加如下代码,保证可运行刚才编辑好的界面。
if __name__ == "__main__":
    import sys
    app = QApplication(sys.argv)
    MainWindow = MainWindow()
    MainWindow.show()
    sys.exit(app.exec_())
由于要调用树莓派的管脚并发送脉冲所以要导入GPIO和time库
所以在代码开头添加
from PyQt5.QtWidgets import QMainWindow, QApplication
from PyQt5.QtCore import pyqtSlot, QThread, pyqtSignal
import RPi.GPIO as GPIO
import time
然后由于输出脉冲是一个循环程序,所以需要开启另一个线程,防止循环阻塞界面的运行,因此重新定义QThread类中的的run()方法。
class O_doorThread(QThread):
    trigger = pyqtSignal()

    def __int__(self, parent=None):
        super(O_doorThread,self).__init__(parent)
    def setdirecton(self, opendoor):
        if opendoor:
            GPIO.output(38,False)
        else:
            GPIO.output(38,True)


    def run(self):
        """
        第二线程运行函数
        """
        n=0
        while True:
            n=n+1
            time.sleep(0.00005)       #设置脉冲频率
            GPIO.output(40,False)
            time.sleep(0.00005)
            GPIO.output(40,True)
#    print(n)
            if n==9800:
                break
        self.trigger.emit()
然后重写按钮触发方法,完成第二线程的开启
 def on_pushButton_clicked(self):
        """
        点击按钮运行
        """
        self.doorThread=O_doorThread()                #将O_doorThread()实例
        self.doorThread.setdirecton( self.opendoor)   #设置电机运行方向
        time.sleep(0.5)
        self.doorThread.trigger.connect(self.changedirecton)
        self.doorThread.start()                       #第二线程开启
下面给出全部代码:
from PyQt5.QtWidgets import QMainWindow, QApplication
from PyQt5.QtCore import pyqtSlot, QThread, pyqtSignal
import RPi.GPIO as GPIO
import time
from Ui_motormain import Ui_MainWindow


class O_doorThread(QThread):
    trigger = pyqtSignal()

    def __int__(self, parent=None):
        super(O_doorThread,self).__init__(parent)
    def setdirecton(self, opendoor):
        if opendoor:
            GPIO.output(38,False)
        else:
            GPIO.output(38,True)


    def run(self):
        """
        第二线程运行
        """
        n=0
        while True:
            n=n+1
            time.sleep(0.00005)
            GPIO.output(40,False)
            time.sleep(0.00005)
            GPIO.output(40,True)
#    print(n)
            if n==9800:
                break
        self.trigger.emit()


class MainWindow(QMainWindow, Ui_MainWindow):
    """
    Class documentation goes here.
    """
    def __init__(self, parent=None):
        """
        Constructor

        @param parent reference to the parent widget
        @type QWidget
        """
        super(MainWindow, self).__init__(parent)
        self.setupUi(self)
        self.opendoor=True
        GPIO.setwarnings(False)
        GPIO.setmode(GPIO.BOARD)
        GPIO.setup(38,GPIO.OUT)
        GPIO.setup(40,GPIO.OUT)

    @pyqtSlot()
    def on_pushButton_clicked(self):
        """
        Slot documentation goes here.
        """
        self.doorThread=O_doorThread()
        self.doorThread.setdirecton( self.opendoor)
        time.sleep(0.5)
        self.doorThread.trigger.connect(self.changedirecton)
        self.doorThread.start()


    def changedirecton(self):

#        print('done')
        if self.opendoor:                             #改变电机运转方向
            self.opendoor=False
            self.pushButton.setText('close door')     #改变按钮文字
        else:
            self.opendoor=True
            self.pushButton.setText('open door')
#        self.doorThread.setdirecton( self.opendoor)


if __name__ == "__main__":
    import sys
    app = QApplication(sys.argv)
    MainWindow = MainWindow()
    MainWindow.show()
    sys.exit(app.exec_())
楼主用这段代码控制步进电机驱动了一个装置的开门和拉门。