树莓派+opencv进行摄像头云台颜色追踪
大家好啊。今天终于把摄像头云台颜色追踪实现了。过来写一下经验。
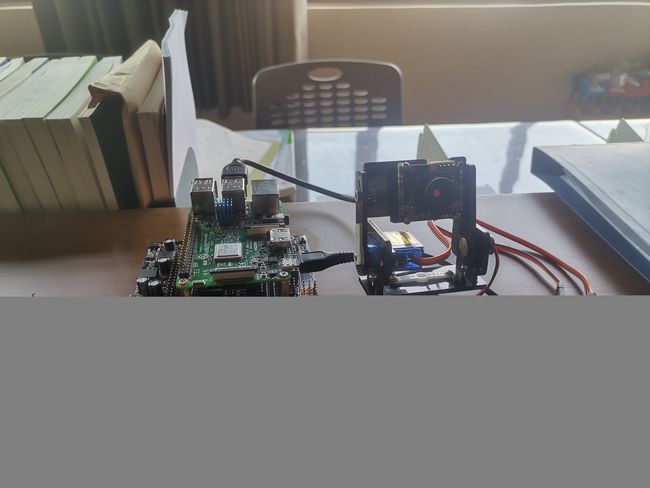 我用的是亚博的扩展板,usb 摄像头,摄像头云台。树莓派4b(不知道为什么我的3b连接扩展板就报警,蜂鸣器响个不停,后来问了他们家的技术人员说是不是他家的树莓派,也挺无语的,这还分谁家的),后来终于在我的不懈努力下,终于搞明白了,原来是我的树莓派相关引脚出了问题,接触不良。所以报警,所以也提醒一下您,找不到问题时,可能是树莓派引脚出现的问题。
一、镜像
这里我用的是亚博自家的镜像,因为里面有自带的opencv库,至于装opencv的过程,你懂的,很麻烦,以前装的清华源的,以后有机会再总结吧,考虑到版权问题,这里暂时不能提供链接,有需要的,下面滴滴。树莓派官网的下载地址:http://www.raspberrypi.org/downloads
可在官网上下载最新的Raspbian树莓派系统。
二、代码
import RPi.GPIO as GPIO
import time
#bgr8转jpeg格式
import enum
import cv2
def bgr8_to_jpeg(value, quality=75):
return bytes(cv2.imencode(’.jpg’, value)[1])
#显示摄像头组件
import cv2
import traitlets
import ipywidgets.widgets as widgets
from IPython.display import display
import time
线程功能操作库
import threading
import inspect
import ctypes
image_widget = widgets.Image(format=‘jpeg’, width=300, height=300)
display(image_widget)
#舵机引脚定义
ServoPin = 11 #S2
ServoPinB = 9 #S3
#设置GPIO口为BCM编码方式
GPIO.setmode(GPIO.BCM)
#舵机引脚设置为输出模式
def init():
GPIO.setup(ServoPin, GPIO.OUT)
GPIO.setup(ServoPinB, GPIO.OUT)
#定义一个脉冲函数,用来模拟方式产生pwm值
#时基脉冲为20ms,该脉冲高电平部分在0.5-2.5ms控制0-180度
def servo_pulse(myangleA, myangleB):
pulsewidth = myangleA
GPIO.output(ServoPin, GPIO.HIGH)
time.sleep(pulsewidth/1000000.0)
GPIO.output(ServoPin, GPIO.LOW)
time.sleep(20.0/1000-pulsewidth/1000000.0)
pulsewidthB = myangleB
GPIO.output(ServoPinB, GPIO.HIGH)
time.sleep(pulsewidthB/1000000.0)
GPIO.output(ServoPinB, GPIO.LOW)
time.sleep(20.0/1000-pulsewidthB/1000000.0)
#根据舵机脉冲控制范围为500-2500usec内:
def Servo_control(angle_1, angle_2):
init()
if angle_1 < 500:
angle_1 = 500
elif angle_1 > 2500:
angle_1 = 2500
if angle_2 < 500:
    angle_2 = 500
elif angle_2 > 2500:
    angle_2 = 2500
servo_pulse(angle_1, angle_2)
def _async_raise(tid, exctype):
“”“raises the exception, performs cleanup if needed”""
tid = ctypes.c_long(tid)
if not inspect.isclass(exctype):
exctype = type(exctype)
res = ctypes.pythonapi.PyThreadState_SetAsyncExc(tid, ctypes.py_object(exctype))
if res == 0:
raise ValueError(“invalid thread id”)
elif res != 1:
# “”“if it returns a number greater than one, you’re in trouble,
# and you should call it again with exc=NULL to revert the effect”""
ctypes.pythonapi.PyThreadState_SetAsyncExc(tid, None)
def stop_thread(thread):
_async_raise(thread.ident, SystemExit)
image = cv2.VideoCapture(0)
image.set(3, 320)
image.set(4, 240)
image.set(5, 90) #设置帧率
#fourcc = cv2.VideoWriter_fourcc(*“MPEG”)
image.set(cv2.CAP_PROP_FOURCC, cv2.VideoWriter.fourcc(‘M’, ‘J’, ‘P’, ‘G’))
#image.set(cv2.CAP_PROP_BRIGHTNESS, 40) #设置亮度 -64 - 64 0.0
#image.set(cv2.CAP_PROP_CONTRAST, 50) #设置对比度 -64 - 64 2.0
#image.set(cv2.CAP_PROP_EXPOSURE, 156) #设置曝光值 1.0 - 5000 156.0
ret, frame = image.read()
image_widget.value = bgr8_to_jpeg(frame)
global color_x, color_y, color_radius
color_x = color_y = color_radius = 0
global target_valuex
target_valuex = 1500
global target_valuey
target_valuey = 1500
global g_mode
g_mode = 0
创建存储HSV色域颜色分类数据的数组
import numpy as np
global color_lower
color_lower = np.array([156, 43, 46])
global color_upperv
color_upper = np.array([180, 255, 255])
创建PID控制实例
import PID
xservo_pid = PID.PositionalPID(1.1, 0.2, 0.8)
yservo_pid = PID.PositionalPID(0.8, 0.2, 0.8)
颜色选择按钮配置
Redbutton = widgets.Button(
value=False,
description=‘红色’,
disabled=False,
button_style=’’, # ‘success’, ‘info’, ‘warning’, ‘danger’ or ‘’
tooltip=‘Description’,
icon=‘uncheck’ )
Greenbutton = widgets.Button(
value=False,
description=‘绿色’,
disabled=False,
button_style=’’, # ‘success’, ‘info’, ‘warning’, ‘danger’ or ‘’
tooltip=‘Description’,
icon=‘uncheck’ )
Bluebutton = widgets.Button(
value=False,
description=‘蓝色’,
disabled=False,
button_style=’’, # ‘success’, ‘info’, ‘warning’, ‘danger’ or ‘’
tooltip=‘Description’,
icon=‘uncheck’ )
Yellowbutton = widgets.Button(
value=False,
description=‘黄色’,
disabled=False,
button_style=’’, # ‘success’, ‘info’, ‘warning’, ‘danger’ or ‘’
tooltip=‘Description’,
icon=‘uncheck’ )
Orangebutton = widgets.Button(
value=False,
description=‘橙色’,
disabled=False,
button_style=’’, # ‘success’, ‘info’, ‘warning’, ‘danger’ or ‘’
tooltip=‘Description’,
icon=‘uncheck’ )
Closebutton = widgets.Button(
value=False,
description=‘关闭’,
disabled=False,
button_style=’’, # ‘success’, ‘info’, ‘warning’, ‘danger’ or ‘’
tooltip=‘Description’,
icon=‘uncheck’ )
output = widgets.Output()
display(Redbutton, Greenbutton, Bluebutton, Yellowbutton, Orangebutton, Closebutton, output)
def ALL_Uncheck():
Redbutton.icon = ‘uncheck’
Greenbutton.icon = ‘uncheck’
Bluebutton.icon = ‘uncheck’
Yellowbutton.icon = ‘uncheck’
Orangebutton.icon = ‘uncheck’
def on_Redbutton_clicked(b):
global color_lower, color_upper, g_mode
global target_valuex, target_valuey
ALL_Uncheck()
b.icon = ‘check’
color_lower = np.array([0, 43, 46])
color_upper = np.array([10, 255, 255])
target_valuex = target_valuey = 2048
Servo_control(1500, 1500)
g_mode = 1
with output:
print(“RedButton clicked.”)
def on_Greenbutton_clicked(b):
global color_lower, color_upper, g_mode
global target_valuex, target_valuey
ALL_Uncheck()
b.icon = ‘check’
color_lower = np.array([35, 43, 46])
color_upper = np.array([77, 255, 255])
target_valuex = target_valuey = 2048
Servo_control(1500, 1500)
g_mode = 1
with output:
print(“GreenButton clicked.”)
def on_Bluebutton_clicked(b):
global color_lower, color_upper, g_mode
global target_valuex, target_valuey
ALL_Uncheck()
b.icon = ‘check’
color_lower=np.array([100, 43, 46])
color_upper = np.array([124, 255, 255])
target_valuex = target_valuey = 2048
Servo_control(1500, 1500)
g_mode = 1
with output:
print(“Bluebutton clicked.”)
def on_Yellowbutton_clicked(b):
global color_lower, color_upper, g_mode
global target_valuex, target_valuey
ALL_Uncheck()
b.icon = ‘check’
color_lower = np.array([26, 43, 46])
color_upper = np.array([34, 255, 255])
target_valuex = target_valuey = 2048
Servo_control(1500, 1500)
g_mode = 1
with output:
print(“Yellowbutton clicked.”)
def on_Orangebutton_clicked(b):
global color_lower, color_upper, g_mode
global target_valuex, target_valuey
ALL_Uncheck()
b.icon = ‘check’
color_lower = np.array([11, 43, 46])
color_upper = np.array([25, 255, 255])
target_valuex = target_valuey = 2048
Servo_control(1500, 1500)
g_mode = 1
with output:
print(“Orangebutton clicked.”)
def on_Closebutton_clicked(b):
global g_mode
ALL_Uncheck()
g_mode = 0
with output:
    print("CloseButton clicked.")
Redbutton.on_click(on_Redbutton_clicked)
Greenbutton.on_click(on_Greenbutton_clicked)
Bluebutton.on_click(on_Bluebutton_clicked)
Yellowbutton.on_click(on_Yellowbutton_clicked)
Orangebutton.on_click(on_Orangebutton_clicked)
Closebutton.on_click(on_Closebutton_clicked)
云台运动主进程
def Color_track():
global color_lower, color_upper, g_mode

global target_valuex, target_valuey

t_start = time.time()

fps = 0

times = 0

while True:

    ret, frame = image.read()

    frame = cv2.resize(frame, (300, 300))

    frame_ = cv2.GaussianBlur(frame,(5,5),0)

    hsv = cv2.cvtColor(frame,cv2.COLOR_BGR2HSV)

    mask = cv2.inRange(hsv,color_lower,color_upper)

    mask = cv2.erode(mask,None,iterations=2)

    mask = cv2.dilate(mask,None,iterations=2)

    mask = cv2.GaussianBlur(mask,(3,3),0)

    cnts = cv2.findContours(mask.copy(),cv2.RETR_EXTERNAL,cv2.CHAIN_APPROX_SIMPLE)[-2]

    if g_mode == 1: # 按钮切换开关

        if len(cnts) > 0:

            cnt = max (cnts, key = cv2.contourArea)

            (color_x,color_y),color_radius = cv2.minEnclosingCircle(cnt)

            if color_radius > 10:

                times =  times +  1

                # 将检测到的颜色标记出来

                cv2.circle(frame,(int(color_x),int(color_y)),int(color_radius),(255,0,255),2)

                # Proportion-Integration-Differentiation

                xservo_pid.SystemOutput = color_x

                xservo_pid.SetStepSignal(150)

                xservo_pid.SetInertiaTime(0.01, 0.1)

                target_valuex = int(1500+xservo_pid.SystemOutput)

                # 输入Y轴方向参数PID控制输入

                yservo_pid.SystemOutput = color_y

                yservo_pid.SetStepSignal(150)

                yservo_pid.SetInertiaTime(0.01, 0.1)

                target_valuey = int(1500+yservo_pid.SystemOutput)

                # 将云台转动至PID调校位置

                time.sleep(0.008)

                if times == 5 :

                    times = 0

                    Servo_control(target_valuex,target_valuey)

    fps = fps + 1

    mfps = fps / (time.time() - t_start)

    cv2.putText(frame, "FPS " + str(int(mfps)), (40,40), cv2.FONT_HERSHEY_SIMPLEX, 0.8, (0,255,255), 3)

    # 实时传回图像数据进行显示

    image_widget.value = bgr8_to_jpeg(frame)
启动进程
thread1 = threading.Thread(target=Color_track)
thread1.setDaemon(True)
thread1.start()
关闭进程
stop_thread(thread1)
三、 注意事项
1、代码应用jupyterlab,不能用树莓派的python编辑器直接编译,如何使用去b站有很多教程。
2、开机后有两个进程是开机自启动的,一个是用于传输视频信号的mjpeg服务器,另一个就是蓝牙APK或者小程序控制的bluetooth_control程序。如果您要进行其他实验时,为避免两个进程间对临界资源的占用,我们需要先在命令行终端输入:
top
查看bluetooth_control的进程号。
然后sudo kill -9 进程号
接着我们就可以进行其他的实验,而不用担心两个进程对临界资源的占用了。
3、如果树莓派执行代码总是报错,并且在检查多次硬件没有问题的情况下,镜像重刷是最简便最快速解决问题的方法。
有问题欢迎留言,看到第一时间回复!敬请期待小编下面的更新吧。拜拜喽!