unity学习日记:AssetBundle工作流程之资源的打包与加载
在很多类型游戏的制作过程中,开发者都会考虑一个非常重要的问题,即如何在游戏运行过程中对资源进行动态的下载和加载。为此,Unity引擎引入了AssetBundle这一技术来满足开发者的上述需求,一方面,开发者可以通过AssetBundle将游戏中所需要的各类资源打包压缩并上传到网络服务器上;另一方面,在运行时游戏可以从服务器上下载该资源,从而实现资源的动态加载。ok,要实现动态的下载和加载资源,第一步就是先要打包资源。unity使用BuildPipeline.BuildAssetBundles来打包资源。
打包方法一:
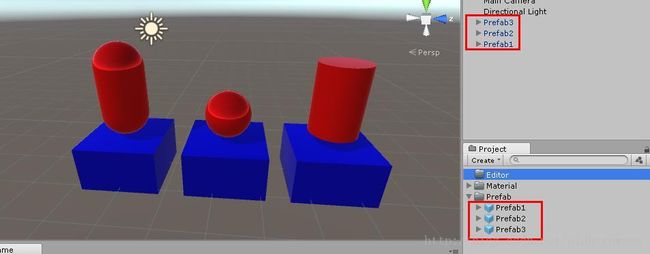
首先,创建三个Prefab来作为我们想要打包的资源,并创建两个材质球为Prefab上色。
然后在Assets下创建一个名为Editor的文件夹(此文件夹名不能更改,否则打包失败),并在其中创建打包所用的脚本,命名为AssetBundlesBuild(可随意命名)。

编辑脚本:
using System.Collections;
using System.Collections.Generic;
using UnityEngine;
using UnityEditor;//必须先引用UnityEditor

public class AssetBundlesBuild : MonoBehaviour
{
//在菜单栏中添加一个名为AssetBundles的菜单(可随意命名),并在其下添加一个命名为Build AssetBundles的选项(随意命名)
[MenuItem("资源包/创建资源包")]
//创建一个静态方法用来执行打包操作(方法名随意)
static void aaa()
{
//创建一个AssetBundleBuild的类型的数组,因此例中要打包两个资源包,故数组容量为2。
//这个数组其实是定义了你要打包的资源文件和资源包之间的关系,也就是说将Assets文件夹下的哪些资源文件打包到哪些资源包里面。
AssetBundleBuild[] buildmap = new AssetBundleBuild[2];
//将要打包的第一个资源包的名称命名为ZiYuanBao1
buildmap[0].assetBundleName = "ZiYuanBao1";
//将要打包的第二个资源包的名称命名为ZiYuanBao2
buildmap[1].assetBundleName = "ZiYuanBao2";
//创建一个字符串数组用来指明ZiYuanBao1想要打包的资源文件及其位置,打包文件数既是数组容量
string[] ziyuan = new string[2];
//将Prefab1和Prefab2在Assets文件夹下的目录及其名称和文件类型作为字符串赋给字符串数组
ziyuan[0] = "Assets/Prefab1.Prefab";
ziyuan[1] = "Assets/Prefab2.Prefab";
//指明ZiYuanBao1想要打包的资源文件
buildmap[0].assetNames = ziyuan;
//创建字符串数组ziyuan2用来指明ZiYuanBao2想要打包的资源文件及其位置,打包文件数既是数组容量
string[] ziyuan2 = new string[1];
//将Prefab3在Assets文件夹下的目录及其名称和文件类型作为字符串赋给字符串数组
ziyuan2[0] = "Assets/Prefab3.Prefab";
//指明ZiYuanBao2想要打包的资源文件
buildmap[1].assetNames = ziyuan2;
//完成打包,输出路径为Assets下的StreamingAssets文件夹(可随意命名,但必须确定存在该文件夹)
//此行意为:在不对资源包设置任何特殊选项的情况下按照buildmap所指定的文件关系进行打包,资源包目标平台是StandaloneWindows,输出路径是Assets/StreamingAssets
BuildPipeline.BuildAssetBundles("Assets/StreamingAssets",buildmap,
BuildAssetBundleOptions.None, BuildTarget.StandaloneWindows);
//刷新资源路径,避免生成的文件不显示
AssetDatabase.Refresh ();
}}
可以看到脚本编译完成后,菜单栏多出了一个选项。

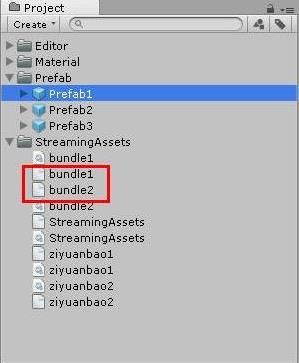
最后执行打包动作,打包完成,指定文件夹下出现了相关资源包文件:

打包方法二:在方法一中,我们以编写代码的方式为资源文件和资源包指明了打包关系,为了提高效率,unity还提供了另一种方法如下。
首先,点击想要打包的资源文件,在Inspector视图中设置想要包含此资源文件的资源包名称。如图。
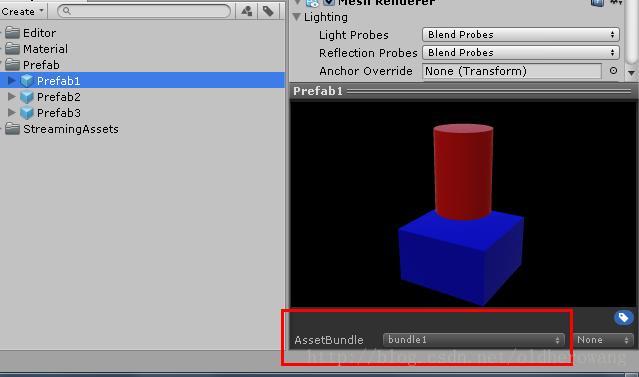
此处,我们将Prefab1和Prefab2的Assetbundle设置为bundle1,将Prefab3的Assetbundle设置为bundle2,既将Prefab1和Prefab2打包在资源包bundle1里面,将Prefab3打包在资源包bundle2里面。
然后同样是在Assets文件夹下面创建一个名为Editor的文件夹(此文件夹名不能更改,否则打包失败),并在其中创建打包所用的脚本,命名为AssetBundlesBuild(可随意命名),因为之前已经创建过,故不再次进行创建了。打开脚本,编辑。
using System.Collections;
using System.Collections.Generic;
using UnityEngine;
using UnityEditor;

public class AssetBundlesBuild : MonoBehaviour
{
//在菜单栏中添加一个名为AssetBundles的菜单(可随意命名),并在其下添加一个命名为Build AssetBundles的选项(随意命名)
[MenuItem("AssetBundles/Build AssetBundles")]
//创建一个静态方法用来执行打包操作(方法名随意)
static void aaa()
{

//完成打包,输出路径为Assets下的StreamingAssets文件夹(可随意命名,但必须确定存在该文件夹)
//此行意为:在不对资源包设置任何特殊选项的情况下按照在unity中Inspector视图中所指定的文件关系进行打包,资源包目标平台是StandaloneWindows,输出路径是Assets/StreamingAssets
BuildPipeline.BuildAssetBundles("Assets/StreamingAssets",
BuildAssetBundleOptions.None,BuildTarget.StandaloneWindows);
//刷新资源路径,避免生成的文件不显示
AssetDatabase.Refresh ();
}}
最后执行打包动作,打包完成,指定文件夹下出现了相关资源包文件:
AssetBundle使用的增量式打包仅重新打包发生变化的资源包,当资源文件或者typetree发生变化时才会重新打包。
AssetBundle的加载步骤:(注:仅代码,详解见http://blog.csdn.net/oldherowang/article/details/74977908)
将之前所生成的Ziyuanbao1和ziyuanbao2及其Manifest文件删除。并且把最开始生成的两个材质球打包成bundle3。

新建脚本,编辑:
using System.Collections;
using System.Collections.Generic;
using UnityEngine;

public class DownloadAssetBundle : MonoBehaviour {


// Use this for initialization
IEnumerator Start ()
{
WWW w1 = WWW.LoadFromCacheOrDownload("file://" + Application.dataPath + "/StreamingAssets/StreamingAssets", 0);
yield return w1;
if (w1.error != null)
{
Debug.Log(w1.error);
}
else
{
AssetBundle abManifest = w1.assetBundle;
yield return abManifest;
AssetBundleManifest manifest = abManifest.LoadAsset("AssetBundleManifest");
string[] depend = manifest.GetAllDependencies("bundle1");
AssetBundle[] depend_ab = new AssetBundle[depend.Length];
for (int i = 0; i < depend.Length; i++)
{
WWW w = WWW.LoadFromCacheOrDownload("file://" + Application.dataPath + "/StreamingAssets/" + depend[i],0);
yield return w;
depend_ab[i] = w.assetBundle;
yield return depend_ab;
}
WWW w2 = WWW.LoadFromCacheOrDownload("file://" + Application.dataPath + "/StreamingAssets/bundle1", 0);
yield return w2;
AssetBundle Bundle1 = w2.assetBundle;
AssetBundleRequest request= Bundle1.LoadAssetAsync("Prefab1");//异步加载
yield return request;
GameObject obj = (GameObject)request.asset;
Instantiate(obj, Vector3.zero, Quaternion.identity);
}
}
}
编辑完成后,将脚本挂载到Camera上,运行之后会在场景内见到被加载上来的Prefab1。

关于下载及加载Assetbundle的详细步骤解析,请见:http://blog.csdn.net/oldherowang/article/details/74977908