SpringBoot + ActiveMq (官方原生版和使用JmsMessagingTemplate版、消息可靠保证)
鸣谢:如果您觉得本文对您有帮助,请点赞和收藏,Thanks。
目录
- 一、 SpringBoot 集成ActiveMq的两种方式
- 方式一:使用官方示例代码(official项目)
- 方式二:使用Spring的JmsMessagingTemplate
- 二、消息可靠保证机制
- 三、消息持久化
- 四、重试机制
SpringBoot 集成ActiveMq的两种方式:
第一种:使用官方示例代码;
第二种:使用Spring的JmsMessagingTemplate
代码GitHub地址:https://github.com/xshxsh/mq.git
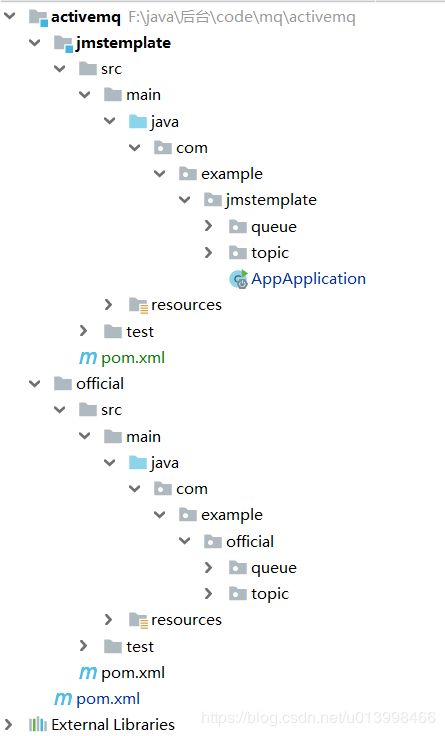
特别说明:本项目是聚合项目,所有公共依赖都在父项目中,请读者根据需要获取项目代码
项目结构:

概念:
- Queue - Point-to-Point (点对点):
当一个消息生产者产生一个消息时,会把消息放入一个队列(Queue)中,然后消息消费者从Queue中读取消息,如果同时有多个消费者读取消息,ActiveMq保证消息只会被一个消费者读取到,消费者读取到消息之后需要向ActiveMq发送一条确认信息,确认消息已经被接收,此时,队列(Queue)中的消息出队,没被消费的消息会一直存在MQ队列中直到MQ被关闭。 - Topic - Publisher/Subscriber Model (发布/订阅者)
消息生产者(发布)将消息发布到 topic 中,同时有多个消息消费者(订阅)消费该消息。和点对点方式不同,发布到 topic 的消息会被所有订阅者消费。 当生产者发布消息,不管是否有消费者。都不会保存消息,所以一定要先有消息的消费者,后有消息的生产者。否则消息产生后会别立刻丢弃。启动项目的时候,先起消费者,再起生产者。
父项目POM文件:
    4.0.0


		org.springframework.boot
		spring-boot-starter-parent
		2.1.6.RELEASE


		1.8


    com.example
    activemq
    1.0-SNAPSHOT

    pom


        producer
        consumer
        official


            org.springframework.boot
            spring-boot-starter-activemq


		    org.messaginghub
		    pooled-jms


            org.springframework.boot
            spring-boot-starter-web
一、 SpringBoot 集成ActiveMq的两种方式
方式一:使用官方示例代码(official项目)
1、yml配置文件
server:
  port: 8082
2、pom.xml文件
    4.0.0


        com.example
        activemq
        1.0-SNAPSHOT


    com.example
    official
    1.0-SNAPSHOT
点对点模式
1、生产者
public class QueueProducer {
    public static void main(String[] args) {
        try {
            // 创建连接工厂
            ActiveMQConnectionFactory connectionFactory = new ActiveMQConnectionFactory("tcp://127.0.0.1:61616");

            // 创建连接
            Connection connection = connectionFactory.createConnection();
            connection.start();

            // 创建会话(设置关闭事务,自动应答模式)
            Session session = connection.createSession(false, Session.AUTO_ACKNOWLEDGE);

            // 创建目的地 (主题 or 队列)
            Destination destination = session.createQueue("myQueue");

            // 创建消息生产者
            MessageProducer producer = session.createProducer(destination);

            // 不持久化消息(当MQ关闭后,消息将丢失)
            producer.setDeliveryMode(DeliveryMode.NON_PERSISTENT);

            // 创建要发送的消息
            String text = "Hello world!";
            TextMessage message = session.createTextMessage(text);

            // 发送消息
            System.out.println("客户端发送消息...");
            producer.send(message);

            // 关闭连接
            session.close();
            connection.close();
        } catch (Exception e) {
            e.printStackTrace();
        }
    }
}
2、消费者
public class QueueConsumer {
    public static void main(String[] args) {
        try {

            // 创建连接工厂
            ActiveMQConnectionFactory connectionFactory = new ActiveMQConnectionFactory("tcp://127.0.0.1:61616");

            // 创建连接
            Connection connection = connectionFactory.createConnection();
            //开启连接
            connection.start();

            // 创建会话(第一个参数:关闭事务;第二个参数:使用消息自动应答模式)
            Session session = connection.createSession(false, Session.AUTO_ACKNOWLEDGE);

            // 创建目的地 (主题 or 队列)
            Destination destination = session.createQueue("myQueue");

            // 创建消息消费者
            MessageConsumer consumer = session.createConsumer(destination);

            System.out.println("服务端开始监听消息。。。");

            // 同步接收消息(1000,即1秒,为消息接收的超时时间,设为0则不超时)
            Message message = consumer.receive(1000);

            if (message instanceof TextMessage) {
                TextMessage textMessage = (TextMessage) message;
                String text = textMessage.getText();
                System.out.println("接收到的text消息为: " + text);
            }else {
                System.out.println("接收到的message消息为: " + message);
            }

            //异步接收消息消息(需要服务端一直开启)
//            while(true){
//                consumer.setMessageListener(message -> {
//                if (message instanceof TextMessage) {
//                    TextMessage textMessage = (TextMessage) message;
//                    String text = null;
//                    try {
//                        text = textMessage.getText();
//                    } catch (JMSException e) {
//                        e.printStackTrace();
//                    }
//                    System.out.println("接收到的消息为: " + text);
//                } else {
//                    System.out.println("消息为空");
//                }
//            });
//            }

            //关闭连接(如果使用异步方式,则不需要关闭连接,因为要一直监听)
            consumer.close();
            session.close();
            connection.close();
        } catch (Exception e) {
            e.printStackTrace();
        }
    }
}
主题-发布订阅模式
1、生产者
public class TopicProducer {
    public static void main(String[] args) {
        try {
            // 创建连接工厂
            ActiveMQConnectionFactory connectionFactory = new ActiveMQConnectionFactory("tcp://127.0.0.1:61616");

            // 创建连接
            Connection connection = connectionFactory.createConnection();
            connection.start();

            // 创建会话(设置关闭事务,自动应答模式)
            Session session = connection.createSession(false, Session.AUTO_ACKNOWLEDGE);

            // 创建目的地 (主题 or 队列)
            Destination destination = session.createTopic("myTopic");

            // 创建消息生产者
            MessageProducer producer = session.createProducer(destination);

            // 不持久化消息(当MQ关闭后,消息将丢失)
            producer.setDeliveryMode(DeliveryMode.NON_PERSISTENT);

            // 创建要发送的消息
            String text = "Hello world topic!";
            TextMessage message = session.createTextMessage(text);

            // 发送消息
            System.out.println("客户端发送消息。。。");
            producer.send(message);

            // 关闭连接
            session.close();
            connection.close();
        } catch (Exception e) {
            e.printStackTrace();
        }
    }
}
2、第一个消费者
public class TopicConsumer1 {
    public static void main(String[] args) {
        try {

            // 创建连接工厂
            ActiveMQConnectionFactory connectionFactory = new ActiveMQConnectionFactory("tcp://127.0.0.1:61616");

            // 创建连接
            Connection connection = connectionFactory.createConnection();
            connection.start();

            // 创建会话
            Session session = connection.createSession(false, Session.AUTO_ACKNOWLEDGE);

            // 创建目的地 (主题 or 队列)
            Destination destination = session.createTopic("myTopic");

            // 创建消息消费者
            MessageConsumer consumer = session.createConsumer(destination);

            System.out.println("服务端开始监听消息。。。");

            while(true){
                // 等待消息到来(1000,即1秒,为消息接收的超时时间,设为0则不超时)
                Message message = consumer.receive(1000);

                if (message instanceof TextMessage) {
                    TextMessage textMessage = (TextMessage) message;
                    String text = textMessage.getText();
                    System.out.println("接收到的text消息为: " + text);
                }else {
                    System.out.println("接收到的message消息为: " + message);
                }
            }

        } catch (Exception e) {
            e.printStackTrace();
        }
    }
}
3、第二个消费者
public class TopicConsumer2 {
    public static void main(String[] args) {
        try {

            // 创建连接工厂
            ActiveMQConnectionFactory connectionFactory = new ActiveMQConnectionFactory("tcp://127.0.0.1:61616");

            // 创建连接
            Connection connection = connectionFactory.createConnection();
            connection.start();

            // 创建会话
            Session session = connection.createSession(false, Session.AUTO_ACKNOWLEDGE);

            // 创建目的地 (主题 or 队列)
            Destination destination = session.createTopic("myTopic");

            // 创建消息消费者
            MessageConsumer consumer = session.createConsumer(destination);

            System.out.println("服务端开始监听消息。。。");

            while(true){
                // 等待消息到来(1000,即1秒,为消息接收的超时时间,设为0则不超时)
                Message message = consumer.receive(1000);

                if (message instanceof TextMessage) {
                    TextMessage textMessage = (TextMessage) message;
                    String text = textMessage.getText();
                    System.out.println("接收到的text消息为: " + text);
                }else {
                    System.out.println("接收到的message消息为: " + message);
                }
            }
        } catch (Exception e) {
            e.printStackTrace();
        }
    }
}
方式二:使用Spring的JmsMessagingTemplate
JmsMessagingTemplate封装了JmsTemplate,两者皆可使用,这里使用JmsMessagingTemplate
说明:这里的生产者生产消息采用浏览器访问方式,方便控制消息生产和消费,当然也可以单独起一个线程自动生产消息。
1、yml配置文件
server:
  port: 8081
spring:
  #如果是点对点(queue),那么此处默认应该是false,如果发布订阅,那么一定设置为true
  jms:
    pub-sub-domain: true
  activemq:
    user: admin
    password: admin
    #定义ActivMQ的连接地址
    broker-url: tcp://127.0.0.1:61616
    #mq连接池
    pool:
      enabled: true
      max-connections: 8
      #空闲的连接过期时间,默认为30秒
      idle-timeout: 30000
    #定义队列名称
    queueName: myQueue
    #定义主题名称
    topicName: myTopic
2、pom.xml文件
    4.0.0


        com.example
        activemq
        1.0-SNAPSHOT


    com.example
    jmsdemo
    1.0-SNAPSHOT
点对点模式(开启点对点模式,请把yml文件的pub-sub-domain设为false)
访问路径:127.0.0.1:8081/sendToQueue?msg=要发送的消息
1、生产者
@RestController
public class QueueProducer {

    @Autowired
    private JmsMessagingTemplate jmsMessagingTemplate;

    @RequestMapping("sendToQueue")
    public void sendMessage(String msg, HttpServletResponse response) throws IOException {

        //队列名称
        ActiveMQQueue queue = new ActiveMQQueue("myQueue");

        //发送消息
        jmsMessagingTemplate.convertAndSend(queue, msg);

        System.out.println("客户端发送消息成功");

        response.getWriter().write("success");
    }
}
2、消费者
@Component
public class QueueConsumer {

//    @Autowired
//    private JmsMessagingTemplate jmsMessagingTemplate;

    // 使用JmsListener配置消费者监听的队列
    @JmsListener(destination = "myQueue")
    public void handleMessage(String msg) {
        System.out.println("服务端成功接收queue消息成功:" + msg);
    }

    /*
    @JmsListener(destination = "myQueue")
    // SendTo 会将此方法返回的数据, 写入到 OutQueue 中去.
    @SendTo("outQueue")
    public String handleMessage2(String msg) {
        System.out.println("成功接受msg" + msg);
        return "成功接受msg" + msg;
    }
    */
}
主题-发布订阅模式
访问路径:127.0.0.1:8081/sendToTopic?msg=要发送的消息
1、生产者
@RestController
public class TopicProducer {
    @Autowired
    private JmsMessagingTemplate jmsMessagingTemplate;

    @RequestMapping("sendToTopic")
    public void sendMessage(String msg, HttpServletResponse response) throws IOException {

        //队列名称
        ActiveMQTopic topic = new ActiveMQTopic("myTopic");

        //发送消息
        jmsMessagingTemplate.convertAndSend(topic, msg);

        System.out.println("客户端发送消息成功");

        response.getWriter().write("success");
    }
}
2、消费者
@Component
public class TopicConsumer {

    // 使用JmsListener配置消费者监听的队列
    @JmsListener(destination = "myTopic")
    public void handleMessage1(String msg) {
        System.out.println("消费者1成功接收topic消息成功:" + msg);
    }

    // 使用JmsListener配置消费者监听的队列
    @JmsListener(destination = "myTopic")
    public void handleMessage2(String msg) {
        System.out.println("消费者2成功接收topic消息成功:" + msg);
    }
}
}
二、消息可靠保证机制
- 事务控制模式
生产者:
//生产者必须要将消息提交事务,才可以提交到队列中
Session session = connection.createSession(true, Session.AUTO_ACKNOWLEDGE);
...此处省略中间代码...
// 发送消息
producer.send(message);
//手动提交事务
session.commit();

消费者:
Session session = createConnection.createSession(true, Session.AUTO_ACKNOWLEDGE);
...此处省略中间代码...
TextMessage textMessage = (TextMessage) message;
String text = textMessage.getText();
session.commit();
- 手动签收模式
生产者:开启手动签收,在消费者接受完消息后手动签收
Session session = connection.createSession(false, Session.CLIENT_ACKNOWLEDGE);

消费者:
Session session = connection.createSession(false, Session.CLIENT_ACKNOWLEDGE);
TextMessage textMessage = (TextMessage) message;
String text = textMessage.getText();
message.acknowledge();
三、消息持久化
//若需要持久化,只需要在生产者设置
// 创建消息生产者
MessageProducer producer = session.createProducer(destination);
// 持久化消息,当MQ关闭后,消息会保存成文件(在acitvemq的data目录中)
producer.setDeliveryMode(DeliveryMode.PERSISTENT);
四、重试机制
-
重试
当消费者接收到消息后,如果抛出异常,activemq会自动重试。
如果不需要自动重试,可以把接收消息的代码try起来,在catch里面做处理,比如记录日志或保存数据库,方便后面的补偿。补偿机制可以采用定时任务,定时检查异常日志或数据库记录,进行特定处理,或者人工进行补偿。 -
保持幂等性
如果进行重试,会导致消息被重复消费,应该要采取措施保持消息幂等性。
通常使用消息的唯一ID(ActiveMq自动生成的,message.getJMSMessageID())或者使用业务唯一ID进行比对。
比如:在第一次消息被接收时,把消息唯一ID存放在缓存里面。当异常重试的时候,比对到缓存里面是否存在相同的ID,如果存在就进行签收,避免第三次重试。