0. 数据结构图文解析系列
| 数据结构系列文章 |
|---|
| 数据结构图文解析之:数组、单链表、双链表介绍及C++模板实现 |
| 数据结构图文解析之:栈的简介及C++模板实现 |
| 数据结构图文解析之:队列详解与C++模板实现 |
| 数据结构图文解析之:树的简介及二叉排序树C++模板实现. |
| 数据结构图文解析之:AVL树详解及C++模板实现 |
| 数据结构图文解析之:二叉堆详解及C++模板实现 |
1. 线性表简介
线性表是一种线性结构,它是由零个或多个数据元素构成的有限序列。线性表的特征是在一个序列中,除了头尾元素,每个元素都有且只有一个直接前驱,有且只有一个直接后继,而序列头元素没有直接前驱,序列尾元素没有直接后继。
数据结构中常见的线性结构有数组、单链表、双链表、循环链表等。线性表中的元素为某种相同的抽象数据类型。可以是C语言的内置类型或结构体,也可以是C++自定义类型。
2. 数组
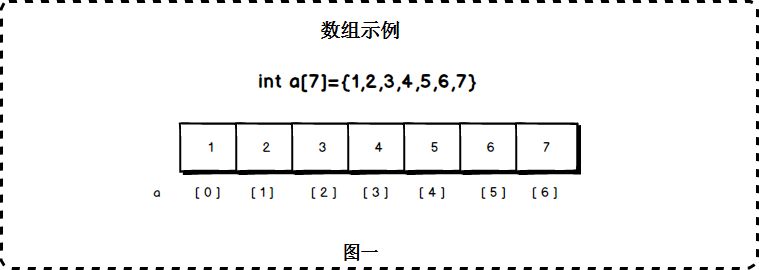
数组在实际的物理内存上也是连续存储的,数组有上界和下界。C语言中定义一个数组:
数组下标是从0开始的,a[0]对应第一个元素。其中,a[0]称为数组a的下界,a[6]称为数组a的上届。超过这个范围的下标使用数组,将造成数组越界错误。
数组的特点是:数据连续,支持快速随机访问。
数组分为固定数组与动态数组。其中固定数组的大小必须在编译时就能够确认,动态数组允许在运行时申请数组内存。复杂点的数组是多维数组,多维数组实际上也是通过一维数组来实现的。在C语言中,可以通过malloc来分配动态数组,C++使用new。另外,C++的标准模板库提供了动态数组类型vector以及内置有固定数组类型array。
3. 单向链表
单向链表是链表的一种。链表由节点所构成,节点内含一个指向下一个节点的指针,节点依次链接成为链表。因此,链表这种数据结构通常在物理内存上是不连续的。链表的通常含有一个头节点,头节点不存放实际的值,它含有一个指针,指向存放元素的第一个节点。
3.1 单向链表的节点结构
//节点结构
template
class Node
{
public :
    T _value;
    Node* _next;
public:
    Node() = default;
    Node(T value, Node * next)
        : _value(value), _next(next){}
}; - _value: 节点的值
- _next: 指针,指向下一个节点
3.2 单向链表的抽象数据结构
//单链表
template
class SingleLink
{
public:
    typedef Node*  pointer;
    SingleLink();
    ~SingleLink();

    int size();                         //获取长度
    bool isEmpty();                     //判空

    Node* insert(int index, T t); //在指定位置进行插入
    Node* insert_head(T t);         //在链表头进行插入
    Node* insert_last(T t);         //在链表尾进行插入

    Node*  del(int index);         //在指定位置进行删除
    Node*  delete_head();         //删除链表头
    Node*  delete_last();         //删除链表尾

    T get(int index);                 //获取指定位置的元素
    T get_head();                     //获取链表头元素
    T get_last();                     //获取链表尾元素

    Node* getHead();                 //获取链表头节点

private :
    int count;
    Node * phead;

private :
    Node * getNode(int index);      //获取指定位置的节点
}; - phead: 链表的头节点。
- count: 链表元素个数。
3.3 单链表添加节点
链表的插入元素操作时间复杂度O(1),只需要进行指针的指向修改操作。
在2之后添加7:
- 为元素7构建节点 。
- 将节点2 的next指针指向节点7。
- 将节点7的next指向节点3。(节点3 的位置要先保留起来)
/*
在指定位置插入新节点
*/
template
Node* SingleLink::insert(int index, T t)
{
    Node * preNode = getNode(index);
    if (preNode)
    {
        Node *newNode = new Node(t,preNode->_next);
        preNode->_next = newNode;
        count++;
        return newNode;
    }
    return nullptr;
};
/*
从头部插入
*/
template
Node* SingleLink::insert_head(T t)
{
    return insert(0, t);
};
/*
从尾部进行插入
*/
template
Node* SingleLink::insert_last(T t)
{
    return insert(count, t);
};
3.4 单链表删除节点
单链表的删除操作同样是一个时间复杂度O(1)的操作,它也只需要修改节点的指针指针后即可销毁被删除节点。
例如我们删除链表元素7:
相应的代码:
/*
删除链表指定位置元素
*/
template
Node* SingleLink::del(int index)
{
    if (isEmpty())
        return nullptr;
    Node* ptrNode = getNode(index);
    Node* delNode = ptrNode->_next;
    ptrNode->_next = delNode->_next;
    count--;
    delete delNode;
    return ptrNode->_next;
};
/*
删除头节点
*/
template
Node* SingleLink::delete_head()
{
    return del(0);
};
/*
删除尾节点
*/
template
Node*SingleLink::delete_last()
{
    return del(count);
};
3.5 单链表代码测试
int main()
{
    SingleLink link;
    for (int i = 0; i < 10; i++)
    {
        link.insert(i, i);
    }
    cout << link.size() << endl;

    link.insert_head(1111);
    link.insert_last(2222);

    SingleLink::pointer ptr = link.getHead();
    while (ptr != nullptr)
    {
        cout << ptr->_value << endl;
        ptr = ptr->_next;
    }

    getchar();
    return 0;
}
测试结果:
10
1111
0
1
2
3
4
5
6
7
8
9
2222
其他的操作较为简单,不在这里贴出代码,文章底部有完整链表类的代码链接。
4. 双向链表
单链表的节点链接是单方向的,要得到指定节点的前一个节点,必须从头遍历链表。
双向链表是链表的一种。与单链表一样,双向节点由节点链接而成,每个节点含有两个指针,分别指向直接前驱与直接后继。从双向链表的任何一个节点开始都能够遍历整个链表。
我们将双向链表实现为双向循环链表,也即是最后一个元素的后继将指向头节点,整个链表形成一个循环
例如,我们为元素1,2,3,4,5 构建一个双向循环链表
在图中:
表头为空。
表头的前驱节点是节点5,表头的后继节点是节点1;
节点1的前驱节点是表头,节点1的后继节点是节点2;
节点2的前驱节点是节点1,节点2的后继节点是节点3;
...
4.1 双向链表节点结构
双向循环的节点中,比单向链表中多了一个指向直接前驱的指针
/*
双向链表的节点结构
*/
template
struct Node
{
public:
    Node()= default;
    Node(T value, Node* preptr, Node* nextptr)
        :_value(value), pre_ptr(preptr), next_ptr(nextptr){}

public:
    T _value;
    Node* pre_ptr;
    Node* next_ptr;
}; - _value: 节点元素的值
- pre_ptr:指向直接前驱的指针
- next_ptr:指向直接后继的指针
4.2 双向链表的抽象数据结构
双向链表类的定义与单链表相似。
/*
* 双向链表类
*/
template
class DoubleLink
{
public:
    typedef Node* pointer;
public:
    DoubleLink();
    ~DoubleLink(){};
public:
    Node* insert(int index, T value);
    Node* insert_front(T value);
    Node* insert_last(T value);

    Node* del(int index);
    Node* delete_front();
    Node* delete_last();

    bool isEmpty();
    int size();

    T get(int index);
    T get_front();
    T get_last();
    Node* getHead();

private:
    Node* phead;
    int count;
private :
    Node* getNode(int index);
};
4.3 双向链表添加节点
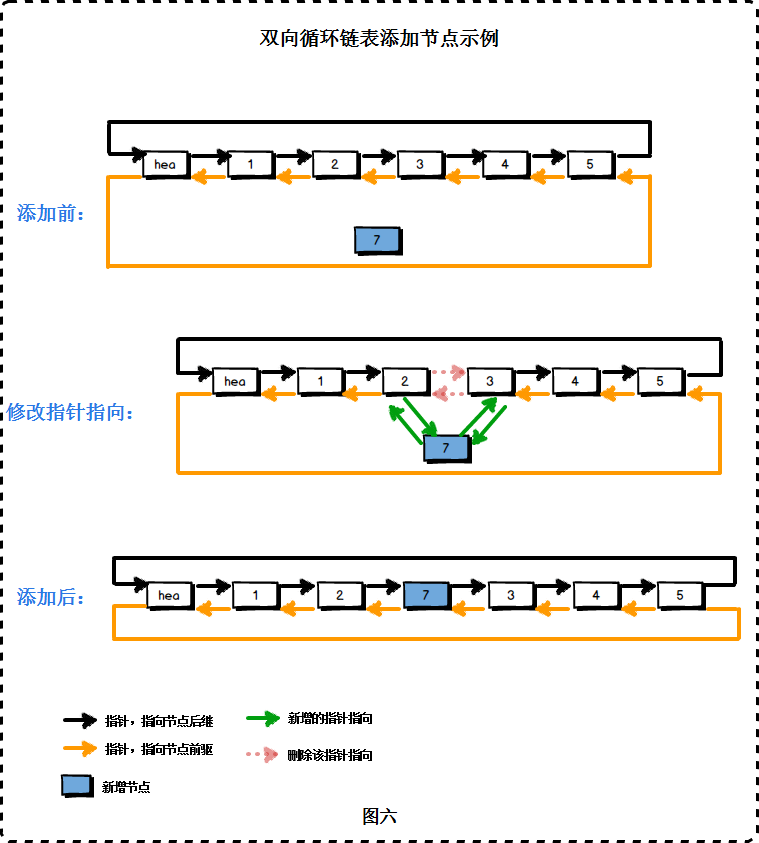
与单链表一样,双向链表添加节点的时间复杂度为O(1),它也只需要修改相关指针的指向。
/*
*将新节点插到第一个位置
*/
template
Node* DoubleLink::insert_front(T value)
{
    Node* newNode = new Node(value, phead, phead->next_ptr);
    phead->next_ptr ->pre_ptr= newNode;
    phead->next_ptr = newNode;
    count++;
    return newNode;
};
/*
*将新节点插到链表尾部
*/
template
Node* DoubleLink::insert_last(T value)
{
    Node * newNode = new Node(value, phead->pre_ptr, phead);
    phead->pre_ptr->next_ptr = newNode;
    phead->pre_ptr = newNode;
    count++;
    return newNode;
};
/*
*将节点位置插到index位置之前
*/

template
Node* DoubleLink::insert(int index, T value)
{
    if (index == 0)
        return insert_front(value);

    Node* pNode = getNode(index);
    if (pNode == nullptr)
        return nullptr;
    Node* newNode = new Node(value, pNode->pre_ptr, pNode);
    pNode->pre_ptr->next_ptr = newNode;
    pNode->pre_ptr = newNode;
    count++;

    return newNode;
};
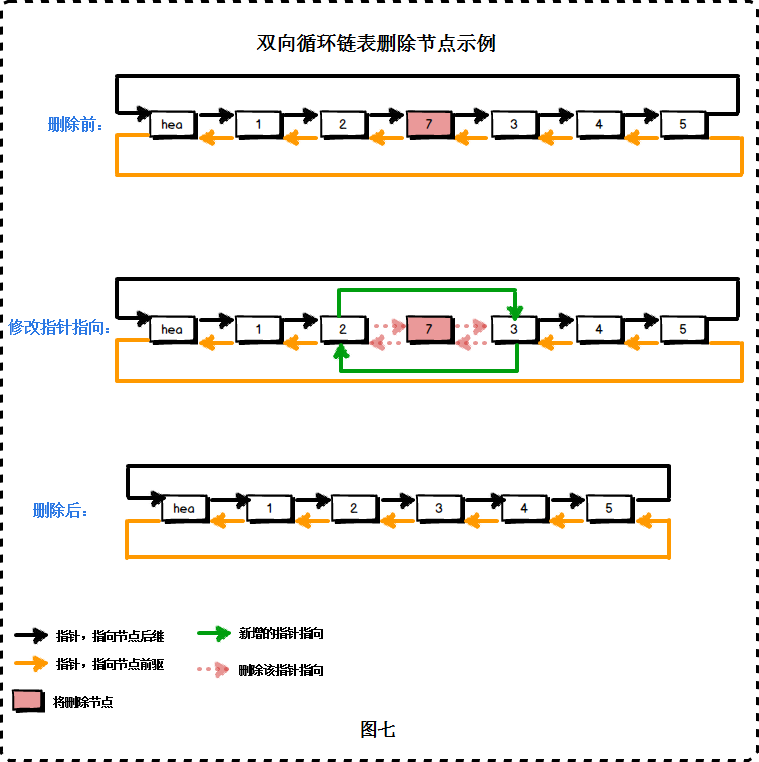
4.4 双向链表删除节点
/*
*删除链表第一个节点
*返回删除后链表第一个节点
*/
template
Node* DoubleLink::delete_front()
{
    if (count == 0)
    {
        return nullptr;
    }
    Node* pnode = phead->next_ptr;
    phead->next_ptr = pnode->next_ptr;
    pnode->next_ptr->pre_ptr = phead;
    delete pnode;
    count--;
    return phead->next_ptr;
};
/*
*删除链表的末尾节点
*返回删除后链表尾部元素
*/
template
Node* DoubleLink::delete_last()
{
    if (count == 0)
    {
        return nullptr;
    }
    Node*pnode = phead->pre_ptr;
    pnode->pre_ptr->next_ptr = phead;
    phead->pre_ptr = pnode->pre_ptr;
    delete pnode;
    count--;
    return phead->pre_ptr;
}
/*
*删除指定位置的元素
*
*/
template
Node* DoubleLink::del(int index)
{
    if (index == 0)
        return delete_front();
    if (index == count - 1)
        return delete_last();
    if (index >= count)
        return nullptr;
    Node* pnode = getNode(index);
    pnode->pre_ptr->next_ptr = pnode->next_ptr;
    pnode->next_ptr->pre_ptr = pnode->pre_ptr;

    Node* ptemp = pnode->pre_ptr;
    delete pnode;
    count--;
    return ptemp;
};
其他的接口实现都很简单,这里不再讲解。下面有提供完整的工程项目及源代码。
4.5 双向链表代码测试
int main()
{
    DoubleLink dlink;
    //插入测试
    for (int i = 0; i < 10; i++)
    {
        dlink.insert(0, i+10);
    }
    dlink.insert(0,  100);
    dlink.insert_last(1000);
    cout <<"链表长度:"<< dlink.size() << endl;

    //删除测试
    dlink.delete_front();
    dlink.delete_last();
    dlink.del(3);


    DoubleLink::pointer ptr = dlink.getHead();
    ptr = ptr->next_ptr;
    while (ptr != dlink.getHead())
    {
        cout << ptr->_value<next_ptr;
    }

    getchar();
    return 0;
}
测试结果:
链表长度:12
19
18
17
15
14
13
12
11
10
5. 单链表、双向链表源代码
单链表github源代码:https://github.com/huanzheWu/Data-Structure/blob/master/singleList/singleList/singleList.h
双链表github源代码:https://github.com/huanzheWu/Data-Structure/blob/master/DoubleLink/DoubleLink/DoubleLink.h
另外声明:
- C++模板不支持分离编译,因此类定义与成员函数的实现都在.h文件中完成;
- 可以看到代码中new一个新节点之后,并没有使用(prt!=nullptr)来检查内存分配是否成功,这是因为new失败时直接抛出异常,不同于C语言malloc内存分配失败返回NULL。
原创文章,转载请注明出处:http://www.cnblogs.com/QG-whz/p/5170147.html


