Okhttp3 源码分析
最近详细的看了一下okhttp的源码,okhttp是一个开源的网络请求框架,本文导入的okhttp版本为
implementation 'com.squareup.okhttp3:okhttp:3.12.1'okhttp请求可以分为同步以及异步,本文分为三部分:同步、异步、拦截器链,进行简单分析。
1.同步
同步的使用如下:
OkHttpClient client = new OkHttpClient();
Request request = new Request.Builder().url(urlString).build();
Call call = client.newCall(request);
Response response = call.execute();
同步使用call.execute()开始网络请求。execute实现在RealCall.java中
//RealCall.java
@Override public Response execute() throws IOException {
  ...
  try {
    client.dispatcher().executed(this);
    Response result = getResponseWithInterceptorChain();
    if (result == null) throw new IOException("Canceled");
    return result;
  } catch (IOException e) {
    ...
  } finally {
    client.dispatcher().finished(this);
  }
}
先来看try中第一句,其实就是调用Dispatcher.java的executed方法
//Dispatcher.java
synchronized void executed(RealCall call) {
  runningSyncCalls.add(call);
}
executed方法就只有一句话,往runningSyncCalls中添加RealCall实例,那么这个runningSyncCalls是什么呢?找到Dispatcher文件的开头,会看见定义了三个队列
/** Ready async calls in the order they'll be run. */
private final Deque readyAsyncCalls = new ArrayDeque<>();//异步的等待队列

/** Running asynchronous calls. Includes canceled calls that haven't finished yet. */
private final Deque runningAsyncCalls = new ArrayDeque<>();//异步的运行队列

/** Running synchronous calls. Includes canceled calls that haven't finished yet. */
private final Deque runningSyncCalls = new ArrayDeque<>();//同步的运行队列
executed方法就是往同步的运行队列里添加了RealCall实例。
再回到RealCall.java中execute方法try中的第二句,可以直接看到Response通过getResponseWithInterceptorChain方法获取到了,那么网络请求肯定是这个方法里面执行的。getResponseWithInterceptorChain这个方法通过英文可以大概知道是通过拦截链来获取结果的。okhttp的拦截策略后面再讲,因为异步也是通过这个方法获取结果。
那么来到execute方法的最后finally中,其实就是调用Dispatcher.java的finished方法
void finished(RealCall call) {
  finished(runningSyncCalls, call);
}

private  void finished(Deque calls, T call) {
  Runnable idleCallback;
  synchronized (this) {
    if (!calls.remove(call)) throw new AssertionError("Call wasn't in-flight!");
    idleCallback = this.idleCallback;
  }

  boolean isRunning = promoteAndExecute();

  if (!isRunning && idleCallback != null) {
    idleCallback.run();
  }
}
可以从代码中看到calls.remove(call),将这个请求从同步的运行队列中移除,idleCallback可以忽略,并没有对this.idleCallback赋值,下面来到promoteAndExecute这个方法,进入这个方法可以看见全部是与异步有关,相当于同步只是走一遍判断,这个方法就结束了(promoteAndExecute具体分析放在异步中)。
到这里同步就结束了。
2.异步
异步的使用如下:
OkHttpClient client = new OkHttpClient();
Request request = new Request.Builder().url(urlString).method("GET", null).build();
Call call = client.newCall(request);
call.enqueue(new Callback() {
    @Override
    public void onFailure(Call call, IOException e) {

    }

    @Override
    public void onResponse(Call call, Response response) throws IOException {

    }
});
异步使用call.enqueue()开始网络请求。enqueue也是实现在RealCall.java中
//RealCall.java
@Override public void enqueue(Callback responseCallback) {
  synchronized (this) {
    if (executed) throw new IllegalStateException("Already Executed");
    executed = true;
  }
  captureCallStackTrace();
  eventListener.callStart(this);
  client.dispatcher().enqueue(new AsyncCall(responseCallback));
}
将Callback传入方法,重点在最后一句,调用了Dispatcher.java的enqueue方法,将Callback传入到新初始化的AsyncCall(其实是Runnable)中,方便后面调用Callback接口中的方法。
//Dispatcher.java
void enqueue(AsyncCall call) {
  synchronized (this) {
    readyAsyncCalls.add(call);
  }
  promoteAndExecute();
}
enqueue方法中往异步的准备队列添加了AsyncCall,添加完后,执行到promoteAndExecute方法,是不是很眼熟,就是同步中最后执行的方法。
//Dispatcher.java
private boolean promoteAndExecute() {
  assert (!Thread.holdsLock(this));

  List executableCalls = new ArrayList<>();
  boolean isRunning;
  synchronized (this) {
    for (Iterator i = readyAsyncCalls.iterator(); i.hasNext(); ) {
      AsyncCall asyncCall = i.next();

      if (runningAsyncCalls.size() >= maxRequests) break; // Max capacity.
      if (runningCallsForHost(asyncCall) >= maxRequestsPerHost) continue; // Host max capacity.

      i.remove();
      executableCalls.add(asyncCall);
      runningAsyncCalls.add(asyncCall);
    }
    isRunning = runningCallsCount() > 0;
  }

  for (int i = 0, size = executableCalls.size(); i < size; i++) {
    AsyncCall asyncCall = executableCalls.get(i);
    asyncCall.executeOn(executorService());
  }

  return isRunning;
}
整个方法很简单,从readyAsyncCalls队列中循环取出一条数据,判断runningAsyncCalls正在运行异步队列是否满了(默认maxRequests为64),没有满,readyAsyncCalls移除这条数据,往executableCalls以及runningAsyncCalls中添加这条数据,最后for循环中,取出executableCalls中数据,执行AsyncCall中executeOn方法。executeOn的参数executorService()是什么呢?点击找到这个方法。
public synchronized ExecutorService executorService() {
  if (executorService == null) {
    executorService = new ThreadPoolExecutor(0, Integer.MAX_VALUE, 60, TimeUnit.SECONDS,
        new SynchronousQueue(), Util.threadFactory("OkHttp Dispatcher", false));
  }
  return executorService;
}
可以看见就是创建一个线程池,这个线程池是一个核心线程数为0,最大线程数为MAX_VALUE,线程空闲回收时间为60s,阻塞队列为SynchronousQueue(不缓存数据的队列)的队列。
继续AsyncCall的executeOn方法
void executeOn(ExecutorService executorService) {
  ...
  boolean success = false;
  try {
    executorService.execute(this);
    success = true;
  } catch (RejectedExecutionException e) {
    ...
    responseCallback.onFailure(RealCall.this, ioException);
  } finally {
    if (!success) {
      client.dispatcher().finished(this); // This call is no longer running!
    }
  }
}
方法中executorService.execute方法具体实现在AsyncCall中的execute方法
@Override protected void execute() {
  ...
  try {
    Response response = getResponseWithInterceptorChain();
    if (retryAndFollowUpInterceptor.isCanceled()) {
      signalledCallback = true;
      responseCallback.onFailure(RealCall.this, new IOException("Canceled"));
    } else {
      signalledCallback = true;
      responseCallback.onResponse(RealCall.this, response);
    }
  } catch (IOException e) {
    ...
  } finally {
    client.dispatcher().finished(this);
  }
}
这个方法中会看到一个熟悉的方法getResponseWithInterceptorChain,那么异步具体的网络请求也就是在这个方法里面执行的(最后一部分拦截器链具体分析)。
最后finally中的代码与上一步executeOn中finally代码相同,就一起分析了(至于executeOn中success标志很简单,一看就明白什么时候会执行进去),这句话也很眼熟啊,具体调用了Dispatcher.java的enqueue方法,与同步不同的是传的参数不同,但是跳转的finished方法是相同的。
void finished(AsyncCall call) {
  finished(runningAsyncCalls, call);
}

private  void finished(Deque calls, T call) {
  Runnable idleCallback;
  synchronized (this) {
    if (!calls.remove(call)) throw new AssertionError("Call wasn't in-flight!");
    idleCallback = this.idleCallback;
  }

  boolean isRunning = promoteAndExecute();

  if (!isRunning && idleCallback != null) {
    idleCallback.run();
  }
}
与同步相同,将runningAsyncCalls中的请求移除,然后运行到promoteAndExecute方法,看等待队列中是否还有数据没有运行,有则又进行一次循环,没有则结束异步。
3.拦截器链
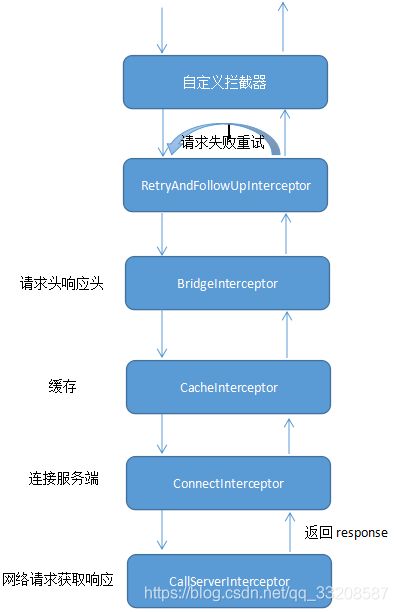
通过上面的同步与异步请求中,可以知道网络请求其实是在getResponseWithInterceptorChain()方法中完成的。先看看这个方法的内容。
Response getResponseWithInterceptorChain() throws IOException {
  // Build a full stack of interceptors.
  List interceptors = new ArrayList<>();
  //添加自定义的拦截器
  interceptors.addAll(client.interceptors());
  //请求失败重试
  interceptors.add(retryAndFollowUpInterceptor);
  //修改请求头、响应头
  interceptors.add(new BridgeInterceptor(client.cookieJar()));
  //缓存数据
  interceptors.add(new CacheInterceptor(client.internalCache()));
  //连接服务端
  interceptors.add(new ConnectInterceptor(client));
  if (!forWebSocket) {
    interceptors.addAll(client.networkInterceptors());
  }
  //发起请求获得响应
  interceptors.add(new CallServerInterceptor(forWebSocket));

  //创建拦截器链
  Interceptor.Chain chain = new RealInterceptorChain(interceptors, null, null, null, 0,
      originalRequest, this, eventListener, client.connectTimeoutMillis(),
      client.readTimeoutMillis(), client.writeTimeoutMillis());

  return chain.proceed(originalRequest);
}
可以看到这个方法中添加一些拦截器,创建拦截器链,调用拦截器链的proceed方法。
//RealInterceptorChain.java
public Response proceed(Request request, StreamAllocation streamAllocation, HttpCodec httpCodec,
    RealConnection connection) throws IOException {
  ...

  // Call the next interceptor in the chain.
  //创建新的拦截器链,index加1
  RealInterceptorChain next = new RealInterceptorChain(interceptors, streamAllocation, httpCodec,
      connection, index + 1, request, call, eventListener, connectTimeout, readTimeout,
      writeTimeout);
  Interceptor interceptor = interceptors.get(index);
  Response response = interceptor.intercept(next);

  ...

  return response;
}
这个方法主要看上面这段,创建了一个新的拦截器链,对index加1(方便使用新拦截器链取拦截器时,取得下一个拦截器),然后获取到第index个拦截器,调用拦截器的intercept方法。
首先来看看第一个拦截器RetryAndFollowUpInterceptor的intercept方法
@Override public Response intercept(Chain chain) throws IOException {
  Request request = chain.request();
  RealInterceptorChain realChain = (RealInterceptorChain) chain;
  Call call = realChain.call();
  EventListener eventListener = realChain.eventListener();

  StreamAllocation streamAllocation = new StreamAllocation(client.connectionPool(),
      createAddress(request.url()), call, eventListener, callStackTrace);
  this.streamAllocation = streamAllocation;

  int followUpCount = 0;
  Response priorResponse = null;
  while (true) {
    if (canceled) {
      streamAllocation.release();
      throw new IOException("Canceled");
    }

    Response response;
    boolean releaseConnection = true;
    try {
      response = realChain.proceed(request, streamAllocation, null, null);
      releaseConnection = false;
    } catch (RouteException e) {
      // The attempt to connect via a route failed. The request will not have been sent.
      if (!recover(e.getLastConnectException(), streamAllocation, false, request)) {
        throw e.getFirstConnectException();
      }
      releaseConnection = false;
      continue;
    } catch (IOException e) {
      // An attempt to communicate with a server failed. The request may have been sent.
      boolean requestSendStarted = !(e instanceof ConnectionShutdownException);
      if (!recover(e, streamAllocation, requestSendStarted, request)) throw e;
      releaseConnection = false;
      continue;
    } finally {
      // We're throwing an unchecked exception. Release any resources.
      if (releaseConnection) {
        streamAllocation.streamFailed(null);
        streamAllocation.release();
      }
    }

    ...
}
拦截器的具体处理逻辑这里不讲,可以看到方法中使用了response = realChain.proceed(request, streamAllocation, null, null);,这里的realChain就是之前的新拦截器链,新的拦截器链中index是加1了的,也就是说新拦截器链的proceed方法里面会取到下一个拦截器,再执行下个拦截器的intercept方法。
从第一个拦截器RetryAndFollowUpInterceptor开始,之后的拦截器都会使用chain.proceed,调用下一个拦截器,直到最后一个拦截器CallServerInterceptor没有调用proceed方法。最后一个拦截器获取响应,再将response通过一层层拦截器传回来,每一层对response进行相应的判断与处理,最后获得最终结果。