Spark-Core(四) - Shuffle剖析&&ByKey算子解析&&Spark中的监控&&广播变量、累加器
一、Spark-Core(三)回顾
- 1.1、Spark on yarn的运行方式
二、Shuffle的剖析
- 2.1、2.1、IDEA下使用repartition和coalesce对用户进行分组
- 2.2、coalesce和repartition在生产上的使用
- 2.3、reduceByKey和groupByKey的区别
- 2.4、图解reduceByKey和groupByKey
- 2.5、reduceByKey和groupByKey的源码&&aggregateByKey
- 2.6、collect vs collectAsMap源码剖析
三、Spark中的监控描述
- 3.1、 监控参数配置&&在Spark shell中测试
- 3.2、 REST API的方式&&具体使用&&REST API信息保存位置
四、RDD中的重要变量
- 4.1、 共享变量
- 4.2、 广播变量
- 4.2.1、普通的join
- 4.2.2、BroadCast Join
- 4.3、 计数器(Accumulator)
一、Spark-Core(三)回顾
1、主要讲了cache操作,重点:宽窄依赖的定义,在容错方面的差异;key-value编程的时候以key作为基础条件
1.1、Spark on yarn的运行方式
1、主要运行方式:local[2] -->最简单的开发方式,就是一个local几的问题;Yarn的时候要有一个HADOOP_CONF_DIR目录;
问题:使用yarn模式的时候需不要在 S P A R K H O M E / c o n f / s l a v e s 下 配 置 主 机 名 , 不 需 要 ; 只 需 要 提 交 的 机 器 是 g a t e w a y , ( 指 的 是 在 SPARK_HOME/conf/slaves下配置主机名,不需要;只需要提交的机器是gateway,(指的是在 SPARKHOME/conf/slaves下配置主机名,不需要;只需要提交的机器是gateway,(指的是在SPARK_HOME/conf/spark-env.sh这下面配置了文件即可);跑yarn的时候只需要这台机器做一个客户端即可;
误区:在$spark_home/sbin/start-all.sh或者start-master.sh start-slaves.sh;这种模式在生产上基本不会使用,spark on yarn不需要启动这些东西,slaves中也不需要配置东西;情况:让业务人员跑一种情况spark on yarn,他竟然问了,你们生产上怎么没有spark运行节点,是不是要把spark集群上的节点启动起来。
底层原理根本没有掌握,所以才会出现上述情况,本课程基本都是使用local[2]的场景,生产上基本使用的都是spark on yarn场景,不需要启动任何spark几点;
只需要gateway+spark-submit运行即可;重点:并不需要运行spark节点。
二、Shuffle的剖析
1、有一些操作在spark中触发事件叫做shuffle,这个操作主要是重新分发数据,如何理解?
提供一些通话记录,统计今天打了多少个电话、打出去了多少个电话;在通讯录界面,有通话时间、通话时常、通讯人。本质就是一个Word count;
(天时间+拨打,1) -->reduceByKey
相同的天时间+拨打 ==> shuffle到同一个reduce上去,不这样做你能进行累加操作吗?
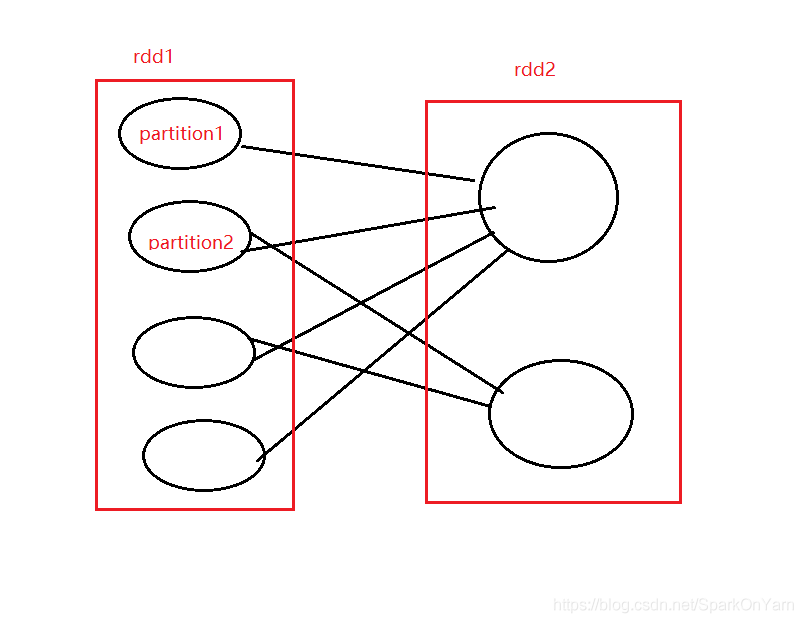
shuffle就是一组具有共同特征的数据分发到一个节点上进行操作,如下进行图解:
如何理解跨Partition进行分组?
如上图:partition2的数据可能分到不同的地方去了;
数据在不同的节点上,肯定会涉及到数据的拷贝,会涉及到磁盘的IO和网络的IO;所以shuffle是一个复杂的和使用昂贵的操作。绝大多数涉及shuffle的场景都会存在数据倾斜的可能性。
背景:
为了理解在shuffle的过程中到底发生了什么,我们以reduceByKey的操作去进行理解,reduceByKey的操作会生成一个新的RDD,一个key所对应的值都会combined into the key,就是相同的key都会被分配到一个reduce上去处理;并不是所有的value值在相同的partition上或者相同机器上的,但是他们必须要在同一个地点协同工作。
产生shuffle的算子:
比如:repartition系列的操作:repartition和coalesce,ByKey系列:reduceByKey、groupByKey;Join系列:cogroup和join
性能影响:
这个shuffle是一个昂贵的操作因为涉及磁盘IO、网络IO、数据的序列化;为了组织数据shuffle,spark会产生一系列的task(stage),包括map task和reduce task去聚合数据。这种方式来自于MapReduce
本质上的,结果是保存在内存上的除非扛不住,涉及一些排序的会写到一个文件上去,相关的排序数据是map端输出的;
shuffle在大数据计算中是一个性能杀手也是一个瓶颈所在。
scala> val info=sc.textFile("file:///home/hadoop/data/ruozeinput.txt")
info: org.apache.spark.rdd.RDD[String] = file:///home/hadoop/data/ruozeinput.txt MapPartitionsRDD[4] at textFile at <console>:24

scala> info.partitions.length
res1: Int = 2

scala> val info1=info.coalesce(1)
info1: org.apache.spark.rdd.RDD[String] = CoalescedRDD[5] at coalesce at <console>:25

scala> info1.partitions.length
res2: Int = 1

//coalesce此处是不起作用的
scala> val info2=info.coalesce(4)
info2: org.apache.spark.rdd.RDD[String] = CoalescedRDD[6] at coalesce at <console>:25

scala> info2.partitions.length
res3: Int = 2

//需要在coalesce后加上一个true这个设置的分区数才能够生效:
scala> val info3=info.coalesce(4,true)
info3: org.apache.spark.rdd.RDD[String] = MapPartitionsRDD[10] at coalesce at <console>:25

scala> info3.partitions.length
res4: Int = 4
在RDD.scala中查看repartition和coalesce方法:
1、查看coalesce方法:
分区数numpartition可传可不传,shuffle可传可不传:
 def coalesce(numPartitions: Int, shuffle: Boolean = false,
               partitionCoalescer: Option[PartitionCoalescer] = Option.empty)
              (implicit ord: Ordering[T] = null)
      : RDD[T] = withScope {

2、查看repartition方法:
调用的就是coalesce,repartition是肯定经过shuffle的:
  def repartition(numPartitions: Int)(implicit ord: Ordering[T] = null): RDD[T] = withScope {
    coalesce(numPartitions, shuffle = true)
  }
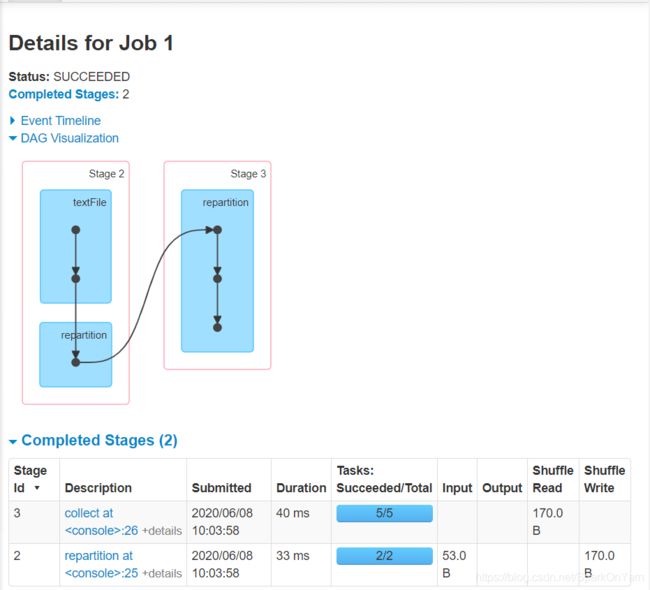
info3.collect对应的DAG图:
repartition(5)带来的区别:
scala> val info4 = info.repartition(5)
info4: org.apache.spark.rdd.RDD[String] = MapPartitionsRDD[14] at repartition at <console>:25

scala> info4.collect
res6: Array[String] = Array(hello       hello   hello, world    world, john)
-
解析:为什么读进来是2,因为info.partitions.length的长度为2;然后又设置的repartition是5,所以另外一个是5.
-
2个分区变成5个分区增加了数据的并行度,如果降低分区数,你可以考虑使用coalesce
repartition在源码中的体现:
 /**
   * Return a new RDD that is reduced into `numPartitions` partitions.
   *
   * This results in a narrow dependency, e.g. if you go from 1000 partitions
   * to 100 partitions, there will not be a shuffle, instead each of the 100
   * new partitions will claim 10 of the current partitions. If a larger number
   * of partitions is requested, it will stay at the current number of partitions.
   *
   * However, if you're doing a drastic coalesce, e.g. to numPartitions = 1,
   * this may result in your computation taking place on fewer nodes than
   * you like (e.g. one node in the case of numPartitions = 1). To avoid this,
   * you can pass shuffle = true. This will add a shuffle step, but means the
   * current upstream partitions will be executed in parallel (per whatever
   * the current partitioning is).
2.1、IDEA下使用repartition和coalesce对用户进行分组
import org.apache.spark.{SparkConf, SparkContext}

import scala.collection.mutable.ListBuffer

object RepartitionApp {
  def main(args: Array[String]): Unit = {
      val sparkConf = new SparkConf().setAppName("RepartitionApp").setMaster("local[2]")
      val sc = new SparkContext(sparkConf)

		//sc.parallelize的时候设置并行度:
      val students = sc.parallelize(List("17er","老二","本泽马","zz","jeff","woodtree"),3)

	//mapPartitionWithIndex:分分区的时候给分区加个编号,入参肯定是一个tuple,val stus = new ListBuffer[String],创建一个长度内容都可变的集合,对分区进行迭代,有的话给它拿出来放到学生里面去,需要把分区中的数据拿出来,再看看他是哪个组的
      students.mapPartitionsWithIndex((index,partition) => {
        val stus = new ListBuffer[String]
        while(partition.hasNext){
          stus += "~~~" + partition.next() + ",在哪个组:" + (index+1)
        }
        //返回可迭代的学生对象
        stus.iterator
      }).foreach(println)
      	//foreach进行打印

      sc.stop()
  }

}

输出结果:
~~~17er,在哪个组:1
~~~老二,在哪个组:1
~~~本泽马,在哪个组:2
~~~zz,在哪个组:2
~~~jeff,在哪个组:3
~~~woodtree,在哪个组:3
从3个组变成2个组:
- 比如此时部门裁员,裁成2个组:
•students.mapPartitionsWithIndex((index,partition) ==>

--> 修改成如下显示:
 students.coalesce(2).mapPartitionsWithIndex((index,partition) => {
裁员前是3各组,修改成5个组:
students.repartition(5).mapPartitionsWithIndex((index,partition)
输出结果:
~~~17er,在哪个组:2
~~~老二,在哪个组:3
~~~jeff,在哪个组:3
~~~本泽马,在哪个组:4
~~~woodtree,在哪个组:4
~~~zz,在哪个组:5

students.coalesce(5,true).mapPartitionsWithIndex((index,partition) => {
输出结果:
~~~17er,在哪个组:2
~~~老二,在哪个组:3
~~~jeff,在哪个组:3
~~~zz,在哪个组:5
~~~本泽马,在哪个组:4
~~~woodtree,在哪个组:4
六个元素,并行度是3,分区是5,分组起始位置为什么是2
- mapPartitionWithIndex中主要有一个index可以拿到的是partition的位置。
2.2、coalesce和repartition在生产上的使用
coalesce vs repartition
思考:
1、假设ARDD转换为BRDD,ARDD中有300个分区,每一个分区中的记录只有1条id=100的,此时做了一个filter操作,id>99的;
2、filter是窄依赖,A中有多少分区数B中就有多少分区数,也就是在RDDB中有300个partition;
3、原来每一个partition中有10万条数据,现在过滤完后每一个partition中只有1条数据,输出300个文件每个文件中1条数据这个肯定是不合适的,如果此时在输出的文件中做一个操作;
4、coalesce(1),对数据进行收敛,这样的话对于小文件来说的话就会好很多。
假设出来的文件很大,把coalesce调大就行了;
repartition的话可以把数据打散,提升并行度。
2.3、reduceByKey和groupByKey的区别
1、reduceByKey手写一个wc:
scala> sc.textFile("file:///home/hadoop/data/ruozeinput.txt").flatMap(_.split("\t")).map((_,1)).reduceByKey(_+_)
res2: org.apache.spark.rdd.RDD[(String, Int)] = ShuffledRDD[4] at reduceByKey at <console>:25
2、groupByKey的数据结构&&输出:
1、groupByKey的数据结构:
scala> sc.textFile("file:///home/hadoop/data/ruozeinput.txt").flatMap(_.split("\t")).map((_,1)).groupByKey()
res5: org.apache.spark.rdd.RDD[(String, Iterable[Int])] = ShuffledRDD[14] at groupByKey at <console>:25

//数据结构剖析:key是string类型,value是一个可迭代的Iterable[Int],我们应该通过这个Iterable[Int]的value联想到reduce上去;

查看reducer.java源码,看到这个数据结构和它确实挺相似的:在reduce中这个values中放了很多个1
void reduce(K2 key, Iterator<V2> values,
              OutputCollector<K3, V3> output, Reporter reporter)
    throws IOException;


//groupByKey的输出结果:
(john,CompactBuffer(1))
(hello,CompactBuffer(1, 1, 1))
(world,CompactBuffer(1, 1))
20/06/13 09:54:14 INFO Executor
groupByKey的这种数据结构怎么对value值求和?
- 先在IDEA中对代码进行开发测试,然后放到spark-shell中去执行:
1、在IDEA中根据代码提示进行开发:
     sc.textFile("hdfs://hadoop004:9000/data/input/ruozeinput.txt")
         .flatMap(_.split("\t"))
         .map((_,1))
         .groupByKey()
         .map( x=>(x._1,x._2.sum))
         .foreach(println)


2、放到Spark-shell中去执行得到如下的结果
scala> sc.textFile("file:///home/hadoop/data/ruozeinput.txt").flatMap(_.split("\t")).map((_,1)).groupByKey().map(x =>(x._1,x._2.sum)).foreach(println)
[Stage 0:>                                                          (0 + 2) / 2](john,1)
(hello,3)
(world,2)

3、在UI界面中去查看信息:
groupByKey和reduceByKey在UI界面中体现的区别:
1、groupByKey如下体现:
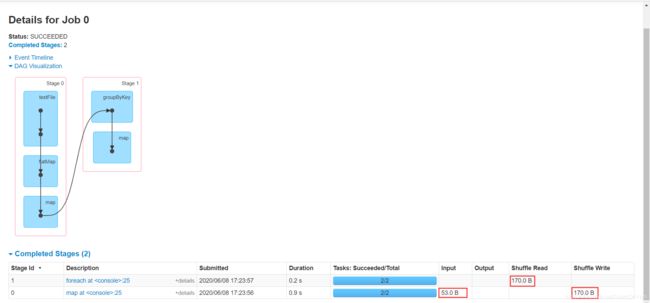
2、reduceByKey如下体现:

两者的区别:
1、从DAG图上看,没有太大的差别,需要观察的一个是数据量,reduceByKey shuffle的数据要比groupByKey shuffle的少;
2、在工作中,需要优先使用reduceByKey,reduceByKey在本地就做了一个聚合的操作,聚合的结果再经过shuffle所以数据量要少一些。
2.4、图解reduceByKey和groupByKey
数据准备,假设有3个map的数据:
1:(a,1) (b,1)
2:(a,1) (b,1) (a,1) (b,1)
3:(a,1) (b,1) (a,1) (b,1) (a,1) (b,1)
1、groupByKey的shuffle过程:
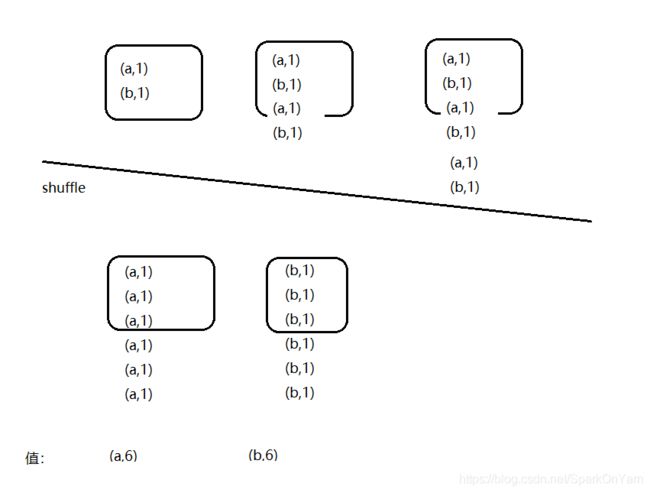
2、reduceByKey在Map端会进行一个本地的聚合,减少了shuffle数据量(减少了数据分发的数据量):
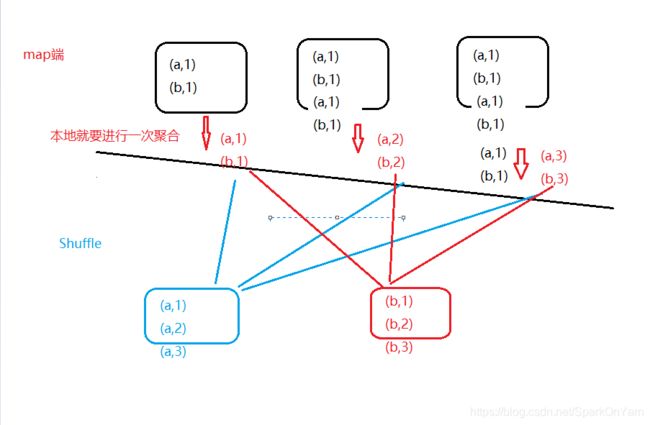
所以为什么么reduceByKey是152B,而groupByKey是172B
有些方法使用reduceByKey解决不了的话应该怎么办?
combine是在map端的,还需要引出一个算子:
2.5、reduceByKey和groupByKey的源码&&aggregateByKey
1、查看groupByKey方法:
 def groupByKey(): RDD[(K, Iterable[V])] = self.withScope {
    groupByKey(defaultPartitioner(self))
  }

2、再点击groupByKey中去:
def groupByKey(partitioner: Partitioner): RDD[(K, Iterable[V])] = self.withScope {
    // groupByKey shouldn't use map side combine because map side combine does not
    // reduce the amount of data shuffled and requires all map side data be inserted
    // into a hash table, leading to more objects in the old gen.
    val createCombiner = (v: V) => CompactBuffer(v)
    val mergeValue = (buf: CompactBuffer[V], v: V) => buf += v
    val mergeCombiners = (c1: CompactBuffer[V], c2: CompactBuffer[V]) => c1 ++= c2
    val bufs = combineByKeyWithClassTag[CompactBuffer[V]](
      createCombiner, mergeValue, mergeCombiners, partitioner, mapSideCombine = false)
    bufs.asInstanceOf[RDD[(K, Iterable[V])]]
  }

//查看到这个方法定义中,mapSideCombine = false,map端的聚合再groupByKey中默认是没有开启的

1、查看reduceByKey方法:
 def reduceByKey(func: (V, V) => V): RDD[(K, V)] = self.withScope {
    reduceByKey(defaultPartitioner(self), func)
  }

它的底层调用的是combineByKeyWithClassTag,在这个方法中, mapSideCombine: Boolean = true,这个参数默认定义的是true
2.6、collect vs collectAsMap源码剖析
1、collect源码:在RDD.scala中体现
- 方法定义:返回值就是数组类型,这个方法只能被用于返回数组结果少的,因为所有的数据都会被加载到机器内存中;数据量一旦多系统就会报OOM的错误,然后崩溃。
- 每一个action就会触发一个算子,只要算子的底层调用的是runJob,那它就是action;
重要:语法定义:
Array.concat(results: *) --> 在Scala04中 printn(sum(1.to(10) :*)) 中有所体现:
:_*把results转换成一个可变参数,在concat后面接的才是可变参数:Array[String] *
   * Return an array that contains all of the elements in this RDD.

   * @note This method should only be used if the resulting array is expected to be small, as
   * all the data is loaded into the driver's memory.
   */
  def collect(): Array[T] = withScope {
    val results = sc.runJob(this, (iter: Iterator[T]) => iter.toArray)
    Array.concat(results: _*)
  }
- collect仅仅适用于数据量少的场景,一旦数据量多的话就会系统就会报错,OOM
2、collectAsMap的源码:在PairRDDFunctions.scala中
  /**
   * Return the key-value pairs in this RDD to the master as a Map.
   *
   * Warning: this doesn't return a multimap (so if you have multiple values to the same key, only
   *          one value per key is preserved in the map returned)
   *
   * @note this method should only be used if the resulting data is expected to be small, as
   * all the data is loaded into the driver's memory.
   */
  def collectAsMap(): Map[K, V] = self.withScope {
  //获取所有的数据
    val data = self.collect()
    //声明一个HashMap
    val map = new mutable.HashMap[K, V]
    //设置map的长度
    map.sizeHint(data.length)
    //循环将数据放进去
    data.foreach { pair => map.put(pair._1, pair._2) }
    map
  }
区别和具体使用体现可以查看这篇博客:
- https://blog.csdn.net/zhanglong_4444/article/details/87159299
三、Spark中的监控描述
1、首先我们启动一个spark-shell,去触发一个job,sc.parallelize(List(1,2,3,4,5,6,7)).cunt;此时通过UI界面去查看,一个action触发一个stage,一个stage中又有4个task;对于一个任务来说,我们需要关注的是这个任务启动的时间有多久,任务运行的周期是多久?
模拟业务场景:我们在本地运行这个spark任务,中途退出,再次启动spark-shell,还能否看见这个任务(是否完成、失败);半夜在运行Spark任务,假设该任务结束了或者是挂了,就没有这个界面的信息了;
–》 所以对于一个作业来说,需要引出一个监控的概念,用于监控作业的完成情况:
网址:http://spark.apache.org/docs/latest/monitoring.html
官网释义:
每一个SparkContext都会启动一个Web UI,默认的端口是4040,这个应用上展示了很多有用的信息:
1、一系列调度的stages和tasks
2、RDD的大小和内存使用情况
3、环境相关信息
4、正在运行的executor的信息
你能够通过http://4040网址访问到应用程序相关信息,如果你的机器上启动了多个SparkContext的话,这个端口号会依次进行递增;
这些信息仅仅只能够在应用程序的生命周期中被访问到,意思是如果spark-shell关了,这些信息就无法被访问到了。
你要去看Web UI信息的话,在启动应用程序之前设置一个参数:set spark.eventLog.enabled to true;它会记录这些事件信息,把这些信息保存在内存中。
但是单单这个参数的修改是满足不了业务需求产生监控相关的东西。
viewing after the fact
1、通过Spark提供的history服务来访问UI,提供了应用程序的已经存在的事件日志;
2、进入到$SPARK_HOME/sbin目录下,使用命令:./sbin/start-history-server.sh;
3、这个命令会列出完成的、重试的、未完成的应用程序信息,在默认的ip/hostname:18080端口下;
4、当使用文件系统提供类时(查看spark.history.provider),这个基础日志目录一定要被应用通过spark.history.fs.logDirectory这个参数进行配置,能够包含子目录,每一个子目录都代表了一个应用程序的event log
5、Spark job本身一定要配置log events,记录他们通过相同的分享方式,同一个写目录;举例:如果一个服务被配置在了这个目录下:hdfs://namenode/shared/spark-logs,接下来的client的存储目录都在这个下:
第一步:spark.eventLog.enabled true
第二步:spark.eventLog.dir hdfs://namenode/shared/spark-logs 参数开启以后,上设置hdfs的存储目录
Environment Variables(环境变量)
以Spark.history开头的都需要配置到SPARK_HISTORY_OPTS中去;
3.1、监控参数配置&&在Spark shell中测试
1、编辑$SPARK_HOME/conf/spark-defaults.conf这份文件,没有这份文件就先拷贝一下,cp spark-defaults.conf.template spark-defaults.conf,然后进行编辑:
spark.eventLog.enabled           true
spark.eventLog.dir               hdfs://hadoop004:9000/spark_directory
2、同理对$SPARK_HOME/conf/spark-env.sh这份文件进行编辑,进入到编辑模式;注意这个目录:/spark_directory要在hdfs上有
SPARK_HISTORY_OPTS="-Dspark.history.fs.logDirectory=hdfs://hadoop004:9000/spark_dir
ectory"
3、这些配置完成后,进入到$SPARK_HOME/sbin目录下,进行启动history服务:
[hadoop@hadoop004 sbin]$ ./start-history-server.sh
starting org.apache.spark.deploy.history.HistoryServer, logging to /home/hadoop/app/spark/logs/spark-hadoop-org.apache.spark.deploy.history.HistoryServer-1-hadoop004.out
[hadoop@hadoop004 sbin]$ pwd
/home/hadoop/app/spark/sbin
此时我们去到Spark-shell中去运行几个job:
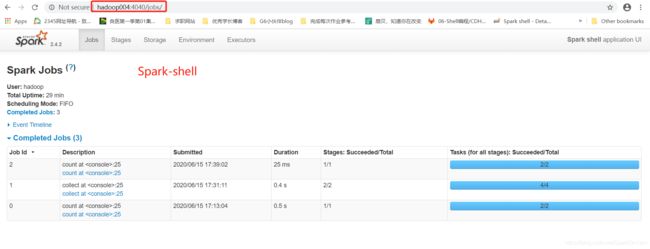
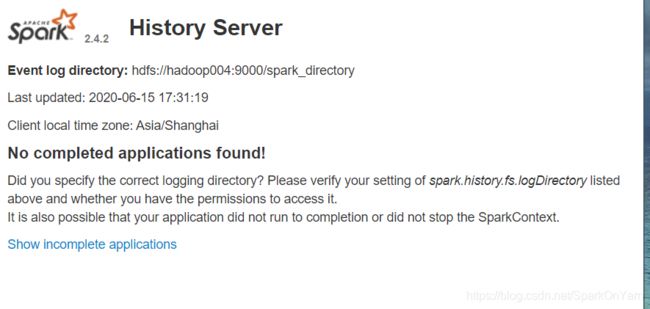
此时我们去到spark-history中是查看不到我们正在运行的job的,需要我们把spark-shell这个命令框给kill掉,它才会显示历史的job状况:
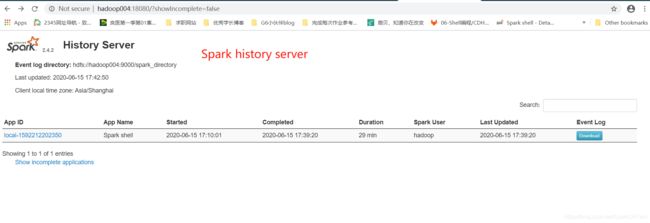
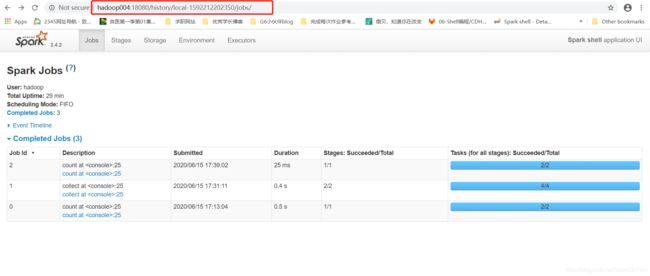
history服务下记录的信息和spark 4040端口页面下展示的信息是一样的:
注意事项:
1、我们在18080端口上点击头部是可以进行排序的,这很容易去鉴别数据倾斜;进入到tasks后,直接点击duration。
2、这个history server显示的包括完成和未完成的作业;
3、未完成的作业会根据事件进行控制
4、通过sc.stop()把spark作业停下来
3.2、REST API的方式&&具体使用&&REST API信息保存位置
1、返回应用程序执行的结果,对于运行中的程序,使用history server去访问到JSON,使用如下网址:http://xxx:18080/api/v1/
2、一个应用程序通过application ID被引用;当我们使用spark on yarn的时候,每一个应用程序都能有多次尝试,多次尝试ID只针对cluster模式,不对client模式生效。
进入到Web UI界面上去进行查看
Web UI网址:http://hadoop004:18080/api/v1/applications
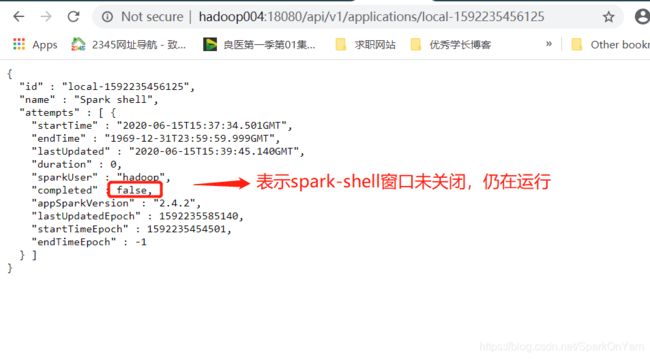
- 返回的是一个JSON串的信息,如果之前spark-shell运行了,中断一次再运行,那就会产生两个JSON串信息;返回的是一个JSON数组,拿到的是所有的应用程序;
1、hadoop004:18080/api/vi 此时是没有任何显示的
2、hadoop004:18080/api/v1/application 返回一个json数组,拿到的是所有的应用程序
1、因为我们先后分别两次启动了spark-shell,所以是两个app-id
[ {
  "id" : "local-1592214299829",
  "name" : "Spark shell",
  "attempts" : [ {
    "startTime" : "2020-06-15T09:44:58.631GMT",
    "endTime" : "2020-06-15T11:46:02.161GMT",
    "lastUpdated" : "2020-06-15T11:46:02.229GMT",
    "duration" : 7263530,
    "sparkUser" : "hadoop",
    "completed" : true,
    "appSparkVersion" : "2.4.2",
    "lastUpdatedEpoch" : 1592221562229,
    "startTimeEpoch" : 1592214298631,
    "endTimeEpoch" : 1592221562161
  } ]
}, {
  "id" : "local-1592212202350",
  "name" : "Spark shell",
  "attempts" : [ {
    "startTime" : "2020-06-15T09:10:01.266GMT",
    "endTime" : "2020-06-15T09:39:20.794GMT",
    "lastUpdated" : "2020-06-15T09:39:20.855GMT",
    "duration" : 1759528,
    "sparkUser" : "hadoop",
    "completed" : true,
    "appSparkVersion" : "2.4.2",
    "lastUpdatedEpoch" : 1592213960855,
    "startTimeEpoch" : 1592212201266,
    "endTimeEpoch" : 1592213960794
  } ]
} ]

2、hadoop004:18080/api/v1/applications/appid 查看这个程序是否在运行
- hadoop004:18080/api/v1/applications/app-id/jobs 列出app-id下的所有job信息:
http://hadoop004:18080/api/v1/applications/local-1592235456125/jobs
[ {
"jobId" : 1,
"name" : "count at :25" ,
"submissionTime" : "2020-06-15T15:45:16.940GMT",
"completionTime" : "2020-06-15T15:45:17.024GMT",
"stageIds" : [ 2 ],
"status" : "SUCCEEDED",
"numTasks" : 2,
"numActiveTasks" : 0,
"numCompletedTasks" : 2,
"numSkippedTasks" : 0,
"numFailedTasks" : 0,
"numKilledTasks" : 0,
"numCompletedIndices" : 2,
"numActiveStages" : 0,
"numCompletedStages" : 1,
"numSkippedStages" : 0,
"numFailedStages" : 0,
"killedTasksSummary" : { }
}, {
"jobId" : 0,
"name" : "collect at :25" ,
"submissionTime" : "2020-06-15T15:39:11.307GMT",
"completionTime" : "2020-06-15T15:39:12.192GMT",
"stageIds" : [ 0, 1 ],
"status" : "SUCCEEDED",
"numTasks" : 4,
"numActiveTasks" : 0,
"numCompletedTasks" : 4,
"numSkippedTasks" : 0,
"numFailedTasks" : 0,
"numKilledTasks" : 0,
"numCompletedIndices" : 4,
"numActiveStages" : 0,
"numCompletedStages" : 2,
"numSkippedStages" : 0,
"numFailedStages" : 0,
"killedTasksSummary" : { }
} ]
//我在这个spark-shell中启动了使用action算子触发了两个job;
第一个job:
sc.textFile("file:///home/hadoop/data/ruozeinput.txt").flatMap(_.split("\t")).map((_,1)).reduceByKey(_+_).collect
sc.parallelize(List(1,2,3,4,5,6,7)).count
4、也可以在jobs后面跟上[job-id]
- 这个的一般使用场景:服务搭建好,前端配合,设计好UI接口,然后再告诉前端接口。
Metrics:一般是用不到的
主要关注点:HistoryServer和RestAPI
REST API信息在HDFS上的保存位置:
1、jps命令查看到HistoryServer就会一个java进程,ps -ef|grep 端口号:
[hadoop@hadoop004 ~]$ jps
7970 DataNode
14947 HistoryServer

[hadoop@hadoop004 ~]$ ps -ef|grep 14947
hadoop    14947      1  0 17:15 ?        00:01:45 /usr/java/jdk1.8.0_45/bin/java -cp /home/hadoop/app/spark/conf/:/home/hadoop/app/spark/jars/*:/home/hadoop/app/hadoop/etc/hadoop/ -Dspark.history.fs.logDirectory=hdfs://hadoop004:9000/spark_directory -Xmx1g org.apache.spark.deploy.history.HistoryServer
hadoop    25423  25352  0 23:56 pts/1    00:00:00 grep 14947
2、HistoryServer不用的话使用命令停止:./stop-history-server.sh
3、记录的日志保存在这个位置:[hadoop@hadoop004 ~]$ hdfs dfs -text hdfs://hadoop004:9000/spark_directory/local-1592212202350
- 这个读取出来的信息就是JSON,我们在REST API上查看到的JSON信息就是此处解析出来的。
我去到hdfs上读取这段信息的时候还出现了报错:
Permission denied when trying to open /webhdfs/v1/spark_directory/local-1592212202350?op=GET_BLOCK_LOCATIONS: Forbidden
四、RDD中的重要变量
- 4.1、 共享变量
- 4.2、 广播变量
- 4.2.1、普通的join
- 4.2.2、BroadCast Join
- 4.3、 计数器(Accumulator)
四、RDD中的重要变量
4.1、共享变量
-
当一个算子map\reduce执行在远端机器中,每一个函数中都是有一个副本的;算子里面用到了一个外部的数据,这种情况会把数据拷贝到所有的机器上去;
-
Spark中跨task读写共享变量(多线程)这种方式效率不高
val value = new HashMap()
val rdd = ...
rdd.foreach(x =>{
	value //...
})
4.2、广播变量
Map join把数据分发到集群中的缓存上去;广播变量允许编程人员保存一份变量cache到机器上,而不是一个task一个task这样的拷贝;
假设value这个变量10m,foreach中有1000个task,当内部使用到了外部的变量,这个变量要拷贝到所有的task中去,100*10m = 1G,需要在内存中耗费很高的资源;
广播变量不是每一个task一个副本,而是每一个机器一个副本;
scala> val broadcastvar = sc.broadcast(Array(1,2,3))
broadcastvar: org.apache.spark.broadcast.Broadcast[Array[Int]] = Broadcast(6)

scala> broadcastvar.value
res6: Array[Int] = Array(1, 2, 3)
这么简单的方式在生产上肯定是行不通的,生产上至少是要进行join的:
4.2.1、普通的join
4.2.2、BroadCast Join
4.3、计数器(Accmulator)
顾名思义:就是一个计数的作用
累加器是一个变量,仅仅支持add操作,也就是说它只能够加;它底层就是实现了一个MapReduce中的counter或者sum;
对于一个用户来说,你能够创建一个带名字的和不带名字的计数器;longAccmulator中可以传参数,也可以不传参数
  /**
   * Create and register a long accumulator, which starts with 0 and accumulates inputs by `add`.
   */
  def longAccumulator: LongAccumulator = {
    val acc = new LongAccumulator
    register(acc)
    acc
  }

  /**
   * Create and register a long accumulator, which starts with 0 and accumulates inputs by `add`.
   */
  def longAccumulator(name: String): LongAccumulator = {
    val acc = new LongAccumulator
    register(acc, name)
    acc
  }

再点进registry中,跳转到如下:
  /**
   * Register the given accumulator with given name.
   *
   * @note Accumulators must be registered before use, or it will throw exception.
   */
  def register(acc: AccumulatorV2[_, _], name: String): Unit = {
    acc.register(this, name = Option(name))
  }
还是启动一个Spark-shell,进行测试,官方案例:
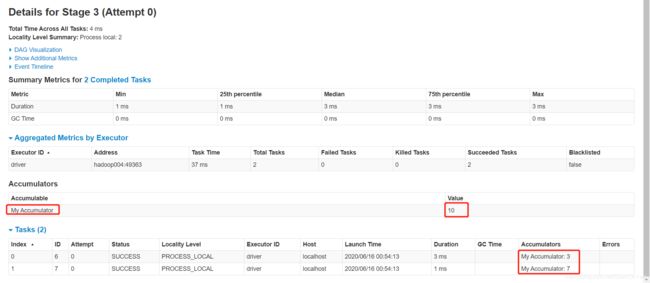
scala> val accum = sc.longAccumulator("My Accumulator")
accum: org.apache.spark.util.LongAccumulator = LongAccumulator(id: 75, name: Some(My Accumulator), value: 0)

scala> sc.parallelize(Array(1,2,3,4)).foreach( x => accum.add(x))

scala> accum.value
res4: Long = 10
