Spring5.0源码深度解析之SpringBean的Aop源码分析
SpringAop源码分析:需要关联SpringBean的生命周期
思考:
1.什么时候创建代理类对象
2.SpringAop中如何综合运用CGLIB和JDK动态代理
@EnableAspectJAutoProxy:开启AOP的权限
注入到Spring容器中
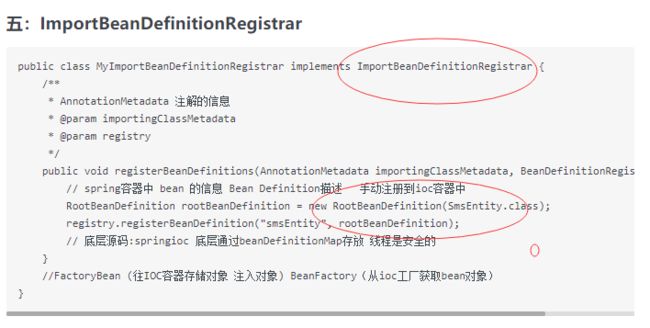
ImportBeanDefinitionRegistrar手动注册Bean对象
在前几章中提过,实现ImportBeanDefinitionRegistrar这个接口,可以自己手动注册一些Bean到Spring容器中
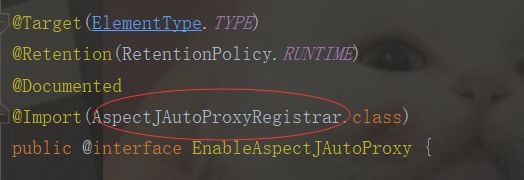
AspectJAutoProxyRegistrar实现了ImportBeanDefinitionRegistrar就可以手动注册Bean对象
class AspectJAutoProxyRegistrar implements ImportBeanDefinitionRegistrar {

   @Override
   public void registerBeanDefinitions(
         AnnotationMetadata importingClassMetadata, BeanDefinitionRegistry registry) {
       //这里手动注册Bean
      AopConfigUtils.registerAspectJAnnotationAutoProxyCreatorIfNecessary(registry);
      AnnotationAttributes enableAspectJAutoProxy =
            AnnotationConfigUtils.attributesFor(importingClassMetadata, EnableAspectJAutoProxy.class);
      if (enableAspectJAutoProxy != null) {
         if (enableAspectJAutoProxy.getBoolean("proxyTargetClass")) {
            AopConfigUtils.forceAutoProxyCreatorToUseClassProxying(registry);
         }
         if (enableAspectJAutoProxy.getBoolean("exposeProxy")) {
            AopConfigUtils.forceAutoProxyCreatorToExposeProxy(registry);
         }
      }
   }
}
public static BeanDefinition registerAspectJAnnotationAutoProxyCreatorIfNecessary(BeanDefinitionRegistry registry) {
    return registerAspectJAnnotationAutoProxyCreatorIfNecessary(registry, (Object)null);
}
注册或者升级AnnotationAwareAspectJAutoProxyCreator
对于AOP的实现,基本上都是靠AnnotationAwareAspectJAutoProxyCreator去完成的,它可以根据@Point注解定义的切点来自动代理相匹配的bean。
但是为了配置简便,Spring使用了自定义配置来帮助我们自动注册AnnotationAwareAspectJAutoProxyCreator,其注册过程就是在这里实现的。
public static BeanDefinition registerAspectJAnnotationAutoProxyCreatorIfNecessary(BeanDefinitionRegistry registry, @Nullable Object source) {
    return registerOrEscalateApcAsRequired(AnnotationAwareAspectJAutoProxyCreator.class, registry, source);
}
private static BeanDefinition registerOrEscalateApcAsRequired(Class cls, BeanDefinitionRegistry registry, @Nullable Object source) {
    Assert.notNull(registry, "BeanDefinitionRegistry must not be null");

    //如果已经存在了自动代理创建器且存在的自动代理创建器与现在的不一致,那么需要根据优先级来判断到底使用哪一个
    if (registry.containsBeanDefinition("org.springframework.aop.config.internalAutoProxyCreator")) {
        BeanDefinition apcDefinition = registry.getBeanDefinition("org.springframework.aop.config.internalAutoProxyCreator");
        if (!cls.getName().equals(apcDefinition.getBeanClassName())) {
            int currentPriority = findPriorityForClass(apcDefinition.getBeanClassName());
            int requiredPriority = findPriorityForClass(cls);
            if (currentPriority < requiredPriority) {
                //改变Bean最重要的就是改变bean所对应的属性className属性
                apcDefinition.setBeanClassName(cls.getName());
            }
        }
        //如果已经存在自动代理创建器并且与将要创建的一致,那么无须再次创建
        return null;
    } else {
        RootBeanDefinition beanDefinition = new RootBeanDefinition(cls);
        beanDefinition.setSource(source);
        beanDefinition.getPropertyValues().add("order", -2147483648);
        beanDefinition.setRole(2);
        registry.registerBeanDefinition("org.springframework.aop.config.internalAutoProxyCreator", beanDefinition);
        return beanDefinition;
    }
}
以上代码实现了自动注册AnnotationAwareAspectJAutoProxyCreator类的功能,同时这里还涉及到了一个优先级的问题,
如果已经存在了自动代理创建器,而且存在的自动代理创建器与现在的不一致,那么需要根据优先级来判断到底使用哪一个。
综上:总结下
1.@EnableAspectJAutoProxy:开启AOP的权限
2.@Import(AspectJAutoProxyRegistrar.class)注入到容器中,手动注册切面类
3.AnnotationAwareAspectJAutoProxyCreator需要将这个类注入到IOC容器中
4.registerBeanDefinition注册Bean信息内容:
##BeanId=org.springframework.aop.config.internalAutoProxyCreator
##class:AnnotationAwareAspectJAutoProxyCreator
我们打印下注册的Bean
1无参构造函数....说明对象初开始始化了
2执行自定义bean的init方法
beanDefinitionNames[i]:org.springframework.context.annotation.internalConfigurationAnnotationProcessor
beanDefinitionNames[i]:org.springframework.context.annotation.internalAutowiredAnnotationProcessor
beanDefinitionNames[i]:org.springframework.context.annotation.internalRequiredAnnotationProcessor
beanDefinitionNames[i]:org.springframework.context.annotation.internalCommonAnnotationProcessor
beanDefinitionNames[i]:org.springframework.context.event.internalEventListenerProcessor
beanDefinitionNames[i]:org.springframework.context.event.internalEventListenerFactory
beanDefinitionNames[i]:myConfig
beanDefinitionNames[i]:memberServiceImpl
beanDefinitionNames[i]:payService
beanDefinitionNames[i]:loginAop
beanDefinitionNames[i]:org.springframework.aop.config.internalAutoProxyCreator //这个就是我们分析注入的Bean
AnnotationAwareAspectJAutoProxyCreator
后面我们需要了解SpringAOP底层是如何实现的 离不开AnnotationAwareAspectJAutoProxyCreator
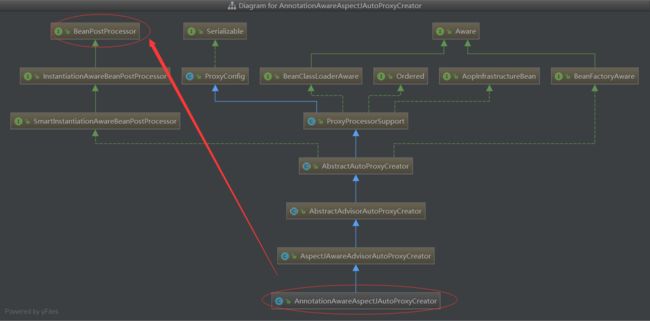
下面看看AnnotationAwareAspectJAutoProxyCreator类图结构
在类图中,我们看到:AnnotationAwareAspectJAutoProxyCreator的祖宗是BeanPostProcessors接口,而实现BeanPostProcessor后,当Spring加载这个Bean时会在实例化前调用其postProcessorAfterInitialization方法。
BeanPostProcessors是对我们的Bean的初始化方法实现增强。由Java多态,可知AnnotationAwareAspectJAutoProxyCreator也是可以实现对Bean初始化方法增强。
所以AnnotationAwareAspectJAutoProxyCreator本质就是对init方法实现增强
public interface BeanPostProcessor {
    @Nullable
    default Object postProcessBeforeInitialization(Object bean, String beanName) throws BeansException {//init方法前置处理
        return bean;
    }

    @Nullable
    default Object postProcessAfterInitialization(Object bean, String beanName) throws BeansException {//init方法后置处理
        return bean;
    }
}
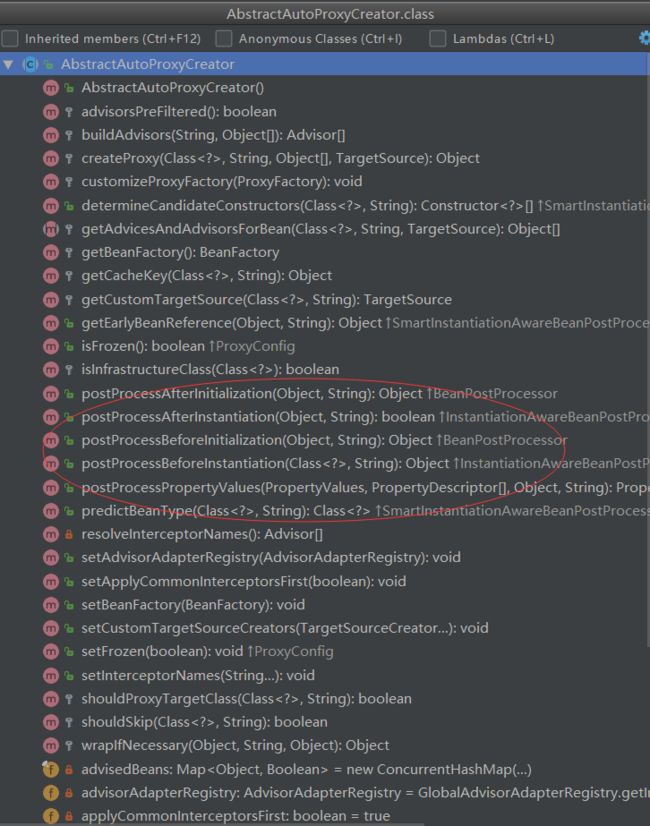
AnnotationAwareAspectJAutoProxyCreator的前置和后置在AbstractAutoProxyCreator实现类中实现
AbstractAutoProxyCreator的BeanPostProcessor后置处理器的前置处理器:没做任何事
public Object postProcessBeforeInitialization(Object bean, String beanName) {
    return bean;
}
AbstractAutoProxyCreator的BeanPostProcessor后置处理器的后置处理器:具体做事情,使用后置处理器实现代理对象的创建
public Object postProcessAfterInitialization(@Nullable Object bean, String beanName) throws BeansException {
    if (bean != null) {
        //根据给定的bean的class和name构建出一个key,格式:beanClassName_beanName
        Object cacheKey = this.getCacheKey(bean.getClass(), beanName);

        if (!this.earlyProxyReferences.contains(cacheKey)) {
            //如果它适合被代理,则需要封装指定的Bean
            return this.wrapIfNecessary(bean, beanName, cacheKey);
        }
    }
    return bean;
}
protected Object wrapIfNecessary(Object bean, String beanName, Object cacheKey) {
    //如果已经处理过
    if (StringUtils.hasLength(beanName) && this.targetSourcedBeans.contains(beanName)) {
        return bean;
    //无需增强
    } else if (Boolean.FALSE.equals(this.advisedBeans.get(cacheKey))) {
        return bean;
    //给定的bean类是否代表一个基础设施类,基础设施类不应被代理,或者配置了指定bean不需要自动代理
    } else if (!this.isInfrastructureClass(bean.getClass()) && !this.shouldSkip(bean.getClass(), beanName)) {
        //如果存在增强方法则创建代理
        Object[] specificInterceptors = this.getAdvicesAndAdvisorsForBean(bean.getClass(), beanName, (TargetSource)null);
        //如果获取到了增强则需要针对增强创建代理
        if (specificInterceptors != DO_NOT_PROXY) {
            this.advisedBeans.put(cacheKey, Boolean.TRUE);
            //创建代理
            Object proxy = this.createProxy(bean.getClass(), beanName, specificInterceptors, new SingletonTargetSource(bean));
            this.proxyTypes.put(cacheKey, proxy.getClass());
            return proxy;
        } else {
            this.advisedBeans.put(cacheKey, Boolean.FALSE);
            return bean;
        }
    } else {
        this.advisedBeans.put(cacheKey, Boolean.FALSE);
        return bean;
    }
}
函数中我们已经看到了代理创建的雏形。当然真正开始之前还需要经过一些判断,比如是否已经处理过或者是否是需要跳过的bean,而真正创建代理的代码是从getAdvicesAndAdvisorsForBean开始的。
创建代理主要包含两个步骤:
1.获取增强方法或者增强器
2.根据获取的增强进行代理
虽然看似简单,但是每个步骤中都经历了大量复杂的逻辑。首先来看看获取增强方法的实现逻辑
protected Object[] getAdvicesAndAdvisorsForBean(Class beanClass, String beanName, @Nullable TargetSource targetSource) {
    List advisors = this.findEligibleAdvisors(beanClass, beanName);
    return advisors.isEmpty() ? DO_NOT_PROXY : advisors.toArray();
}
protected ListfindEligibleAdvisors(Class beanClass, String beanName) { List candidateAdvisors = this.findCandidateAdvisors();//获取所有的增强 List eligibleAdvisors = this.findAdvisorsThatCanApply(candidateAdvisors, beanClass, beanName);//寻找所有增强中适用于bean的增强并应用 this.extendAdvisors(eligibleAdvisors); if (!eligibleAdvisors.isEmpty()) { eligibleAdvisors = this.sortAdvisors(eligibleAdvisors); } return eligibleAdvisors; }
对于指定bean的增强方法的获取一定是包含两个步骤的,获取所有的增强以及寻找所有增强中适用于bean的增强并应用,那么findCandidateAdvisors与findAdvisorsThatCanApply便是做了这两件事情。
当然如果无法找到对应的增强器便返回DO_NOT_PROXY,其中DO_NOT_PROXY=null
获取增强器
由于我们分析的是使用注解进行的AOP,所以对于findCandidateAdvisors的实现其实是由AnnotationAwareAspectJAutoProxyCreator类完成 的,
我们继续跟踪AnnotationAwareAspectJAutoProxyCreator的findCandidateAdvisors方法。
protected ListfindCandidateAdvisors() { //当使用注解方式配置AOP的时候并不是丢弃了对XML配置的支持 //这里调用父类方法加载配置文件中的AOP声明 List advisors = super.findCandidateAdvisors(); if (this.aspectJAdvisorsBuilder != null) { advisors.addAll(this.aspectJAdvisorsBuilder.buildAspectJAdvisors()); } return advisors; }
在真正研究代码之前可以自己尝试去想想解析思路,看看自己的实现与Spring的实现是否有差别?我们先看看函数提供的大概功能框架,读者可以尝试实现这些功能点,看看是否有思路
1、获取所有beanName,,这一步骤中所有在beanFactory中注册的bean都会被提起出来。
2、遍历所有beanName,并找出声明AspectJ注解的类,进行进一步的处理
3、对标记为AspectJ注解的类进行增强器的提取
4、将提取结果加入缓存
现在我们进入buildAspectJAdvisors函数实现,对Spring中所有类进行分析,提取Advisor
public ListbuildAspectJAdvisors() { List aspectNames = this.aspectBeanNames; if (aspectNames == null) { synchronized(this) { aspectNames = this.aspectBeanNames; if (aspectNames == null) { List advisors = new LinkedList(); List aspectNames = new LinkedList(); //获取所有的beanName String[] beanNames = BeanFactoryUtils.beanNamesForTypeIncludingAncestors(this.beanFactory, Object.class, true, false); String[] var18 = beanNames; int var19 = beanNames.length; //循环所有的beanName找出对应的增强方法 for(int var7 = 0; var7 < var19; ++var7) { String beanName = var18[var7]; //不合法的bean则略过,由子类定义规则,默认返回true if (this.isEligibleBean(beanName)) { Class beanType = this.beanFactory.getType(beanName); //如果存在Aspect注解 if (beanType != null && this.advisorFactory.isAspect(beanType)) { aspectNames.add(beanName); AspectMetadata amd = new AspectMetadata(beanType, beanName); if (amd.getAjType().getPerClause().getKind() == PerClauseKind.SINGLETON) { MetadataAwareAspectInstanceFactory factory = new BeanFactoryAspectInstanceFactory(this.beanFactory, beanName); //解析标记为AspectJ注解中增强的方法 List classAdvisors = this.advisorFactory.getAdvisors(factory); .... } this.aspectBeanNames = aspectNames; return advisors; } } } if (aspectNames.isEmpty()) { return Collections.emptyList(); } else { //记录在缓存中 List advisors = new LinkedList(); .... } }
至此我们已经完成看Advisor的提取,在上面的步骤中最为重要的也最为繁杂的就是增强的获取。而这一功能委托给了this.advisorFactory.getAdvisors(factory);方法去实现
public ListgetAdvisors(MetadataAwareAspectInstanceFactory aspectInstanceFactory) { //获取标记为AspectJ的类 Class aspectClass = aspectInstanceFactory.getAspectMetadata().getAspectClass(); //获取标记为AspectJ的name String aspectName = aspectInstanceFactory.getAspectMetadata().getAspectName(); //验证 this.validate(aspectClass); MetadataAwareAspectInstanceFactory lazySingletonAspectInstanceFactory = new LazySingletonAspectInstanceFactoryDecorator(aspectInstanceFactory); List advisors = new LinkedList(); Iterator var6 = this.getAdvisorMethods(aspectClass).iterator(); while(var6.hasNext()) { Method method = (Method)var6.next(); Advisor advisor = this.getAdvisor(method, lazySingletonAspectInstanceFactory, advisors.size(), aspectName); if (advisor != null) { advisors.add(advisor); } } if (!advisors.isEmpty() && lazySingletonAspectInstanceFactory.getAspectMetadata().isLazilyInstantiated()) { //如果寻找的增强器不为空而且配置了增强延迟初始化,那么需要在首位加入同步实例化增强器 Advisor instantiationAdvisor = new ReflectiveAspectJAdvisorFactory.SyntheticInstantiationAdvisor(lazySingletonAspectInstanceFactory); advisors.add(0, instantiationAdvisor); } Field[] var12 = aspectClass.getDeclaredFields(); int var13 = var12.length; for(int var14 = 0; var14 < var13; ++var14) { Field field = var12[var14]; //获取DeclareParents注解 Advisor advisor = this.getDeclareParentsAdvisor(field); if (advisor != null) { advisors.add(advisor); } } return advisors; }
函数中首先完成了对增强器的获取,包括获取注解以及根据注解生成增强的步骤,然后考虑到在配置中可能会将增强配置成延迟初始化,那么需要在首位加入同步实例化增强器以保证增强使用之前的实例化,
最后是对DeclareParents注解的获取,下面详细介绍下每个步骤:
1.普通增强器的获取
实现步骤包括对切点的注解的获取以及根据注解信息生成增强
public Advisor getAdvisor(Method candidateAdviceMethod, MetadataAwareAspectInstanceFactory aspectInstanceFactory, int declarationOrderInAspect, String aspectName) {
    this.validate(aspectInstanceFactory.getAspectMetadata().getAspectClass());
    //切点信息的获取
    AspectJExpressionPointcut expressionPointcut = this.getPointcut(candidateAdviceMethod, aspectInstanceFactory.getAspectMetadata().getAspectClass());
    //根据切点信息生成增强器
    return expressionPointcut == null ? null : new InstantiationModelAwarePointcutAdvisorImpl(expressionPointcut, candidateAdviceMethod, this, aspectInstanceFactory, declarationOrderInAspect, aspectName);
}
切点信息的获取。所谓获取切点信息就是指定注解的表达式信息的获取,如:@Around("loginAop()")
private AspectJExpressionPointcut getPointcut(Method candidateAdviceMethod, Class candidateAspectClass) {
    //获取方法上的注解
    AspectJAnnotation aspectJAnnotation = AbstractAspectJAdvisorFactory.findAspectJAnnotationOnMethod(candidateAdviceMethod);
    if (aspectJAnnotation == null) {
        return null;
    } else {
        //使用AspectJExpressionPointcut实例封装获取的信息
        AspectJExpressionPointcut ajexp = new AspectJExpressionPointcut(candidateAspectClass, new String[0], new Class[0]);
        //提取得到的注解中的表达式,如: @Pointcut("execution (* com.mayikt.service..*.*(..))")中的execution (* com.mayikt.service..*.*(..))
        ajexp.setExpression(aspectJAnnotation.getPointcutExpression());
        if (this.beanFactory != null) {
            ajexp.setBeanFactory(this.beanFactory);
        }

        return ajexp;
    }
}
protected static AbstractAspectJAdvisorFactory.AspectJAnnotation findAspectJAnnotationOnMethod(Method method) {
    //设置敏感的注解类
    Class[] classesToLookFor = new Class[]{Before.class, Around.class, After.class, AfterReturning.class, AfterThrowing.class, Pointcut.class};
    Class[] var2 = classesToLookFor;
    int var3 = classesToLookFor.length;

    for(int var4 = 0; var4 < var3; ++var4) {
        Class c = var2[var4];
        AbstractAspectJAdvisorFactory.AspectJAnnotation foundAnnotation = findAnnotation(method, c);
        if (foundAnnotation != null) {
            return foundAnnotation;
        }
    }

    return null;
}
private static  AbstractAspectJAdvisorFactory.AspectJAnnotation findAnnotation(Method method, Class toLookFor) {
    //获取指定方法上的注解并使用AspectJAnnotation封装
    A result = AnnotationUtils.findAnnotation(method, toLookFor);
    return result != null ? new AbstractAspectJAdvisorFactory.AspectJAnnotation(result) : null;
}
根据切点信息生成增强。所有的增强都由Advisor的实现类InstantiationModelAwarePointcutAdvisorImpl统一封装
public InstantiationModelAwarePointcutAdvisorImpl(AspectJExpressionPointcut declaredPointcut, Method aspectJAdviceMethod, AspectJAdvisorFactory aspectJAdvisorFactory, MetadataAwareAspectInstanceFactory aspectInstanceFactory, int declarationOrder, String aspectName) {
  ....
    if (aspectInstanceFactory.getAspectMetadata().isLazilyInstantiated()) {
        Pointcut preInstantiationPointcut = Pointcuts.union(aspectInstanceFactory.getAspectMetadata().getPerClausePointcut(), this.declaredPointcut);
        this.pointcut = new InstantiationModelAwarePointcutAdvisorImpl.PerTargetInstantiationModelPointcut(this.declaredPointcut, preInstantiationPointcut, aspectInstanceFactory);
        this.lazy = true;
    } else {
        this.pointcut = this.declaredPointcut;
        this.lazy = false;
        this.instantiatedAdvice = this.instantiateAdvice(this.declaredPointcut);
    }
}
在封装过程中只是简单的将信息封装在类的实例中,所有的信息单纯的赋值,在实例化过程中还完成了对于增强器的初始化。因为不同的增强所体现的逻辑是不同的,
比如@Before("test()")与@After("test()")标签的不同就是增强器增强的位置不同,所以就需要不同的增强器来完成不同的逻辑,而根据注解中的信息初始化对应的增强器就是在instantiateAdvice函数中实现的。
private Advice instantiateAdvice(AspectJExpressionPointcut pointcut) {
    Advice advice = this.aspectJAdvisorFactory.getAdvice(this.aspectJAdviceMethod, pointcut, this.aspectInstanceFactory, this.declarationOrder, this.aspectName);
    return advice != null ? advice : EMPTY_ADVICE;
}
public Advice getAdvice(Method candidateAdviceMethod, AspectJExpressionPointcut expressionPointcut, MetadataAwareAspectInstanceFactory aspectInstanceFactory, int declarationOrder, String aspectName) {
   ....
        Object springAdvice;
        //根据不同的注解类型封装不同的增强器
        switch(aspectJAnnotation.getAnnotationType()) {
        case AtBefore:
            springAdvice = new AspectJMethodBeforeAdvice(candidateAdviceMethod, expressionPointcut, aspectInstanceFactory);
            break;
        case AtAfter:
            springAdvice = new AspectJAfterAdvice(candidateAdviceMethod, expressionPointcut, aspectInstanceFactory);
            break;
        case AtAfterReturning:
            springAdvice = new AspectJAfterReturningAdvice(candidateAdviceMethod, expressionPointcut, aspectInstanceFactory);
            AfterReturning afterReturningAnnotation = (AfterReturning)aspectJAnnotation.getAnnotation();
            if (StringUtils.hasText(afterReturningAnnotation.returning())) {
                ((AbstractAspectJAdvice)springAdvice).setReturningName(afterReturningAnnotation.returning());
            }
            break;
        case AtAfterThrowing:
            springAdvice = new AspectJAfterThrowingAdvice(candidateAdviceMethod, expressionPointcut, aspectInstanceFactory);
            AfterThrowing afterThrowingAnnotation = (AfterThrowing)aspectJAnnotation.getAnnotation();
            if (StringUtils.hasText(afterThrowingAnnotation.throwing())) {
                ((AbstractAspectJAdvice)springAdvice).setThrowingName(afterThrowingAnnotation.throwing());
            }
            break;
        case AtAround:
            springAdvice = new AspectJAroundAdvice(candidateAdviceMethod, expressionPointcut, aspectInstanceFactory);
            break;
        case AtPointcut:
            if (this.logger.isDebugEnabled()) {
                this.logger.debug("Processing pointcut '" + candidateAdviceMethod.getName() + "'");
            }

            return null;
        default:
            throw new UnsupportedOperationException("Unsupported advice type on method: " + candidateAdviceMethod);
        }
....
}
从函数中可以看出,Spring会根据不同的注解生成不同的增强器,例如AtBefore会对应AspectJMethodBeforeAdvice,而在AspectJMethodBeforeAdvice中完成了增强方法的逻辑。
我们先分析几个常用的增强器实现:
我们首先看下MethodBeforeAdviceInterceptor 类的内部实现
public class MethodBeforeAdviceInterceptor implements MethodInterceptor, Serializable {
    //代表前置增强的AspectJMethodBeforeAdvice
    private MethodBeforeAdvice advice;

    public MethodBeforeAdviceInterceptor(MethodBeforeAdvice advice) {
        Assert.notNull(advice, "Advice must not be null");
        this.advice = advice;
    }

    public Object invoke(MethodInvocation mi) throws Throwable {
        this.advice.before(mi.getMethod(), mi.getArguments(), mi.getThis());
        return mi.proceed();
    }
}
跟踪before方法
public void before(Method method, Object[] args, @Nullable Object target) throws Throwable {
    this.invokeAdviceMethod(this.getJoinPointMatch(), (Object)null, (Throwable)null);
}
protected Object invokeAdviceMethod(@Nullable JoinPointMatch jpMatch, @Nullable Object returnValue, @Nullable Throwable ex) throws Throwable {
    return this.invokeAdviceMethodWithGivenArgs(this.argBinding(this.getJoinPoint(), jpMatch, returnValue, ex));
}
protected Object invokeAdviceMethodWithGivenArgs(Object[] args) throws Throwable {
    Object[] actualArgs = args;
    if (this.aspectJAdviceMethod.getParameterCount() == 0) {
        actualArgs = null;
    }

    try {
        ReflectionUtils.makeAccessible(this.aspectJAdviceMethod);
        //激活增强方法
        return this.aspectJAdviceMethod.invoke(this.aspectInstanceFactory.getAspectInstance(), actualArgs);
    } catch (IllegalArgumentException var4) {
        throw new AopInvocationException("Mismatch on arguments to advice method [" + this.aspectJAdviceMethod + "]; pointcut expression [" + this.pointcut.getPointcutExpression() + "]", var4);
    } catch (InvocationTargetException var5) {
        throw var5.getTargetException();
    }
}
invokeAdviceMethodWithGivenArgs方法中的aspectJAdviceMethod正是对于前置增强的方法,在这里实现了调用
AspectJAfterAdvice
后置增强与前置增强不一样,前置增强是在拦截器链中放置MethodBeforeAdviceInterceptor,而在MethodBeforeAdviceInterceptor中又放置了AspectJMethodBeforeAdvice,并在调用invoke时首先串联调用。
但是在后置增强的时候却不一样,没有提供中间的类,而是直接在拦截器链中使用了中间的AspectJAfterAdvice。
public class AspectJAfterAdvice extends AbstractAspectJAdvice implements MethodInterceptor, AfterAdvice, Serializable {
    public AspectJAfterAdvice(Method aspectJBeforeAdviceMethod, AspectJExpressionPointcut pointcut, AspectInstanceFactory aif) {
        super(aspectJBeforeAdviceMethod, pointcut, aif);
    }

    public Object invoke(MethodInvocation mi) throws Throwable {
        Object var2;
        try {
            var2 = mi.proceed();
        } finally {
            //激活增强的方法
            this.invokeAdviceMethod(this.getJoinPointMatch(), (Object)null, (Throwable)null);
        }

        return var2;
    }
    public boolean isBeforeAdvice() {
        return false;
    }

    public boolean isAfterAdvice() {
        return true;
    }
}
getAdvisor方法走完了,又回到我们的getAdvisors方法
public ListgetAdvisors(MetadataAwareAspectInstanceFactory aspectInstanceFactory) { //获取标记为AspectJ的类 Class aspectClass = aspectInstanceFactory.getAspectMetadata().getAspectClass(); //获取标记为AspectJ的name String aspectName = aspectInstanceFactory.getAspectMetadata().getAspectName(); //验证 this.validate(aspectClass); MetadataAwareAspectInstanceFactory lazySingletonAspectInstanceFactory = new LazySingletonAspectInstanceFactoryDecorator(aspectInstanceFactory); List advisors = new LinkedList(); Iterator var6 = this.getAdvisorMethods(aspectClass).iterator(); while(var6.hasNext()) { Method method = (Method)var6.next(); Advisor advisor = this.getAdvisor(method, lazySingletonAspectInstanceFactory, advisors.size(), aspectName); if (advisor != null) { advisors.add(advisor); } } if (!advisors.isEmpty() && lazySingletonAspectInstanceFactory.getAspectMetadata().isLazilyInstantiated()) { //如果寻找的增强器不为空而且配置了增强延迟初始化,那么需要在首位加入同步实例化增强器 Advisor instantiationAdvisor = new ReflectiveAspectJAdvisorFactory.SyntheticInstantiationAdvisor(lazySingletonAspectInstanceFactory); advisors.add(0, instantiationAdvisor); } Field[] var12 = aspectClass.getDeclaredFields(); int var13 = var12.length; for(int var14 = 0; var14 < var13; ++var14) { Field field = var12[var14]; //获取DeclareParents注解 Advisor advisor = this.getDeclareParentsAdvisor(field); if (advisor != null) { advisors.add(advisor); } } return advisors; }
增加同步器实例化增强器
protected static class SyntheticInstantiationAdvisor extends DefaultPointcutAdvisor {
    public SyntheticInstantiationAdvisor(final MetadataAwareAspectInstanceFactory aif) {
        super(aif.getAspectMetadata().getPerClausePointcut(), new MethodBeforeAdvice() {
            //目标方法前调用,类似Before
            public void before(Method method, Object[] args, @Nullable Object target) {
                //简单初始化aspect
                aif.getAspectInstance();
            }
        });
    }
}
获取DeclareParents注解
private Advisor getDeclareParentsAdvisor(Field introductionField) {
    DeclareParents declareParents = (DeclareParents)introductionField.getAnnotation(DeclareParents.class);
    if (declareParents == null) {
        return null;
    } else if (DeclareParents.class == declareParents.defaultImpl()) {
        throw new IllegalStateException("'defaultImpl' attribute must be set on DeclareParents");
    } else {
        //使用DeclareParentsAdvisor对功能进行封装
        return new DeclareParentsAdvisor(introductionField.getType(), declareParents.value(), declareParents.defaultImpl());
    }
}
寻找匹配的增强器
前面的函数中已经完成了所有增强器的解析,但是对于所有的增强器来讲,并不一定都适用于当前的bean,还要跳出适合的增强器,也就是满足我们配置的通配符的增强器。
protected ListfindEligibleAdvisors(Class beanClass, String beanName) { List candidateAdvisors = this.findCandidateAdvisors(); //过滤已经得到的Advisors List eligibleAdvisors = this.findAdvisorsThatCanApply(candidateAdvisors, beanClass, beanName); this.extendAdvisors(eligibleAdvisors); if (!eligibleAdvisors.isEmpty()) { eligibleAdvisors = this.sortAdvisors(eligibleAdvisors); } return eligibleAdvisors; }
继续看findAdvisorsThatCanApply:
protected ListfindAdvisorsThatCanApply(List candidateAdvisors, Class beanClass, String beanName) { ProxyCreationContext.setCurrentProxiedBeanName(beanName); List var4; try { var4 = AopUtils.findAdvisorsThatCanApply(candidateAdvisors, beanClass); } finally { ProxyCreationContext.setCurrentProxiedBeanName((String)null); } return var4; }
public static ListfindAdvisorsThatCanApply(List candidateAdvisors, Class clazz) { if (candidateAdvisors.isEmpty()) { return candidateAdvisors; } else { List eligibleAdvisors = new LinkedList(); Iterator var3 = candidateAdvisors.iterator(); //首先处理引介增强 while(var3.hasNext()) { Advisor candidate = (Advisor)var3.next(); if (candidate instanceof IntroductionAdvisor && canApply(candidate, clazz)) { eligibleAdvisors.add(candidate); } } boolean hasIntroductions = !eligibleAdvisors.isEmpty(); Iterator var7 = candidateAdvisors.iterator(); while(var7.hasNext()) { Advisor candidate = (Advisor)var7.next(); //对于普通bean的处理 if (!(candidate instanceof IntroductionAdvisor) && canApply(candidate, clazz, hasIntroductions)) { eligibleAdvisors.add(candidate); } } return eligibleAdvisors; }
具体做事的方法
public static boolean canApply(Advisor advisor, Class targetClass, boolean hasIntroductions) {
    if (advisor instanceof IntroductionAdvisor) {
        return ((IntroductionAdvisor)advisor).getClassFilter().matches(targetClass);
    } else if (advisor instanceof PointcutAdvisor) {
        PointcutAdvisor pca = (PointcutAdvisor)advisor;
        return canApply(pca.getPointcut(), targetClass, hasIntroductions);
    } else {
        return true;
    }
}
public static boolean canApply(Pointcut pc, Class targetClass, boolean hasIntroductions) {
    Assert.notNull(pc, "Pointcut must not be null");
    if (!pc.getClassFilter().matches(targetClass)) {
        return false;
    } else {
        MethodMatcher methodMatcher = pc.getMethodMatcher();
        if (methodMatcher == MethodMatcher.TRUE) {
            return true;
        } else {
            IntroductionAwareMethodMatcher introductionAwareMethodMatcher = null;
            if (methodMatcher instanceof IntroductionAwareMethodMatcher) {
                introductionAwareMethodMatcher = (IntroductionAwareMethodMatcher)methodMatcher;
            }

            Set> classes = new LinkedHashSet(ClassUtils.getAllInterfacesForClassAsSet(targetClass));
            classes.add(targetClass);
            Iterator var6 = classes.iterator();

            while(var6.hasNext()) {
                Class clazz = (Class)var6.next();
                Method[] methods = ReflectionUtils.getAllDeclaredMethods(clazz);
                Method[] var9 = methods;
                int var10 = methods.length;

                for(int var11 = 0; var11 < var10; ++var11) {
                    Method method = var9[var11];
                    if (introductionAwareMethodMatcher != null && introductionAwareMethodMatcher.matches(method, targetClass, hasIntroductions) || methodMatcher.matches(method, targetClass)) {
                        return true;
                    }
                }
            }

            return false;
        }
    }
}
创建代理
protected Object wrapIfNecessary(Object bean, String beanName, Object cacheKey) {
    if (StringUtils.hasLength(beanName) && this.targetSourcedBeans.contains(beanName)) {
        return bean;
    } else if (Boolean.FALSE.equals(this.advisedBeans.get(cacheKey))) {
        return bean;
    } else if (!this.isInfrastructureClass(bean.getClass()) && !this.shouldSkip(bean.getClass(), beanName)) {
        Object[] specificInterceptors = this.getAdvicesAndAdvisorsForBean(bean.getClass(), beanName, (TargetSource)null);
        if (specificInterceptors != DO_NOT_PROXY) {
            this.advisedBeans.put(cacheKey, Boolean.TRUE);
            Object proxy = this.createProxy(bean.getClass(), beanName, specificInterceptors, new SingletonTargetSource(bean));
            this.proxyTypes.put(cacheKey, proxy.getClass());
            return proxy;
        } else {
            this.advisedBeans.put(cacheKey, Boolean.FALSE);
            return bean;
        }
    } else {
        this.advisedBeans.put(cacheKey, Boolean.FALSE);
        return bean;
    }
}
在获取所有bean的增强器后,便可以进行代理的创建了。
protected Object createProxy(Class beanClass, @Nullable String beanName, @Nullable Object[] specificInterceptors, TargetSource targetSource) {
    if (this.beanFactory instanceof ConfigurableListableBeanFactory) {
        AutoProxyUtils.exposeTargetClass((ConfigurableListableBeanFactory)this.beanFactory, beanName, beanClass);
    }

    ProxyFactory proxyFactory = new ProxyFactory();
    //获取当前类中相关属性
    proxyFactory.copyFrom(this);
    if (!proxyFactory.isProxyTargetClass()) {
         //检查设置和属性
        if (this.shouldProxyTargetClass(beanClass, beanName)) {
            proxyFactory.setProxyTargetClass(true);
        } else {
            //添加代理接口
            this.evaluateProxyInterfaces(beanClass, proxyFactory);
        }
    }

    Advisor[] advisors = this.buildAdvisors(beanName, specificInterceptors);
    //加入增强器
    proxyFactory.addAdvisors(advisors);
    //设置需要代理的类
    proxyFactory.setTargetSource(targetSource);
    //定制代理
    this.customizeProxyFactory(proxyFactory);
    //用来控制代理工厂被配置后,是否还运行修改通知,默认false,不允许修改代理的配置
    proxyFactory.setFrozen(this.freezeProxy);
    if (this.advisorsPreFiltered()) {
        proxyFactory.setPreFiltered(true);
    }

    return proxyFactory.getProxy(this.getProxyClassLoader());
}
对于代理类创建及处理过程,Spring委托给了proxyFactory去处理,而在此函数中主要是对proxyFactory的初始化操作,进而对真正的创建代理做准备。
这些初始化的步骤如下:
1、获取当前类的属性
2、添加代理接口
3、封装Advisor并加入到proxyFactory中
4、设置要代理的类
5、当然在Spring中还为子类提供了定制函数customizeProxyFactory,子类可以在此函数中进行对proxyFactory的进一步封装。
6、进行获取代理操作
获得五个通知
创建代理类
public Object getProxy(@Nullable ClassLoader classLoader) {
    return this.createAopProxy().getProxy(classLoader);
}
public AopProxy createAopProxy(AdvisedSupport config) throws AopConfigException {
    if (!config.isOptimize() && !config.isProxyTargetClass() && !this.hasNoUserSuppliedProxyInterfaces(config)) {
        return new JdkDynamicAopProxy(config);
    } else {
        Class targetClass = config.getTargetClass();
        if (targetClass == null) {
            throw new AopConfigException("TargetSource cannot determine target class: Either an interface or a target is required for proxy creation.");
        } else {
            return (AopProxy)(!targetClass.isInterface() && !Proxy.isProxyClass(targetClass) ? new ObjenesisCglibAopProxy(config) : new JdkDynamicAopProxy(config));
        }
    }
}
至此,我们已经完成 代理的创建,不管我们之前是否阅读过Spring源代码,但是都是或多或少听过Spring的代理中JDKProxy的实现和CGLIBProxy的实现。
Spring是如何选取的呢?
if (!config.isOptimize() && !config.isProxyTargetClass() && !this.hasNoUserSuppliedProxyInterfaces(config))
从if中的判断条件可以看到3个方面影响Spring的判断
Optimize:用来控制CGLIB创建过程的代理是否使用激进的优化策略。除非完全了解AOP代理如何优化处理,否则不推荐用户使用这个配置。目前这个属性仅用于CGLIB代理,对于JDK动态代理(默认代理)无效。
ProxyTargetClas:这个属性为true时,目标类本身被代理而不是目标类的接口。如果这个属性值设置为true,CGLIB代理将会被创建
hasNoUserSuppliedProxyInterfaces:是否存在代理接口
SpringAOP总结:
1、配置@EnableAspectJAutoProxy:开启AOP权限
2、@Import(AspectJAutoProxyRegistrar.class):往IOC容器中注入SpringAOP切面类
3、registerAspectJAnnotationAutoProxyCreatorIfNecessary():注册切面类
4、AnnotationAwareAspectJAutoProxyCreator.class:注册到IOC容器中,【AOP的入口】
5、AnnotationAwareAspectJAutoProxyCreator:祖宗是BeanPostProcessor接口,而实现BeanPostProcessor接口后,当Spring加载这个Bean会在实例化前调用其后置处理器实现增强
6、postProcessAfterInitialization:后置处理器【AOP实现核心逻辑】
####6.1、wrapIfNecessary()判断该对象是否在AOP的扫包范围内,真正创建代理类的地方
#########6.1.1、getAdvicesAndAdvisorsForBean创建代理对象包括获取增强方法和根据获取的增强进行代理
#########6.1.2、createAopProxy()判断被代理类是否实现了接口,如果有实现了接口的化,是采用JDK动态代理,否则情况下就使用CGLIB代理
####6.2、根据条件判断使用JdkDynamicAopProxy或者JdkDynamicAopProxy方法实现代理
####6.3、最终执行目标方法的时候,就会进入到JdkDynamicAopProxy 的invoke方法或者JdkDynamicAopProxy的intercept方法【后面讲解】
####6.5、底层使用集合存放使用通知,然后再使用责任链设计模式循环的调用【后面讲解】
本文参考:
参考书籍:Spring源码深度解析
蚂蚁课堂:http://www.mayikt.com/


