kubernetes prometheus监控部署与java客户端开发
目标:在k8s集群中搭建Prometheus监控,实现java客户端查询监控数据
环境:Kubernetes / IntelliJ IDEA
步骤:Prometheus简介->容器化部署->prometheus http api查询->java http方法->Spring RestTemplate方法->使用PromQL查询容器cpu与内存信息
1.Prometheus简介
Prometheus是一套由SoundCloud公司开发的开源监控、报警、时间序列数据库的组合。
主要特点:可自定义多维数据模型(时间序列由metric名和一组key/value标签组成),拥有强大的查询语言PromQL,可以通过基于HTTP的pull方式采集时序数据,可以通过push gateway进行时序列数据推送等等。
数据模型:从根本上说,所有的存储都按时间序列实现,相同的metrics和label组成一条时间序列。
数据类型:
(1)Counter:用于累计值
(2)Gauge:常规数值
(3)Histogram:柱状图
(4)Summary:类似于Histogram,常用于跟踪事件发生的规模
(5)instance:被采集的目标
(6)job:相同类型instance的集合
2.容器化部署
部署文件地址:https://github.com/kubernetes/kubernetes/tree/master/cluster/addons/prometheus
参考方案地址:https://github.com/kevin7674/prometheus
(1)修改prometheus-statefulset
主要修改数据存储的路径,此处指定为NFS存储
volumes:
  - name: config-volume
    configMap:
      name: prometheus-config
  - name: prometheus-data
    persistentVolumeClaim:
      claimName: nfs-pvc
设置prometheus-data的路径为nfs-pvc
(2)修改prometheus-service
设置为NodePort方式,暴露服务端口
kind: Service
apiVersion: v1
metadata:
  name: prometheus
  namespace: kube-system
  labels:
    kubernetes.io/name: "Prometheus"
    kubernetes.io/cluster-service: "true"
    addonmanager.kubernetes.io/mode: Reconcile
spec:
  type: NodePort
  ports:
    - name: http
      port: 9090
      protocol: TCP
      targetPort: 9090
      nodePort: 30090
  selector:
    k8s-app: prometheus
此处暴露30090端口以供测试
(3)部署流程
依次执行:
kubectl create -f node-exporter-ds.yml
kubectl create -f node-exporter-service.yaml
kubectl create -f prometheus-rbac.yaml
kubectl create -f prometheus-configmap.yaml
kubectl create -f prometheus-statefulset.yaml
kubectl create -f prometheus-service.yaml
访问http://nodeip:30090
选择targets查看监控的目标:
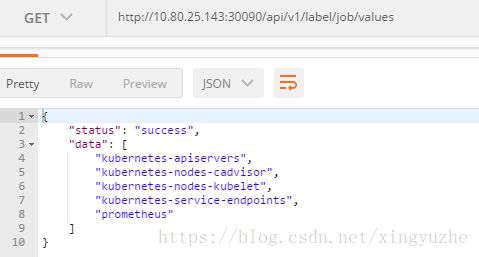
3.prometheus http api查询
使用postman测试prometheus的http api,后一步骤中的java程序参考测试url编写
(1)targets
(2)job
4.java http方法
使用HTTPURLConnection方法,传入访问url,获取返回信息:
package com.boe.cloud.monitor.prometheus.service;

import org.springframework.stereotype.Service;

import java.io.BufferedReader;
import java.io.IOException;
import java.io.InputStream;
import java.io.InputStreamReader;
import java.net.HttpURLConnection;
import java.net.URL;

@Service
public class HttpUtils {

    // http request
    public static String httpRequest(String requestUrl){
        StringBuffer buffer = new StringBuffer();
        try {
            URL url = new URL(requestUrl);
            // http连接
            HttpURLConnection httpUrlConn = (HttpURLConnection) url.openConnection();
            httpUrlConn.setDoInput(true);
            httpUrlConn.setRequestMethod("GET");
            httpUrlConn.connect();

            //
            InputStream inputStream = httpUrlConn.getInputStream();
            InputStreamReader inputStreamReader = new InputStreamReader(inputStream, "utf-8");
            BufferedReader bufferedReader = new BufferedReader(inputStreamReader);

            //
            String str = null;
            while ((str = bufferedReader.readLine()) != null) {
                buffer.append(str);
            }
            //
            bufferedReader.close();
            inputStreamReader.close();
            inputStream.close();
            inputStream = null;
            //
            httpUrlConn.disconnect();

        }catch (IOException e){
            e.printStackTrace();
        }
        return buffer.toString();
    }
}
5.Spring RestTemplate方法
使用Spring RestTemplate方法:
Application主方法修改:
package com.boe.cloud.caas.monitor;

import org.springframework.beans.factory.annotation.Autowired;
import org.springframework.boot.SpringApplication;
import org.springframework.boot.autoconfigure.SpringBootApplication;
import org.springframework.boot.web.client.RestTemplateBuilder;
import org.springframework.context.annotation.Bean;
import org.springframework.web.client.RestTemplate;

@SpringBootApplication
public class CaasMonitorApplication {

    @Autowired
    private RestTemplateBuilder builder;

    @Bean
    public RestTemplate restTemplate(){
        return builder.build();
    }

    public static void main(String[] args) {
        SpringApplication.run(CaasMonitorApplication.class, args);
    }
}
controller方法:
package com.boe.cloud.caas.monitor.controller;

import com.boe.cloud.caas.monitor.service.MonitorService;
import io.swagger.annotations.Api;
import io.swagger.annotations.ApiOperation;
import org.json.JSONObject;
import org.springframework.beans.factory.annotation.Autowired;
import org.springframework.web.bind.annotation.RequestMapping;
import org.springframework.web.bind.annotation.RequestMethod;
import org.springframework.web.bind.annotation.RequestParam;
import org.springframework.web.bind.annotation.RestController;
import org.springframework.web.client.RestTemplate;

@RestController
public class MonitorController {

    @Autowired
    private RestTemplate restTemplate;

    @RequestMapping(value = "/monitor/api", method = RequestMethod.GET)
    @ApiOperation(value = "GetUrl", notes = "URL")
    public String getUrl(@RequestParam(value = "UrlAddress") String urlAddress){
        return this.restTemplate.getForObject(urlAddress, String.class);
    }
}
遇到问题:url中包含{},resttemplate自动识别为占位符,报错,正在处理,暂时使用java http方法
6.使用PromQL查询容器cpu与内存信息
(1)cpu usage
查询:http://10.80.25.143:30090/api/v1/query?query=container_cpu_usage_seconds_total{namespace="kube-system",pod_name="kube-proxy-frn6l",container_name="kube-proxy"}
(2)memory
查询:http://10.80.25.143:30090/api/v1/query?query=container_memory_usage_bytes{namespace="kube-system",pod_name="kube-proxy-frn6l",container_name="kube-proxy"}


