深度之眼Pytorch框架训练营第四期——图像分类与Resnet
文章目录
- 图像分类与Resnet
- 1、模型是如何将图像分类的
- 2、 resnet18模型inference代码
- (1)图像分类的Inference(推理)
- 3、resnet18结构分析
- (1)图像分类经典模型
- (2)Resnet结构分析
- (3)`Pytorch`中的Resnet实现
图像分类与Resnet
1、模型是如何将图像分类的
上面这一幅图象,对于人类而言,我们看到的是一个RGB图像,然后判断出这是一个蜜蜂,而对于计算机而言,是无法理解RGB图像的,它能看到的是一个三维的张量,然后它也没办法判断这是一个蜜蜂图像,它只能输出一个字符串,而不知道具体的含义是什么。但是在计算机中,模型所做的事情,并不是将一个三维张量转化为一个字符串,那么模型是如何完成图像分割的呢?
- 将类别名与标签进行转换:
label_name = {"ants": 0, "bees": 1} - 取输出向量最大值的标号得到标签:
_, predicted = torch.max(outputs.data, 1) - 复杂运算,得到输出向量:
outptus = resnet18(img_tensor)
可以看出,计算机读入了一个三维张量,通过模型的复杂运算,得到了一个输出向量,模型仅仅只干了这么一件事情,而后面得到标签以及类别名与标签的转换不属于模型的范畴,是我们人为的去理解这个输出向量的物理意义从而制定的转换规则
2、 resnet18模型inference代码
(1)图像分类的Inference(推理)
在深度学习中,模型完成一个从输入到预测的过程称之为Inference,图像分类的Inference步骤如下:
- 获取数据与标签
- 选择模型,损失函数,优化器
- 写训练代码
- 写inference代码
- 获取数据与模型
- 数据变换,如RGB变换为4D-Tensor
- 前向传播
- 输出保存预测结果
下面以resnet18这个模型的inference代码为例说明:
img_dir = os.path.join("..", "..", "data/data/hymenoptera_data/val/bees")
model_path = "./checkpoint_14_epoch.pkl"
time_total = 0
img_list, img_pred = list(), list()

# 1. data
img_names = get_img_name(img_dir)
num_img = len(img_names)

# 2. model
resnet18 = get_model(model_path, True)
resnet18.to(device)
resnet18.eval()

with torch.no_grad():
    for idx, img_name in enumerate(img_names):

        path_img = os.path.join(img_dir, img_name)

        # step 1/4 : path --> img
        img_rgb = Image.open(path_img).convert('RGB')

        # step 2/4 : img --> tensor
        img_tensor = img_transform(img_rgb, inference_transform)
        img_tensor.unsqueeze_(0)
        img_tensor = img_tensor.to(device)

        # step 3/4 : tensor --> vector
        time_tic = time.time()
        outputs = resnet18(img_tensor)
        time_toc = time.time()

        # step 4/4 : visualization
        _, pred_int = torch.max(outputs.data, 1)
        pred_str = classes[int(pred_int)]

        if vis:
            img_list.append(img_rgb)
            img_pred.append(pred_str)

            if (idx+1) % (vis_row*vis_row) == 0 or num_img == idx+1:
                for i in range(len(img_list)):
                    plt.subplot(vis_row, vis_row, i+1).imshow(img_list[i])
                    plt.title("predict:{}".format(img_pred[i]))
                plt.show()
                plt.close()
                img_list, img_pred = list(), list()

        time_s = time_toc-time_tic
        time_total += time_s

        print('{:d}/{:d}: {} {:.3f}s '.format(idx + 1, num_img, img_name, time_s))

print("\ndevice:{} total time:{:.1f}s mean:{:.3f}s".
      format(device, time_total, time_total/num_img))
if torch.cuda.is_available():
    print("GPU name:{}".format(torch.cuda.get_device_name()))
从上面的代码可以看出,在Inference阶段的三个注意事项:
- 确保 model处于eval状态而非training
- 设置
torch.no_grad(),减少内存消耗 - 数据预处理需保持一致,分清楚是RGB还是BGR?
3、resnet18结构分析
(1)图像分类经典模型
自2012年提出了 A l e x n e t Alexnet Alexnet以来,到现在已经出现了几十种的卷积神经网络,而Pytorch实现了其中的经典网络:
- A l e x n e t Alexnet Alexnet
- D e n s e n e t Densenet Densenet
- G o o g l e n e t Googlenet Googlenet
- I n c e p t i o n Inception Inception
- M n a s n e t Mnasnet Mnasnet
- M o b i l e n e t Mobilenet Mobilenet
- R e s n e t Resnet Resnet
- S h u f f l e n e t Shufflenet Shufflenet
- S q u e e z e n e t Squeezenet Squeezenet
- V g g Vgg Vgg
(2)Resnet结构分析
R e s n e t Resnet Resnet是何凯明于2015年提出的网络,其核心思想如下图所示:
这个网络最大的特点就是在前向传播的过程中,提供了一个恒等映射, 这是非常重要的,通过这个支路,可以很好地减轻梯度消失的问题,从而使得更深的卷积神经网络可以更好地进行训练,上图展示的是一个 block , 在 R e s n e t Resnet Resnet中是由多个 block 堆叠组成的,可以看到一个 block 输入一个 x x x,然后经过两个 weight layer (Pytorch中为卷积层),之后得到的特征与原来的 x x x进行相加才进行 R e L u ReLu ReLu,然后输出。这里的一个 weight layer 是由一个卷基层加上一个 B N BN BN层构成的,因此可以看出,一个 block 是由两个卷积层,两个 B N BN BN层,两个 R e L u ReLu ReLu构成的。

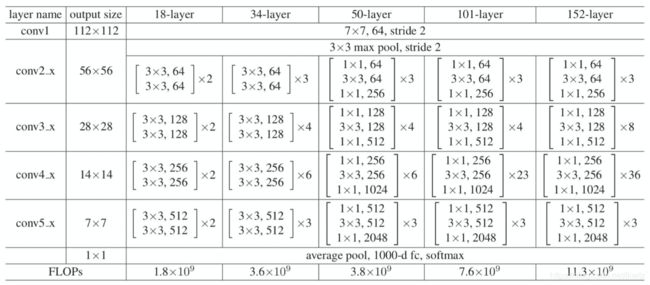
上面这幅图中,第一列( 18-layer )为 r e s n e t 18 resnet18 resnet18的结构示意图
- 首先我们通常的输入是 224 × 224 224\times224 224×224,通过 c o n v 1 conv1 conv1,由于 s t r i d e = 2 stride=2 stride=2,因此最终的输出是 112 × 112 112\times112 112×112
- 然后,在 c o n v 2. x conv2.x conv2.x中,首先经过了一个池化层,这个池化层也是 s t r i d e = 2 stride=2 stride=2,因此输出再次减半,为 56 × 56 56\times56 56×56,
- 接下来就是非常经典的 block 堆叠, 18 − l a y e r 18-layer 18−layer有4个 layer 堆叠而成,每一个 layer 中可以看出是一个框乘二,每个框有两行,每一行为上图中的一个 weight layer 层,乘二表示是两个block
这里需要注意的是第三个的输出大小为 28 × 28 28\times28 28×28,这是由于在进入 l a y e r 2 layer2 layer2,也就是 c o n v 3. x conv3.x conv3.x的第一个卷基层时,其 s t r i d e stride stride同样为2,因此也进行了一个减半的操作,后面的 c o n v 4. x conv4.x conv4.x和 c o n v 5. x conv5.x conv5.x也是类似的操作,最终输出一个 7 × 7 7\times7 7×7的一个特征,然后通过一个池化层,得到的特征为 1 × 1 1\times1 1×1,最后经过一个全连接层和一个 s o f t m a x softmax softmax转化为一个概率输出
这里之所以被称之为 r e s n e t 18 resnet18 resnet18,是统计了网络中带权值的层的个数为18( c o n v 1 conv1 conv1有一个, c o n v 1. x conv1.x conv1.x到 c o n v 2. x conv2.x conv2.x有每一个都有 2 × 2 2\times2 2×2个,最后的池化层还有一个),因此是 18 18 18个带权值的层,所以被称之为 r e s n e t 18 resnet18 resnet18
(3)Pytorch中的Resnet实现
def _resnet(arch, block, layers, pretrained, progress, **kwargs):
    model = ResNet(block, layers, **kwargs)
    if pretrained:
        state_dict = load_state_dict_from_url(model_urls[arch],
                                              progress=progress)
        model.load_state_dict(state_dict)
    return model


def resnet18(pretrained=False, progress=True, **kwargs):
    r"""ResNet-18 model from
    `"Deep Residual Learning for Image Recognition" `_

    Args:
        pretrained (bool): If True, returns a model pre-trained on ImageNet
        progress (bool): If True, displays a progress bar of the download to stderr
    """
    return _resnet('resnet18', BasicBlock, [2, 2, 2, 2], pretrained, progress,
                   **kwargs)
可以看出,resnet18实现非常简单,传入了一个BasicBlock,一个列表,这两个是最关键的参数,BasicBlock这个类中的forward函数如下:
def forward(self, x):
    identity = x

    out = self.conv1(x)
    out = self.bn1(out)
    out = self.relu(out)

    out = self.conv2(out)
    out = self.bn2(out)

    if self.downsample is not None:
        identity = self.downsample(x)

    out += identity
    out = self.relu(out)

    return out
可以看出,forward函数的实现与理论是完全一致的

