一、ThreadLocal介绍
ThreadLocal是用来维护本线程的变量,为每一个线程分配一个只属于该线程的对象。并不能解决共享变量的并发问题.ThreadLocal是将各线程的值存入本线程的Map中,以ThreadLocal自身作为key,需要用时获取该线程之前存入的值。
二、ThreadLocal内部设计
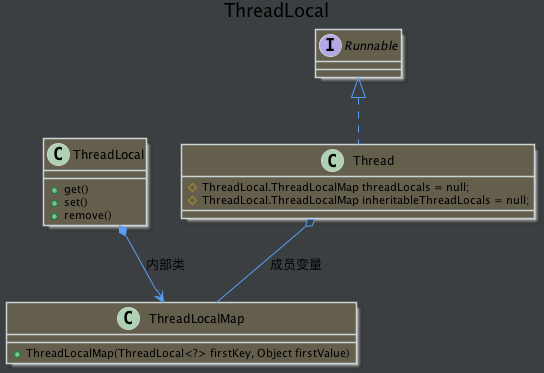
类图关系uml图:
首先,来看一下ThreadLocal内部提供的几个方法
/**
*用来获取当前线程在threadLocal中保存的当前线程的变量副本
*/
public T get() { }
/**
*用来设置当前线程的变量副本。将当前线程变量的副本设置到threadLocal中
*/
public void set(T value) { }
/**
*用来移除当前线程在Threadlocal存储的变量副本
*/
public void remove() { }
/**
*一般是用来在使用时进行重写的,它是一个延迟加载方法。给当前线程初始化一个初始值
*/
protected T initialValue() { }

/**
* ThreadLocalMap 是ThreadLocal的核心
* ThreadLocalMap这个类在ThreadLocal中定义,它被每一个线程所持有。每一个线程ThreadLocalMap的key存储的是ThreadLocal共享的对象,value存储的是线程变量的副本的值。
*/
static class ThreadLocalMap
下面看一下ThreadLocal类是如何为每个线程创建一个变量的副本的。
1、首先看下get方法的实现
    public T get() {
       Thread t = Thread.currentThread();
       ThreadLocalMap map = getMap(t);
       if (map != null) {
           ThreadLocalMap.Entry e = map.getEntry(this);
           if (e != null) {
               @SuppressWarnings("unchecked")
               T result = (T)e.value;
               return result;
           }
       }
       return setInitialValue();
   }
首先获取当前线程对象t,然后通过getMap(t)获取每一个线程中持有的Map对象,这里的Map就是ThreadLocalMap对象。 然后接着获取下面的
对每一句进行仔细分析:
(1)首先看一下getMap方法中做了什么:
 ThreadLocalMap getMap(Thread t) {
      return t.threadLocals;
  }
从上面getMap中调用当前线程t,返回当前线程t中的成员变量threadLocals。那么继续去Thread类中看一下这个成员变量.
 /* ThreadLocal values pertaining to this thread. This map is maintained
   * by the ThreadLocal class. */
  ThreadLocal.ThreadLocalMap threadLocals = null;
说明了ThreadLocalMap是在ThreadLocal定义,被使用在Thread类中。
再看一下ThreadLocalMap中的实现
  static class ThreadLocalMap {

      /**
       * The entries in this hash map extend WeakReference, using
       * its main ref field as the key (which is always a
       * ThreadLocal object).  Note that null keys (i.e. entry.get()
       * == null) mean that the key is no longer referenced, so the
       * entry can be expunged from table.  Such entries are referred to
       * as "stale entries" in the code that follows.
       */
      static class Entry extends WeakReference> {
          /** The value associated with this ThreadLocal. */
          Object value;

          Entry(ThreadLocal k, Object v) {
              super(k);
              value = v;
          }
      }
可以看到ThreadLocalMap中的Entry继承了WeakReference,并且WeakReference的key值类型是ThreadLocal
(2) 然后看一下setInitialValue()方法
首先得到一个null的初始值initialValue(),然后判断ThreadLocalMap是否为null,不为null就直接将初始值set到ThreadLocalMap中,否则为空就创建一个ThreadLocalMap并将值set到ThreadLocalMap中。
到这里ThreadLocal为每个线程创建的变量副本设计的主要原理应该清楚了:
首先每个Thread线程里面持有ThreadLocal.ThreadLocalMap成员变量,线程的副本变量就是存储在ThreadLocal.ThreadLocalMap中的,它以ThreadLocal实例为key,副本变量为value。
初始时ThreadLocal.ThreadLocalMap为空 然后在调用get和set方法的时候进行ThreadLocal.ThreadLocalMap的初始化。
然后在当前线程里面如果要使用副本,就调用TheadLocal的get方法在ThreadLocal.ThreadLocalMap中查找
三、子线程获取父线程的属性用InheritableThreadLocal
上面的ThreadLocal获取父线程中的属性,是获取不到的。
如果想要在子线程中获取到父线程中的属性,就需要用到InheritableThreadLocal
   public static void main(String[] args) {


        final ThreadLocal inheritableThreadLocal = new InheritableThreadLocal();
        final ThreadLocal threadLocal = new ThreadLocal();

        inheritableThreadLocal.set("inheritableThreadLocal 父线程 ....");
        threadLocal.set("threadLoal父线程 。。。。");
        Thread inheritableThread = new Thread(new Runnable() {
            public void run() {
                System.out.println(inheritableThreadLocal.get());
                System.out.println(threadLocal.get());
            }
        });

        inheritableThread.start();
    }
   运行的结果:
   inheritableThreadLocal 父线程 ....
   null
四、手写ThreadLocal
package test;
import java.util.Collections;
import java.util.HashMap;
import java.util.Map;
/**
 * @author td
 */
public class MyThreadLocal {

    private Map container = Collections.synchronizedMap(new HashMap());

    protected T initialValue() {
        return null;
    }
    private T initilization(Thread currentThread ) {
        T t = initialValue();
        container.put(currentThread, t);
        return t;
    }

    public T get() {
        Thread currentThread = Thread.currentThread();
        T t = container.get(currentThread);
        if (t != null) {
            return t;
        }
        return initilization(currentThread);
    }

    public void remove() {
        Thread currentThread = Thread.currentThread();
        if (this.container.containsKey(currentThread)) {
            this.container.remove(currentThread);
        }
    }

    public void set(T t) {
        Thread currentThread = Thread.currentThread();
        this.container.put(currentThread, t);
    }
}
五、ThreadLocal应用案例
使用ThreadLocal保存线程的上下文,获取每个线程中的用户信息
public class ThreadContext {

    private static ThreadLocal userResurece = new ThreadLocal<>();

    public static String getUser() {
        return userResurece.get();
    }

    public static void bindUser(String user) {
        userResurece.set(user);
    }

    public static String unbindUser() {
        String user = userResurece.get();
        userResurece.remove();
        return user;
    }
}
新建一个Filter,将每次请求的用户信息放到线程中去
public class PerFilter extends OncePerRequestFilter {

    @Override
    protected void doFilterInternal(HttpServletRequest httpServletRequest, HttpServletResponse httpServletResponse, FilterChain filterChain) throws ServletException, IOException {
        try {
            String user = ThreadContext.getUser();
            if (user == null) {
                Authentication authentication = SecurityContextHolder.getContext().getAuthentication();
                Object object = authentication.getPrincipal();

                if (object != null) {
                    UserEntity userEntity = (UserEntity) object;
                    String value  = org.apache.commons.lang3.RandomStringUtils.randomAlphabetic(5);
                    System.out.println(userEntity.getUuid()+"----"+Thread.currentThread().getName()+ value);
                    ThreadContext.bindUser(userEntity.getUsername()+"----"+Thread.currentThread().getName()+value);
                }else {
                    ThreadContext.bindUser("testtestUser");
                }
            }
            filterChain.doFilter(httpServletRequest, httpServletResponse);
        } finally {
          //  ThreadContext.unbindUser();
        }

    }
}
在方法中获取当前用户信息
  private String getUser() {
       /* Authentication authentication = SecurityContextHolder.getContext().getAuthentication();
        UserEntity userEntity = (UserEntity) authentication.getPrincipal();*/

       return ThreadContext.getUser();
    }

    运行结果:

zhangsan----http-nio-8080-exec-4HFGrU
zhangsan----http-nio-8080-exec-5zkHZG
zhangsan----http-nio-8080-exec-6BIJvY
zhangsan----http-nio-8080-exec-7uuljF
zhangsan----http-nio-8080-exec-8gzRWf
zhangsan----http-nio-8080-exec-9tDszn
zhangsan----http-nio-8080-exec-10WDekP
zhangsan----http-nio-8080-exec-1GYkoP
zhangsan----http-nio-8080-exec-3oYOnk
zhangsan----http-nio-8080-exec-4HFGrU
zhangsan----http-nio-8080-exec-5zkHZG
zhangsan----http-nio-8080-exec-6BIJvY
zhangsan----http-nio-8080-exec-7uuljF
zhangsan----http-nio-8080-exec-8gzRWf
zhangsan----http-nio-8080-exec-9tDszn
zhangsan----http-nio-8080-exec-1GYkoP
zhangsan----http-nio-8080-exec-2hwdaU
从上可以发现tomcat初始化线程池为10个,后面每次获取到的都相同。
在原有的基础上增加一个子线程,在子线程中给不同的用户发送消息。使用inheritableThreadLocal
//将ThreadLocal改为InheritableThreadLocal
 private static ThreadLocal userResurece = new InheritableThreadLocal<>();

   public static String getUser() {
       return userResurece.get();
   }

   public static void bindUser(String user) {
       userResurece.set(user);
   }

   public static String unbindUser() {
       String user = userResurece.get();
       userResurece.remove();
       return user;
   }
 //在子线程中直接使用
  Thread thread = new Thread(new Runnable() {
           @Override
           public void run() {
               System.out.println(getUser());

           }
       });
       thread.start();
