Log4j2 使用 ELK 简单介绍
ELK 介绍
ELK 是 Logstash+ElasticSearch+Kibana:
- Logstash 负责收集日志
- ElasticSearch 负责存储日志
- Kibana 提供Web界面查看日志信息
Log4j2配置
Log4j2为我们提供SocketAppender,使得我们可以通过TCP或UDP发送日志,详见:
http://logging.apache.org/log4j/2.x/manual/appenders.html#SocketAppender
为了将日志发送到Logstash,我们的配置如下:
log4j2.xml
<Configuration>
    <Appenders>
        <Console name="Stdout" target="SYSTEM_OUT">
            <PatternLayout pattern="%d{yyyy-MM-dd HH:mm:ss,SSS}:%5p [%40.40c{1.}:%3L] - %m%n"/>
        Console>
        <Socket name="Socket" host="localhost" port="4560">
            <JsonLayout compact="true" eventEol="true" />
            <PatternLayout pattern="%d{yyyy-MM-dd HH:mm:ss,SSS}:%5p [%40.40c{1.}:%3L] - %m%n"/>
        Socket>
    Appenders>
    <Loggers>
        <Root level="debug">
            <AppenderRef ref="Stdout"/>
            <AppenderRef ref="Socket"/>
        Root>
    Loggers>
Configuration>
Logstash配置
为了获取Log4j2的日志信息,我们编写logstash的配置文件 test-log4j2.conf,如下:
test-log4j2.conf
input {
    tcp {
        host => "localhost"
        port => 4560
        codec => json
    }
    stdin {

    }
}
filter {
  #Only matched data are send to output.
}
output {
    stdout {
      codec => rubydebug
    }
}
Logstash提供了log4j输入插件,但是只能用于log4j1.x,不能用于log4j2,因此,我们在配置文件中使用tcp输入插件。
plugins-inputs-tcp 插件说明:
https://www.elastic.co/guide/en/logstash/current/plugins-inputs-tcp.html
安装插件
./bin/logstash-plugin install logstash-input-tcp安装成功提示
Validating logstash-input-tcp
Installing logstash-input-tcp
Installation successful
在该配置文件中,我们使用stdout输出插件以及rubydebug的codec插件,这使得我们的logstash输出打印在控制台,并且使用ruby的输出格式。
因此,当我们在控制台启动logstash,如下:
./bin/logstash -f config/test-log4j2.conf当我们在应用程序打印日志,logstash的输出如下:
{
       "message" => "2015-12-08 12:57:45,178 INFO  [qtp981012032-24] UserController (UserController.java:37) - hello tries to login",
      "@version" => "1",
    "@timestamp" => "2015-12-08T04:57:45.180Z",
          "host" => "172.30.20.8",
          "type" => "microwiki",
          "name" => "Routh"
}
ElasticSearch配置
为了让 logstash 将日志信息输出到 elasticsearch,我们更改logstash的配置文件,增加了名为 elasticsearch 的输出插件,如下:
https://www.elastic.co/guide/en/logstash/current/plugins-outputs-elasticsearch.html
test-log4j2.conf
input {
    tcp {
        host => "localhost"
        port => 4560
        codec => json
    }
    stdin {

    }
}
filter {
  #Only matched data are send to output.
}
output {
    stdout {
      codec => rubydebug
    }
    elasticsearch {
        action => "index"                #The operation on ES
        codec  => rubydebug
        hosts  => "192.168.235.32:9200"      #ElasticSearch host, can be array.
        index  => "logstash-%{+YYYY.MM.dd}"      #The index to write data to.
    }
}
我们修改elasticsearch的配置文件 config/elasticsearch.yml ,主要的修改为:
cluster.name: testlog4j2-Cluster
node.name: testlog4j2-node1
network.host: 192.168.235.32
http.port: 9200
elasticsearch 的其他配置采用默认的配置项。配置完成后,我们启动elasticsearch,如下:
./bin/elasticsearch -d此时,我们通过应用程序打印日志,即可将日志信息通过logstash输出至elasticsearch,我们通过elasticsearch提供的API查看我们的日志信息,如下:
输入:
http://192.168.235.32:9200/logstash-2017.09.26/_searchelasticsearch 输出:
{
  "took": 2,
  "timed_out": false,
  "_shards": {
    "total": 5,
    "successful": 5,
    "failed": 0
  },
  "hits": {
    "total": 4,
    "max_score": 1,
    "hits": [
      {
        "_index": "microwiki-2017.09.26",
        "_type": "microwiki",
        "_id": "AVGALOrsilzU44B28xlP",
        "_score": 1,
        "_source": {
          "message": "2017.09.26 14:00:04,884 INFO [qtp981012032-24] UserController (UserController.java:37) - hello tries to login",
          "@version": "1",
          "@timestamp": "2017.09.26T06:00:04.886Z",
          "host": "192.168.235.32",
          "type": "microwiki",
          "name": "Routh"
        }
      },
      {
        "_index": "microwiki-2017.09.26",
        "_type": "microwiki",
        "_id": "AVGAMByJilzU44B28xlQ",
        "_score": 1,
        "_source": {
          "message": "2017.09.26 14:03:34,608 INFO [qtp981012032-25] UserController (UserController.java:37) - hello tries to login",
          "@version": "1",
          "@timestamp": "2017.09.26T06:03:34.609Z",
          "host": "192.168.235.32",
          "type": "microwiki",
          "name": "Routh"
        }
      }
    ]
  }
}
Kibana配置
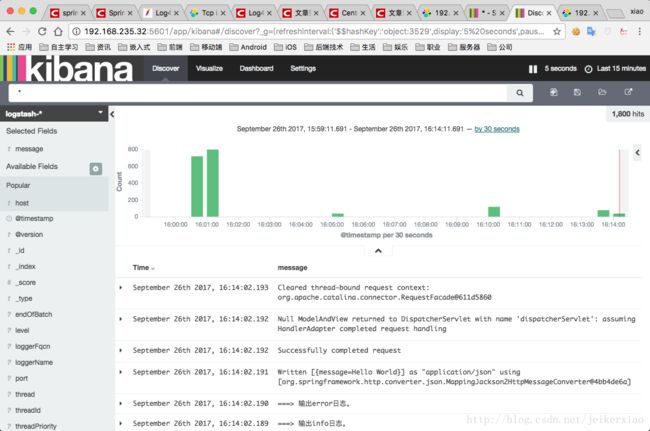
Kibana提供良好的用户界面,使得我们可以很方便地访问elasticsearch并通过图形化工具展示。
我们修改Kibana的配置文件,使之能与我们的elasticsearch配合使用,主要修改项如下:
server.host: "192.168.235.32"
server.port: 5601
elasticsearch.url: "192.168.235.32:9200/" "="" style="color: rgb(53, 114, 176); text-decoration: none; border-radius: 0px !important; border: 0px !important; bottom: auto !important; float: none !important; height: auto !important; left: auto !important; margin: 0px !important; outline: 0px !important; overflow: visible !important; padding: 0px !important; position: static !important; right: auto !important; top: auto !important; vertical-align: baseline !important; width: auto !important; box-sizing: content-box !important; min-height: auto !important; background: none !important;">http://192.168.235.32:9200"
因为ELK所有组件都在同一台机器上跑,所以将其相关的URL都设置为192.168.235.32。此时,我们可以启动Kibana,它会自动连接elasticsearch。
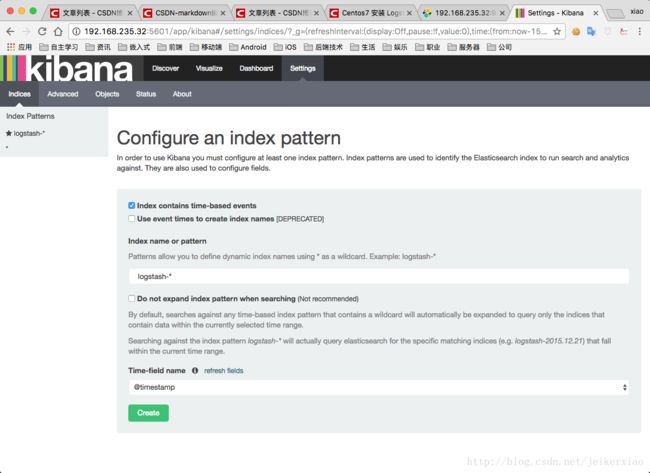
通过浏览器访问:http://192.168.235.32:5601,进入Kibana页面。
logstash默认的index为“logstash-%{+YYYY.MM.dd}”,而上述配置文件更改为“testlog4j2-%{+YYYY.MM.dd}”,因此我们配置该索引项。
关于Kibana的搜索,采用Lucene的语法,详见:
https://lucene.apache.org/core/2_9_4/queryparsersyntax.html
总结
了解如何将log4j2的日志输出到ELK以及如何使用ELK收集、处理和展示我们的日志数据。

