分布式事务(五)Seata AT模式-Spring Cloud微服务添加 AT 分布式事务
文章目录
- 下载订单项目案例(无事务版)
- Seata Server - TC全局事务协调器
- Seata Server 配置
- registry.conf
- file.conf
- 启动参数设置
- 启动 Seata Server
- order订单服务添加 Seata AT 事务
- order-parent 添加 seata 依赖
- 配置
- application.yml
- registry.conf
- file.conf
- 创建 seata 数据源代理
- 启动全局事务
- 启动 order 项目进行测试
- 测试出现异常,回滚的情况
- storage库存服务添加 Seata AT 事务
- 配置
- 创建 seata 数据源代理
- 启动分支事务
- order 的业务类中调用减少商品库存
- 启动 storage 项目进行测试
- 测试出现异常,回滚的情况
- account账户服务添加 Seata AT 事务
- 配置
- 创建 seata 数据源代理
- 启动分支事务
- order 的业务类中调用扣减账户金额
- 启动 account 项目进行测试
- 测试出现异常,回滚的情况
- 代码提交、推送到 git 仓库
项目源码: https://gitee.com/benwang6/seata-samples
下载订单项目案例(无事务版)
在上一节中我们完成了订单项目案例,但没有添加事务处理。下面在这个项目中我们添加 Seata AT 事务。
无事务版案例代码可以在这里下载:
https://gitee.com/benwang6/seata-samples/tree/%E6%97%A0%E4%BA%8B%E5%8A%A1%E7%89%88
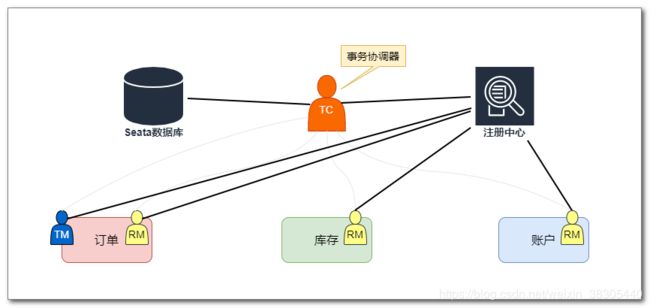
Seata Server - TC全局事务协调器
在《分布式事务(三)Seata分布式事务框架-AT模式介绍》 中介绍了 Seata AT 事务原理,介绍了 AT 事务的三个角色:TC(事务协调器)、TM(事务管理器)和RM(资源管理器),其中 TM 和 RM 是嵌入在业务应用中的,而 TC 则是一个独立服务。

Seata Server 就是 TC,直接从官方仓库下载启动即可,下载地址:https://github.com/seata/seata/releases
Seata Server 配置
Seata Server 的配置文件有两个:
seata/conf/registry.confseata/conf/file.conf
registry.conf

Seata Server 要向注册中心进行注册,这样,其他服务就可以通过注册中心去发现 Seata Server,与 Seata Server 进行通信。
Seata 支持多款注册中心服务:nacos 、eureka、redis、zk、consul、etcd3、sofa。
我们项目中要使用 eureka 注册中心,eureka服务的连接地址、注册的服务名,这需要在 registry.conf 文件中进行配置:
registry {
  # file 、nacos 、eureka、redis、zk、consul、etcd3、sofa
  # 这里选择 eureka 注册配置
  type = "eureka"

  nacos {
	......
  }

  # eureka的注册配置
  eureka {
    # 注册中心地址
    serviceUrl = "http://localhost:8761/eureka"
    # 注册的服务ID
    application = "seata-server"
    weight = "1"
  }

  redis {
	......
  }
  ......
file.conf
Seata 需要存储全局事务信息、分支事务信息、全局锁信息,这些数据存储到什么位置?
针对存储位置的配置,支持放在配置中心,或者也可以放在本地文件。Seata Server 支持的配置中心服务有:nacos 、apollo、zk、consul、etcd3。
这里我们选择最简单的,使用本地文件,这需要在 registry.conf 配置文件中来指定:
......

config {
  # file、nacos 、apollo、zk、consul、etcd3
  # 在这里选择使用本地文件来保存配置
  type = "file"


......

  etcd3 {
    serverAddr = "http://localhost:2379"
  }

  file {
    # 在这里设置配置文件的文件名
    name = "file.conf"
  }
}
file.conf 中对事务信息的存储位置进行配置,存储位置支持:file、db、redis。
这里我们选择数据库作为存储位置,这需要在 file.conf 中进行配置:
store {
  ## store mode: file、db、redis
  # 这里选择数据库存储
  mode = "db"

  ## file store property
  file {
  	......
  }

  # 数据库存储
  db {
    ## the implement of javax.sql.DataSource, such as DruidDataSource(druid)/BasicDataSource(dbcp)/HikariDataSource(hikari) etc.
    datasource = "druid"
    ## mysql/oracle/postgresql/h2/oceanbase etc.
    dbType = "mysql"
    driverClassName = "com.mysql.jdbc.Driver"

	# 数据库连接配置
    url = "jdbc:mysql://127.0.0.1:3306/seata?useUnicode=true&characterEncoding=UTF-8&serverTimezone=GMT%2B8"
    user = "root"
    password = "root"
    minConn = 5
    maxConn = 30

	# 事务日志表表名设置
    globalTable = "global_table"
    branchTable = "branch_table"
    lockTable = "lock_table"

    queryLimit = 100
    maxWait = 5000
  }

  ## redis store property
  redis {
  	......
  }
}
启动参数设置
启动文件:seata-server.bat
用文本编辑器打开文件,找到文件中这一行:
%JAVACMD% %JAVA_OPTS% -server -Xmx2048m -Xms2048m -Xmn1024m -Xss512k -XX:Sur......
看到 Seata Server 默认使用 2G 内存,测试环境我们可以把内存调低:
%JAVACMD% %JAVA_OPTS% -server -Xmx256m -Xms256m -Xmn128m -Xss512k -XX:Sur......
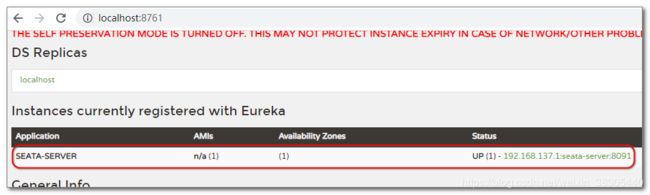
启动 Seata Server
双击 seata-server.bat 启动 Seata Server。
查看 Eureka 注册中心 Seata Server 的注册信息:
order订单服务添加 Seata AT 事务
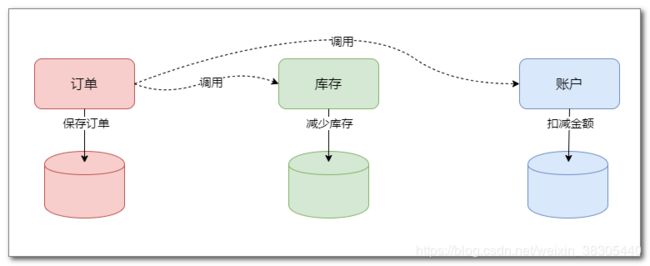
订单调用库存和账户,我们先从前面的订单开始。
在订单项目中要启动全局事务,还要执行订单保存的分支事务。
order-parent 添加 seata 依赖
order-parent 的 pom.xml 文件中有一段注释掉的 seata 依赖,现在可以打开它了:
<project xmlns="http://maven.apache.org/POM/4.0.0" xmlns:xsi="http://www.w3.org/2001/XMLSchema-instance"
         xsi:schemaLocation="http://maven.apache.org/POM/4.0.0 http://maven.apache.org/xsd/maven-4.0.0.xsd">
    <modelVersion>4.0.0modelVersion>
    <parent>
        <groupId>org.springframework.bootgroupId>
        <artifactId>spring-boot-starter-parentartifactId>
        <version>2.3.2.RELEASEversion>
        <relativePath/>
    parent>
    <groupId>cn.tedugroupId>
    <artifactId>order-parentartifactId>
    <version>1.0-SNAPSHOTversion>
    <packaging>pompackaging>
    <name>order-parentname>


    <properties>
        <mybatis-plus.version>3.3.2mybatis-plus.version>
        <druid-spring-boot-starter.version>1.1.23druid-spring-boot-starter.version>
        <seata.version>1.3.0seata.version>
        <spring-cloud-alibaba-seata.version>2.0.0.RELEASEspring-cloud-alibaba-seata.version>
        <spring-cloud.version>Hoxton.SR6spring-cloud.version>
    properties>

    <dependencies>
        <dependency>
            <groupId>org.springframework.bootgroupId>
            <artifactId>spring-boot-starterartifactId>
        dependency>
        <dependency>
            <groupId>org.springframework.bootgroupId>
            <artifactId>spring-boot-starter-webartifactId>
        dependency>
        <dependency>
            <groupId>org.springframework.cloudgroupId>
            <artifactId>spring-cloud-starter-netflix-eureka-clientartifactId>
        dependency>
        <dependency>
            <groupId>org.springframework.cloudgroupId>
            <artifactId>spring-cloud-starter-openfeignartifactId>
        dependency>

        <dependency>
            <groupId>com.baomidougroupId>
            <artifactId>mybatis-plus-boot-starterartifactId>
            <version>${mybatis-plus.version}version>
        dependency>

        <dependency>
            <groupId>mysqlgroupId>
            <artifactId>mysql-connector-javaartifactId>
        dependency>
        <dependency>
            <groupId>com.alibabagroupId>
            <artifactId>druid-spring-boot-starterartifactId>
            <version>${druid-spring-boot-starter.version}version>
        dependency>


        <dependency>
          <groupId>com.alibaba.cloudgroupId>
          <artifactId>spring-cloud-alibaba-seataartifactId>
          <version>${spring-cloud-alibaba-seata.version}version>
          <exclusions>
            <exclusion>
              <artifactId>seata-allartifactId>
              <groupId>io.seatagroupId>
            exclusion>
          exclusions>
        dependency>
        <dependency>
          <groupId>io.seatagroupId>
          <artifactId>seata-allartifactId>
          <version>${seata.version}version>
        dependency>


        <dependency>
            <groupId>org.projectlombokgroupId>
            <artifactId>lombokartifactId>
        dependency>
        <dependency>
            <groupId>org.springframework.bootgroupId>
            <artifactId>spring-boot-starter-testartifactId>
            <scope>testscope>
            <exclusions>
                <exclusion>
                    <groupId>org.junit.vintagegroupId>
                    <artifactId>junit-vintage-engineartifactId>
                exclusion>
            exclusions>
        dependency>
    dependencies>

    <dependencyManagement>
        <dependencies>
            <dependency>
                <groupId>org.springframework.cloudgroupId>
                <artifactId>spring-cloud-dependenciesartifactId>
                <version>${spring-cloud.version}version>
                <type>pomtype>
                <scope>importscope>
            dependency>
        dependencies>
    dependencyManagement>

    <build>
        <plugins>
            <plugin>
                <groupId>org.springframework.bootgroupId>
                <artifactId>spring-boot-maven-pluginartifactId>
            plugin>
        plugins>
    build>

project>
配置
application.yml
TC 事务协调器通过“事务组”的方式将多个服务组织成一个全局事务。每个服务启动时要向TC注册,加入同一个事务组。
spring:
  ......

  cloud:
    alibaba:
      seata:
        tx-service-group: order_tx_group

......
registry.conf
需要从注册中心获得 TC 的地址,这里配置注册中心的地址。
TC 在注册中心注册的服务ID在下面 file.conf 中指定。
registry {
  # file 、nacos 、eureka、redis、zk、consul、etcd3、sofa
  type = "eureka"

  nacos {
    serverAddr = "localhost"
    namespace = ""
    cluster = "default"
  }
  eureka {
    serviceUrl = "http://localhost:8761/eureka"
    # application = "default"
    # weight = "1"
  }
  redis {
    serverAddr = "localhost:6379"
    db = "0"
    password = ""
    cluster = "default"
    timeout = "0"
  }
  zk {
    cluster = "default"
    serverAddr = "127.0.0.1:2181"
    session.timeout = 6000
    connect.timeout = 2000
    username = ""
    password = ""
  }
  consul {
    cluster = "default"
    serverAddr = "127.0.0.1:8500"
  }
  etcd3 {
    cluster = "default"
    serverAddr = "http://localhost:2379"
  }
  sofa {
    serverAddr = "127.0.0.1:9603"
    application = "default"
    region = "DEFAULT_ZONE"
    datacenter = "DefaultDataCenter"
    cluster = "default"
    group = "SEATA_GROUP"
    addressWaitTime = "3000"
  }
  file {
    name = "file.conf"
  }
}

config {
  # file、nacos 、apollo、zk、consul、etcd3、springCloudConfig
  type = "file"

  nacos {
    serverAddr = "localhost"
    namespace = ""
    group = "SEATA_GROUP"
  }
  consul {
    serverAddr = "127.0.0.1:8500"
  }
  apollo {
    app.id = "seata-server"
    apollo.meta = "http://192.168.1.204:8801"
    namespace = "application"
  }
  zk {
    serverAddr = "127.0.0.1:2181"
    session.timeout = 6000
    connect.timeout = 2000
    username = ""
    password = ""
  }
  etcd3 {
    serverAddr = "http://localhost:2379"
  }
  file {
    name = "file.conf"
  }
}
file.conf
在这里我们指定 TC 的服务ID seata-server:
vgroupMapping.order_tx_group = "seata-server"
order_tx_group 对应 application.yml 中注册的事务组名。
transport {
  # tcp udt unix-domain-socket
  type = "TCP"
  #NIO NATIVE
  server = "NIO"
  #enable heartbeat
  heartbeat = true
  # the client batch send request enable
  enableClientBatchSendRequest = true
  #thread factory for netty
  threadFactory {
    bossThreadPrefix = "NettyBoss"
    workerThreadPrefix = "NettyServerNIOWorker"
    serverExecutorThread-prefix = "NettyServerBizHandler"
    shareBossWorker = false
    clientSelectorThreadPrefix = "NettyClientSelector"
    clientSelectorThreadSize = 1
    clientWorkerThreadPrefix = "NettyClientWorkerThread"
    # netty boss thread size,will not be used for UDT
    bossThreadSize = 1
    #auto default pin or 8
    workerThreadSize = "default"
  }
  shutdown {
    # when destroy server, wait seconds
    wait = 3
  }
  serialization = "seata"
  compressor = "none"
}
service {
  #transaction service group mapping
  # order_tx_group 与 yml 中的 “tx-service-group: order_tx_group” 配置一致
  # “seata-server” 与 TC 服务器的注册名一致
  # 从eureka获取seata-server的地址,再向seata-server注册自己,设置group
  vgroupMapping.order_tx_group = "seata-server"
  #only support when registry.type=file, please don't set multiple addresses
  order_tx_group.grouplist = "127.0.0.1:8091"
  #degrade, current not support
  enableDegrade = false
  #disable seata
  disableGlobalTransaction = false
}

client {
  rm {
    asyncCommitBufferLimit = 10000
    lock {
      retryInterval = 10
      retryTimes = 30
      retryPolicyBranchRollbackOnConflict = true
    }
    reportRetryCount = 5
    tableMetaCheckEnable = false
    reportSuccessEnable = false
  }
  tm {
    commitRetryCount = 5
    rollbackRetryCount = 5
  }
  undo {
    dataValidation = true
    logSerialization = "jackson"
    logTable = "undo_log"
  }
  log {
    exceptionRate = 100
  }
}
创建 seata 数据源代理
Seata AT 事务对业务代码无侵入,全自动化处理全局事务,其功能是靠 Seata 的数据源代理工具实现的。
这里我们创建 Seata 的数据源代理,并排除 Spring 默认的数据源。
package cn.tedu.order;

import com.alibaba.druid.pool.DruidDataSource;
import io.seata.rm.datasource.DataSourceProxy;
import org.springframework.boot.context.properties.ConfigurationProperties;
import org.springframework.context.annotation.Bean;
import org.springframework.context.annotation.Configuration;
import org.springframework.context.annotation.Primary;

import javax.sql.DataSource;

@Configuration
public class DatasourceConfiguration {
    @Bean
    @ConfigurationProperties(prefix = "spring.datasource")
    public DataSource druidDataSource(){
        DruidDataSource druidDataSource = new DruidDataSource();
        return druidDataSource;
    }

    @Primary
    @Bean("dataSource")
    public DataSourceProxy dataSource(DataSource druidDataSource){
        return new DataSourceProxy(druidDataSource);
    }
}
主程序中排除Springboot 的默认数据源:
package cn.tedu.order;

import org.mybatis.spring.annotation.MapperScan;
import org.springframework.boot.SpringApplication;
import org.springframework.boot.autoconfigure.SpringBootApplication;
import org.springframework.boot.autoconfigure.jdbc.DataSourceAutoConfiguration;
import org.springframework.cloud.openfeign.EnableFeignClients;

@EnableFeignClients
@MapperScan("cn.tedu.order.mapper")
@SpringBootApplication(exclude = DataSourceAutoConfiguration.class)
public class OrderApplication {

    public static void main(String[] args) {
        SpringApplication.run(OrderApplication.class, args);
    }

}
启动全局事务
Seata AT 对业务无侵入,所以启动全局事务非常简单,只需要添加一个 @GlobalTransactional 注解即可。
另外我们一步一步地添加全局事务并测试,这里先把 storage 和 account 调用注掉。
package cn.tedu.order.service;

import cn.tedu.order.entity.Order;
import cn.tedu.order.feign.AccountClient;
import cn.tedu.order.feign.EasyIdGeneratorClient;
import cn.tedu.order.feign.StorageClient;
import cn.tedu.order.mapper.OrderMapper;
import io.seata.spring.annotation.GlobalTransactional;
import org.springframework.beans.factory.annotation.Autowired;
import org.springframework.stereotype.Service;

@Service
public class OrderServiceImpl implements OrderService {
    @Autowired
    private OrderMapper orderMapper;
    @Autowired
    EasyIdGeneratorClient easyIdGeneratorClient;
    @Autowired
    private AccountClient accountClient;
    @Autowired
    private StorageClient storageClient;

    @GlobalTransactional
    @Override
    public void create(Order order) {
        // 从全局唯一id发号器获得id
        Long orderId = easyIdGeneratorClient.nextId("order_business");
        order.setId(orderId);

        orderMapper.create(order);

        // 修改库存
        //storageClient.decrease(order.getProductId(), order.getCount());

        // 修改账户余额
        //accountClient.decrease(order.getUserId(), order.getMoney());

    }
}
启动 order 项目进行测试
按顺序启动服务:
- Eureka
- Seata Server
- Easy Id Generator
- Order
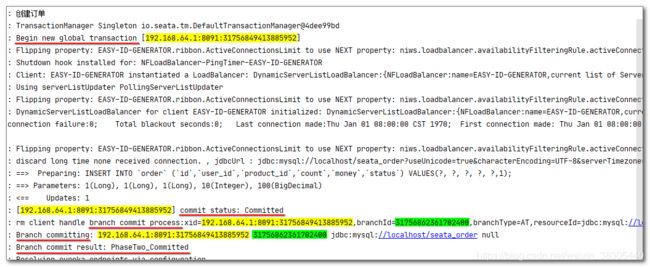
调用保存订单,地址:
http://localhost:8083/create?userId=1&productId=1&count=10&money=100
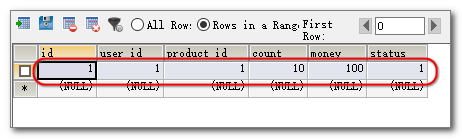
观察控制台,看到全局事务和订单的分支事务已经启动,并可以看到全局事务ID(XID)和分支事务ID(Branch ID):
然后观察数据库中新添加的订单数据:
测试出现异常,回滚的情况
在业务代码中加一个模拟异常再试一下:
package cn.tedu.order.service;

import cn.tedu.order.entity.Order;
import cn.tedu.order.feign.AccountClient;
import cn.tedu.order.feign.EasyIdGeneratorClient;
import cn.tedu.order.feign.StorageClient;
import cn.tedu.order.mapper.OrderMapper;
import io.seata.spring.annotation.GlobalTransactional;
import org.springframework.beans.factory.annotation.Autowired;
import org.springframework.stereotype.Service;

@Service
public class OrderServiceImpl implements OrderService {
    @Autowired
    private OrderMapper orderMapper;
    @Autowired
    EasyIdGeneratorClient easyIdGeneratorClient;
    @Autowired
    private AccountClient accountClient;
    @Autowired
    private StorageClient storageClient;

    @GlobalTransactional
    @Override
    public void create(Order order) {
        // 从全局唯一id发号器获得id
        Long orderId = easyIdGeneratorClient.nextId("order_business");
        order.setId(orderId);

        orderMapper.create(order);

        if (Math.random() < 0.5) {
            throw new RuntimeException("模拟异常");
        }

        // 修改库存
        //storageClient.decrease(order.getProductId(), order.getCount());

        // 修改账户余额
        //accountClient.decrease(order.getUserId(), order.getMoney());

    }
}
重启 order 项目,并调用保存订单:
http://localhost:8083/create?userId=1&productId=1&count=10&money=100
可以看到全局事务回滚的日志:
订单启动全局事务部分完成,在继续之前,先把模拟异常注释掉:
        ......

        //if (Math.random() < 0.5) {
        //    throw new RuntimeException("模拟异常");
        //}

        ......
storage库存服务添加 Seata AT 事务
配置
与订单项目中添加的配置完全相同,请参考订单配置章节配置下面三个文件:
- application.yml
- registry.conf
- file.conf
创建 seata 数据源代理
与订单项目中数据源代理完全相同,请参考订单中数据源代理章节,在 cn.tedu.storage 包下创建数据源配置类 DatasourceConfiguration。主程序注解排除 DataSourceAutoConfiguration 自动配置类。
启动分支事务
在业务方法上添加 @Transactional 注解启动本地事务:
package cn.tedu.storage.service;

import cn.tedu.storage.mapper.StorageMapper;
import org.springframework.beans.factory.annotation.Autowired;
import org.springframework.stereotype.Service;
import org.springframework.transaction.annotation.Transactional;

@Service
public class StorageServiceImpl implements StorageService {
    @Autowired
    private StorageMapper storageMapper;

    @Transactional
    @Override
    public void decrease(Long productId, Integer count) throws Exception {
        storageMapper.decrease(productId,count);
    }
}
order 的业务类中调用减少商品库存
前面我们把调用商品库存注释掉了,现把注释打开:
        // 修改库存
        storageClient.decrease(order.getProductId(), order.getCount());
启动 storage 项目进行测试
按顺序启动项目:
- Eureka
- Seata Server
- Easy Id Generator
- Storage
- Order
调用保存订单,地址:
http://localhost:8083/create?userId=1&productId=1&count=10&money=100
订单会调用库存,这两个服务会分别启动一个分支事务,两个分支事务一起组成一个全局事务:

观察两个项目的控制台都有Seata AT事务的日志,Storage 项目控制台如下:

然后观察数据库中新添加的订单和减少的库存:
减少的库存:

测试出现异常,回滚的情况
在业务代码中加一个模拟异常再试一下:
package cn.tedu.storage.service;

import cn.tedu.storage.mapper.StorageMapper;
import org.springframework.beans.factory.annotation.Autowired;
import org.springframework.stereotype.Service;
import org.springframework.transaction.annotation.Transactional;

@Service
public class StorageServiceImpl implements StorageService {
    @Autowired
    private StorageMapper storageMapper;

    @Transactional
    @Override
    public void decrease(Long productId, Integer count) throws Exception {
        storageMapper.decrease(productId,count);

        if (Math.random() < 0.5) {
            throw new RuntimeException("模拟异常");
        }
    }
}
重启 storage 项目,并调用保存订单:
http://localhost:8083/create?userId=1&productId=1&count=10&money=100
查看数据库表 order 和 storage,如果执行成功会新增订单、减少库存,如果执行失败则数据没有变化,被回滚了。
storage 分支事务部分完成,在继续之前,先把模拟异常注释掉:
        ......

        //if (Math.random() < 0.5) {
        //    throw new RuntimeException("模拟异常");
        //}

        ......
account账户服务添加 Seata AT 事务
配置
与订单项目中添加的配置完全相同,请参考订单配置章节配置下面三个文件:
- application.yml
- registry.conf
- file.conf
创建 seata 数据源代理
与订单项目中数据源代理完全相同,请参考订单中数据源代理章节,在 cn.tedu.account 包下创建数据源配置类 DatasourceConfiguration。主程序注解排除 DataSourceAutoConfiguration 自动配置类。
启动分支事务
在业务方法上添加 @Transactional 注解启动本地事务:
package cn.tedu.account.service;

import cn.tedu.account.mapper.AccountMapper;
import org.springframework.beans.factory.annotation.Autowired;
import org.springframework.stereotype.Service;
import org.springframework.transaction.annotation.Transactional;

import java.math.BigDecimal;
@Service
public class AccountServiceImpl implements AccountService {
    @Autowired
    private AccountMapper accountMapper;

    @Transactional
    @Override
    public void decrease(Long userId, BigDecimal money) {
        accountMapper.decrease(userId,money);
    }
}
order 的业务类中调用扣减账户金额
前面我们把调用账户注释掉了,现把注释打开:
        // 修改账户余额
        accountClient.decrease(order.getUserId(), order.getMoney());
启动 account 项目进行测试
按顺序启动项目:
- Eureka
- Seata Server
- Easy Id Generator
- Storage
- Account
- Order
调用保存订单,地址:
http://localhost:8083/create?userId=1&productId=1&count=10&money=100
订单会调用库存和账户,这三个服务会分别启动一个分支事务,三个分支事务一起组成一个全局事务:

观察三个项目的控制台都有Seata AT事务的日志,account 项目控制台如下:

然后观察数据库中的订单表、库存表和账户表。
这是账户表,看到金额已经被扣减:

测试出现异常,回滚的情况
在业务代码中加一个模拟异常再试一下:
package cn.tedu.account.service;

import cn.tedu.account.mapper.AccountMapper;
import org.springframework.beans.factory.annotation.Autowired;
import org.springframework.stereotype.Service;
import org.springframework.transaction.annotation.Transactional;

import java.math.BigDecimal;
@Service
public class AccountServiceImpl implements AccountService {
    @Autowired
    private AccountMapper accountMapper;

    @Transactional
    @Override
    public void decrease(Long userId, BigDecimal money) {
        accountMapper.decrease(userId,money);

        if (Math.random() < 0.5) {
            throw new RuntimeException("模拟异常");
        }
    }
}
重启 account 项目,并调用保存订单:
http://localhost:8083/create?userId=1&productId=1&count=10&money=100
查看数据库表 order、storage 和 account,如果执行成功会新增订单、减少库存、扣减金额,如果执行失败则数据没有变化,被回滚了。
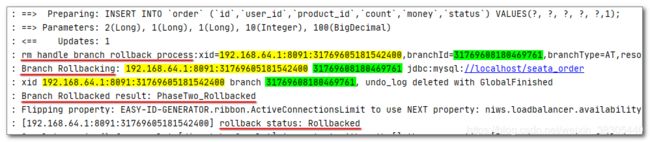
失败时,在 order 和 storage 控制台可以看到回滚日志。
这是 storage 的回滚日志:

account 分支事务部分完成,最后把模拟异常注释掉:
        ......

        //if (Math.random() < 0.5) {
        //    throw new RuntimeException("模拟异常");
        //}

        ......
代码提交、推送到 git 仓库
按 ctrl+k 提交代码,代码全部选中进行提交即可。
提交后,再按 ctrl+shift+k 执行推送,把代码推送到远程仓库。
项目源码: https://gitee.com/benwang6/seata-samples