Android后台服务概述
本篇文章主要讲述android servivce相关知识,其中会穿插一些其他的知识点,作为初学者的教程。老鸟绕路
目录
为什么要用Service
Service及其继承者IntentService
service的生命周期
IntentService
一个后台计数器的例子来讲述Service
Service如何与UI组件通信
Broadcast
Service与通知栏的通信
为什么要用Service
我们接触android的时候,大部分时候是在和activity打交道,但是有些比如网络下载、大文件读取、解析等耗时却又不需要界面对象的操作。一旦退出界面,那么可能就会变得不可控(比如界面退出后,线程通知UI显示进度,但是由于View已经被销毁导致报错,或者界面退出后下载中断,就算你写得非常完美,什么异常状态都考虑到了,还是保证不了系统由于内存紧张把你这个后台的activity给干掉,依附于于它的下载线程也中断。)
这时候Service就有它的用武之地了,不依赖界面,消耗资源少,优先级比后台activity高,不会轻易被系统干掉(就算被干掉,也有标志位设置可以让它自动重启,这也是一些流氓软件牛皮鲜的招数)、
Service及其继承者IntentService
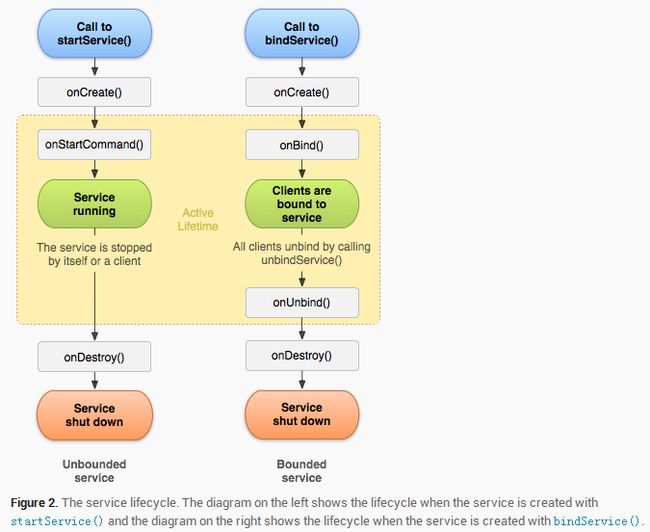
service的生命周期
service的生命周期相对activity要简单不少。
可以看出service有两条生命线,一条是调用startService,一条是调用bindService
,两条生命线相互独立。本文只讲startService。
一道选择题,解释service生命周期的所有问题:
android通过startService的方式开启服务,关于service生命周期的onCreate()和onStart() 说法正确的是哪两项
A.当第一次启动的时候先后调用 onCreate()和 onStart()方法
B.当第一次启动的时候只会调用 onCreate()方法
C.如果 service 已经启动,将先后调用 onCreate()和 onStart()方法
D.如果 service 已经启动,只会执行 onStart()方法,不在执行 onCreate()方法
答案自己想下,结尾公布
IntentService
一些容易被忽略的基础知识:Service运行的代码是在主线程上的,也就是说,直接在上面运行会卡住UI,这时就Service的继承者(继承于Service的子类)IntentService就应运而生。android studio的新建里面直接就有IntentService的模板,足见其应用之广。
那么Service与IntentService的区别在哪呢?
详见这里 Android之Service与IntentService的比较
简单来说就是
- IntentService内部有个工作线程(Worker Thread),会将startService传入的intent通过Handler-Message机制传入工作线程,开发者通过重载onHandleIntent进行服务的具体实现。
- IntentService在跑完onHandleIntent后,如何Handler队列里没有其他消息,就会自动结束服务,有点像Thread中run函数一样,跑完run函数之后,线程就结束了。而service需要自己去停止。
一个后台计数器的例子来讲述Service
实战环节,本文通过一个计数器的例子模拟下载文件的耗时操作。
public void startService(View view){
    Intent intent = new Intent(this,BackgroundService.class);            intent.setAction("com.example.administrator.servicestudy.action.counter");
    intent.putExtra("duration",10);
    intent.putExtra("interval",1.0f);
    startService(intent);
}
上述代码就是一个启动service的例子,action相当于做什么操作(适用于一个service处理多种请求的情况。),extra就是参数。参数中duration代表总时间10秒,interval代码每隔一秒。
private static final String ACTION_COUNTER = "com.example.administrator.servicestudy.action.counter";

@Override
protected void onHandleIntent(Intent intent) {
    if (intent != null) {
        final String action = intent.getAction();
        if (ACTION_COUNTER.equals(action)) {
            final int duration = intent.getIntExtra(EXTRA_DURATION,0);
            final float interval = intent.getFloatExtra(EXTRA_INTERVAL,0);
            handleActionCounter(duration, interval);
        }
    }
}

private void handleActionCounter(int duration, float interval) {
    for(int i=0; i
可以看到重载onHandleIntent处理事件,handleActionCounter表示具体服务。根据传入的参数决定循环时间和sleep间隔。
当然别忘了在manifest文件中声明该Service
以上就是最基本的IntentService的用法了,不过为了代码独立性更好,可以将代码写成这样。
Activity
public void startService(View view){
     BackgroundService.startCounterService(this,1,10);
}
Service
public static void startCounterService(@NonNull Context context, int interval, int duration) {
        Intent intent = new Intent(context, BackgroundService.class);
        intent.setAction(ACTION_COUNTER);
        intent.putExtra(EXTRA_DURATION, duration);
        intent.putExtra(EXTRA_INTERVAL, interval);
        context.startService(intent);
    }
在Service里写个静态方法,只将参数传入,剩余的全都在Service内实现。虽然代码写的位置变了,但是代码运行的位置没变(静态方法依然还是运行在activity端),这样做将EXTRA_DURATION、EXTRA_INTERVAL等参数也不暴露给外部。做到更好的封装性和模块化,推荐这种做法。
Service如何与UI组件通信
那么Service在后台努力干活的时候,如何将当前进度通知给用户呢,因为Service不依赖任何界面,所以自身没办法操作界面(除非用Toast)。所以Service就要与其他组件进行通信(主要就是activity和通知栏了,但不限于上述两者)。
android组件间的通信(还记得android四大组件是哪四个不?)。 大部分通过android四大组件之一的Broadcast来通信。
那么简要说下Broadcast
Broadcast
生命周期:
就这么简单,一旦处理完广播就被销毁,没有onCreate,也没有onDestory
最重要的一点就是receiver里不能处理耗时操作,超过5秒(好像是)系统就会报错
Service
 private void updateUI(int current,int total){
    Intent intent = new Intent(BROADCAST_UPDATE_UI);
    intent.putExtra(EXTRA_CURRENT,current);
    intent.putExtra(EXTRA_TOTAL,total);

    sendBroadcast(intent);
}
可以看到,发个广播就这么简单,把参数填入intent,自定义一个action,send!好了。
Activity
@Override
protected void onResume() {
    super.onResume();
    IntentFilter intentFilter = new IntentFilter();
    intentFilter.addAction(BackgroundService.BROADCAST_UPDATE_UI);
    registerReceiver(mBackgroundServiceReceiver,intentFilter);
}

@Override
protected void onPause() {
    super.onPause();
    unregisterReceiver(mBackgroundServiceReceiver);
}

private BroadcastReceiver mBackgroundServiceReceiver = new BroadcastReceiver() {
    @Override
    public void onReceive(Context context, Intent intent) {
        Log.d(TAG,"receive:"+intent.getAction());
        if(intent.getAction() == BackgroundService.BROADCAST_UPDATE_UI){
            int current = intent.getIntExtra(BackgroundService.EXTRA_CURRENT,0);
            int total = intent.getIntExtra(BackgroundService.EXTRA_TOTAL,0);
            mHint.setText(current+"/"+total);
        }
    }
};
Activity在resume的时候注册一个广播接收器,pasue的时候注销掉。在receiver里处理更新UI的操作。就这么简单
同样的,为了代码更具有封装性。在Activity中将recevier去掉。放在Service中,看代码:
public static class BackgroundServiceReceiver extends BroadcastReceiver {
    private static List mHandlers = new ArrayList<>();

    @Override
    public void onReceive(Context context, Intent intent) {
        if(intent.getAction().equals(BROADCAST_UPDATE_UI)){
            int current = intent.getIntExtra(BackgroundService.EXTRA_CURRENT,0);
            int total = intent.getIntExtra(BackgroundService.EXTRA_TOTAL,0);
            for (UIHandler handler : mHandlers) {
                handler.onUpdateUI(current,total);
            }
        }
    }
}

public interface UIHandler {
    void onUpdateUI(int current,int total);
}

public static void registerUIHandler(UIHandler handler){
    if(handler != null){
        BackgroundServiceReceiver.mHandlers.add(handler);
    }

}

public static void unregisterUIHandler(UIHandler handler){
    BackgroundServiceReceiver.mHandlers.remove(handler);
}
这里代码有点多,一点一点说,
- 首先在manifest里注册一个静态广播接收器,静态就是表示一直都会接收的,不需要手动register和unregister。一般的receiver都是单独一个文件,这里为了更好地封装性,写在Service里作为静态内部类。所以在manifest里的注册名字也写成了.BackgroundService$BackgroundServiceReceiver,注意中间一个美元符号,那就是表示公共静态内部类的标志。
- 在Service内部实现一个Receiver,具体和Activity里面的一样。
- 然后写一个interface,代表具体的UI处理
- 写一个注册函数和反注册函数,用以界面组件注册UI更新事件。
- 由于该Service可能不止只更新一个界面组件,所以注册的Handler是一个列表。在收到广播后,将所有注册过的组件都通知更新一遍。
然后在Activity中注册一下。替换掉注册广播的地方。
@Override
protected void onResume() {
    super.onResume();
    IntentFilter intentFilter = new IntentFilter();
    intentFilter.addAction(BackgroundService.BROADCAST_UPDATE_UI);
//        registerReceiver(mBackgroundServiceReceiver,intentFilter);
    BackgroundService.registerUIHandler(mServiceUIHandler);
}

@Override
protected void onPause() {
    super.onPause();
    BackgroundService.unregisterUIHandler(mServiceUIHandler);
//        unregisterReceiver(mBackgroundServiceReceiver);
}

private BackgroundService.UIHandler mServiceUIHandler = new BackgroundService.UIHandler() {
    @Override
    public void onUpdateUI(int current, int total) {
        Log.d(TAG,"receive: service broadcast");
        mHint.setText(current+"/"+total);
    }
};
这样就完成了一个Service的封装,简化Activity的代码,我的思想一直都是Activity中,应该只处理和界面有关的代码。就像C语言的main函数一样,你不可能把所有代码都写在main函数里吧。或者面函数的同一个文件里吧。
那么我们加一个stop Service的函数吧。
Service
public static void stopCounterService(@NonNull Context context){
    Intent intent = new Intent(context, BackgroundService.class);
    intent.setAction(ACTION_COUNTER);
    context.stopService(intent);
}
Activity
public void stopService(View view){
//        Intent intent = new Intent(this,BackgroundService.class);
//        intent.setAction("com.example.administrator.servicestudy.action.counter");
//        stopService(intent);
    BackgroundService.stopCounterService(this);
}
IntentService是以Message为单位来停止的,也就是说,一定要等到当前消息处理完才能完全stop掉,为此我们可以加一个标志位,一旦Service停止,强制循环退出。
Service
@Override
public void onCreate() {
    super.onCreate();
    Log.d(TAG,"onCreate");
    mServiceFinished = false;
}

@Override
public void onDestroy() {
    super.onDestroy();
    Log.d(TAG,"onDestroy");
    mServiceFinished = true;
}

private void handleActionCounter(int duration, float interval) {
   for(int i=0; i
Service与通知栏的通信
至此我们已经完成了Service与Activity的通信,Service与Activity之间通过广播进行通信。Service负责逻辑处理,Activity负责更新界面显示。但是到这边还没发现Service的独特之处,就是这个这些代码完全也可以写在Activity里面的,写在Service里面无非就是结构更好看点,如果你那么认为就错了。你可以在Activity中退出再进入,可以发现计数器并没有因为Activity的退出而终止或者暂停。依然跟着时间走。这点是写在Activity中完全做不到的。当然你也可以通过一些小技巧来达到同样的效果,不过我们这个例子是为了模拟后台下载用的。所以不扯这些了。
下面进入真正的后台下载。Service与通知栏的通信。
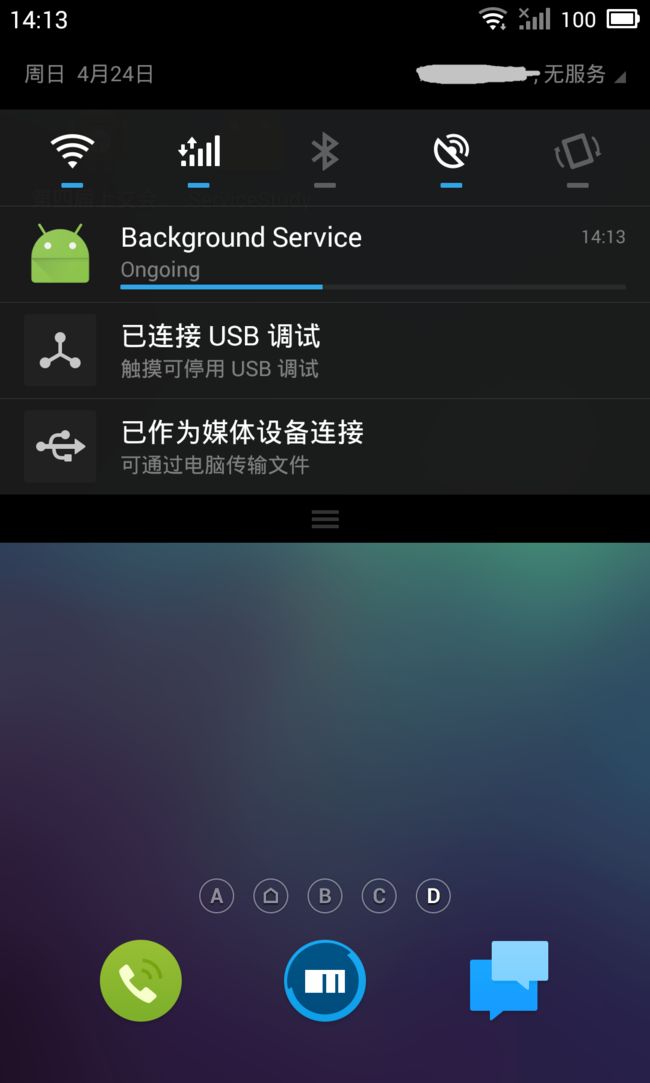
我们这样设计一个程序,当Activity退出后,通知栏继续显示计数器进度,点击通知或者再次进入Activity,通知栏取消显示进度(为了不重复显示,也为了演示代码)。
为此我们新建一个新的Service,并在Activity添加如下代码
NotificationService
public class NotificationService extends Service {
    private static final String TAG = NotificationService.class.getSimpleName();

    public NotificationService() {
    }

    @Override
    public IBinder onBind(Intent intent) {
        return null;
    }

    @Override
    public void onCreate() {
        super.onCreate();
        BackgroundService.registerUIHandler(mUIHandler);
    }

    @Override
    public void onDestroy() {
        super.onDestroy();
        Log.d(TAG,"onDestroy");
        BackgroundService.unregisterUIHandler(mUIHandler);
    }
    ......
}
这里我们新建的是一个普通的service,而不是IntentService,因为这边我们不需要耗时操作,我们甚至连onStartCommand都没有重载,因为我们只需要在启动服务的时候注册一个UI更新的回调就可以了,然后在销毁服务的时候注销掉。
Activity
@Override
protected void onResume() {
    super.onResume();
    ...
    stopService(new Intent(this,NotificationService.class));
}

@Override
protected void onPause() {
    super.onPause();
    ...
    startService(new Intent(this,NotificationService.class));
}
我们在Activity Resume的时候关闭通知栏通知服务,在Pause的时候开启该服务,这样就能做到我们的设计初衷。
接下来就是通知栏的UI更新操作了,都是通知栏的接口,听说2.3和4.0以上的接口很不一样,我们这边用的是4.0以上的接口。
private BackgroundService.UIHandler mUIHandler = new BackgroundService.UIHandler() {
    @Override
    public void onUpdateUI(int current, int total) {
        Log.d(TAG,"Notification onUpdateUI");
        //点击通知后,启动Activity,最后的FLAG_ONE_SHOT,表示只执行一次,具体自行百度。
        PendingIntent pendingIntent = PendingIntent.getActivity(NotificationService.this,
                0,
                new Intent(NotificationService.this,MainActivity.class),
                PendingIntent.FLAG_ONE_SHOT);

        NotificationManager nm = (NotificationManager) getSystemService(NOTIFICATION_SERVICE);
        Notification.Builder builder = new Notification.Builder(getApplicationContext());
        Notification notification = builder.setContentTitle("Background Service")
                .setTicker("Counting...")//状态栏上滚动的字符串
                .setContentText("Ongoing")//设置通知的正文
                .setProgress(total, current, false)//设置通知栏的进度条,android真贴心,终于可以不用自定义进度条了。
                .setOngoing(true)//设置可不可以取消该通知
                .setContentIntent(pendingIntent)//点击该通知后的操作。
                .setDefaults(Notification.DEFAULT_ALL)//通知的音效、震动、呼吸灯全都随系统设置,当然你也可以自定义
                .setAutoCancel(true)//是不是点击之后自动取消,否则的话,可能你需要手动调用接口来取消
                .setOnlyAlertOnce(true)//音效震动呼吸灯是否只提醒一下,专门给进度条之类,频繁更新的通知用的,不设置这个,你可以试试,那鬼畜的音效
                .setSmallIcon(R.mipmap.ic_launcher)//这个不解释了
                .build();
        //第一个参数为ID,APP内全局唯一,相同的ID表示相同的通知,不会在通知栏新增一条通知,不同的话,则在通知栏插入一条新的通知。第二个参数就是刚才配置的通知。
        nm.notify(1234,notification);
    }
};
最后提醒一句,通知不配置PendingIntent是不会显示的哦
为了完美模拟后台下载,我们在下载完成后(服务被销毁后),发送一个结束广播,通知UI层。


