OKHttp原理解析
Okhttp 应该是Android目前非常流行的第三方网络库,尝试讲解他的使用以及原理分析,分成几个部分:
- Okhttp同步和异步使用
- 同步和异步流程
- Dispatcher
- 拦截器
- 缓存
- 连接池复用
OKHttp的使用
OKHttp支持同步请求和异步请求
- 同步请求
OkHttpClient mClient = new OkHttpClient.Builder().build();
Request request = new Request.Builder()
                .url("http://www.baidu.com")
                .get()
                .build();
Call call = mClient.newCall(request);
Response response = call.execute();
- 异步请求
OkHttpClient mClient = new OkHttpClient.Builder().build();
Request request = new Request.Builder()
                .url("http://www.baidu.com")
                .get()
                .build();
Call call = mClient.newCall(request);
call.enqueue(new Callback() {
    @Override
    public void onFailure(Call call, IOException e) {
    }
    @Override
    public void onResponse(Call call, Response response) throws IOException {
        Log.e(TAG, "onResponse: " + response.body().string() );
    }
});
这里只是很简单的使用了OKHttp去get请求,分别用了同步请求和异步请求。
前面的流程基本是一样的,构造OkHttpClient实例,构造一个Request表示Http的Request请求,再生成Call请求;
最后根据是同步还是异步,决定是直接在当前线程执行execute(),还是 enqueue()加入dispacter待执行队列。
注意enqueue()的回调并不是在主线程。如果需要切换线程的话可能需要借助Handler。
Request 和 Call 分不清两者的分别,既然有了Request为什么需要Call;
- Request 表示Http的Request请求,用来封装网络请求信息及请求体,跟Response相对应;
- Response 表示Http的Response响应,用来封装网络响应信息和响应体;
- Call 表示请求执行器,负责发起网络请求;
同步和异步流程
1.同步请求
Response response = call.execute();
call是一个接口,由RealCall实现:
//RealCall
public Response execute() throws IOException {
  synchronized (this) {
    if (executed) throw new IllegalStateException("Already Executed");
    executed = true;
  }
  captureCallStackTrace();
  timeout.enter();
  eventListener.callStart(this);
  try {
    // dispatcher加入执行队列
    client.dispatcher().executed(this);
    // 拦截器责任链:真正执行请求、处理结果
    Response result = getResponseWithInterceptorChain();
    if (result == null) throw new IOException("Canceled");
    return result;
  } catch (IOException e) {
    e = timeoutExit(e);
    eventListener.callFailed(this, e);
    throw e;
  } finally {
     // 从dispatcher正在执行队列中移除
    client.dispatcher().finished(this);
  }
}
Dispatcher负责控制执行哪个请求,内部有线程池执行请求,但是在同步请求里面并没有发挥它真正的作用,只是在开始时加入正在执行队列,执行完毕后从正在执行的队列中移除。
同步请求是在当前线程直接执行的,之所以加入dispatcher正在执行的队列,是为了方便判断哪些请求是正在进行的。
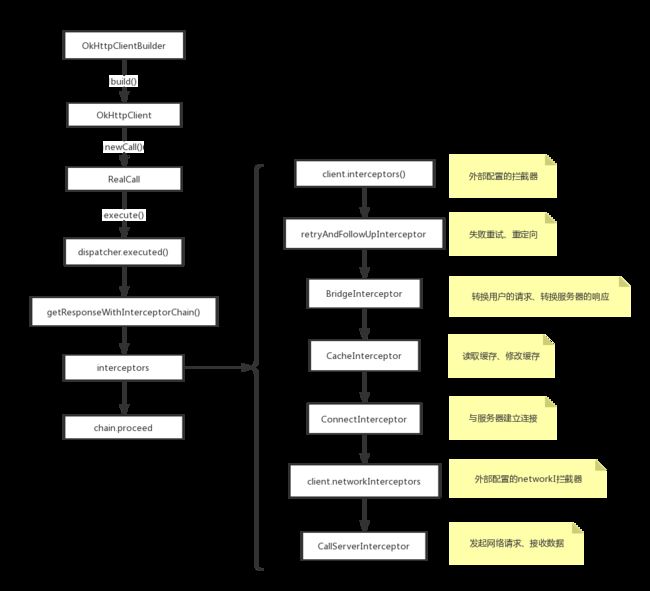
getResponseWithInterceptorChain() 是一个责任链模式,是OkHttp的精髓,内部是一连串的拦截器,每个拦截器各司其职,包含了从网络请求到网络响应以及各种处理,甚至可以加入用户自定义的拦截器,类似网络协议。
2.异步请求
call.enqueue(new Callback() {
    @Override
    public void onFailure(Call call, IOException e) {
    }
    @Override
    public void onResponse(Call call, Response response) throws IOException {
        Log.e(TAG, "onResponse: " + response.body().string() );
    }
});
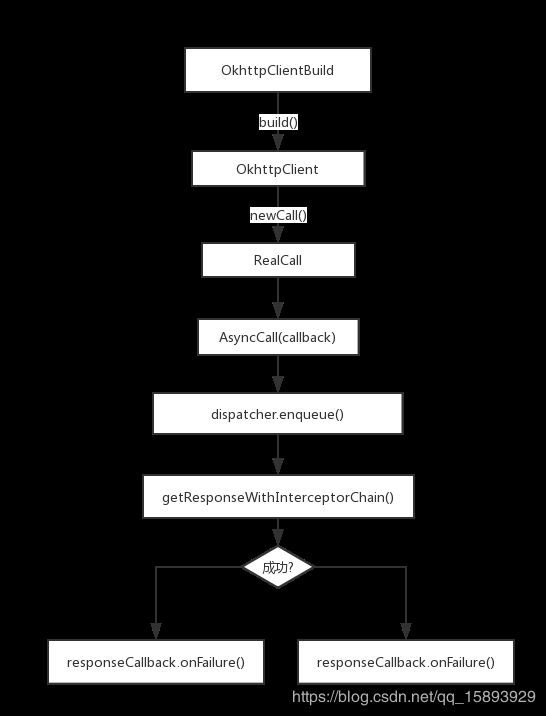
具体看下,RealCall实现enqueue()
// RealCall
public void enqueue(Callback responseCallback) {
  synchronized (this) {
    if (executed) throw new IllegalStateException("Already Executed");
    executed = true;
  }
  captureCallStackTrace();
  eventListener.callStart(this);
  client.dispatcher().enqueue(new AsyncCall(responseCallback));
}
这里新建了一个AsyncCall,并加入dispatcher的待执行队列。在dispatcher的线程池执行到AsyncCall.executeOn()
// AsyncCall
// executorService是一个线程池
void executeOn(ExecutorService executorService) {
  assert (!Thread.holdsLock(client.dispatcher()));
  boolean success = false;
  try {
    executorService.execute(this); // 真正执行
    success = true;
  } catch (RejectedExecutionException e) {
    ...
    responseCallback.onFailure(RealCall.this, ioException);
  } finally {
    if (!success) {
      client.dispatcher().finished(this); // This call is no longer running!
    }
  }
}
AsyncCall 继承自NameRunnable,NameRunnable的run方法会执行execute(),所以
executorService.execute(this) 最后会执行AsyncCall的execute()方法
protected void execute() {
  try {
    Response response = getResponseWithInterceptorChain();
    if (retryAndFollowUpInterceptor.isCanceled()) {
      signalledCallback = true;
      // 失败回调
      responseCallback.onFailure(RealCall.this, new IOException("Canceled"));
    } else {
      signalledCallback = true;
      // 成功回调
      responseCallback.onResponse(RealCall.this, response);
    }
  } catch (IOException e) {
...
  } finally {
    // 从dispatcher正在执行队列中移除
    client.dispatcher().finished(this);
  }
}
可见,最后还是走到了getResponseWithInterceptorChain(),只不过跟同步请求不一样的是,它执行在dispatcher的线程池里面,最后在子线程回调
Dispatcher
Dispatcher 顾名思义,负责分发执行任务。
// 线程池,负责执行AsyncCall异步请求
private @Nullable ExecutorService executorService;

// AsyncCall异步请求待执行队列
private final Deque<AsyncCall> readyAsyncCalls = new ArrayDeque<>();

// AsyncCall异步请求正在执行队列
private final Deque<AsyncCall> runningAsyncCalls = new ArrayDeque<>();

// RealCall同步请求正在执行队列
private final Deque<RealCall> runningSyncCalls = new ArrayDeque<>();
Dispatcher 的任务很简单,控制分发当前执行的请求
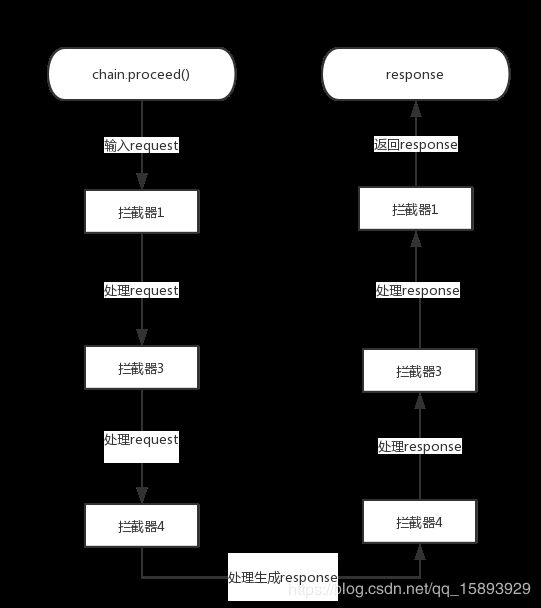
拦截器:责任链模式
RealCall 内部构造了一条拦截器链,看下拦截器是怎么起作用的?
// 自定义拦截器
public class CustomInterceptor implements Interceptor {
    @Override
    public Response intercept(Chain chain) throws IOException {
        Request request = chain.request();
        // 1.发起请求前,获取到上一个拦截器传过来的request,对request处理
        // 2.交给下个拦截器处理,最后获得response
        Response response = chain.proceed(request);
        // 对response 处理返回给上一层
       return response;
    }
}
这样说可能会比较抽象,画个流程图就很清晰了。
RealCall的getResponseWithInterceptor()真正处理了请求
// RealCall
Response getResponseWithInterceptorChain() throws IOException {
  List<Interceptor> interceptors = new ArrayList<>();
  interceptors.addAll(client.interceptors());
  interceptors.add(retryAndFollowUpInterceptor);
  interceptors.add(new BridgeInterceptor(client.cookieJar()));
  interceptors.add(new CacheInterceptor(client.internalCache()));
  interceptors.add(new ConnectInterceptor(client));
  if (!forWebSocket) {
    interceptors.addAll(client.networkInterceptors());
  }
  interceptors.add(new CallServerInterceptor(forWebSocket));
  Interceptor.Chain chain = new RealInterceptorChain(interceptors, null, null, null, 0,
      originalRequest, this, eventListener, client.connectTimeoutMillis(),
      client.readTimeoutMillis(), client.writeTimeoutMillis());
  return chain.proceed(originalRequest);
}
不管是异步请求还是同步请求都会走到getResponseWithInterceptorChain(),内部的拦截器链:
-
client.interceptors()
应用拦截器 -
RetryAndFollowUpInterceptor
1.在网络请求失败后进行重试
2.重定向时直接发起新的请求 -
BridgeInterceptor
1.设置内容长度,内容编码
2.设置gzip压缩,并在接收到内容后进行解压
3.添加cookie
4.添加其他报头keep-alive -
CacheInterceptor
管理服务器返回内容的缓存,由内存策略决定 -
ConnectInterceptor
为请求找到合适的连接,复用已有连接或重新创建的连接,由连接池决定 -
client.networkInterceptors()
网络拦截器 -
CallServerInterceptor
向服务器发起真正的访问请求,获取response
缓存 CacheInterceptor
http缓存机制
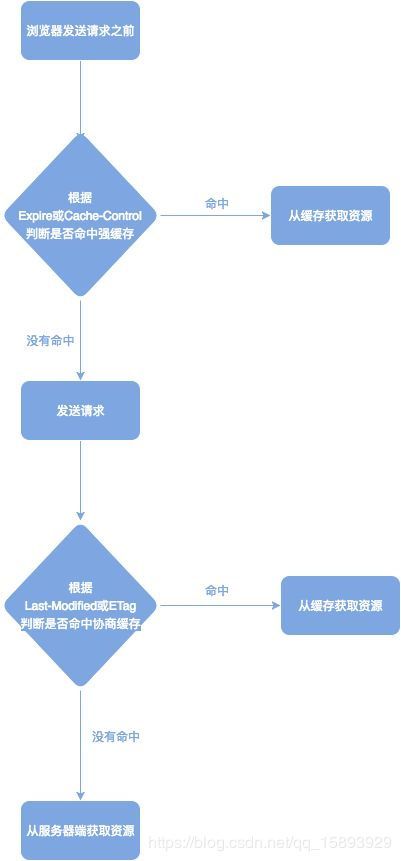
http分强缓存和协商缓存
强缓存:如果客户端命中缓存就不需要和服务器端发生交互,有两个字段Expires和Cache-Control
协商缓存:不管客户端是否命中缓存都要和服务器端发生交互,主要字段有 if-modified/if-modified-since 、Etag/if-none-match
Expires:表示缓存过期时间
Cache-Control :表示缓存的策略,有两个容易搞混的:no-store 表示绝不使用缓存,no-cache 表示在使用缓存之前,向服务器发送验证请求,返回304则表示资源没有修改,可以使用缓存,返回200则资源发生修改,需要替换
if-modified:服务器端资源的最后修改时间,响应头部会带上这个标识
if-modified-since:客户端请求会带上资源的最后修改时间,服务端返回304表示资源未修改,返回200则资源发生修改,需要替换
Etag:服务端的资源的标识,响应头部会带上这个标识
If-none-match:客户端请求会带上资源的额标识,服务端同样检查,返回304或200
之前一直没能记住或者搞混http的缓存机制,读了下面的文章终于理解了。
参考自:https://zhuanlan.zhihu.com/p/29750583
CacheInterceptor
public Response intercept(Chain chain) throws IOException {
  // 从cache中获取对应的响应的缓存
  Response cacheCandidate = cache != null ? cache.get(chain.request()) : null;

 CacheStrategy strategy = new CacheStrategy.Factory(now, chain.request(), cacheCandidate).get();

  Request networkRequest = strategy.networkRequest;
  Response cacheResponse = strategy.cacheResponse;

  networkResponse = chain.proceed(networkRequest);
  // 获取到网络的Response

  if (cacheResponse != null) {
if (networkResponse.code() == HTTP_NOT_MODIFIED) {
    // 返回码304,资源没有发生改变
    cache.update(cacheResponse, response); // 修改cache
    return response;
}
  }
  Response response = networkResponse.newBuilder()
    .cacheResponse(stripBody(cacheResponse))
    .networkResponse(stripBody(networkResponse))
    .build();
  ...
  CacheRequest cacheRequest = cache.put(response); // response加入缓存
  ...
}
OKHttp cache类底层实现是DiskLruCache,在之前的文章《LruCache 和 DiskLruCache 的使用以及原理分析》有过介绍。
-
CacheStrategy 缓存策略,根据上面的Http机制、request,确定是使用网络的response、还是缓存的response
-
cache.get(chain.request()) 从 DiskLruCache取出response
-
cache.update(cacheResponse, response); 从 DiskLruCache修改response
-
cache.put(response); // response加入 DiskLruCache缓存
连接池复用 ConnectInterceptor
// ConnectInterceptor
public Response intercept(Chain chain) throws IOException {
  RealInterceptorChain realChain = (RealInterceptorChain) chain;
  Request request = realChain.request();
 //  获取 StreamAllocation
 StreamAllocation streamAllocation = realChain.streamAllocation();

  // We need the network to satisfy this request. Possibly for validating a conditional GET.
  boolean doExtensiveHealthChecks = !request.method().equals("GET");
  // 通过streamAllocation 获取复用的或者新生成的连接Connection
  HttpCodec httpCodec = streamAllocation.newStream(client, chain, doExtensiveHealthChecks);
  RealConnection connection = streamAllocation.connection();

  return realChain.proceed(request, streamAllocation, httpCodec, connection);
}
ConnectInterceptor的intercept()流程很简单,基本靠StreamAllocation,StreamAllocation是在上一个拦截器RetryAndFollowUpInterceptor生成构造的。
// RetryAndFollowUpInterceptor
public Response intercept(Chain chain) throws IOException {
    ...
    // 构造StreamAllocation
    StreamAllocation streamAllocation = new StreamAllocation(client.connectionPool(),
         createAddress(request.url()), call, eventListener, callStackTrace);
    ...
}
StreamAllocation 是管理类,管理客户端请求call、客户端到服务端的连接和客户端到服务端之间的流
在这里StreamAllocation有两个作用: 构造出HttpCodec、构造出RealConnection
- HttpCodec 负责对request进行编码和对response解码,有两个实现类Http1Codec和Http2Codec,分别对应 HTTP/1.1 和 HTTP/2 版本
- RealConnection 表示客户端到服务端的连接,底层利用socket建立连接
// StreamAllocation
public HttpCodec newStream(
    OkHttpClient client, Interceptor.Chain chain, boolean doExtensiveHealthChecks) {
  int connectTimeout = chain.connectTimeoutMillis();
  int readTimeout = chain.readTimeoutMillis();
  int writeTimeout = chain.writeTimeoutMillis();
  int pingIntervalMillis = client.pingIntervalMillis();
  boolean connectionRetryEnabled = client.retryOnConnectionFailure();

  try {
    RealConnection resultConnection = findHealthyConnection(connectTimeout, readTimeout,
        writeTimeout, pingIntervalMillis, connectionRetryEnabled, doExtensiveHealthChecks);
    HttpCodec resultCodec = resultConnection.newCodec(client, chain, this);

    synchronized (connectionPool) {
      codec = resultCodec;
      return resultCodec;
    }
  } catch (IOException e) {
    throw new RouteException(e);
  }
}
StreamAllocation里面有一个重要的变量ConnectionPool连接池,定时维护管理RealConnection,该连接池内部是Deque
findHealthyConnection() 从连接池ConnectionPool里面寻找出可复用的连接或者生成一个新的连接。
总结
- OKHttp 使用责任链模式,从上到下分发处理请求,又从下到上处理结果。
- OKHttp 默认的缓存底层是DiskLruCache
- OkHttp 底层是socket,支持Http、Https,复用连接
- OkHttp 还大量使用了建造者模式 Builder
参考:
https://zhuanlan.zhihu.com/p/29750583
https://jsonchao.github.io/2018/12/01/Android主流三方库源码分析(一、深入理解OKHttp源码)
https://www.e-learn.cn/content/qita/1209012
感想
最近一段时间慢慢地开始看Android源码或者是第三方库的源码,一开始真的好难受,各种屡不清看不明,后面逐渐地发现自己竟然可以看懂了,还能找出网上一些博客上的错误,果然还是有点进步的。
这里分享一点自己小tip:
- 如果源码太复杂,可以先看好的博客文章抓住主要流程,再带着问题去探究源码;
- 抓住主要脉络,开始不要深究细节,否则会钻牛角尖(不要问我为什么会知道)
- 多看几遍,一定要尝试画流程图
- 做笔记或者博客做总结,这一步会发现自己还是有好多不懂的
最后,我发现我该看不懂的还是看不懂,哭了。


