EventBus3.0配置及使用
一、前言
EventBus是Android中组件与组件之间通信的框架,可以解耦和简化Activity与Activity、Activity和Fragment、Fragment和Fragment之间的通信。
详情可移步至:
github地址:https://github.com/greenrobot/EventBus
官方文档:http://greenrobot.org/eventbus/documentation
EventBus主要角色:
- Event 传递的事件对象
- Subscriber 事件的订阅者
- Publisher 事件的发布者
- ThreadMode 定义函数在何种线程中执行
各角色协作图:
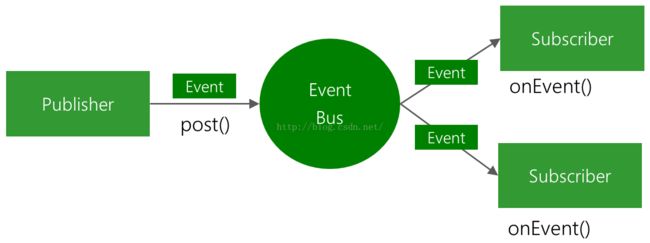
这里事件发布者将所有的事件都Post到EventBus这个总线,再通过EventBus将事件分发给对应的事件订阅者。
二、使用
1.首先需要依赖工程
compile 'org.greenrobot:eventbus:3.0.0'2.使用前应该注册/订阅
EventBus.getDefault().register(this);EventBus.getDefault().post("message");@Subscribe(threadMode = ThreadMode.MAIN,priority = 100) //在ui线程执行,优先级为100
public void onEvent(String message){
Log.e(TAG, message);
}ThreadMode总共四个:
- MAIN 在UI主线程
- BACKGROUND 后台线程,仅当发布者在UI线程时才会新建一个后台线程执行
- POSTING 和发布者处在同一个线程
- ASYNC 异步线程,无论发布者在哪个线程都重新建一个线程执行
5.优先级高的可以拦截事件向下传递
EventBus.getDefault().cancelEventDelivery(event) ;EventBus.getDefault().unregister(this);这里也许我们会有一个疑问,就是怎么区分发送的事件由谁来接收呢?其实,我们post事件时发送了一个对象出去,那么接收的方法中传进来的参数也为这个对象的订阅者则会接收到这个消息。假如如果我们post的都是String的对象却想要不同的订阅者处理,则可以新建两个不同的类都包含一个String的信息来区分。即
public class Event {

    public static class A {} // A事件
    public static class B {} // B事件
    public static class C { // C事件
        String message;
        public C(String message) {
            this.message = message;
        }
    }

}-keepattributes *Annotation*
-keepclassmembers class ** {
@org.greenrobot.eventbus.Subscribe ;
}
-keep enum org.greenrobot.eventbus.ThreadMode { *; }
# Only required if you use AsyncExecutor
-keepclassmembers class * extends org.greenrobot.eventbus.util.ThrowableFailureEvent {
(java.lang.Throwable);
} 三、加速模式
EventBus3.0新增了一个加速模式,即通过相应的配置可以大大提高EventBus的性能。
1.在app的build.gradle中的 dependencies 中还需要配置eventbus-annotation-processor
apt 'org.greenrobot:eventbus-annotation-processor:3.0.1' apt {
arguments {
eventBusIndex "com.afei.test.MyEventBusIndex"
}
}apply plugin: 'com.neenbedankt.android-apt'apply plugin: 'com.android.application'
apply plugin: 'com.neenbedankt.android-apt'
android {
compileSdkVersion 23
buildToolsVersion "24.0.0"
defaultConfig {
applicationId "com.afei.test"
minSdkVersion 17
targetSdkVersion 23
versionCode 1
versionName "1.0"
}
buildTypes {
release {
minifyEnabled false
proguardFiles getDefaultProguardFile('proguard-android.txt'), 'proguard-rules.pro'
}
}
}
dependencies {
compile fileTree(include: ['*.jar'], dir: 'libs')
testCompile 'junit:junit:4.12'
apt 'org.greenrobot:eventbus-annotation-processor:3.0.1'
compile 'com.android.support:appcompat-v7:23.4.0'
compile 'org.greenrobot:eventbus:3.0.0'
compile 'com.android.support:support-v4:23.4.0'
}
apt {
    arguments {
        eventBusIndex "com.afei.test.MyEventBusIndex"
    }
}classpath 'com.neenbedankt.gradle.plugins:android-apt:1.8'6.启用加速模式
EventBus.builder().addIndex(new MyEventBusIndex()).installDefaultEventBus();