React Native_手把手教你做项目(一.项目搭建)
总体感觉RN更新速度很快,一些老的教程都不合适新的版本。初学乍道,确实感觉很坑。废话不多说,我们直接跨过山越过海,直接撸个综合项目,进行RN的学习。据说FaceBook最近要对RN有重大版本的更新,不知道会更改到什么地步,希望会在模拟器的调试上变得更加方便一些。RN总体感觉比微信小程序墨迹多了,(ಥ_ಥ)
项目预览
ReactNative版本
react-native-cli: 2.0.1
react-native: 0.55.4
项目搭建
cd 需要创建项目的路径
react-native init babyShow(项目名称)
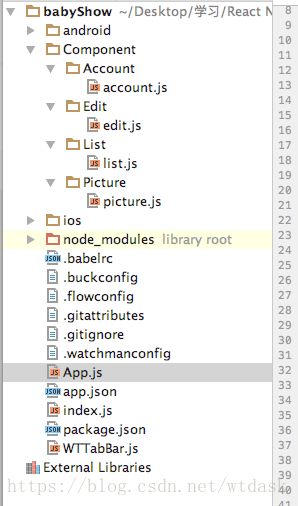
创建如下文件
account.js edit.js list.js picture.js 都填写如下代码
记得修改class名称和text内容
/**
 * Sample React Native App
 * https://github.com/facebook/react-native
 * @flow
 */

import React, { Component } from 'react';
import {
    Platform,
    StyleSheet,
    Text,
    View
} from 'react-native';

const instructions = Platform.select({
    ios: 'Press Cmd+R to reload,\n' +
    'Cmd+D or shake for dev menu',
    android: 'Double tap R on your keyboard to reload,\n' +
    'Shake or press menu button for dev menu',
});

export default class account extends Component{
    render() {
        return (


                    账户页面


        );
    }
}

const styles = StyleSheet.create({
    container: {
        flex: 1,
        justifyContent: 'center',
        alignItems: 'center',
        backgroundColor: '#F5FCFF',
    },
});
App.js
/**
 * Sample React Native App
 * https://github.com/facebook/react-native
 * @flow
 */

import React, { Component } from 'react';
import {
  Platform,
  StyleSheet,
  Text,
  View
} from 'react-native';

import List from  './Component/List/list';
import Edit from  './Component/Edit/edit';
import Account from  './Component/Account/account';
import Picture from  './Component/Picture/picture';

export default class App extends Component{
  render() {
    return (


         主要模块


    );
  }
}

const styles = StyleSheet.create({
  container: {
    flex: 1,
    justifyContent: 'center',
    alignItems: 'center',
    backgroundColor: '#F5FCFF',
  },
});
使用TabBar组件
npm install react-native-scrollable-tab-view –save
图标库组件
npm install react-native-vector-icons –save
Link图片
react-native link
图标库地址
RAP地址
mock地址
将前面文章中自定义的WTTabBar.js文件复制到项目中。
修改WTTabBar.js文件
import React, { Component } from 'react';
import {
    Platform,
    StyleSheet,
    Text,
    View,
    AppRegistry,
    TouchableOpacity,
    Image,
    PixelRatio,
} from 'react-native';


import PropTypes from 'prop-types';
import Icon from 'react-native-vector-icons/Ionicons';


export default class WTTabBar extends Component {
    static propTypes={
        goToPage:PropTypes.func, //跳转到Tab的方法
        activeTab:PropTypes.number,//选中的下标
        tabs:PropTypes.array,//tabs的集合!像OC items的数组

        //接下来,拓展自定义的属性
        tabIconNames:PropTypes.array,//Item图片的名称
        tabNames:PropTypes.array,//文字的名字
        tabIconSelectedName:PropTypes.array,//保存选中图片的集合
    }
    render() {
        return (

                {/*返回一个一个的Item*/}
                {/*//遍历集合,返回对象和角标。调用回调方法,传递值tab,i*/}
                {this.props.tabs.map((tab,i)=>this.renderItem(tab,i))}

        );
    }
    renderItem(tab,i){
        //判断i是否是当前选中的tab!
        const color = this.props.activeTab == i ? "orange":"black";

        return(
            1}//取消高亮
                onPress={()=>this.props.goToPage(i)}
                key={i}
                style={styles.tab}
            >

                    this.props.tabIconNames[i]}
                        size={30}
                        color={color}
                    />
                    {/*文字*/}
                    {this.props.tabNames[i]}


        )
    }
}

const styles = StyleSheet.create({
    tabsStyle:{
        flexDirection:'row',
        height:50
    },
    tabItem:{
        justifyContent:'center',
        alignItems:'center'
    },
    tab:{
        flex:1
    }
});
App.js文件
/**
* Sample React Native App
* https://github.com/facebook/react-native
* @flow
*/
import React, { Component } from 'react';
import {
Platform,
StyleSheet,
Text,
View
} from 'react-native';
import List from './Component/List/list';
import Edit from './Component/Edit/edit';
import Account from './Component/Account/account';
import Picture from './Component/Picture/picture';
import WTTabBar from './WTTabBar';
import ScrollabelTabView,{DefaultTabBar,ScrollableTabBar} from 'react-native-scrollable-tab-view';
export default class App extends Component{
constructor(props){
super(props);
this.state={
tabNames:['视频','录制','图片','我的'],
tabIconNames:['ios-videocam-outline','ios-recording','ios-reverse-camera','ios-contact']
}
}
render() {
let tabNames = this.state.tabNames;
let tabIconNames = this.state.tabIconNames;
return (
}
tabBarPosition = "bottom"
scrollWithoutAnimation = {true} //禁止滑动动画,但是仍可滑动
locked = {true} //禁止滑动
>
"list"/>
"edit"/>
"picture"/>
"account"/>
运行效果
那么,项目的基本目录结构已经大致完成。
下一篇文章我们会继续学习ListView,页面渲染。


