Flask-APScheduler使用
转载@ 听风。
1.安装
pip install apscheduler安装完毕
2. 简单任务
首先,来个最简单的例子,看看它的威力。
![]()
# coding:utf-8
from apscheduler.schedulers.blocking import BlockingScheduler
import datetime


def aps_test():
    print datetime.datetime.now().strftime('%Y-%m-%d %H:%M:%S'), '你好'


scheduler = BlockingScheduler()
scheduler.add_job(func=aps_test, trigger='cron', second='*/5')
scheduler.start()![]()
看代码,定义一个函数,然后定义一个scheduler类型,添加一个job,然后执行,就可以了,代码是不是超级简单,而且非常清晰。看看结果吧。
5秒整倍数,就执行这个函数,是不是超级超级简单?对了,apscheduler就是通俗易懂。
再写一个带参数的。
![]()
# coding:utf-8
from apscheduler.schedulers.blocking import BlockingScheduler
import datetime


def aps_test(x):
    print datetime.datetime.now().strftime('%Y-%m-%d %H:%M:%S'), x

scheduler = BlockingScheduler()
scheduler.add_job(func=aps_test, args=('你好',), trigger='cron', second='*/5')
scheduler.start()![]()
结果跟上面一样的。
好了,上面只是给大家看的小例子,我们先从头到位梳理一遍吧。apscheduler分为4个模块,分别是Triggers,Job stores,Executors,Schedulers.从上面的例子我们就可以看出来了,triggers就是触发器,上面的代码中,用了cron,其实还有其他触发器,看看它的源码解释。
The ``trigger`` argument can either be:
          #. the alias name of the trigger (e.g. ``date``, ``interval`` or ``cron``), in which case any extra keyword
             arguments to this method are passed on to the trigger's constructor
          #. an instance of a trigger class
看见没有,源码中解释说,有date, interval, cron可供选择,其实看字面意思也可以知道,date表示具体的一次性任务,interval表示循环任务,cron表示定时任务,好了,分别写个代码看看效果最明显。
![]()
 1 # coding:utf-8
 2 from apscheduler.schedulers.blocking import BlockingScheduler
 3 import datetime
 4
 5
 6 def aps_test(x):
 7     print datetime.datetime.now().strftime('%Y-%m-%d %H:%M:%S'), x
 8
 9 scheduler = BlockingScheduler()
10 scheduler.add_job(func=aps_test, args=('定时任务',), trigger='cron', second='*/5')
11 scheduler.add_job(func=aps_test, args=('一次性任务',), next_run_time=datetime.datetime.now() + datetime.timedelta(seconds=12))
12 scheduler.add_job(func=aps_test, args=('循环任务',), trigger='interval', seconds=3)
13
14 scheduler.start()![]()
看看结果
其实应该不用我解释代码,大家也可以看出结果了,非常清晰。除了一次性任务,trigger是不要写的,直接定义next_run_time就可以了,关于date这部分,官网没有解释,但是去看看源码吧,看这行代码。
![]()
 1     def _create_trigger(self, trigger, trigger_args):
 2         if isinstance(trigger, BaseTrigger):
 3             return trigger
 4         elif trigger is None:
 5             trigger = 'date'
 6         elif not isinstance(trigger, six.string_types):
 7             raise TypeError('Expected a trigger instance or string, got %s instead' % trigger.__class__.__name__)
 8
 9         # Use the scheduler's time zone if nothing else is specified
10         trigger_args.setdefault('timezone', self.timezone)
11
12         # Instantiate the trigger class
13 return self._create_plugin_instance('trigger', trigger, trigger_args)![]()
第4行,如果trigger为None,直接定义trigger为'date'类型。其实弄到这里,大家应该自己拓展一下,如果实现web的异步任务。假设接到一个移动端任务,任务完成后,发送一个推送到移动端,用date类型的trigger完成可以做的很好。
3.日志
好了,scheduler的基本应用,我想大家已经会了,但这仅仅只是开始。如果代码有意外咋办?会阻断整个任务吗?如果我要计算密集型的任务咋办?下面有个代码,我们看看会发生什么情况。
![]()
 1 # coding:utf-8
 2 from apscheduler.schedulers.blocking import BlockingScheduler
 3 import datetime
 4
 5
 6 def aps_test(x):
 7     print 1/0
 8     print datetime.datetime.now().strftime('%Y-%m-%d %H:%M:%S'), x
 9
10 scheduler = BlockingScheduler()
11 scheduler.add_job(func=aps_test, args=('定时任务',), trigger='cron', second='*/5')
12
13 scheduler.start()![]()
还是上面代码,但我们中间故意加了个错误,看看会发生什么情况。
说我们没有log文件,好吧,我们添加一个log文件,看看写的什么。
![]() View Code
View Code
终于可以看到了,这时候才看到错误,这个是一定要注意的。
其实,到这里,完全可以执行大多数任务了,但我们为了效率,安全性,再往下面看看,还有什么。
4.删除任务
假设我们有个奇葩任务,要求执行一定阶段任务以后,删除某一个循环任务,其他任务照常进行。有如下代码:
![]()
![]()
1 # coding:utf-8
 2 from apscheduler.schedulers.blocking import BlockingScheduler
 3 import datetime
 4 import logging
 5
 6 logging.basicConfig(level=logging.INFO,
 7                     format='%(asctime)s %(filename)s[line:%(lineno)d] %(levelname)s %(message)s',
 8                     datefmt='%Y-%m-%d %H:%M:%S',
 9                     filename='log1.txt',
10                     filemode='a')
11
12
13 def aps_test(x):
14     print datetime.datetime.now().strftime('%Y-%m-%d %H:%M:%S'), x
15
16
17 def aps_date(x):
18     scheduler.remove_job('interval_task')
19     print datetime.datetime.now().strftime('%Y-%m-%d %H:%M:%S'), x
20
21
22 scheduler = BlockingScheduler()
23 scheduler.add_job(func=aps_test, args=('定时任务',), trigger='cron', second='*/5', id='cron_task')
24 scheduler.add_job(func=aps_date, args=('一次性任务,删除循环任务',), next_run_time=datetime.datetime.now() + datetime.timedelta(seconds=12), id='date_task')
25 scheduler.add_job(func=aps_test, args=('循环任务',), trigger='interval', seconds=3, id='interval_task')
26 scheduler._logger = logging
27
28 scheduler.start()![]()
看看结果,
在运行过程中,成功删除某一个任务,其实就是为每个任务定义一个id,然后remove_job这个id,是不是超级简单,直观?那还有什么呢?
5.停止任务,恢复任务
看看官方文档,还有pause_job, resume_job,用法跟remove_job一样,这边就不详细介绍了,就写个代码。
![]()
![]()
 1 # coding:utf-8
 2 from apscheduler.schedulers.blocking import BlockingScheduler
 3 import datetime
 4 import logging
 5
 6 logging.basicConfig(level=logging.INFO,
 7                     format='%(asctime)s %(filename)s[line:%(lineno)d] %(levelname)s %(message)s',
 8                     datefmt='%Y-%m-%d %H:%M:%S',
 9                     filename='log1.txt',
10                     filemode='a')
11
12
13 def aps_test(x):
14     print datetime.datetime.now().strftime('%Y-%m-%d %H:%M:%S'), x
15
16
17 def aps_pause(x):
18     scheduler.pause_job('interval_task')
19     print datetime.datetime.now().strftime('%Y-%m-%d %H:%M:%S'), x
20
21
22 def aps_resume(x):
23     scheduler.resume_job('interval_task')
24     print datetime.datetime.now().strftime('%Y-%m-%d %H:%M:%S'), x
25
26 scheduler = BlockingScheduler()
27 scheduler.add_job(func=aps_test, args=('定时任务',), trigger='cron', second='*/5', id='cron_task')
28 scheduler.add_job(func=aps_pause, args=('一次性任务,停止循环任务',), next_run_time=datetime.datetime.now() + datetime.timedelta(seconds=12), id='pause_task')
29 scheduler.add_job(func=aps_resume, args=('一次性任务,恢复循环任务',), next_run_time=datetime.datetime.now() + datetime.timedelta(seconds=24), id='resume_task')
30 scheduler.add_job(func=aps_test, args=('循环任务',), trigger='interval', seconds=3, id='interval_task')
31 scheduler._logger = logging
32
33 scheduler.start()![]()
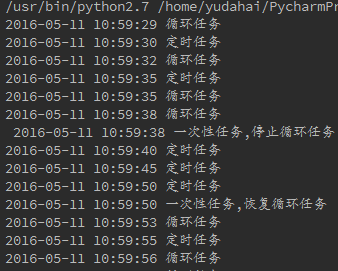
看看结果
是不是很容易?好了,删除任务,停止任务,恢复任务就介绍到这,下面我们看看监听任务。
6.意外
任何代码都可能发生意外,关键是,发生意外了,如何第一时间知道,这才是公司最关心的,apscheduler已经为我们想到了这些。
看下面的代码,
![]()
![]()
 1 # coding:utf-8
 2 from apscheduler.schedulers.blocking import BlockingScheduler
 3 from apscheduler.events import EVENT_JOB_EXECUTED, EVENT_JOB_ERROR
 4 import datetime
 5 import logging
 6
 7 logging.basicConfig(level=logging.INFO,
 8                     format='%(asctime)s %(filename)s[line:%(lineno)d] %(levelname)s %(message)s',
 9                     datefmt='%Y-%m-%d %H:%M:%S',
10                     filename='log1.txt',
11                     filemode='a')
12
13
14 def aps_test(x):
15     print datetime.datetime.now().strftime('%Y-%m-%d %H:%M:%S'), x
16
17
18 def date_test(x):
19     print datetime.datetime.now().strftime('%Y-%m-%d %H:%M:%S'), x
20     print 1/0
21
22
23 def my_listener(event):
24     if event.exception:
25         print '任务出错了!!!!!!'
26     else:
27         print '任务照常运行...'
28
29 scheduler = BlockingScheduler()
30 scheduler.add_job(func=date_test, args=('一定性任务,会出错',), next_run_time=datetime.datetime.now() + datetime.timedelta(seconds=15), id='date_task')
31 scheduler.add_job(func=aps_test, args=('循环任务',), trigger='interval', seconds=3, id='interval_task')
32 scheduler.add_listener(my_listener, EVENT_JOB_EXECUTED | EVENT_JOB_ERROR)
33 scheduler._logger = logging
34
35 scheduler.start()![]()
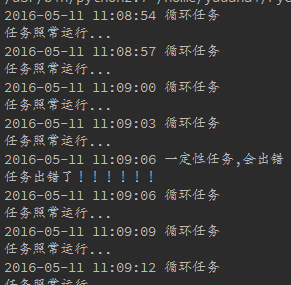
看看结果
是不是很直观,在生产环境中,你可以把出错信息换成发送一封邮件或者发送一个短信,这样定时任务出错就可以立马就知道了。
好了,今天就讲到这,以后我们有机会再来拓展这个apscheduler,这个非常强大而且直观的后台任务库。
7作业运行的控制
add_job的第二个参数是trigger,它管理着作业的调度方式。它可以为date, interval或者cron。对于不同的trigger,对应的参数也相同。
(1). cron定时调度
year (int|str) – 4-digit year
month (int|str) – month (1-12)
day (int|str) – day of the (1-31)
week (int|str) – ISO week (1-53)
day_of_week (int|str) – number or name of weekday (0-6 or mon,tue,wed,thu,fri,sat,sun)
hour (int|str) – hour (0-23)
minute (int|str) – minute (0-59)
second (int|str) – second (0-59)
start_date (datetime|str) – earliest possible date/time to trigger on (inclusive)
end_date (datetime|str) – latest possible date/time to trigger on (inclusive)
timezone (datetime.tzinfo|str) – time zone to use for the date/time calculations (defaults to scheduler timezone)
和Linux的Crontab一样,它的值格式为:
| Expression | Field | Description |
|---|---|---|
| * | any | Fire on every value |
| */a | any | Fire every a values, starting from the minimum |
| a-b | any | Fire on any value within the a-b range (a must be smaller than b) |
| a-b/c | any | Fire every c values within the a-b range |
| xth y | day | Fire on the x -th occurrence of weekday y within the month |
| last x | day | Fire on the last occurrence of weekday x within the month |
| last | day | Fire on the last day within the month |
| x,y,z | any | Fire on any matching expression; can combine any number of any of the above expressions |
几个例子如下:
| 1 2 3 4 5 |
# Schedules job_function to be run on the third Friday # of June, July, August, November and December at 00:00, 01:00, 02:00 and 03:00 sched.add_job(job_function, 'cron', month='6-8,11-12', day='3rd fri', hour='0-3') # Runs from Monday to Friday at 5:30 (am) until 2014-05-30 00:00:00 sched.add_job(job_function, 'cron', day_of_week='mon-fri', hour=5, minute=30, end_date='2014-05-30') |
(2). interval 间隔调度
它的参数如下:
weeks (int) – number of weeks to wait
days (int) – number of days to wait
hours (int) – number of hours to wait
minutes (int) – number of minutes to wait
seconds (int) – number of seconds to wait
start_date (datetime|str) – starting point for the interval calculation
end_date (datetime|str) – latest possible date/time to trigger on
timezone (datetime.tzinfo|str) – time zone to use for the date/time calculations
例子:
| 1 2 |
# Schedule job_function to be called every two hours sched.add_job(job_function, 'interval', hours=2) |
(3). date 定时调度
最基本的一种调度,作业只会执行一次。它的参数如下:
run_date (datetime|str) – the date/time to run the job at
timezone (datetime.tzinfo|str) – time zone for run_date if it doesn’t have one already
例子:
| 1 2 3 4 |
# The job will be executed on November 6th, 2009 sched.add_job(my_job, 'date', run_date=date(2009, 11, 6), args=['text']) # The job will be executed on November 6th, 2009 at 16:30:05 sched.add_job(my_job, 'date', run_date=datetime(2009, 11, 6, 16, 30, 5), args=['text']) |


