安卓数据库DBflow详解
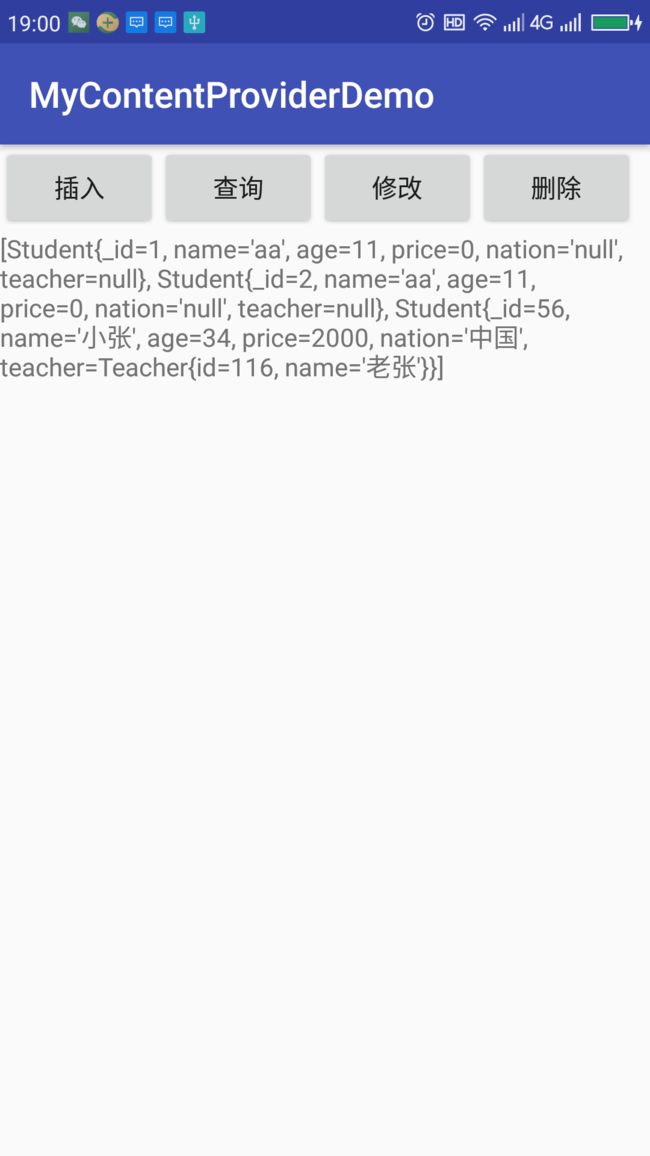
我们先来看下效果图
一、配置
Android Studio 3.1.2的配置
根目录的build.gradle
allprojects {
    repositories {
        google()
        jcenter()
        maven { url "https://www.jitpack.io" }//加上这个
    }
在module的build.gradle配置如下所示
def dbflow_version = "4.2.4"
dependencies {
    annotationProcessor "com.github.Raizlabs.DBFlow:dbflow-processor:${dbflow_version}"
    implementation "com.github.Raizlabs.DBFlow:dbflow-core:${dbflow_version}"
    implementation "com.github.Raizlabs.DBFlow:dbflow:${dbflow_version}"
}
配置就结束了。
二、代码使用流程
在新建的AppDatabase.java中的配置如下
@Database(name = AppDatabase.DATA_NAME,version = AppDatabase.DATA_VERSION)
public final class AppDatabase {

    public static final String DATA_NAME = "StudentDatabase";//数据库名称

    public static final int DATA_VERSION = 5;//版本信息,一开始的时候是1,这个5是进过升级过后额值
}
在BaseApplication中的初始化;
public class BaseApplication extends Application {
    @Override
    public void onCreate() {
        super.onCreate();
        FlowManager.init(this);
    }
}
下面就是增删该查的操作
Student.java类
@Table(database = AppDatabase.class)//建立的表是在AppDatabase数据库中,默认的表名为:Student_Table
public class Student extends BaseModel implements Parcelable{
    @PrimaryKey(autoincrement = true)
    private int _id;
    @Column
    private String name;
    @Column
    private int age;
    @Column
    private int price;
    @Column
    private String nation;
    @ForeignKey(tableClass = Teacher.class,saveForeignKeyModel = true)//这里是设置为one-one的形式,切记不要加stubbedRelationship = true,要不然后期只能查询id,其他值查不出来。
    private Teacher teacher;

    @Override
    public String toString() {
        return "Student{" +
                "_id=" + _id +
                ", name='" + name + '\'' +
                ", age=" + age +
                ", price=" + price +
                ", nation='" + nation + '\'' +
                ", teacher=" + teacher +
                '}';
    }

    public Teacher getTeacher() {
        return teacher;
    }

    public void setTeacher(Teacher teacher) {
        this.teacher = teacher;
    }

    public Student(int _id, String name, int age, int price, String nation, Teacher teacher) {
        this._id = _id;
        this.name = name;
        this.age = age;
        this.price = price;
        this.nation = nation;
        this.teacher = teacher;
    }

    public Student() {
    }

    public int getPrice() {
        return price;
    }

    public void setPrice(int price) {
        this.price = price;
    }

    public String getNation() {
        return nation;
    }

    public void setNation(String nation) {
        this.nation = nation;
    }

    public Student(String name, int age) {
        this.name = name;
        this.age = age;
    }

    public Student(int _id, String name, int age) {
        this._id = _id;
        this.name = name;
        this.age = age;
    }

    public Student(String name, int age, int price, String nation) {
        this.name = name;
        this.age = age;
        this.price = price;
        this.nation = nation;
    }

    public String getName() {
        return name;
    }

    public void setName(String name) {
        this.name = name;
    }

    public int getAge() {
        return age;
    }

    public void setAge(int age) {
        this.age = age;
    }

    public int get_id() {
        return _id;
    }

    public void set_id(int _id) {
        this._id = _id;
    }

    @Override
    public int describeContents() {//暂时return 为0就好
        return 0;
    }

    @Override
    public void writeToParcel(Parcel dest, int flags) {//序列化的操作
        dest.writeInt(_id);
        dest.writeString(name);
        dest.writeInt(age);
    }

    public static final Creator CREATOR = new Creator(){

        @Override
        public Student createFromParcel(Parcel source) {
            int _id = source.readInt();
            String name = source.readString();
            int age = source.readInt();
            return new Student(_id,name,age);
        }

        @Override
        public Student[] newArray(int size) {
            return new Student[size];
        }
    };

} @Table(database = AppDatabase.class)
public class Teacher extends BaseModel {
@PrimaryKey(autoincrement = true)
private int id;
@Column
private String name;
public Teacher() {
}
public Teacher(String name) {
this.name = name;
}
public int getId() {
return id;
}
public void setId(int id) {
this.id = id;
}
public String getName() {
return name;
}
public void setName(String name) {
this.name = name;
}
@Override
public String toString() {
return "Teacher{" +
"id=" + id +
", name='" + name + '\'' +
'}';
}
}增加
private void insertDatas() {
        List students = SQLite.select().from(Student.class).queryList();

        Teacher teacher = new Teacher("老张");
        Student student = new Student();
        student.setName("小张");
        student.setAge(34);
        student.setNation("中国");
        student.setPrice(2000);
        student.setTeacher(teacher);

        Log.e(TAG, "insertDatas: "+student.toString());
        student.save();
        queryDatas();
    }
更新
private void updateDatas() {
//        Student student = new Student();
//        student.set_id(10);
//        student.setName("小王");
//        student.update();
        SQLite.update(Student.class).set(Student_Table.age.eq(10))
                .where(Student_Table._id.eq(10))
                .execute();
        queryDatas();
    }
删除
private void deleteDatas() {
        SQLite.delete().from(Student.class).where(Student_Table._id.greaterThan(2))
                .execute();
        queryDatas();
    }
查询(查询分为同步查询和异步查询,使用非常简单只用在查询的时候增加异步方法就好,查询完成后是回调在主线程中)
*同步查询
private void queryDatas() {
        List students = SQLite.select()
                .from(Student.class)
                .orderBy(Student_Table._id, true)
                .queryList();
        Log.e(TAG, "queryDatas: "+students.size()+students.toString());
        tv_show.setText(students.toString());
    }
*异步查询
private void asyncQueryDatas(){
        SQLite.select().from(Student.class)
                .orderBy(Student_Table._id,true)
                .async()//异步查询标志
                .queryListResultCallback(new QueryTransaction.QueryResultListCallback() {//成功的监听
                    @Override
                    public void onListQueryResult(QueryTransaction transaction, @NonNull List tResult) {
                        Log.e(TAG, "onListQueryResult: "+Thread.currentThread().getName());//回调在主线程
                        Log.e(TAG, "onListQueryResult: "+tResult.toString());
                        tv_show.setText(tResult.toString());

                    }
                })
                .error(new Transaction.Error() {//错误监听
                    @Override
                    public void onError(@NonNull Transaction transaction, @NonNull Throwable error) {

                    }
                })
                .execute();//执行动作
    }
下面说一下升级
在表中增加列
*需要在bean类中添加相应的类型
    @Column
    private int price;
    @Column
    private String nation;
*在写一个类继承
AlterTableMigration这个类
代码如下所示
@Migration(version = 5, database = AppDatabase.class)//修改完成后需要把verson的值+1
public class MyMigration extends AlterTableMigration {

    public MyMigration(Class table) {
        super(table);
    }

    @Override
    public void onPreMigrate() {
        addColumn(SQLiteType.REAL,"price");//列的增加
        addColumn(SQLiteType.TEXT,"nation");//列的增加
        //addForeignKeyColumn(SQLiteType.INTEGER,"teacher_id", FlowManager.getTableName(Teacher.class)+"(`id`)");//这个方法是用来在增加外键的时候使用的
    }
}
我只是做了测试one-one的。
one-many的看官方分参考文档,官方分实例如下所示
 @ForeignKey(saveForeignKeyModel = false)
    Colony colony;

    List ants;

    @OneToMany(methods = {OneToMany.Method.ALL}, variableName = "ants")
    public List getMyAnts() {
        if (ants == null || ants.isEmpty()) {
            ants = SQLite.select()
                .from(Ant.class)
                .where(Ant_Table.queen_id.eq(id))
                .queryList();
        }
        return ants;
    }
参考资料:
官方文档:点击打开链接 比较快,国内的蛋疼
感谢郭神的微信推送和原创作者,设置外键的那里就是参考微信的里面的。
