Apache Shiro简介
想做一个关于权限管理的系统,了解到Apache Shiro比较适合,那么开始着手学习吧!
一、Apache Shiro简介
Apache Shiro是一个简单易用又强大的Java开源安全管理框架。
四大基石:
- Authentication: 验证用户身份,通常称为用户“登录”
- Authorization: 权限控制
- Cryptography: 加密
- Session Management: 会话管理
其他功能:
- 支持Web
- 缓存:保证高效
- 并发:支持多线程应用
- 测试:支持单元测试、集成测试
- “Run as”:允许用户假设另一个用户的身份
- “Remember me”:可以跨Session记录用户的身份,只有在强制要求登录时才需要用户登录
注意,Shiro不会去维护用户、维护权限,需要开发者自己去设计去提供,然后通过相关接口注入给Shiro。
二、核心概念:Subject, SecurityManager, and Realms
- Subject:”the currently executing user”,即当前用户/第三方服务/守护进程/任何和软件交互的任何事件,下列示例代码为获取Subject对象
import org.apache.shiro.subject.Subject;
import org.apache.shiro.SecurityUtils;
...
Subject currentUser = SecurityUtils.getSubject();- SecurityManager:安全管理器,管理所有用户的安全操作。是Shiro体系结构的核心。Subject都会绑定一个SecurityManager,与Subject的所有交互都会委托给SecurityManager。
- Realms:Realm充当Shiro和应用程序的安全数据之间的“桥梁”或“连接器”。也就是说,Shiro从Realms中获取安全数据(用户、角色、权限等)。
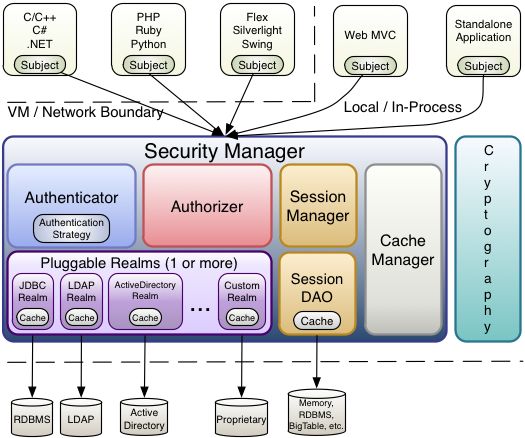
图源:http://greycode.github.io/shiro/doc/architecture.html
首先,应用代码通过Subject进行授权和验证,然后Subject委托给SecurityManager处理,我们需要给SecurityManager注入Realm,从而使SecurityManager得到合法的用户和权限进行判断。
三、如何使用
- Authentication
当调用login方法时,SecurityManager会接受AuthenticationToken,然后分配到一个或多个Realms中执行身份验证。
Subject login
//1. Acquire submitted principals and credentials:
AuthenticationToken token =
new UsernamePasswordToken(username, password);

//2. Get the current Subject:
Subject currentUser = SecurityUtils.getSubject();

//3. Login:
currentUser.login(token);
对于login失败也有相应的处理
Handle Failed Login
//Login:
try {
    currentUser.login(token);
} catch (IncorrectCredentialsException ice) { …
} catch (LockedAccountException lae) { …
}
…
catch (AuthenticationException ae) {…
} - Authorization
通过Subject API可以轻松地执行角色和权限检查。
方式一:Role check
if ( subject.hasRole(“administrator”) ) {
    //show the ‘Create User’ button
} else {
    //grey-out the button?
}
但是这种方式有一个巨大的弱点:无法在运行时添加/删除角色,如果在运行时改变了角色名称/配置,代码就会被破坏。所以如果需要在运行时可以增/删角色,需要使用另一种方法。
方式二: Permission check
if ( subject.isPermitted(“user:create”) ) {
    //show the ‘Create User’ button
} else {
    //grey-out the button?
}
这样,任何分配了“user:create”权限的角色都可以点击’Create User’按钮,并且这些角色和分配都可以在运行时修改。
方式三:Instance-Level Permission Check
if ( subject.isPermitted(“user:delete:jsmith”) ) {
    //delete the ‘jsmith’ user
} else {
    //don’t delete ‘jsmith’
}
这种方式可以更具体的控制权限
大多数安全框架仅提供了Authentication和Authorization功能,但是Shiro还提供了其他的功能。
- Session Management
Shiro可以管理任何环境下的用户会话,即使是非Web/Servlet或EJB容器下——这是区别于其他安全框架而特有的功能
Session session = subject.getSession();- Cryptography
如果使用JDK的MessageDigest进行加密的话
try {
    MessageDigest md = MessageDigest.getInstance("MD5");
    md.digest(bytes);
    byte[] hashed = md.digest();
} catch (NoSuchAlgorithmException e) {
    e.printStackTrace();
}
而使用Shiro只需要
String hex = new Md5Hash(myFile).toHex(); SHA-512散列和密码的Base64编码也一样很简单
String encodedPassword =
new Sha512Hash(password, salt, count).toBase64();- Ciphers
之前使用过JDK Cryptography API, 尤其是javax.crypto.Cipher这个类的开发人员都知道这是比较复杂的加密密码实现。
Shiro试图通过引入其CipherService API来简化加密密码的整个概念。
CipherService是一种简单,无状态的,线程安全的API,可以在一次方法调用中完整地加密或解密数据。我们只需提供密钥,然后根据需要进行加密或解密。
// use 256-bit AES encryption
AesCipherService cipherService = new AesCipherService();
cipherService.setKeySize(256);

//create a test key:
byte[] testKey = cipherService.generateNewKey();

//encrypt a file’s bytes:
byte[] encrypted =
cipherService.encrypt(fileBytes, testKey);- Web Support
将Shiro设置为Web应用程序很简单。唯一需要的是在web.xml中定义一个Shiro Servlet过滤器
ShiroFilter in web.xml
<filter>
    <filter-name>ShiroFilterfilter-name>
    <filter-class>
        org.apache.shiro.web.servlet.IniShiroFilter
    filter-class>

filter>

<filter-mapping>
     <filter-name>ShiroFilterfilter-name>
     <url-pattern>/*url-pattern>
filter-mapping>
四、核心架构
图源:http://greycode.github.io/shiro/doc/architecture.html
有一些在前面有较详细地介绍过,在这里就不再赘述了。
- Authenticator (org.apache.shiro.authc.Authenticator)用户认证管理器:
- Authenticator用于处理用户的登陆逻辑。
- 通过调用Realm接口来判断当前用户的身份。
- 这里涉及到Authentication Strategy(用户认证策略),如果配置了多个Realm,AuthenticationStrategy将用来决定什么样的条件下认证会成功或失败(比如,如果一个realm的数据认证成功而其他的却失败了,能算是认证通过吗?还是必须所有的都认证成功?还是只要第一个成功就可以?)。
- Authorizer (org.apache.shiro.authz.Authorizer)权限管理器:
- Authorizer用于控制用户的访问,决定用户是否被允许做什么。和Authenticator一样, Authorizer也有一套自己的策略去协调Realm
- SessionManager (org.apache.shiro.session.mgt.SessionManager)会话管理器
- 用于创建会话、管理会话的生命周期
- Shiro可以管理任何环境下的用户会话,即使是非Web/Servlet或EJB容器下
- 默认情况下,如果当前环境下有会话管理器,则Shiro会使用(容器)提供的会话管理机制
- SessionDAO (org.apache.shiro.session.mgt.eis.SessionDAO)
- SessionDAO允许使用任何类型的数据源来存储session数据,SessionDAOS代替sessionManager执行CRUD。
- CacheManager (org.apache.shiro.cache.CacheManager)
- CacheManager用于创建与管理在Shiro中的其他组件使用到的缓存实例与生命周期。缓存用于存储在后端获取到的认证、授权和会话管理的数据来改善性能,查找数据时先从缓存中获取,如果没有再从其他数据源获取。Shiro中可以使用任何开源或商业的缓存方案。
References:
- https://www.infoq.com/articles/apache-shiro
- http://greycode.github.io/shiro/doc/architecture.html

