iOSTheme换肤使用说明
效果

iOSTheme-master
Example
To run the example project, clone the repo, and run pod install from the Example directory first.
Requirements
Installation
CTVITTheme-master is available through CocoaPods. To install
it, simply add the following line to your Podfile:
pod 'CTVITTheme-master'
Author
liyuunxiangGit
License
CTVITTheme-master is available under the MIT license. See the LICENSE file for more info.
CTVITTheme-master
Example
To run the example project, clone the repo, and run pod install from the Example directory first.
Requirements
Installation
CTVITTheme-master is available through CocoaPods. To install
it, simply add the following line to your Podfile:
pod 'CTVITTheme-master'
Author
liyuunxiangGit
License
CTVITTheme-master is available under the MIT license. See the LICENSE file for more info.
使用步骤:
一、导入
1.1、直接podfile文件导入pod 'CTVITTheme-master',然后执行pod install
1.2、目前如果没有上传到pod上面,需要收到导入文件,复制Classes里面的所有文件,导入到工程当中。
二、初始化
[[CTVITThemeManager sharedInstance] setupThemeNameArray:@[CTVITThemeWhite, CTVITThemeBlack,CTVITThemeBlue]];
CTVITThemeWhite, CTVITThemeBlack,CTVITThemeBlue,是资源主题Bundle的名称,下面会说到资源Bundle的引入方法。
三、皮肤设置
具体调用非常简单,比如需要换肤的视图控件原本是调用backgroundColor设置颜色,只需要换成调用扩展方法theme_backgroundColor即可,例如:
self.view.theme_backgroundColor = @"block_bg";
self.textField.theme_textColor = @"text_h1";
self.image.theme_image = @"icon_face";
富文本需要用CTVITThemeForegroundColorAttributeName``替换NSForegroundColorAttributeName`,例如:
[tabbarItem theme_setTitleTextAttributes:@{CTVITThemeForegroundColorAttributeName:@"tabbar_normalTitlecolor"} forState:UIControlStateNormal];
另外有些常用的属性在XIB等可视化视图也可以直接设置,
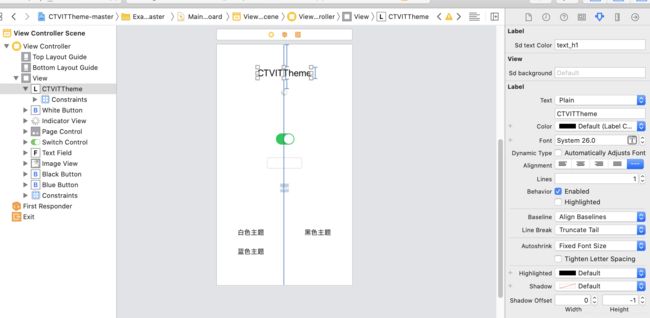
如果直接设置属性的方式不满足需求,还可以自己监听通知CTVITThemeChangedNotification,收到通知之后自行做颜色图标等切换。
四、资源管理
颜色字符串和图片是放在单独的Bundle里面进行管理的,所以刚开始要新建自己的主题Bundle. Bundle中 新建ColorsMap.plist和Images.xcassets
- 图片:就放在相应的主题bundle中的Images.xcassets管理,图片在不同主题下名字要保证一致。
- 颜色字符串:颜色字符串可以参考一下Demo中的文件,首先要有一个大分类,例如Demo中的block、text、line(跟随自己需要分类就好),如果你有一个分类叫SomeThing,那分类下内容命名要带上相应的前缀SomeThing_,不然会报找不到,color string是HEX 或者AHEX格式。
五、Bundle 创建注意事项

file->New->Target->macOS->Bundle
创建完成之后,设置如下:
- Base SDK 设置为 iOS
- Build Active Architecture Only 设置为 “YES”
- Installation Directory 删除掉后面的路径
- Code Signing Identity 选择 Don’t Code Sign iOS
- Deployment Target 设置为 合适的版本
- Skip Install 设置为 “NO”
- Strip Debug Symbols During Copy 设置为 “YES”
- COMBINE_HIDPI_IMAGES 设置为 “NO”
- 再设置一下依赖 :
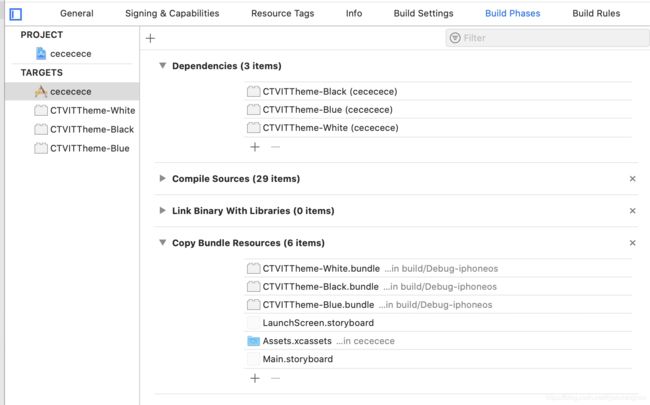
然后在模拟器和真机都进行command + B编译生成Bundle包
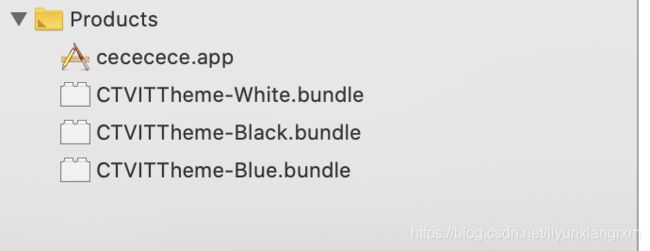
Command + B后生成Bundle包,点击Products里面的
bundle文件,Show in Finder 看到制作好的Bundle包
完成,下面就是在工程中使用了…
点击Products里面的bundle文件,Show in Finder 看到制作好的Bundle包,然后把bundle包拖拽到咱们需要使用的工程里面。
注:
- 如果要直接测试,可以从
皮肤bundle文件文件夹里的Bundle形成文件拖入到项目当中。 - 如果要自己制作bundle包,可以按照
皮肤bundle文件中的CTVITTheme-White的文件里的内容制作bundle包。制作流程看上一步。
实现原理:
其实实现原理非常简单的,我这里拿UIView举例子:
#import

@interface UIView (CTVITTheme)

@property (nonatomic, copy) NSString *theme_backgroundColor;
@property (nonatomic, copy) IBInspectable NSString *sd_background;
@property (nonatomic, copy) NSString *theme_tintColor;

@end
这是针对UIView提供的扩展,大家可以看到其中有换肤属性theme_backgroundColor ,如下图,我们在属性theme_backgroundColor 的Setter方法中有根据主题配置调用系统的相应方法,然后对控件注册监听,等切换主题之后就会收到通知,然后执行theme_didChanged方法,为控件设置正确的主题UI,That’s all~
