前言
前天看到一个爬取了知乎50多万评论的帖子, 羡慕的同时也想自己来尝试一下。看看能不能获取一些有价值的信息。
必备知识点
下面简单的来谈谈我对常见的防爬虫的一些技巧的理解。
headers
现在很多服务器都对爬虫进行了限制,有一个很通用的处理就是检测“客户端”的headers。通过这个简单的判断就可以判断出客户端是爬虫程序还是真实的用户。(虽然这一招在Python中可以很轻松的解决)。
Referer
referer字段很实用,一方面可以用于站内数据的防盗链。比如我们经常遇到的在别处复制的图片链接,粘到我们的博客中出现了“被和谐”的字样。
这就是referer起到的作用,服务器在接收到一个请求的时候先判断Referer是否为本站的地址。如果是的话就返回正确的资源;如果不是,就返回给客户端预先准备好的“警示”资源。
所以再写爬虫的时候(尤其是爬人家图片的时候),加上Referer字段会很有帮助。
User-Agent
User-Agent字段更是没的说了。相信绝大部分有防爬长处理的网站都会判断这个字段。来检测客户端是爬虫程序还是浏览器。
如果是爬虫程序(没有添加header的程序),服务器肯定不会返回正确的内容啦;如果包含了这个字段,才会进行到下一步的防爬虫处理操作。
如果网站仅仅做到了这一步,而你的程序又恰好添加了User-Agent,基本上就可以顺利的蒙混过关了。
隐藏域
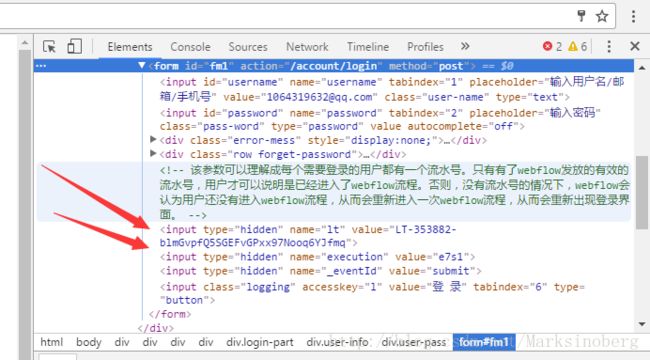
很多时候,我们模拟登录的时候需要提交的数据并不仅仅是用户名密码,还有一些隐藏域的数据。比如拿咱们CSDN来说,查看登录页
https://passport.csdn.net/account/login
的时候,你会发现源码中有这样的内容:
也就是说,如果你的程序仅仅post了username和password。那么是不可能进入到webflow流程的。因为服务器端接收请求的时候还会判断有没有lt和execution这两个隐藏域的内容。
其他
防止爬虫还有很多措施,我本人经验还少,所以不能在这里一一列举了。如果您有相关的经验,不妨留下评论,我会及时的更新到博客中,我非常的赞同大家秉承学习的理念来交流。
模拟登录
在正式的模拟登录知乎之前,我先来写个简单的小例子来加深一下印象。
模拟防爬
模拟防爬肯定是需要服务器端的支持了,下面简单的写一下来模拟整个过程。
服务器端
login.php
先来看看: login.php
用户名: ".$username."
密码:".$password."
token: ".$token;
        }else{
            echo "用户名或密码错误!";
        }
    }else{
        echo "token 验证失败!";
    }
}
login.html
相对应的前端代码简单的写成下面: login.html
郭璞的小窝
浏览器测试
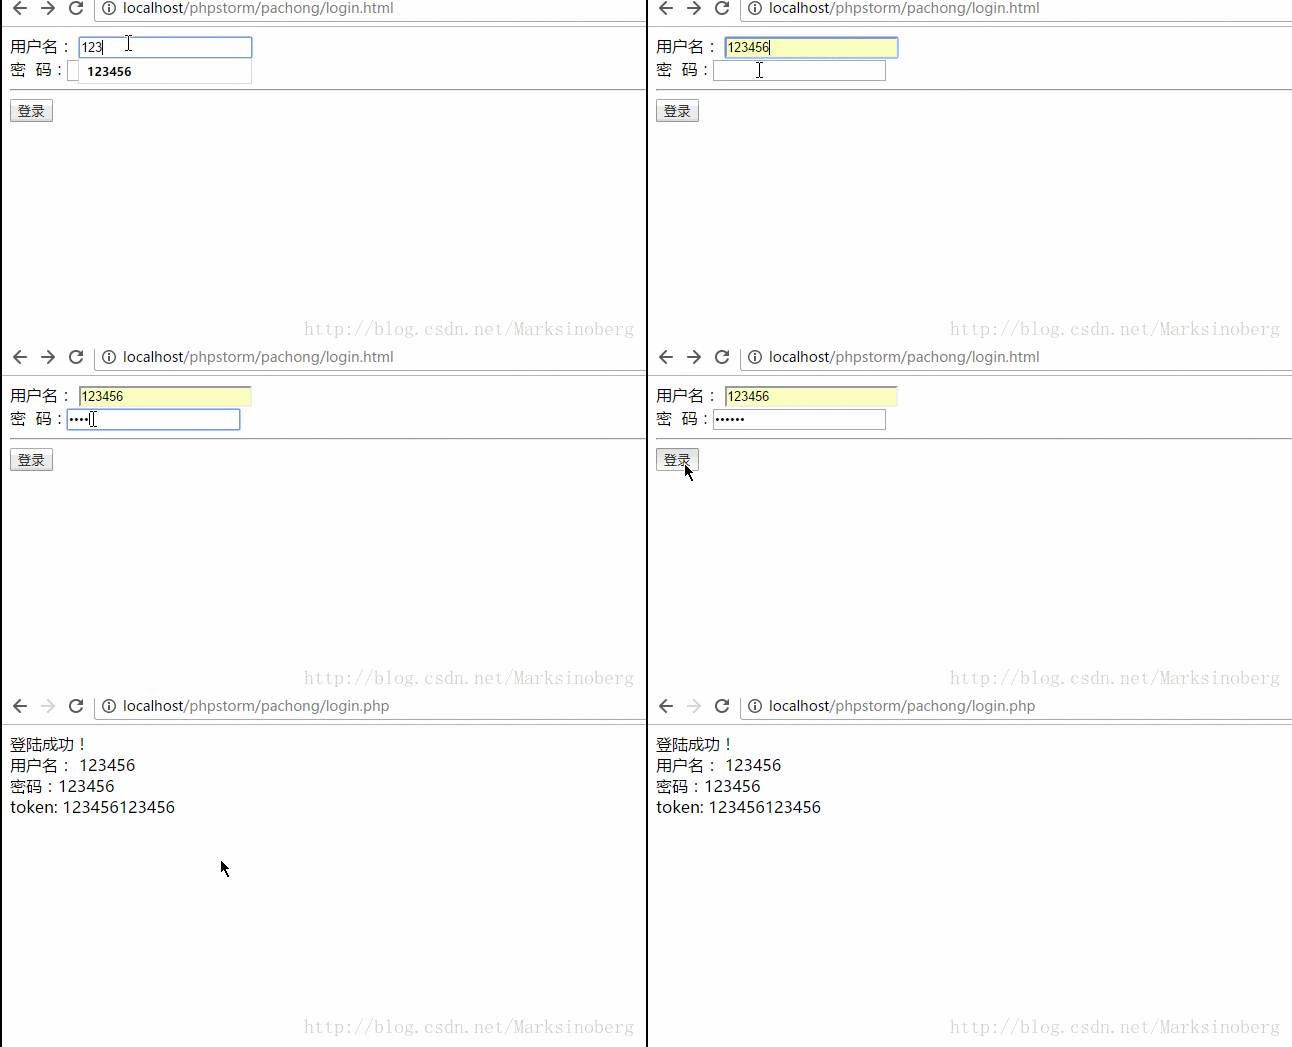
正常提交用户名密码的话如下:
我们不难发现,服务器端和客户端使用了相同的计算规则,这样的话我们就可以实现对客户端的登录请求进行一次简答的甄选了。正常的浏览器请求都是没有问题的。
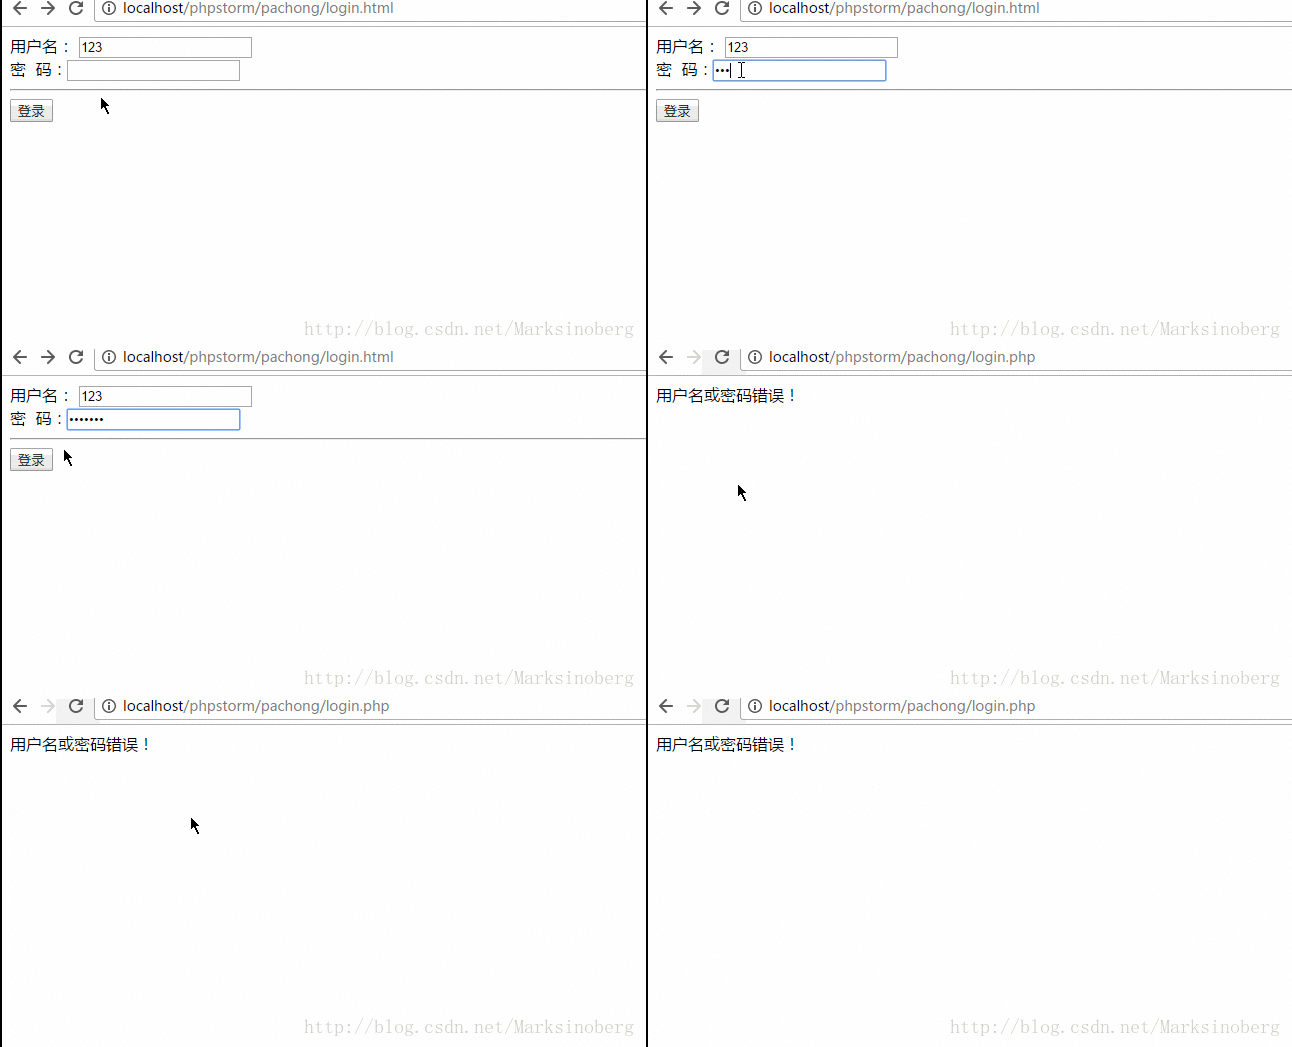
用户名或者密码填写错误的情况如下:
爬虫没有添加隐藏域时
用爬虫程序运行的话,如果没有添加隐藏域的内容,我们就不可能正确地登录了。那么先来看下这样的傻瓜式爬虫是怎么失效的吧。
使用Python写一个这样的爬虫用不了多少代码,那么就用Python来写吧。其他的接口测试工具postman,selenium等等也都是很方便的,这里暂且不予考虑。
# coding: utf8

# @Author: 郭 璞
# @File: sillyway.py
# @Time: 2017/4/7
# @Contact: [email protected]
# @blog: http://blog.csdn.net/marksinoberg
# @Description: 傻瓜式爬虫未添加隐藏域的值

import requests

url = "http://localhost/phpstorm/pachong/login.php"

payload = {
    'username': '123456',
    'password': '123456'
}

response = requests.post(url=url, data=payload)
print(response.text)
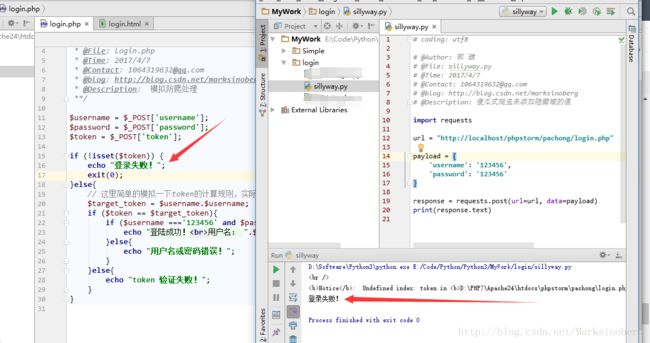
运行的结果如下:
对比PHP文件对于请求的处理,我们可以更加轻松的明白这个逻辑。
添加了隐藏域的爬虫
正如上面失败的案例,我们明白了要添加隐藏域的值的必要性。那么下面来改进一下。
因为我们”不知道”服务器端是怎么对token处理的具体的逻辑。所以还是需要从客户端的网页下手。
且看下面的图片。
注意:这里仅仅是为了演示的方便,采用了对username字段失去焦点时计算token。实际上在网页被拉取到客户端浏览器的时候, 服务器会事先计算好token的值,并赋予到token字段的。所以大可不必计较这里的实现。
Python代码
# coding: utf8

# @Author: 郭 璞
# @File: addhiddenvalue.py
# @Time: 2017/4/7
# @Contact: [email protected]
# @blog: http://blog.csdn.net/marksinoberg
# @Description: 添加了隐藏域信息的爬虫

import requests

## 先获取一下token的内容值,方便接下来的处理
url = 'http://localhost/phpstorm/pachong/login.php'

payload = {
    'username': '123456',
    'password': '123456',
    'token': '123456123456'
}

response = requests.post(url, data=payload)
print(response.text)
实现效果如下:
现在是否对于隐藏域有了更深的认识了呢?
知乎模拟登录
按照我们刚才的逻辑,我们要做的就是:
先打开预登陆界面,目标:得到必须提交的隐藏域的值
然后通过post再次访问该路径(准备好了一切必须的信息)
获取网页内容并进行解析,或者做其他的处理。
思路很清晰了,下面就可以直接上代码了。
# coding: utf8

# @Author: 郭 璞
# @File: ZhiHuLogin.py
# @Time: 2017/4/7
# @Contact: [email protected]
# @blog: http://blog.csdn.net/marksinoberg
# @Description: 模拟登陆知乎
import re
from bs4 import BeautifulSoup
import subprocess, os
import json
import requests

headers = {
    "User-Agent": "Mozilla/5.0 (Windows NT 10.0) AppleWebKit/537.36 (KHTML, like Gecko) Chrome/46.0.2490.86 Safari/537.36",
    "Accept": "text/html,application/xhtml+xml,application/xml;q=0.9,image/webp,*/*;q=0.8",
    "Accept-Encoding": "gzip, deflate",
    "Host": "www.zhihu.com",
    "Upgrade-Insecure-Requests": "1",
}

############################# 从邮箱方式登录
loginurl = 'http://www.zhihu.com/login/email'
session = requests.session()
html = session.get(url=loginurl, headers=headers).text
soup = BeautifulSoup(html, 'html.parser')
print(soup)
xsrf_token = soup.find('input', {'name':'_xsrf'})['value']
print("登录xsrf_token: "+xsrf_token)

############################ 下载验证码备用
checkcodeurl = 'http://www.zhihu.com/captcha.gif'
checkcode = session.get(url=checkcodeurl, headers=headers).content
with open('./checkcode.png', 'wb') as f:
    f.write(checkcode)
print('已经打开验证码,请输入')
# subprocess.call('./checkcode.png', shell=True)
os.startfile(r'checkcode.png')
checkcode = input('请输入验证码:')
os.remove(r'checkcode.png')
############################ 开始登陆
payload = {
    '_xsrf': xsrf_token,
    'email': input('请输入用户名:'),
    'password': getpass.getpass(prompt="请输入密码:"),#input('请输入密码:'),
    'remeber_me': 'true',
    'captcha': checkcode
}
response = session.post(loginurl, data=payload)
print("*"*100)

result = response.text
print("登录消息为:"+result)
tempurl = 'https://www.zhihu.com/question/57964452/answer/155231804'
tempresponse = session.get(tempurl, headers=headers)
soup = BeautifulSoup(tempresponse.text, 'html.parser')
print(soup.title)
实现的效果如下
观察动态图,不难发现对于https://www.zhihu.com/question/57964452/answer/155231804
界面,我们正确的获取到了title的内容。(也许你会说,正常访问也会获取到这个内容的,但是我们是从已登录的session上获取的,请记住这一点哈。)。
更新版知乎模拟登陆
代码部分
# coding: utf8

# @Author: 郭 璞
# @File: MyZhiHuLogin.py
# @Time: 2017/4/8
# @Contact: [email protected]
# @blog: http://blog.csdn.net/marksinoberg
# @Description: 我的模拟登录知乎

import requests
from bs4 import BeautifulSoup
import os, time
import re
# import http.cookiejar as cookielib

# 构造 Request headers
agent = 'Mozilla/5.0 (Linux; Android 6.0; Nexus 5 Build/MRA58N) AppleWebKit/537.36 (KHTML, like Gecko) Chrome/56.0.2924.87 Mobile Safari/537.36'
headers = {
    "Host": "www.zhihu.com",
    "Referer": "https://www.zhihu.com/",
    'User-Agent': agent
}

######### 构造用于网络请求的session
session = requests.Session()
# session.cookies = cookielib.LWPCookieJar(filename='zhihucookie')
# try:
#     session.cookies.load(ignore_discard=True)
# except:
#     print('cookie 文件未能加载')

############ 获取xsrf_token
homeurl = 'https://www.zhihu.com'
homeresponse = session.get(url=homeurl, headers=headers)
homesoup = BeautifulSoup(homeresponse.text, 'html.parser')
xsrfinput = homesoup.find('input', {'name': '_xsrf'})
xsrf_token = xsrfinput['value']
print("获取到的xsrf_token为: ", xsrf_token)

########## 获取验证码文件
randomtime = str(int(time.time() * 1000))
captchaurl = 'https://www.zhihu.com/captcha.gif?r='+\
             randomtime+"&type=login"
captcharesponse = session.get(url=captchaurl, headers=headers)
with open('checkcode.gif', 'wb') as f:
    f.write(captcharesponse.content)
    f.close()
# os.startfile('checkcode.gif')
captcha = input('请输入验证码:')
print(captcha)

########### 开始登陆
headers['X-Xsrftoken'] = xsrf_token
headers['X-Requested-With'] = 'XMLHttpRequest'
loginurl = 'https://www.zhihu.com/login/email'
postdata = {
    '_xsrf': xsrf_token,
    'email': '邮箱@qq.com',
    'password': '密码'
}
loginresponse = session.post(url=loginurl, headers=headers, data=postdata)
print('服务器端返回响应码:', loginresponse.status_code)
print(loginresponse.json())
# 验证码问题输入导致失败: 猜测这个问题是由于session中对于验证码的请求过期导致
if loginresponse.json()['r']==1:
    # 重新输入验证码,再次运行代码则正常。也就是说可以再第一次不输入验证码,或者输入一个错误的验证码,只有第二次才是有效的
    randomtime = str(int(time.time() * 1000))
    captchaurl = 'https://www.zhihu.com/captcha.gif?r=' + \
                 randomtime + "&type=login"
    captcharesponse = session.get(url=captchaurl, headers=headers)
    with open('checkcode.gif', 'wb') as f:
        f.write(captcharesponse.content)
        f.close()
    os.startfile('checkcode.gif')
    captcha = input('请输入验证码:')
    print(captcha)

    postdata['captcha'] = captcha
    loginresponse = session.post(url=loginurl, headers=headers, data=postdata)
    print('服务器端返回响应码:', loginresponse.status_code)
    print(loginresponse.json())


##########################保存登陆后的cookie信息
# session.cookies.save()
############################判断是否登录成功
profileurl = 'https://www.zhihu.com/settings/profile'
profileresponse = session.get(url=profileurl, headers=headers)
print('profile页面响应码:', profileresponse.status_code)
profilesoup = BeautifulSoup(profileresponse.text, 'html.parser')
div = profilesoup.find('div', {'id': 'rename-section'})
print(div)
验证效果
总结
经过了今天的测试,发现自己之前对于网页的处理理解的还是不够到位。
对于“静态页面”,常用的urllib, requests应该是可以满足需要的了。
对于动态页面的爬取,可以使用无头浏览器PhantomJS,Selenium等来实现。
但是一直处理的不够精简,导致在爬一些重定向页面的过程中出现了很多意想不到的问题。
在这块的爬虫程序还有很多地方需要进行完善啊。
另外模拟登录还有一个利器,那就是cookie。下次有时间的话再来学习一下使用cookie来实现。今天就先到这里吧。
参考链接:
http://blog.csdn.net/shell_zero/article/details/50783078


