Nodejs deployment and running in production
- [Narrator] As soon as your application is deployed to server and available to for real usersperformance becomes key, and this not only about the user experience of individual users,but also cost effective, because inefficient code needs more resources to run, which forces you to scale up or out. The suggestions in this video are loosely based on the performance based practices from the Express website. We will implement some of them in this chapter, or I will at least explain them.
The environment varietal NODE_ENV, is not just a convention to use to distinguish between different configurations in your code. It is also used by Express to make assumptions when it comes to caching and login. For instance when running in development, templates are not cached, but compiled for each execution, which makes sense, because this lets you work on a template, and seeing the changes without restarting the app every time. Of course this comes with a performance penalty and my test indicate that your application can run up tothree times slower in development than in production.
The two sunburst charts you are seeing here show the CPU utilization of an application running in development compared to one running in production, and it's clearly visible that in development the CPU is being more busy. Each segment you see is a function on the step,for example the little boxes on the upper left segment on the first chart are just template compiling. If you want to learn more about this please look into my blog I've taken from a few years back. It's also sited on the Express.js website.
Http lets the server and the browser negotiate if the data sent to the server should be compressed or not. To enable that on the server side you need a specific middleware called compress. After adding this middleware a browser that accepts compressed responses and all modern browsers do may be served a synced version of the html code, which can of course drastically reduce the data to be transferred. Let's add this to our application real quick, so I'm heading back to visual studio code.
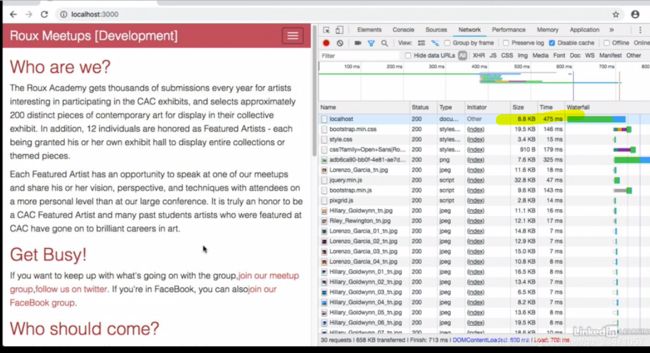
First of all before we optimize that, I want to see the current numbers, so I'm heading over to the website and opening Chrome developer tools, and there I will make sure that the cache is disabled, and entrust reloading the page. Now let's look at the request for localhost, and we see that it has right now a size of eight dot eight kilobytes, and the time is 475 milliseconds.
Now let's go into visual studio code and I'm opening app.js and of course I have to install the middleware npm install dash dash save compression and on top of the page I bring in const compression equals require compression Now as for all middleware I have to of course also edit to the chain of middlewares and I do that right on top.
After line 17 I add app.use compression. Compression accepts a range of configuration settings, but we go with the defaults here. Now I'm starting the application again npm start, and I'm heading back to the browser, let's reload the page now, so let's remember we hadeight dot eight kilobytes and let's compare it.
The time stayed the same, but we see that the size is now three times lower which is plenty.
The Express website comes with a few more recommendations regarding performance.Some we already took into account, some will be implemented during this chapter. Express recommends to cache request results and in the next video we will implement that in the chief of six fold performance improvement there. We should not use synchronous functions. Some functions come in the synchronous and in a asynchronous form, like fs.readFile and fs.readFilesync.
It's not just running a single thread, this means that this NodeJS process, can not handle, any more requests while the synchronous function runs. While this does not matter if the function,is called infrequently this can become a huge problem, if your site becomes successful and gets more traffic. A synchronous function utilized in NodeJS event loop and will free the NodeJS process to do other work until the function returns with a promise or a callback.Remember the decrypt function we used to hash passwords.
This is a good example, we used the asynchronous function because otherwise each time I use the release change, the hashing would have blocked NodeJS. Express also recommends to not use console.log because it's synchronous. In this chapter we will use a, dedicated asynchronous logger to replace console.log. If errors aren't handled and exceptions aren't caught, the node process might terminate with a crash, even if we use a process managerthat then restarts the process.
This will of course impact performance. NodeJS is as mentioned single threaded and the search only utilizes one CPU. By using a cluster module we can distribute requests to multiple processes and utilize the CPU better. We will do that in this chapter as well. Now let's go ahead and implement some of the optimizations we just talked about.
logger
- [Instructor] As mentioned console log is synchronous and not recommended for production.Additionally it does not let us use different log levels depending on the environment we are in. If we look at the warnings we also see that it complains about the usage of console log.We will use bunyan, a dedicated logging module to implement production grade logging for our application now. We will also make the logging use different log levels depending on the environment we are running in.
To do that, we will now extend our config module a little. So I'm going into server, config.Index js, and first I have to install Bunyan. So I go ahead and run npm install, dash, dash save, bunyan. and of course I have to require so add const bunyan equals require bunyan.
Next, let's prepare some configuration depending on the environment. So somewhere before the module exports starts I will now add const loggers equals. So we need a logger for development. And this should be a function, because we want to lazy load those andinstantiate all of them.
So add bunyan dot create logger and I want to pass in the name, and in this case it's just the environment we are running and I want to add the log level. And, for development, it makes sense to use debug. Let's duplicate those lines and let's add production. And test.
And for production of course the name should be production and the log level in productionenvironment should be information and test. The only one to show fatal errors because otherwise it would just clutter our testing results. Next, I will simply go ahead into the respective environment configurations and add a property log.
And for development, it should be loggers dot development and let's copy this line and go ahead to production, it should be loggers production. And, for test it should be loggers dot test. Now we want to of course use this logger. So I'm going into bin www and there we already have the config available obviously and now I will simply bring in the log from the config by adding const log equals config dot log.
Don't forget the parentheses here because we are executing a function. Now let's look for console log statements and I will simply search and replace the now console log with log dot info. And additionally I want to replace the console error messages and they should be log dot fatal.
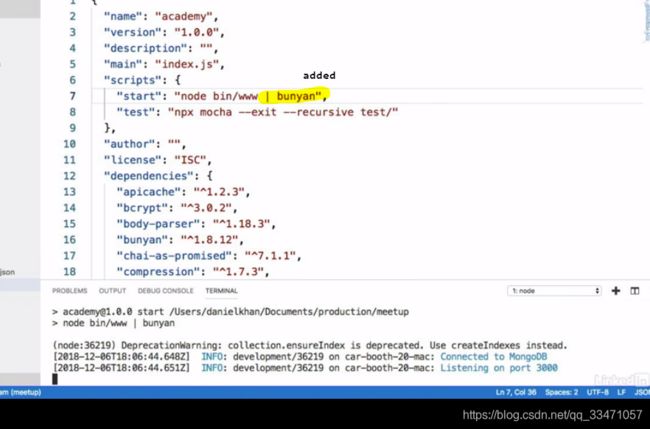
Now let's start the application to see if everything still works. And we see that we get now output from bunyan and the output from bunyan is by default jason, maybe we want it to be a little bit more human friendly so I go into package Jason and there I now just add to the start script. Hypen and bunyan because bunyan has a console formatter we will and restart now.
We see that we get now a formatted output on the console. As the logger is now part of our config it's easy to pass it around in our application wherever we need it.
const log = config.log();
log.info
log.fatal
Add logging
- [Instructor] Node.js runs in a single process, and basically in one thread. This means that it does not fully utilize all CPUs on a host. To remedy this, Node.js provides a cluster module,that will spin up chart processes. Under the hood, Node.js then uses interprocess communication to distribute the load between the chart processes, round robin. Node cluster is not the only way to achieve this. For example, if you use the process manager PM2, as we will do later, it can be configured to scale up to all CPUs as well.
Still, to understand the basic principle behind clustering, we will now implement this from scratch using Node cluster. Before we optimize this, let's run a little load test against our current application. So, on the console, I'm using a patch bench, and we want to concur and see if 10, and I'm running one hundred request against the website.
This takes a little bit, and we see that we have a time per request of around 39 milliseconds.Now, let's see what we can gain by using the cluster module. I'm in bin www, cluster is core module of Node.js, so, I don't have to insert anything in here. I'm just requiring cluster, and it also wants to require the os which is also core module that gives us access to some operating system information.
From this os module, I can now query the number of CPUs. Const numCPUs equals os dot cpus parenthesis, dot length. You will see in the setting, while we are doing that, I'm scrolling down all the way to line 46, and after this line, so, after the instance of the server was created,I now add the logic for the clustering.
And here, at first, say if cluster is master, so, that's the case when we are the master process.That's the process that starts first. I will do a log of info, master, dollar, process, dot, pid, is running. So, we will get the process id of the master process, and then I will use a for loop to create workers for each free CPU.
So, I lower than num CPUs, because one CPUs should be dedicated to the master process as well. One, so for each CPU we will do a cluster with fork which creates a worker. We also want to handle errors here, so, cluster on exit, so if something goes wrong, this event gets the, just that worker process, and there, I copy over that log line from line 49.
But this time it's a log fatal, and it's worker process, worker process pid, just died. And in this case, I want to fork a new worker because otherwise, we would maybe run out of workers, if there was some temporary problem, which lets the workers die. Next, we will have to add the code to run when we are the chart process, and in this chart process, we will now do this db connect, and the listening part.
So, that's the main application code. Everything else can stay the same. And let's now restart the application, and see what happens, and we see the log message that indicates, that all workers have spun up. Now, let's run a load test again. So, before we had around 39 milliseconds response time.
Now, let's do that again, and we see that it's now 24 millisecond, which is a pretty good improvement.
node.js cluster module
const numCPUs = os.cpus().length;
if (cluster.isMaster) {
  log.info(`Master ${process.pid} is running`);
  for (let i = 0; i < numCPUs; i += 1) {
    cluster.fork();
  }
  cluster.on('exit', (worker) => {
    log.fatal(`Worker ${worker.process.pid} just died`);
    cluster.fork();
  });
} else {
  db.connect(config.database.dsn)
    .then(() => {
      log.info('Connected to MongoDB');
      server.listen(port);
    })
    .catch((err) => {
      log.fatal(err);
    });
}

server.on('listening', () => {
  const addr = server.address();
  const bind = typeof addr === 'string'
    ? `pipe ${addr}`
    : `port ${addr.port}`;
  log.info(`Listening on ${bind}`);
});
Security
- [Narrator] Before we deploy our application to the open world, we should make sure that it fulfills basic security requirements. Express comes with a set of recommended best practices.Many deal with how secure connections are handled, but we will later use Nginx to do that for us. Before we talk about Express as such you should make sure that the dependencies we brought in are secure. Newer versions of npm make this very easy for us. We can simply run npm audit and it will check all installed modules for known vulnerabilities and we see that we have 1074 packages installed right now.
But this is plenty of code and there is plenty that could go wrong. So running npm audit frequently like for every deployment makes sense to make sure that there are no packages installed that have known vulnerabilities that can be explored. An easy way to add some level of security to Express is using Helmet. Helmet combines a set of middlewares that deal with non-attack vectors on websites. If we look at the Helmet website we see that the different measures are very well documented.
So if we look for instance at Hide Powered-By we get a key explanation which attack is prevented with this measure. Please take your time to review and understand the differentattacks that Helmet can prevent. We will now install Helmet into our application for that I go into to Visual Studio code and I simply add npm install helmet and on top of our server.
App.js file. Ubpringing Helmet const helmet equals require helmet. And further down after we instantiated the express we will simply add the middleware app.use helmet parentheses and let's start the application. And back on the browser, let's open from developer tools.
Let's reload the page and when we click on the request for localhost we see that helmet set a few headers here that deal with different kinds of attacks. Later as mentioned we will add an additional level of security by serving requests not directly from node.js but via Ngenix as reverse proxy.
app.use(helmet());
Deployment and operation with PM2
- [Instructor] In this video, I will deploy our application to a server using PM2. PM2 is a very powerful process manager that also comes with a feature that lets us deploy a project. This is a good option for smaller projects. In larger projects you might have a whole deployment pipeline that takes care of that. As server, I'm using an EC2 instance, but any host on the internet will do. On this host, I installed Node.js and PM2 and I created the user Node.js and a directory on Node.js deploy.
I also added the public SSH key of my development machine to the list of authorized keys.PM2 tool relies on Git to deploy project from. For that I pushed it to a GitHub repository.Additionally, I copied my .env file into the deploy directory because it's not published to GitHub for obvious security reasons. On MongoDB Atlas, I also white listed the IP of my serverso that it can then connect to the MongoDB cluster.
To setup the deployment on all development machine, we first have to install PM2. I want to install it globally, so I run sudo npm install -g pm2. This asks me for my user password, and then it will install PM2 globally on my development machine. As mentioned, PM2 can handle deployments for us. For that, it needs a configuration file called ecosystem config js that describes this whole deployment.
I have created this configuration file for you already. You can find it in the exercise files. It's in the project root. Let's open it and let's go through it real quick. First, the file describes which apps need to be deployed, and we want to deploy only one app, and its name meetup. We define the start script, and also very important we define that when we push into production,NODE_ENV should be set to production. Starting with line 11, we now describe the actual deployment.
We define the SSH user to be used, the host to connect to, the Git ref, and also the repo to deploy from. Then we define the deployment path on the server, and then we have a few post-deploy commands like copying over the env file into the current directory, doing npm install, and then starting the application. To setup the server for the first deployment, we have to now run pm2 deploy production setup.
This will create all the directories and structures on the host. And next we want to run pm2 deploy production. And this will now deploy the application to the host. Let's look into the host real quick. So I'm in my deploy directory and there. And we now see that pm2 created a few directories with a directory current, which points to the currently running application.
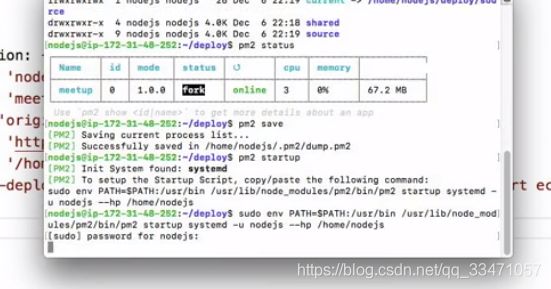
PM2 keeps also copies of all deployment, so that we can roll back if anything goes wrong.Now that the application was deployed, let's see if it's running. So I'm running pm2 status, and I see that everything is running as expected. And now I'm running pm2 save to preserve this setup. And now I also want that this application starts whenever the server started, so I'm running pm2 startup.
And this gives us a command to execute and this command will add our application to the startup scripts. Now of course we're curious if we can access the website, so in my browser opening http and that's my daemon server URL, and I'm connecting to port 3000. On EC2 I have for that open to port 3000 on the firewall. And we see we have now a website running on the internet.
echosystem.config.js
// The purpose of this file is covered in CH 05, Video 06
module.exports = {
  apps: [
    {
      name: 'meetup',
      script: 'bin/www',
      env_production: {
        NODE_ENV: 'production',
      },
    },
  ],
  deploy: {
    production: {
      user: 'nodejs',
      host: '',
      ref: 'origin/master',
      repo: '',

      // Make sure this directory exists on your server or change this entry to match your directory structure
      path: '/home/nodejs/deploy',

      'post-deploy': 'cp ../.env ./ && npm install && pm2 startOrRestart ecosystem.config.js --env production',
    },
  },
};
Running behind a web server (Nginx)
[Instructor] Usually we don't want Node.js to directly serve a website. Things like SSL or TLS encryption are doable, but a web server was exactly made for such a task. That's why the most common setup is running Express Apps behind some reverse proxy like Nginx. On my EC2 instance, I've already installed Engine X and I used Let's Encrypt to install and setup a free SSL certificate. I've also already took care of the proxy configuration.
Let's look into it real quick. So I'm going into /etc/nginx/sites-enabled/default, and there now see this section with location /. So the most important part is the proxy_pass directive here.This tells Nginx to reverse proxy everything to localhost on port 3000. For complete overview of all the proxy directives, please refer to the Nginx documentation.
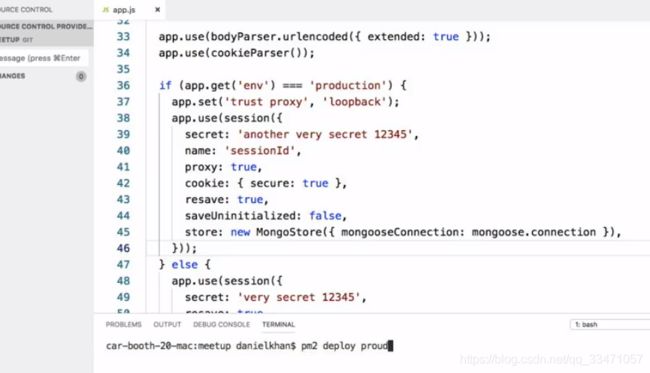
To let Express run behind the proxy properly, we also have to make a few adoptions to the code. So I had backed individual studio code, and in app.js I will now make a few adjustments.First of all I want to distinguish if we're running in development or in production. So now add run line 43, if(app.get('env')), this gives us the current environment we're running on equals production, and I want to do a few things differently.
I'm doing the else branch, and there I copy in, for instance, the setup of the session. So we're running production means behind a proxy, and Express as an option that tells it that it's running behind a proxy. If you don't set that, it might happen that the IP address of the users is not reported correctly. So we are setting trust proxy and we trust here the loopback device,which is our localhost.
And additionally we also want to change the session handling a little bit, so I'm copy over the setup of the session from the else block. And there, for instance, I want to change the secret, and additionally, I also want to change the session Id name, because if we leave the default, which is connect.sId, someone might be able to infer that this is an Express server, and the less we expose about ourselves, the better.
Next we also want to configure that we are running behind a proxy. This makes a few more adjustments to how the session management works, and additionally as we're now behind a SSL connection, we can force the browser to only send secure cookies.
Now let's commit it to my version control, updated for proxies, and let's upload from here.
Push to the server. And now we can simply use pm2 update to push our current application,and now we can simply use pm2 deploy production to push all those changes to the server.Let's head over to the browser now, and let's open https and the URL where the website is running on, and we see that it's now served via https.
Now let's make a quick test. Let's register new user. And password, and we want to upload a picture. Let's submit, and let's login with this user, and we see that it works as suspected.
We now have a working website served via https and running on the internet.


