如何创建一个Progressive Web Apps应用程序
这篇文章主要介绍怎么创建一个PWA程序。首先听说bootstrap4非常好,那我们就把bootstarp4项目变成我们的PWA程序。
顺便推荐一个node插件live-server,用来当做本地服务器运行你的项目。Vs Code也可以安装此插件。
第一步:拥有一个web页面
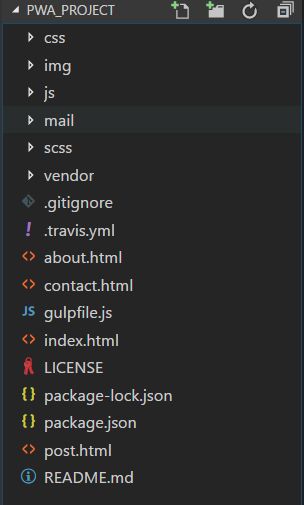
为了展示效果我们从https://startbootstrap.com/下载一个模板。随便下载一个模板,修改项目名称为pwa_project,项目结构如下:
这个项目没有什么特别,是一个非常常规的bootstrap模板。其运行效果如下:
但是他并不是我们想要的PWA,所以我们需要改进它。
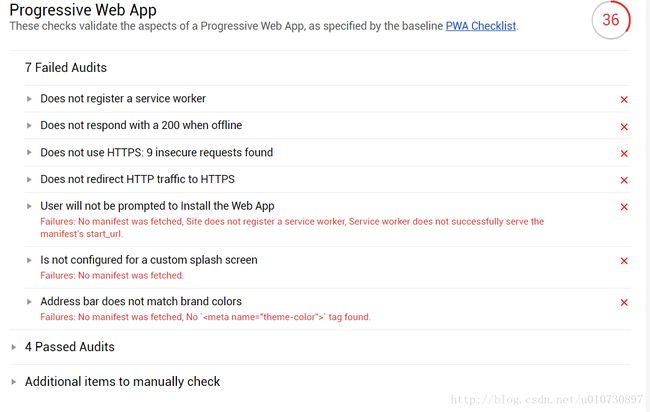
第一步:先用google的扩展插件lighthouse跑一下我们页面(不会lighthouse也不影响,直接跳过):
可以发现什么都好就是PWA这里评分很低。PWA的详细信息:
第二步:正式开始改进,增加manifest.json文件
常规manifest文件如下:(manifest详细介绍)
{
  "dir": "ltr",
  "lang": "zh-cn",
  "name": "Clean Blog",
  "scope": "/",
  "display": "standalone",
  "start_url": "/",
  "short_name": "Blog",
  "theme_color": "transparent",
  "description": "这是一个PWA博客系统",
  "orientation": "any",
  "background_color": "transparent",
  "icons": [
    {
      "src": "https://img.alicdn.com/tfs/TB1VlKFRpXXXXcNapXXXXXXXXXX-16-16.png",
      "type": "image/png",
      "sizes": "16x16"
    }
  ]
}
推荐两个icon在线生成地址:
1、http://www.atool.org/ios_logo.php
2、https://www.favicon-generator.org/
然后在index.html中引入manifest.json文件。
<link ref="manifest" href="manifest.json">然后运行程序,进入调试模式可以查看manifest是否配置成功:

第三步:增加Service Worker
先在index.html页面添加一下代码:
  <script>
    if ('serviceWorker' in navigator) {
      window.addEventListener('load', function () {
        //判断是否已经注册了service worker
        if (navigator.serviceWorker.controller) {
          //已注册
        } else {
          //未注册,执行注册方法
          navigator.serviceWorker.register('sw.js', {
            scope: './'
          }).then(function (reg) {
            //注册完成
          });
        }
      });
    }
  script>
我们在上面代码中注册sw.js,所以我们需要新建一个sw.js文件,并加入以下内容对index页面进行缓存。
//监听service worker事件
self.addEventListener('install', function (event) {
    var homePage = new Request('index.html');
    event.waitUntil(
        //请求首页并将首页存入缓存
        fetch(homePage).then(function (response) {
            //建立cache-homePage缓存
            return caches.open('cache-homePage').then(function (cache) {
                return cache.put(homePage, response);
            });
        }));
});

//请求页面
self.addEventListener('fetch', function (event) {
    event.respondWith(
        fetch(event.request).catch(function (error) {
            //请求失败,从缓存中读取缓存的页面
            return caches.open('cache-homePage').then(function (cache) {
                return cache.match('index.html');
            });
        }));
});

//刷新首页
self.addEventListener('refreshHomePage', function (response) {
    return caches.open('cache-homePage').then(function (cache) {
        //将刷新后的页面缓存
        return cache.put(offlinePage, response);
    });
});
打开chrome的调试工具->Application可以看到下图则表示你已经完成一个简单的PWA程序:

然后我们为该程序添加一个简单的消息通知功能:
现在index.html的Service Woker中加入请求通知权限的代码:
        //添加获取通知权限
        if ('Notification' in window && navigator.serviceWorker) {
          if (Notification.permission == 'granted') {

          } else {
            Notification.requestPermission(function (status) {
              console.log('Notification permission status:', status);
            });
          }
        }
然后在sw.js中加入推送监听:
//监听推送
self.addEventListener('push', function (e) {
    var options = {
        body: 'Here is a notification body!', //主体内容
        icon: 'images/example.png', //通知图标
        vibrate: [100, 50, 100], //震动,先100ms然后暂停50ms最后在震动100ms
        data: { //通知数据,用于人机交互
            dateOfArrival: Date.now(),
            primaryKey: 1
        }
    };
    self.registration.showNotification('Hello world!', options);
});项目源码地址


