一、概述
上一篇文章讲了在wndows 7下通过 apache 部署django项目,主要用于测试环境,本文针对生产线上使用nginx部署django,达到高并发便于管理的目的。
系统:CentOS7.4_x64 python2.7.5 django1.8.18
ip: 172.16.3.152
selinux 关闭
防火墙加上规则 或在测试 时关闭
禁用自带firewalld
#systemctl stop firewalld
#systemctl disable firewalld
#systemctl mask firewalld
安装iptables-service
#yum install iptables-service -y
这里我习惯用iptables 用firewalld自行解决 。
二、安装依赖组件
1、安装pip
#wget https://bootstrap.pypa.io/get-pip.py
#python get-pip.py
2、安装依赖组件
#yum install libxml* python-devel gcc gcc-c++ pcre pcre-devel zlib zlib-devel openssl openssl-deve
3、安装django
#pip install django==1.8.18
4、安装pillow
#pip install pillow
5、安装paramiko
#pip install paramiko
6、把django项目上传到/opt/下
本次测试项目为pythonCMDB
注意:请勿放到/root家目录上,放到这里即使给了775权限,在访问的时候css找不到,被这个坑了好久6系统貌似没有这个限制,但最好不要放在/root家目录下,放这里本次实验肯访问不到css
6、安装uwsgi
#pip install uwsgi
切换到django项目 目录添加cmdb_uwsgi.ini配置文件
#cat /opt/PythonCMDB/cmdb_uwsgi.ini
[uwsgi]
# Django-related settings
# the base directory (full path)
# chdir           = /path/to/your/project
# Django's wsgi file
# module          = project.wsgi
# the virtualenv (full path)
# home            = /path/to/virtualenv
# process-related settings
# master
master          = true
# maximum number of worker processes
processes       = 2
# the socket (use the full path to be safe
socket          = 127.0.0.1:9090
# ... with appropriate permissions - may be needed
# chmod-socket    = 664
# clear environment on exit
vacuum          = true
8、nginx编译安装
#wget http://101.96.10.63/nginx.org/download/nginx-1.12.1.tar.gz (不要问我这个链接怎么是ip,官方就是这样的)
添加nginx系统用户
#groupadd -g 108 -r nginx
#useradd -u 108 -r -g 108 nginx
#解压并编译安装
#tar xvf  nginx-1.12.1.tar.gz
#cd nginx-1.12.1
./configure   --prefix=/usr \
--sbin-path=/usr/sbin/nginx \
--conf-path=/etc/nginx/nginx.conf \
--error-log-path=/var/log/nginx/error.log \
--http-log-path=/var/log/nginx/access.log \
--pid-path=/var/run/nginx/nginx.pid   \
--lock-path=/var/lock/nginx.lock \
--user=nginx \--group=nginx \
--with-http_ssl_module \--with-http_flv_module\
--with-http_stub_status_module \
--with-http_gzip_static_module \
--with-pcre \
 #make && make install   #编译并安装nginx
这里就不添加 到系统 管理服务了(测试了好久有问题报如下错误)
所以直接把如下nginx管理脚本放到django项目 目录下即/opt/PythonCMDB/下
#!/bin/sh
# nginx - this script starts and stops the nginx daemon
# chkconfig:   - 85 15
# description:  Nginx is an HTTP(S) server, HTTP(S) reverse \
#               proxy and IMAP/POP3 proxy server
# processname: nginx
# config:      /etc/nginx/nginx.conf
# config:      /etc/sysconfig/nginx
# pidfile:     /var/run/nginx.pid
# Source function library.
. /etc/rc.d/init.d/functions
# Source networking configuration.
. /etc/sysconfig/network
# Check that networking is up.
[ "$NETWORKING" = "no" ] && exit 0
nginx="/usr/sbin/nginx"
prog=$(basename $nginx)
NGINX_CONF_FILE="/etc/nginx/nginx.conf"
[ -f /etc/sysconfig/nginx ] && . /etc/sysconfig/nginx
lockfile=/var/lock/subsys/nginx
make_dirs() {
   # make required directories
   user=`nginx -V 2>&1 | grep "configure arguments:" | sed 's/[^*]*--user=\([^ ]*\).*/\1/g' -`
   options=`$nginx -V 2>&1 | grep 'configure arguments:'`
   for opt in $options; do
       if [ `echo $opt | grep '.*-temp-path'` ]; then
           value=`echo $opt | cut -d "=" -f 2`
           if [ ! -d "$value" ]; then
 mkdir -p $value && chown -R $user $value
           fi
       fi
   done
}
start() {
    [ -x $nginx ] || exit 5
    [ -f $NGINX_CONF_FILE ] || exit 6
    make_dirs
    echo -n $"Starting $prog: "
    daemon $nginx -c $NGINX_CONF_FILE
    retval=$?
    echo
    [ $retval -eq 0 ] && touch $lockfile
    return $retval
}
stop() {
    echo -n $"Stopping $prog: "
    killproc $prog -QUIT
    retval=$?
    echo
    [ $retval -eq 0 ] && rm -f $lockfile
    return $retval
}
restart() {
    configtest || return $?
    stop
    sleep 1
    start
}
reload() {
    configtest || return $?
    echo -n $"Reloading $prog: "
    killproc $nginx -HUP
    RETVAL=$?
    echo
}
force_reload() {
    restart
}
configtest() {
  $nginx -t -c $NGINX_CONF_FILE
}
rh_status() {
    status $prog
}
rh_status_q() {
    rh_status >/dev/null 2>&1
}
case "$1" in
    start)
        rh_status_q && exit 0
        $1
        ;;
    stop)
        rh_status_q || exit 0
        $1
        ;;
    restart|configtest)
        $1
        ;;
        reload)
        rh_status_q || exit 7
        $1
        ;;
    force-reload)
        force_reload
        ;;
    status)
        rh_status
        ;;
    condrestart|try-restart)
        rh_status_q || exit 0
            ;;
    *)
            echo $"Usage: $0 {start|stop|status|restart|condrestart|try-restart|reload|force-reload|configtest}"
        exit 2
esac
加上执行权限
chmod +x nginx
9、nginx.conf配置
cat /etc/nginx/nginx.conf
user  nginx;
worker_processes  2;
pid    /var/run/nginx.pid;
events {
    worker_connections  1024;
}
http {
    include       mime.types;
    default_type  application/octet-stream;
    log_format  main  '$remote_addr - $remote_user [$time_local] "$request" '
                      '$status $body_bytes_sent "$http_referer" '
                      '"$http_user_agent" "$http_x_forwarded_for"';
    #access_log  logs/access.log  main;
    sendfile        on;
    #tcp_nopush     on;
    #keepalive_timeout  0;
    keepalive_timeout  65;
    #gzip  on;
    server {
        listen       80;
        server_name  localhost;
        #charset koi8-r;
        #access_log  logs/host.access.log  main;
        location /static {
            alias  /opt/PythonCMDB/static;
            index  index.html index.htm;
        }
        location / {
            uwsgi_pass  127.0.0.1:9090;
            include  uwsgi_params;
            uwsgi_param  UWSGI_CHDIR /opt/PythonCMDB;
            uwsgi_param  UWSGI_SCRIPT PythonCMDB.wsgi;
            root   html;
            index  index.html index.htm;
        }
    }
}
创建对应的目录并授权
#mkdir -pv /data1/log/nginx
#chown nginx.nginx /data1/log/nginx -R
10、启动uwsgi
为了方便管理uwsgi,写成启动脚本
cat /opt/PythonCMDB/uwsgid
#!/bin/bash
# uwsgi service
#
# chkconfig: - 90 10
# Author: San
# Date: 2017-10-26

. /etc/init.d/functions
uwsgi_exe=$(which uwsgi)
prog=uwsgid
config_file=cmdb_uwsgi.ini
uwsgi_port=$(cat $config_file|grep "127.0.0.1:"|awk -F: '{print $2}')
pid=$(netstat -ntpul |grep ":$uwsgi_port"|awk  '{print $7}'|awk -F/ '{print $1}')
START(){
    if netstat -ntpul |grep ":$uwsgi_port"|grep -v grep 2>&1 >/dev/null
    then
        echo "$prog($pid) is running..."
    else

     echo -n $"Starting $prog: "
        nohup $uwsgi_exe --ini $config_file  >uwsgi.out 2>&1 &
     echo `[ "$?" -eq 0 ] && success $"$base startup" || failure $"$base startup"`
    fi
}
STOP(){
 echo -n $"Stoping $prog: "
 kill -9  $pid
 echo `[ "$?" -eq 0 ] && success $"$base startup" || failure $"$base startup"`
}
STATUS(){
if [ ! -s $pid ]
then
   echo "$prog($pid) is running ..."
else
   echo "$prog is stoped."
fi
}
case $1 in
 start)
        START
        ;;
 stop)
 STOP
 ;;
 status)
 STATUS
        ;;
        restart)
        STOP
        sleep 1
        START
 ;;
       *)
       echo "USAGE:start|stop|status"
 ;;
esac
加上可执行权限
#chmod +x uwsgid
启动uwsgid
#./uwsgid start
三、登录django项目
http://172.16.3.152
如图:
把uwsgid nginx脚本添加到开机自启动目录
#chmod +x /etc/rc.local

#cat /etc/rc.local
cd /opt/PythonCMDB;./uwsgid start
cd /opt/PythonCMDB;./nginx start
这样在重启系统时即启动uwsgi 和nginx服务。
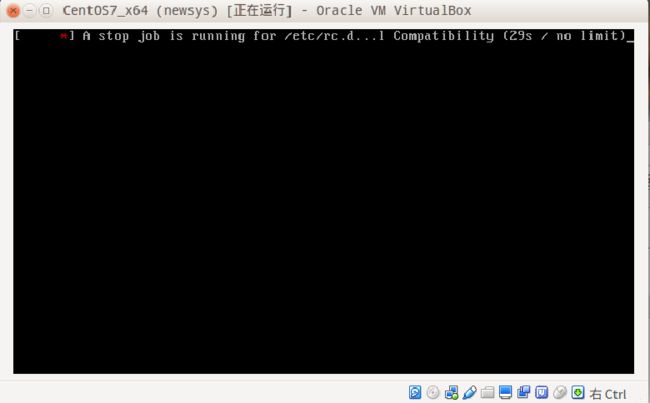
以上看上去貌似完美,但现实往往很残酷啊;重启系统发现机器一直卡在这个画面不动了。。。。如下图:
不得不强制重启;
以上原因是因为没有配置rc-local.service导致的,
解决方法:
添加加/etc/systemd/system/rc-local.service文件
内容如下:
#cat /etc/systemd/system/rc-local.service
#  This file is part of systemd.
#
#  systemd is free software; you can redistribute it and/or modify it
#  under the terms of the GNU Lesser General Public License as published by
#  the Free Software Foundation; either version 2.1 of the License, or
#  (at your option) any later version.

# This unit gets pulled automatically into multi-user.target by
# systemd-rc-local-generator if /etc/rc.d/rc.local is executable.
[Unit]
Description=/etc/rc.d/rc.local Compatibility
ConditionFileIsExecutable=/etc/rc.d/rc.local
After=network.target

[Service]
Type=forking
ExecStart=/etc/rc.d/rc.local start
TimeoutSec=5
RemainAfterExit=yes
#systemctl enable rc-local #开机自启
#systemctl daemon-reload #重新加载systemctl
#systemctl status rc-local 如图:
防火墙头规则添加
#iptables -I  INPUT 5 -p tcp --dport 80 -j ACCEPT      #nginx 80端口插入到iptables INPUT第五条
#services iptables save
#service iptables restart 或systemctl restart iptables
此时重启系统超时为5s后就正常重启或关机啦~完美~
后语:
nginx 通过 uwsgi部署django部署有很多坑,nginx配置一点错误差异会导致,无法访问。特意记录,
以便后续查阅,如有不当之处 ,欢迎留言。


