python-图像搜索
参考来源:《python计算机视觉》
基于BOW的图像检索
(一)基本介绍
-
(1)BOW是指 “Bag-of-Words” 词袋模型,比较简单的理解就是将你所要分类的对象看成一个袋子,而这个袋子里装着组成这个对象的众多元素,对每个元素提取特征点,特征描述指向最多的一个类别则作为这个对象的类别。举个例子,将一段文本看成一个袋子,构成文本的每一个词汇都是独立的并放在这个袋子中,然后看这个袋子里装的都是些什么词汇,将其分类。如果文档中高考、课桌、黑板、粉笔这样的词汇多些,而砖头、拖车、起重机这样的词汇少些,我们就倾向于将它归类到关于学校这类的文档,而不是归到工地。
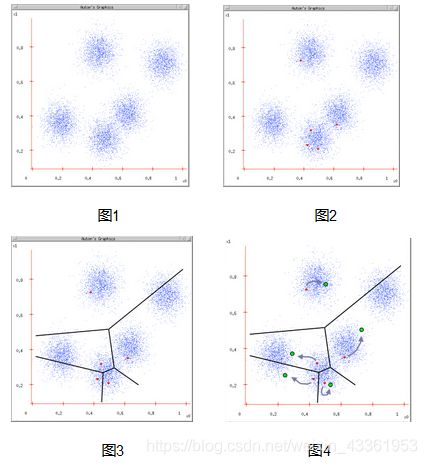
(2)BOW也可以通过关键点投影的方法来表示图像信息,研究者称此方法为Bag-of-Features,图像检索所用的就是将所要分类图像通过建立成视觉等效单词进行分类。如下图,对于图像级分类和识别对象实例来说,效果相当好:

-
视觉单词(词典):视觉单词的思想是将描述子空间量化成一些典型事例,并将图像中的每个描述子指派到其中的某个实例中。这些典型实例可以通过分析训练图像集确定,并被视为视觉单词。所有这些视觉单词构成的集合称为视觉词汇或视觉码本。我们通常用K-means聚类算法去得到聚类质心来做视觉单词。
-
K-means算法流程:
(1)随机初始化 K 个聚类中心
(2)重复下述步骤直至算法收敛:
①对应每个特征,根据距离关系赋值给某个中心/类别;
②对每个类别,根据其对应的特征集重新计算聚类中心。
-
(1)TF的主要思想是:如果某个关键词在一篇文章中出现的频率高,说明该词语能够表征文章的内容,该关键词在其它文章中很少出现,则认为此词语具有很好的类别区分度,对分类有很大的贡献。
(2)IDF的主要思想是:如果文件数据库中包含词语A的文件越少,则IDF越大,则说明词语A具有很好的类别区分能力。
(3)词频(Term Frequency,TF)指的是一个给定的词语在该文件中出现的次数。如:tf = 0.030 ( 3/100 )表示在包括100个词语的文档中, 词语’A’出现了3次。
(4)逆文档频率(Inverse Document Frequency,IDF)是描述了某一个特定词语的普遍重要性,如果某词语在许多文档中都出现过,表明它对文档的区分力不强,则赋予较小的权重;反之亦然。如:idf = 13.287 ( log (10,000,000/1,000) )表示在总的10,000,000个文档中,有1,000个包含词语’A’。
(5)最终的TF-IDF权值为词频与逆文档频率的乘积。
转载自:https://blog.csdn.net/loadstar_kun/article/details/39450137 -
图像检索流程:
(1) 特征提取;
(2)学习 “视觉词典(visual vocabulary)”;
(3)针对输入特征集,根据视觉词典进行量化;
(4)把输入图像,根据TF-IDF转化成视觉单词(visual words)的频率直方图:计算TF值和IDF值,进而得到TF-IDF矩阵,并对其进行L2归一化(向量中每个元素除以向量的L2范数->x/平方和开根号)。
(5) 构造特征到图像的倒排表,通过倒排表快速索引相关图像;
(6)根据索引结果进行直方图匹配;
(二)运行流程以及结果
- 创建词汇(生成模型文件)
构建视觉词典的简单步骤:
(1)提取对n幅图像分别提取sift特征描述子。
(2)对提取的整个sift特征进行K-Means聚类得到k个聚类质心作为视觉词典。
(3)对每幅图像以视觉词典为规范对该幅图像的每一个SIFT特征点计算它与单词表中每个单词的距离,最近的+1,便可得到该幅图像的码本。

(4)执行代码:
# -*- coding: utf-8 -*-
import pickle
from PCV.imagesearch import vocabulary
from PCV.tools.imtools import get_imlist
from PCV.localdescriptors import sift

#获取图像列表
imlist = get_imlist('first1000/')
nbr_images = len(imlist)
#获取特征列表
featlist = [imlist[i][:-3]+'sift' for i in range(nbr_images)]

#提取文件夹下图像的sift特征
#for i in range(nbr_images):
#    sift.process_image(imlist[i], featlist[i])

#生成词汇
voc = vocabulary.Vocabulary('ukbenchtest')
voc.train(featlist, 1000, 10)
#保存词汇
# saving vocabulary
with open('first1000/vocabulary.pkl', 'wb') as f:
    pickle.dump(voc, f)
print ('vocabulary is:', voc.name, voc.nbr_words)
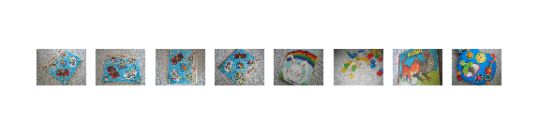
这次实验我没有找到合适的熟知图像的数据集,所以还是使用了教材版本配套的ukbench(肯塔基大学物体识别数据集)的前1000幅图像,部分图像如下:

(5)数据集first1000文件下载链接:
链接:https://pan.baidu.com/s/1qpxnxoHmrp3e4-wVVaaIAQ
提取码:73ty
复制这段内容后打开百度网盘手机App,操作更方便哦
(6)运行以上代码,每张图片都会生成对应的sift文件,通过sift提取特征描述子,将每幅图像的描述子保存在vocabulary.pkl文件中。
![]()

(7)可能出现的问题:这次所使用的python版本为python3.6,我在使用python2.7测试的时候,运行会出现MemoryError错误,这个错误一般和内存有关,我尝试了几次后还是无法解决,猜测是因为对于大量的数据,输入矩阵的巨大会使得内存溢出及效率低下,即数据太多所以处理起来可能导致溢出,但是也不能排除较老版本可能有一些影响,为避免后续出现更多问题,所以改用python3.6版本,将图片数量改成了100,运行没问题。
- 创建数据库并添加图像(将模型文件导入数据库)
(1)在索引图像前,我们需要建立一个数据库,利用图像对数据库进行查询,并返回相似的图像作为搜索结果。这里使用SQLite作为数据库,它可以将所有信息都保存到一个文件,且易于安装和使用。可以直接打开命令行pip install sqlite-web,若是有问题就直接下载安装。
下载地址:https://www.lfd.uci.edu/~gohlke/pythonlibs/#pysqlite
根据自己的python版本下载对应的pysqlite版本,然后到命令行对应目录pip安装,我使用的系统和版本都是64位的,但是64位安装出现了问题,我尝试装了32位的,可以安装成功,运行也没问题。

(2)执行代码:
# -*- coding: utf-8 -*-
import pickle
from PCV.imagesearch import imagesearch
from PCV.localdescriptors import sift
from sqlite3 import dbapi2 as sqlite
from PCV.tools.imtools import get_imlist

#获取图像列表
imlist = get_imlist('first1000/')
nbr_images = len(imlist)
#获取特征列表
featlist = [imlist[i][:-3]+'sift' for i in range(nbr_images)]

# load vocabulary
#载入词汇
with open('first1000/vocabulary.pkl', 'rb') as f:
    voc = pickle.load(f)
#创建索引
indx = imagesearch.Indexer('testImaAdd.db',voc)
indx.create_tables()
# go through all images, project features on vocabulary and insert
#遍历所有的图像,并将它们的特征投影到词汇上
for i in range(nbr_images)[:1000]:
    locs,descr = sift.read_features_from_file(featlist[i])
    indx.add_to_index(imlist[i],descr)
# commit to database
#提交到数据库
indx.db_commit()

con = sqlite.connect('testImaAdd.db')
print (con.execute('select count (filename) from imlist').fetchone())
print (con.execute('select * from imlist').fetchone())
(3)结果显示

完成当前步骤后文件夹中会生成一个数据库文件
![]()
3. 使用几何特性对结果排序(图片索引测试)
(1)速度和可伸缩性是BOW模型的优点,但同时也导致了在用视觉单词表示图像时不包含图像特征的位置信息,利用一些考虑到特征集合关系的专责重排搜索到的靠前结果,可以提高准确率。代码中所使用的方法是在查询图像与靠前图像的特征位置间拟合单应性。
(2)执行代码:
# -*- coding: utf-8 -*-
import pickle
from PCV.localdescriptors import sift
from PCV.imagesearch import imagesearch
from PCV.geometry import homography
from PCV.tools.imtools import get_imlist

# load image list and vocabulary
#载入图像列表
imlist = get_imlist('first1000/')
nbr_images = len(imlist)
#载入特征列表
featlist = [imlist[i][:-3]+'sift' for i in range(nbr_images)]

#载入词汇
with open('first1000/vocabulary.pkl', 'rb') as f:
    voc = pickle.load(f)

src = imagesearch.Searcher('testImaAdd.db',voc)

# index of query image and number of results to return
#查询图像索引和查询返回的图像数
q_ind = 0
nbr_results = 20

# regular query
# 常规查询(按欧式距离对结果排序)
res_reg = [w[1] for w in src.query(imlist[q_ind])[:nbr_results]]
print ('top matches (regular):', res_reg)

# load image features for query image
#载入查询图像特征
q_locs,q_descr = sift.read_features_from_file(featlist[q_ind])
fp = homography.make_homog(q_locs[:,:2].T)

# RANSAC model for homography fitting
#用单应性进行拟合建立RANSAC模型
model = homography.RansacModel()
rank = {}

# load image features for result
#载入候选图像的特征
for ndx in res_reg[1:]:
    locs,descr = sift.read_features_from_file(featlist[ndx])  # because 'ndx' is a rowid of the DB that starts at 1
    # get matches
    matches = sift.match(q_descr,descr)
    ind = matches.nonzero()[0]
    ind2 = matches[ind]
    tp = homography.make_homog(locs[:,:2].T)
    # compute homography, count inliers. if not enough matches return empty list
    try:
        H,inliers = homography.H_from_ransac(fp[:,ind],tp[:,ind2],model,match_theshold=4)
    except:
        inliers = []
    # store inlier count
    rank[ndx] = len(inliers)

# sort dictionary to get the most inliers first
sorted_rank = sorted(rank.items(), key=lambda t: t[1], reverse=True)
res_geom = [res_reg[0]]+[s[0] for s in sorted_rank]
print ('top matches (homography):', res_geom)

# 显示查询结果
imagesearch.plot_results(src,res_reg[:8]) #常规查询
imagesearch.plot_results(src,res_geom[:8]) #重排后的结果
(3)结果


因为我的图片是经过几次测试的,图片都已经被重排过,所以两张出来的结果是一样的,如果测试图集是未排序过的那么两张图可能就不一样了。
- 建立演示程序及Web应用
(1)这个目的是讲演示程序变成web页,自动获得跨平台支持,并以最低环境配置需求展示、分享。这里采用cherryPy包,可以直接进入cmd进行pip install cherrypy,但是我在安装时窗口虽然显示安装成功却始终无法import cherrypy,后来发现系统总是会将cherrypy文件安装到python27目录下,但是环境配置以及安装目录都是在python36下,后面尝试发现进入python36目录下的scripts安装才正确。
(2)执行代码:
# -*- coding: utf-8 -*-
import cherrypy
import pickle
import urllib
import os
from numpy import *
#from PCV.tools.imtools import get_imlist
from PCV.imagesearch import imagesearch
import random

"""
This is the image search demo in Section 7.6.
"""


class SearchDemo:

    def __init__(self):
        # 载入图像列表
        self.path = 'first1000/'
        #self.path = 'D:/python_web/isoutu/first500/'
        self.imlist = [os.path.join(self.path,f) for f in os.listdir(self.path) if f.endswith('.jpg')]
        #self.imlist = get_imlist('./first500/')
        #self.imlist = get_imlist('E:/python/isoutu/first500/')
        self.nbr_images = len(self.imlist)
        print (self.imlist)
        print (self.nbr_images)
        self.ndx = list(range(self.nbr_images))
        print (self.ndx)

        # 载入词汇
        # f = open('first1000/vocabulary.pkl', 'rb')
        with open('first1000/vocabulary.pkl','rb') as f:
            self.voc = pickle.load(f)
        #f.close()

        # 显示搜索返回的图像数
        self.maxres = 10

        # header and footer html
        self.header = """


            Image search


            """
        self.footer = """