KEIL MDK 使用配置工具和STM32CUBEMX工具新建项目 (二)- 添加FreeRTOS
在之前的基础上,添加FreeRTOS的步骤如下:
1. 打开MDK配置工具,选择FreeRTOS的相关组件
2. 编译项目,提示三个函数重复定义了:
.\Objects\TST4.axf: Error: L6200E: Symbol PendSV_Handler multiply defined (by port.o and stm32f3xx_it.o).
.\Objects\TST4.axf: Error: L6200E: Symbol SVC_Handler multiply defined (by port.o and stm32f3xx_it.o).
.\Objects\TST4.axf: Error: L6200E: Symbol SysTick_Handler multiply defined (by cmsis_os2.o and stm32f3xx_it.o).
那么在 stm32f3xx_it.c 文件中将对应的这三个中断函数 weak 掉,再编译就通过了。
__weak void SysTick_Handler(void)
__weak void PendSV_Handler(void)
__weak void SVC_Handler(void)
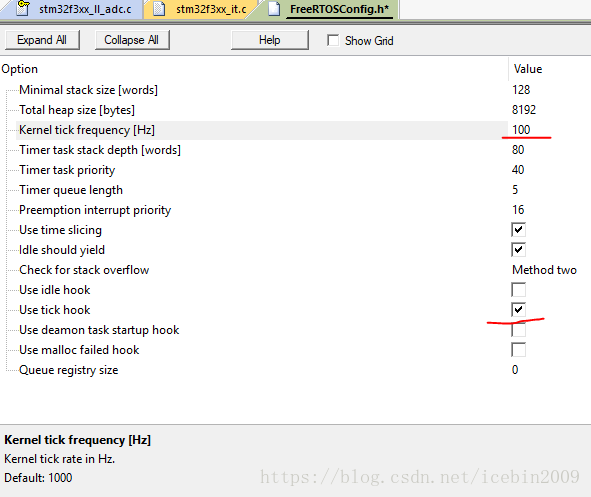
3. 修改 FreeRTOSConfig.h 配置文件,MDK提供的配置向导页面比较直观,将tick改为100Hz,并使用tick hook。
4. 修改main.c文件,添加FreeRTOS相关头文件:
/* USER CODE BEGIN Includes */
#include "FreeRTOS.h" /* Must come first. */
#include "task.h" /* RTOS task related API prototypes. */
#include "queue.h" /* RTOS queue related API prototypes. */
#include "timers.h" /* Software timer related API prototypes. */
#include "semphr.h" /* Semaphore related API prototypes. */
添加LED task
// main() 函数--------------------------------------------------------------------------
/* USER CODE BEGIN 2 */
/* Create the queue receive task as described in the comments at the top
of this file. */
xTaskCreate( prvLedTask,
/* Text name for the task, just to help debugging. */
"LED",
/* The size (in words) of the stack that should be created
for the task. */
configMINIMAL_STACK_SIZE,
/* A parameter that can be passed into the task. Not used
in this simple demo. */
NULL,
tskIDLE_PRIORITY + 2 ,
NULL );
/* USER CODE END 2 */
vTaskStartScheduler();
// main() 函数结束--------------------------------------------------------------------------
添加 prvLedTask 函数
/* USER CODE BEGIN 4 */
static void prvLedTask( void *pvParameters )
{
pvParameters = pvParameters;
for( ;; )
{
HAL_GPIO_TogglePin(GPIOC, GPIO_PIN_13);
vTaskDelay( 20 );
}
}
修改SystemClock_Config() 函数中系统 Systic中断时间,使用 configTICK_RATE_HZ 这个FreeRTOS配置文件中的定义:
/**Configure the Systick interrupt time
*/
HAL_SYSTICK_Config(HAL_RCC_GetHCLKFreq()/configTICK_RATE_HZ);
注意HAL_IncTick();函数原来是由 SysTick_Handler() 调用的,但添加了FreeRTOS之后,重新定义了这个中断指向 xPortSysTickHandler(),此时HAL_IncTick();无法执行,原来依赖于HAL_Delay延时的函数可能无法执行。
5. 添加中断优先级配置函数
static void prvSetupHardware( void )
{
/* Ensure all priority bits are assigned as preemption priority bits
if using a ARM Cortex-M microcontroller. */
// NVIC_SetPriorityGrouping( 0 );
HAL_NVIC_SetPriorityGrouping(NVIC_PRIORITYGROUP_4);
/* TODO: Setup the clocks, etc. here, if they were not configured before
main() was called. */
}
并在main中调用:
/* USER CODE BEGIN SysInit */
prvSetupHardware(); // HAL_Init() 中也进行了相同的配置,此处可以删除
/* USER CODE END SysInit */
6. 编译项目,下载到MCU板,运行便可以看到LED闪。
7. 需要注意的是,如果调用了 STM32CubeMX 重新配置并生成代码,那么之前的 stm32f3xx_it.c 文件中三个中断函数,SystemClock_Config() 函数中系统 Systic中断时间 相关的代码会被恢复为默认代码,需要重新修改过了。

