websocket实现仿微信聊天功能
后端使用的技术是springboot前端是H5+和mui框架。
具体步骤很多,我主要概况一下大概,如果有朋友想要源码欢迎加我qq997355706。
前端最主要的地方有4个:

分别是登录创建与后端websocket的连接,关闭连接和发生错误,和接收消息。
其中open和message又最为重要,里面包括了发送和接收消息。
wsopen: function() {
					console.log("websocket连接已建立...");

					var me = app.getUserGlobalInfo();
					//构建ChatMsg
					var chatMsg = new app.ChatMsg(me.id,null,null,null);
					// 构建DateContent
					var dateContent = new app.DataContent(app.CONNECT,chatMsg,null);
					//发送WebSocket
					CHAT.chat(JSON.stringify(dateContent));

					// //每次连接过后,获取用户的未读未签收消息列表
					fetchUnReadMsg();

					// //定时发送心跳,要小于后端关闭的时间
					setInterval("CHAT.keepalive()",10000);
				},
| | |wsmessage: function(e) {
console.log(“接受消息:”+e.data);
				// //转换为DataContent对象
				var dataContent = JSON.parse(e.data);
				// var chatMsg = JSON.parse(e.data);


				//获取action,判断是否为重新拉取好友/
				var action = dataContent.action;
				if (action === app.PULL_FRIEND) {
					fetchContactList();
					return false;
				}

				// //如果不是重新拉取好友列表,则获取聊天消息模型,渲染接收到的聊天记录
				var chatMsg = dataContent.chatMsg;
				var msg = chatMsg.msg;
				var friendUserId = chatMsg.senderId;
				var myId = chatMsg.receiverId;
				// // console.log(msg);
				// // console.log(myId);
				// // console.log(friendUserId);

				//调用聊天页面的webview的reciveMsg方法
				// var chatWebview = plus.webview.getWebviewById("chatting-190810CHXGPYWNHH");
				var chatWebview = plus.webview.getWebviewById("chatting-" + friendUserId);

				var isRead = true;    //设置消息的默认状态为已读

				//当要接受的webview不为空的时候才做渲染
				if (chatWebview != null) {
					//运用其他webview页面的js脚本
					//接受消息
					chatWebview.evalJS("receiveMsg('" + msg + "')");
					// chatWebview.evalJS("receiveMsg('" + e.data + "')");
					//重新调整滚动条
					chatWebview.evalJS("resizeScreen()");
				} else {
					isRead = false;    //chatWebview 聊天页面没有打开,标记消息为未读
				}

				//接受到消息之后,对消息记录进行签收
				// console.log(chatMsg.msgId);
				var test = new app.DataContent(app.SIGNED,null,chatMsg.msgId);
				CHAT.chat(JSON.stringify(test));

				//保存聊天历史记录到本地缓存,二代表的是朋友的记录
				app.saveUserChatHistory(myId,friendUserId,msg,2);
				// 保存聊天的快照
				app.saveUserChatSnapshot(myId,friendUserId,msg,isRead);
				// //渲染快照列表进行展示
				loadingChatSnapshot();

			},
这是里面的代码,还有其他代码太多就不贴在上面。
里面注意的是保存聊天记录和快照这两部分,这两个部分非常的重要。
然后就是后端chathandler,主要分为了5个步骤:
1.获取客户端发来的消息,将json转化为对象模型
2.判断消息类型,根据不同的类型来处理不同的业务
2.1 当websocket第一次open的时候,初始化channel,把用的channel和userid关联起来
2.2 聊天类型的消息,把聊天记录保存到数据库,同时标记消息的签收状态[未签收]
2.3 签收消息类型,针对具体的消息进行签收,修改数据库中对应消息的签收状态[已签收]
2.4 心跳类型的消息
里面需要注意的是2.1步骤,我们想要聊天是两个人,所以我们需要将各自的channel和userID关联起来,利用channel来判断对方时在线和离线的状态,在通过好友请求的时候我们也可以通过对方的channel获取对方的信息,好实时更新好友的信息。
这是chathandler的代码:
/*
-
处理消息的handler
-
TextWebSocketFrame:在netty中,是用于为websocket专门处理文本的对象 ,frame是消息的载体
*/
public class ChatHandler extends SimpleChannelInboundHandler{//用户记录和管理所有客户端的channel
public static ChannelGroup users = new DefaultChannelGroup(GlobalEventExecutor.INSTANCE);@Override
protected void channelRead0(ChannelHandlerContext ctx, TextWebSocketFrame msg) throws Exception {
// //获取客户端传输过来的消息
// String content = msg.text();
// System.out.println(“接收到的数据:”+content);
//
// for(Channel channel : users){
// channel.writeAndFlush(new TextWebSocketFrame("[服务器在:]"+LocalDateTime.now()+“接收到消息,消息为:”+content));
// }
//下面这个方法,和上面的for循环,一致
// clients.writeAndFlush(new TextWebSocketFrame("[服务器在:]"+LocalDateTime.now()+“接收到消息,消息为:”+content));
// ------------------------------------------------------------------------------------------------------
	//获取客户端传输过来的消息
	String content = msg.text();

	//获取channel
	Channel currentChannel = ctx.channel();

	//1.获取客户端发来的消息,将json转化为对象模型
	DataContent dataContent = JsonUtils.jsonToPojo(content, DataContent.class);
// System.out.println(dataContent.getAction());
// System.out.println(dataContent.getExtend());
// System.out.println("----------------------");
	Integer action = dataContent.getAction();

	//2.判断消息类型,根据不同的类型来处理不同的业务

	if (action == MsgActionEnum.CONNECT.type) {
		//2.1 当websocket第一次open的时候,初始化channel,把用的channel和userid关联起来
		String senderId = dataContent.getChatMsg().getSenderId();
		UserChannelRel.put(senderId, currentChannel);

		//测试
		for (Channel c:users) {
			System.out.println(c.id().asLongText());
		}
		//测试
		UserChannelRel.output();

	}else if(action == MsgActionEnum.CHAT.type) {
		//2.2 聊天类型的消息,把聊天记录保存到数据库,同时标记消息的签收状态[未签收]
		ChatMsg chatMsg = dataContent.getChatMsg();
		String msgText = chatMsg.getMsg();
        String receiverId = chatMsg.getReceiverId();
        String senderId = chatMsg.getSenderId();

        //保存到数据库,并且标记为未签收
        //获取userservice
        UserService userService = (UserService) SpringUtil.getBean("userServiceImpl");
        //返回一个msgId,是未签收的状态
        String msgId = userService.saveMsg(chatMsg);
        //设置MsgId
        chatMsg.setMsgId(msgId);

        //将chatMsg设置在DataContent中,因为后端接收是Datacontent,所以发送也应该是datacontent
        DataContent dataContentMsg = new DataContent();
        dataContentMsg.setChatMsg(chatMsg);

        //发送消息
        Channel receiverChannel = UserChannelRel.get(receiverId);
        if (receiverChannel == null ) {
        	//channel为空代表用户离线,推送消息(JPush,个推,小米推送)
        }else {
        	//当receiverChannel不为空的时候,从ChannelGroup去查找对应的channel是否存在
        	Channel findChannel = users.find(receiverChannel.id());
        	if (findChannel != null) {
        		//用户在线
        		receiverChannel.writeAndFlush(new TextWebSocketFrame(JsonUtils.objectToJson(dataContentMsg)));
// receiverChannel.writeAndFlush(new TextWebSocketFrame(JsonUtils.objectToJson(chatMsg)));
}else {
//用户离线,推送消息
        	}
        }


	}else if(action == MsgActionEnum.SIGNED.type) {
		//2.3 签收消息类型,针对具体的消息进行签收,修改数据库中对应消息的签收状态[已签收]
		//获取userservice
        UserService userService = (UserService) SpringUtil.getBean("userServiceImpl");

        //扩展字段在signed类型的消息中,代表需要去签收的消息id,逗号间隔。
        String msgIdsStr = dataContent.getExtend();
        String msgIds[] = msgIdsStr.split(",");
// System.out.println(msgIdsStr + " 0000000");
// System.out.println(msgIds[0] + " 000000000 ");
        List msgIdList = new ArrayList<>();
        for (String mid : msgIds) {
        	if(StringUtils.isNoneBlank(mid)) {
        		msgIdList.add(mid);
        	}
        }

        //输出msgIDlist
        System.out.println(msgIdList.toString());

        //批量签收
        if (msgIdList != null && !msgIdList.isEmpty() && msgIdList.size() > 0) {
        	userService.updateMsgSigned(msgIdList);
        }

	}else if(action == MsgActionEnum.KEEPALIVE.type) {
		//2.4 心跳类型的消息
		System.out.println("收到来自channel为[" + currentChannel + "]的心跳包...");
	}

}

/*
 * 当客户端连接服务端之后(打开连接)
 * 获取客户端的channel,并且放到ChannelGroup总进行管理
 */
@Override
public void handlerAdded(ChannelHandlerContext ctx) throws Exception {

	users.add(ctx.channel());

}

@Override
public void handlerRemoved(ChannelHandlerContext ctx) throws Exception {

	//当触发handlerRemoved,ChannelGroup会自动移除对应客户端的channel
// clients.remove(ctx.channel());
// System.out.println(“客户端断开,channel对应的长id为:”+ ctx.channel().id().asLongText());
// System.out.println(“客户端断开,channel对应的短id为:”+ ctx.channel().id().asShortText());
	String channelId = ctx.channel().id().asShortText();
	System.out.println("客户端被移除,channelId为:" + channelId);

	users.remove(ctx.channel());

}

@Override
public void exceptionCaught(ChannelHandlerContext ctx, Throwable cause) throws Exception {
	cause.printStackTrace();
	//发生异常之后关闭连接(关闭channel),随后从ChannelGroup中移除
	ctx.channel().close();
	users.remove(ctx.channel());
}
}
然后就是前后端的数据交互,我们在后端创建了dataContent对象和chatmsg对象,datacontent有动作的类型和聊天记录和扩展字段,扩展字段是用于标记后面未读的消息。然后chatmsg主要保存聊天记录。
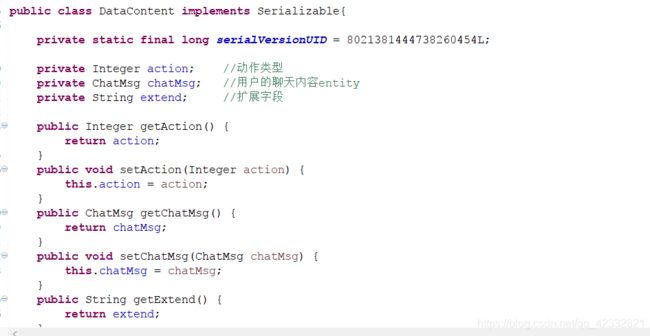

后端同样创建了这两个对象。
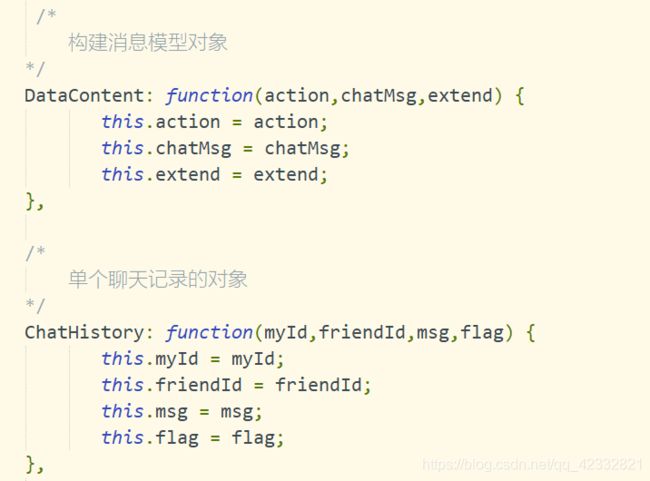
用js使用的构造函数。将对象利用发送消息传到后端。
总结的可能不是太好如果想要更深一步了解,可以加我qq997355706。