vue-router、elementiui、vant 安装引入应用
一.vue-router
1.安装
①直接下载/CDN
https://unpkg.com/vue-router/dist/vue-router.js
在 Vue 后面加载 vue-router,它会自动安装的:
②NPM
npm install vue-router
③在index.js文件中引入
import Vue from 'vue'
import VueRouter from 'vue-router'

Vue.use(VueRouter)
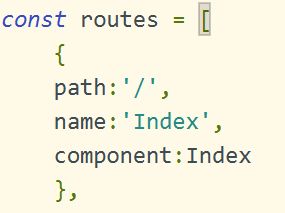
需要跳转的页面在下方写入,例如首页index:

④在main.js文件中引入
import router from './router';
3.路由跳转
二.Vant
1.通过npm安装
npm i vant -S
2.引入组件
①自动按需引入组件 (推荐)
babel-plugin-import 是一款 babel 插件,它会在编译过程中将 import 的写法自动转换为按需引入的方式
#安装插件
npm i babel-plugin-import -D
// 在.babelrc 中添加配置
// 注意:webpack 1 无需设置 libraryDirectory
{
  "plugins": [
    ["import", {
      "libraryName": "vant",
      "libraryDirectory": "es",
      "style": true
    }]
  ]
}
// 对于使用 babel7 的用户,可以在 babel.config.js 中配置
module.exports = {
  plugins: [
    ['import', {
      libraryName: 'vant',
      libraryDirectory: 'es',
      style: true
    }, 'vant']
  ]
};
// 接着你可以在代码中直接引入 Vant 组件
// 插件会自动将代码转化为方式二中的按需引入形式
import { Button } from 'vant';
②手动按需引入组件
在不使用插件的情况下,可以手动引入需要的组件
import Button from 'vant/lib/button';
import 'vant/lib/button/style';
③导入所有组件
Vant 支持一次性导入所有组件,引入所有组件会增加代码包体积,因此不推荐这种做法
在main.js文件中引入:
import Vue from 'vue';
import Vant from 'vant';
import 'vant/lib/index.css';

Vue.use(Vant);
④通过 CDN 引入
使用 Vant 最简单的方法是直接在 html 文件中引入 CDN 链接
三.elementui
1.安装
①npm 安装
npm i element-ui -S
②CDN 安装
在页面上引入 js 和 css 文件即可开始使用
2.引入Element
①完整引入
在 main.js 中写入以下内容:
import Vue from 'vue';
import ElementUI from 'element-ui';
import 'element-ui/lib/theme-chalk/index.css';
import App from './App.vue';

Vue.use(ElementUI);

new Vue({
  el: '#app',
  render: h => h(App)
});
②按需引入
只引入需要的组件,以达到减小项目体积的目的:
首先,安装 babel-plugin-component:
npm install babel-plugin-component -D
然后,将 .babelrc 修改为:
{
  "presets": [["es2015", { "modules": false }]],
  "plugins": [
    [
      "component",
      {
        "libraryName": "element-ui",
        "styleLibraryName": "theme-chalk"
      }
    ]
  ]
}
接下来,如果你只希望引入部分组件,比如 Button 和 Select,那么需要在 main.js 中写入以下内容:
import Vue from 'vue';
import { Button, Select } from 'element-ui';
import App from './App.vue';

Vue.component(Button.name, Button);
Vue.component(Select.name, Select);
/* 或写为
 * Vue.use(Button)
 * Vue.use(Select)
 */

new Vue({
  el: '#app',
  render: h => h(App)
});