Android 一文看懂OKhttp3主流程源码
源码采用okhttp3:4.2.1版本
如有不对,请指正,谢谢
目录
- 一、Okhttp三步走
- 二、流程分析
- 同步请求:
- 异步请求:
- 三、OkHttp的重要类和内部成员
- Dispatcher
- RealCall
- Interceptor
- 四、Okhttp具体都有哪些优化
- 1、Connection连接池
- 2、请求线程池
- 3、支持GZIP来减少数据流量
- 4、缓存响应数据来减少重复的网络请求
一、Okhttp三步走
1、创建OKhttpClient和Request
2、创建Call
3、调用Call的请求方法
代码:
        /**
         * 第一步
         */
        OkHttpClient okHttpClient = new OkHttpClient.Builder().build();
        Request request = new Request.Builder().url("http://www.baidu.com").get().build();
        /**
         * 第二步
         */
        Call call = okHttpClient.newCall(request);
        /**
         * 第三步
         */
        try {
            Response response = call.execute();
        } catch (IOException e) {
            e.printStackTrace();
        }
二、流程分析
1、创建OKhttpClient和Request
看代码:
fun build(): OkHttpClient = OkHttpClient(this)
OKhttp的Client是通过构建方法的设计模式来创建的,最后调用Build方法来创建。
open class OkHttpClient internal constructor(
  builder: Builder
)
最终传入了我们设置好的Build来创建。需要注意的是:OKhttp里的Dispatcher和ConnectionPool等重要的类也是在这里进行初始化的
Request也是相同的设计,这里就不说了。就是指定了一些请求的相关内容。
2、创建Call
创建Call调用了Call call = okHttpClient.newCall(request);的方法,传入request来获取call。
newCall方法最终会调用以下的方法:
companion object {
    fun newRealCall(
      client: OkHttpClient,
      originalRequest: Request,
      forWebSocket: Boolean
    ): RealCall {
      // Safely publish the Call instance to the EventListener.
      return RealCall(client, originalRequest, forWebSocket).apply {
        transmitter = Transmitter(client, this)
      }
    }
  }
可以看到,newRealCall其实是RealCall里的一个伴生对象里的方法(RealCall的静态方法可以这么理解)然后返回了一个RealCall的实例顺便初始化了内部成员Transmitter。这里就不多说了,Real Call的构造方法也就是一个简单的赋值。
3、调用Call的请求方法
同步请求:
override fun execute(): Response {
    synchronized(this) {
      check(!executed) { "Already Executed" }
      executed = true
    }
    transmitter.timeoutEnter()
    transmitter.callStart()
    try {
      client.dispatcher.executed(this)
      return getResponseWithInterceptorChain()
    } finally {
      client.dispatcher.finished(this)
    }
  }
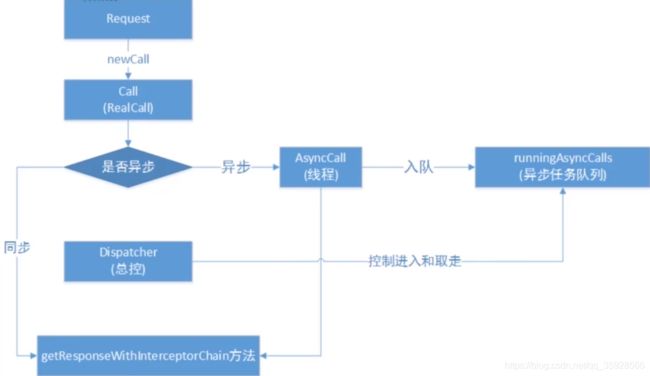
同步请求方法代码如上,同步请求会做以下几个动作。
- 判断这个Call是否已经被调用过。
- 开始统计请求的时间
- 调用client.dispatcher.executed(this)将请求添加到同步请求队列。
- 调用getResponseWithInterceptorChain()添加拦截器链。
- 回收同步请求
同步请求总结:同步请求其实就是将请求放入到请求队列和移除同步请求。
异步请求:
override fun enqueue(responseCallback: Callback) {
    synchronized(this) {
      check(!executed) { "Already Executed" }
      executed = true
    }
    transmitter.callStart()
    client.dispatcher.enqueue(AsyncCall(responseCallback))
  }
最终还是调用了client.dispatcher.enqueue(AsyncCall(responseCallback)),接着看
internal fun enqueue(call: AsyncCall) {
  synchronized(this) {
    readyAsyncCalls.add(call)

    // Mutate the AsyncCall so that it shares the AtomicInteger of an existing running call to
    // the same host.
    if (!call.get().forWebSocket) {
      val existingCall = findExistingCallWithHost(call.host())
      if (existingCall != null) call.reuseCallsPerHostFrom(existingCall)
    }
  }
  promoteAndExecute()
}
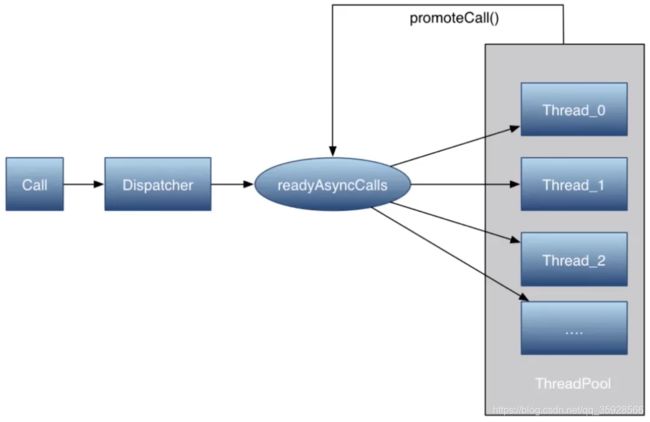
需要注意的是,这里将异步请求加入到了就绪队列中。
private fun promoteAndExecute(): Boolean {
  assert(!Thread.holdsLock(this))

  val executableCalls = mutableListOf<AsyncCall>()
  val isRunning: Boolean
  synchronized(this) {
    val i = readyAsyncCalls.iterator()
    while (i.hasNext()) {
      val asyncCall = i.next()

      if (runningAsyncCalls.size >= this.maxRequests) break // Max capacity.
      if (asyncCall.callsPerHost().get() >= this.maxRequestsPerHost) continue // Host max capacity.

      i.remove()
      asyncCall.callsPerHost().incrementAndGet()
      executableCalls.add(asyncCall)
      runningAsyncCalls.add(asyncCall)
    }
    isRunning = runningCallsCount() > 0
  }

  for (i in 0 until executableCalls.size) {
    val asyncCall = executableCalls[i]
    asyncCall.executeOn(executorService)
  }

  return isRunning
}
这里会把就绪列表中的请求拿出来,判断现在运行数是否是最大(64),同一个host连接数是否最大(5),如果没有就加入到执行队列,循环执行。
fun executeOn(executorService: ExecutorService) {
  assert(!Thread.holdsLock(client.dispatcher))
  var success = false
  try {
    executorService.execute(this)
    success = true
  } catch (e: RejectedExecutionException) {
    val ioException = InterruptedIOException("executor rejected")
    ioException.initCause(e)
    transmitter.noMoreExchanges(ioException)
    responseCallback.onFailure(this@RealCall, ioException)
  } finally {
    if (!success) {
      client.dispatcher.finished(this) // This call is no longer running!
    }
  }
}
这里通过Dispatcher内部维护的线程池进行请求。
三、OkHttp的重要类和内部成员
Dispatcher

用来分配同步和异步的请求。里面维护了一个线程池(核心线程0,最大MAX_INT,60无响应退出。不过实际上只有64个线程在运行)
@get:JvmName("executorService") val executorService: ExecutorService
  get() {
    if (executorServiceOrNull == null) {
      executorServiceOrNull = ThreadPoolExecutor(0, Int.MAX_VALUE, 60, TimeUnit.SECONDS,
          SynchronousQueue(), threadFactory("OkHttp Dispatcher", false))
    }
    return executorServiceOrNull!!
  }
这个线程池用来异步请求。符合生产者消费者模型设计。
同步请求直接添加到同步执行队列中,然后调用。
异步请求分两个情况,如果执行线程小于64且host小于5,则直接加入异步执行队列执行,如果失败进入异步就绪队列。然后重新调用。
RealCall
这个类是OKhttp真正执行的类,其中有AsyncCall这个类非常重要,它是一个Runnable,其中run方法如下:
override fun run() {
  threadName("OkHttp ${redactedUrl()}") {
    var signalledCallback = false
    transmitter.timeoutEnter()
    try {
      val response = getResponseWithInterceptorChain()
      signalledCallback = true
      responseCallback.onResponse(this@RealCall, response)
    } catch (e: IOException) {
      if (signalledCallback) {
        // Do not signal the callback twice!
        Platform.get().log(INFO, "Callback failure for ${toLoggableString()}", e)
      } else {
        responseCallback.onFailure(this@RealCall, e)
      }
    } finally {
      client.dispatcher.finished(this)
    }
  }
}
可以看到,调用了getResponseWithInterceptorChain()方法来获取Response,成功返回异常失败。
最后则调用了client.dispatcher.finished(this),这个方法最终调用了promoteAndExecute(),这样就可以将之前就绪队列中的请求加回来了。
下面是源码:
fun getResponseWithInterceptorChain(): Response {
  // Build a full stack of interceptors.
  val interceptors = mutableListOf<Interceptor>()
  interceptors += client.interceptors
  interceptors += RetryAndFollowUpInterceptor(client)
  interceptors += BridgeInterceptor(client.cookieJar)
  interceptors += CacheInterceptor(client.cache)
  interceptors += ConnectInterceptor
  if (!forWebSocket) {
    interceptors += client.networkInterceptors
  }
  interceptors += CallServerInterceptor(forWebSocket)

  val chain = RealInterceptorChain(interceptors, transmitter, null, 0, originalRequest, this,
      client.connectTimeoutMillis, client.readTimeoutMillis, client.writeTimeoutMillis)

  var calledNoMoreExchanges = false
  try {
    val response = chain.proceed(originalRequest)
    if (transmitter.isCanceled) {
      response.closeQuietly()
      throw IOException("Canceled")
    }
    return response
  } catch (e: IOException) {
    calledNoMoreExchanges = true
    throw transmitter.noMoreExchanges(e) as Throwable
  } finally {
    if (!calledNoMoreExchanges) {
      transmitter.noMoreExchanges(null)
    }
  }
}
这些都非常重要,我们下面这个类来看
Interceptor

上述代码一次添加了以下5个拦截器。用来在网络请求前包装请求头,请求体,判断是否使用缓存,复用connection等,也负责在网络返回后进行解压,缓存,重试等一系列操作。
1)RetryAndFollowUpInterceptor(主要负责失败重连,最大重试次数20)
2)BridgeInterceptor(把用户的Requset转换成可以真正能够请求网络数据的Request,添加请求头等,把Response转换成用户可用的Response)
3)CacheInterceptor(缓存)
4)ConnectInterceptor(维护连接池)
5)CallServerInterceptor(真正的请求)
拦截器其实一种切面编程,每一个拦截器针对下一个拦截器进行切面编程。总体上拦截器对网络请求本身进行了切面编程。这样做可以减少判断和解耦代码职责。
四、Okhttp具体都有哪些优化
1、Connection连接池
http请求每次都会经历三次握手才能建立连接,okhttp针对这一点进行了优化建立了一个connectionpoll的连接池,里面维护着我们需要连接的connection,5个空闲的连接。这样就实现了减少握手次数的作用。
2、请求线程池
okhttp针对异步请求,建立了一个线程池来维护请求。核心线程数为0,这也就意味着okhttp的线程池所有线程都会在闲置时进行回收。最大执行任务数并没有让线程池进行维护,而是自己建立了一个执行队列和就绪队列来进行维护。
3、支持GZIP来减少数据流量
这个由BridgeInterceptor来进行切面编程实现,对CacheInterceptor进行执行完毕编程,进行无缝解压行为。
4、缓存响应数据来减少重复的网络请求
这个有CacheInterceptor进行实现,不管是否使用缓存,前切面都会去判断是否有缓存,有就返回没有就进行网络请求。而是否缓存则是后切面进行实现。
需要注意的是,OKHttp只对GET方法进行缓存。
为什么只缓存GET不缓存POST或者其他呢?因为约定上,GET方法请求到的东西是不变的,而POST会频繁修改参数和提交表单等操作,不符合编程约定。
