NestJS学习与实践
前言
之前一直想写后端,但是对于php python golang 学习成本比较大。nodejs 也作为一种服务器语言,接触比较久的,学习起来成本不大,而且性能也不错。所有我打算先从这入手。
开始时用纯nodejs写后端,发现写起来一堆api要记,写起来麻烦,所有用了nodejs的一个框架:Nest.js。
NestJS 简介
Nest 是一个用于构建高效,可扩展的 Node.js 服务器端应用程序的框架。
学习资料: 官网 https://nestjs.com/
中文 https://docs.nestjs.cn
建议中英文对照的看,有些翻译有点怪
ps: 本文下面不是按照官网的顺序,也不讲官网语法,要看官网语法的请看上面,而是以本人实际开发的步骤写的:
就是把官网里面用到的知识抽出来,方便以后看·····
安装
通过npm 或者yarn安装cli工具构建项目快速
npm i -g @nestjs/cli
// 或者 yarn
yarn global add @nestjs/cli
$ nest new project-name
HMR (不用,框架本身支持)
为了开发方便利用webpack 热模块替换,使代码在开发过程中,实时更新。
- yarn add webpack webpack-cli webpack-node-externals ts-loader --dev 安装包
- 在根目录新建 webpack.config.js 文件 代码如下:
const webpack = require('webpack');
const path = require('path');
const nodeExternals = require('webpack-node-externals');

module.exports = {
  entry: ['webpack/hot/poll?100', './src/main.ts'],
  watch: true,
  target: 'node',
  externals: [
    nodeExternals({
      whitelist: ['webpack/hot/poll?100'],
    }),
  ],
  module: {
    rules: [
      {
        test: /.tsx?$/,
        use: 'ts-loader',
        exclude: /node_modules/,
      },
      {
        test: /.schema?$/,
        use: 'json-schema-loader',
        exclude: /node_modules/,
      }
    ],
  },
  mode: 'development',
  resolve: {
    extensions: ['.tsx', '.ts', '.js'],
  },
  plugins: [new webpack.HotModuleReplacementPlugin()],
  output: {
    path: path.join(__dirname, 'dist'),
    filename: 'server.js',
  },
};
- 改/src/main.ts的代码,如下:
import { NestFactory } from '@nestjs/core';
import { AppModule } from './app.module';

declare const module: any;

async function bootstrap() {
  const app = await NestFactory.create(AppModule);
  await app.listen(3000);

  if (module.hot) {
    module.hot.accept();
    module.hot.dispose(() => app.close());
  }
}
bootstrap();
- 在package.json的文件下加如:
"server": "node dist/server",
"webpack": "webpack --config webpack.config.js"
- 同时运行 yarn webpack ;yarn server;
连接mysql数据库
开始运行 nest g mo users新建一个users.module
- 安装包 yarn add @nestjs/typeorm typeorm mysql
- 在/src/app.module.ts 文件里面加入
import ormconfig from '../ormconfig';
@Module({
  imports: [
      TypeOrmModule.forRoot(ormconfig),
  ],
  controllers: [AppController],
  providers: [],
})
export class AppModule {
  constructor(private readonly connection: Connection) {
    console.warn(__dirname);
    console.warn(connection.isConnected ? '数据库连接成功' : '数据库连接失败');
  }
}
- 在根目录新建 ormconfig.ts文件 在这里要注意下 按照官网的写法在HMR下运行会报错,按照原来的不会有问题。原因在于entity的存放位置,报错如下:

把官网写法改为如下写法:
import { UserEntity } from './src/users/user.entity';
import { TypeOrmModuleOptions } from '@nestjs/typeorm';
const ormconfig: TypeOrmModuleOptions = {
  keepConnectionAlive: true,
  type: 'mysql',
  host: '*****',
  port: '*****,
  username: ''*****',
  password: ''*****',
  database: '*****',
  synchronize: true,
  entities: [UserEntity],
};

export default ormconfig;
- 新建实体 新建 /src/users/user.entity.ts文件
import { Column, Entity, PrimaryGeneratedColumn } from 'typeorm';

@Entity({ name: 'user-info' })
export class UserEntity {
  @PrimaryGeneratedColumn()
  id: number;

  @Column()
  name: string;

  @Column()
  password: string;

  @Column()
  email: string;
}
- module里面加入entity 修改 /src/users/user.module.ts
import { UserEntity } from './user.entity';
....
@Module({
  imports: [TypeOrmModule.forFeature([UserEntity])],
  ....
})
export class UsersModule {}
- nest g s users 新建users.service.ts,使用 @InjectRepository() 修饰器向 UsersService 注入 userRepository:
.....
@Injectable()
export class UsersService {
  constructor(
    @InjectRepository(UserEntity)
    private readonly userRepository: Repository<UserEntity>,
  ) {}

  findAll(): Promise<UserEntity[]> {
    return this.userRepository.find();
  }
}
- nest g co users 新建users.controller.ts
@Controller('users')
export class UsersController {
  constructor(private readonly usersService: UsersService) {}

  @Get('all-user')
  getAllUser(@Req() req) {
    return this.usersService.findAll();
  }
}
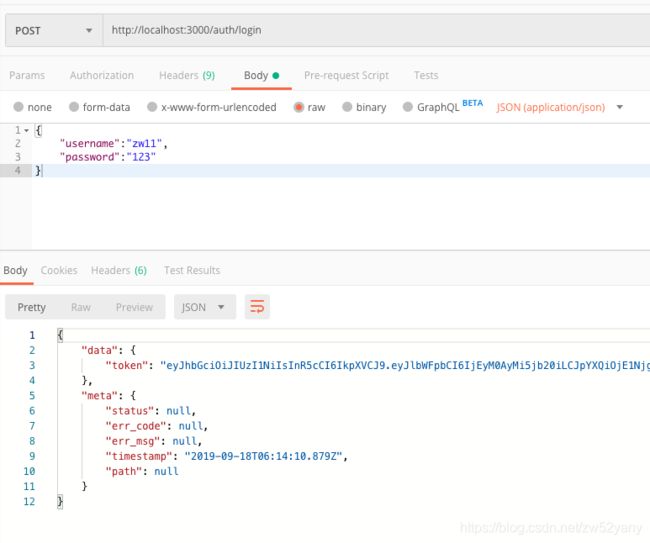
利用postman测试接口

Authorization 登陆认证
- 安装passport passport 是目前最流行的 node.js 认证库 passport-local:密码/用户名 的认证策略
npm install --save @nestjs/passport passport passport-local
 npm install --save-dev @types/passport-local
2.新建 auth 模块 users 模块
nest g module auth
nest g service auth

nest g module users
nest g service users
3.在users module里面注入TypeOrmModule;
@Module({
  imports: [TypeOrmModule.forFeature([UserEntity])],
  providers: [UsersService],
  exports: [UsersService],
  controllers: [UsersController],
})
export class UsersModule {}
在 users service 里面 查询用户名和密码 以及新增用户 采用Repository提供的方法
@Injectable()
export class UsersService {
  constructor(
    @InjectRepository(UserEntity)
    private readonly userRepository: Repository<UserEntity>,
  ) {}
  async findOneByUserName(username): Promise<UserEntity> {
    return this.userRepository.findOne({ name: username });
  }

  async addUser(param: UserDTO) {
    const salt = Math.random()
      .toString(36)
      .substr(2);
    const password = CreateMD5(param.password, salt);

    return this.userRepository.save({
      name: param.name,
      email: param.email,
      password,
      salt,
    });
  }
}
在auth service里面调用userservice方法去验证用户名和密码,下面的代码对密码进行了MD5加密,每个用户新建时生成一个随机sal用于加密密码,数据库存入的是,确保数据库存入的密码的安全。
@Injectable()
export class AuthService {
  constructor(
    private readonly usersService: UsersService
  ) {}

  async validateUser(username: string, pass: string): Promise<any> {
    const user = await this.usersService.findOneByUserName(username);
    if (!user) {
      throw new BadRequestException('用户名不存在');
    }

    if (user && user.password === CreateMD5(pass, user.salt)) {
      const { password, ...result } = user;
      return result;
    }
    return null;
  }
}
- 在auth 文件新建local.strategy.ts文件 调用service对方法进行用户名验证
@Injectable()
export class LocalStrategy extends PassportStrategy(Strategy) {
  constructor(private readonly authService: AuthService) {
    super();
  }

  async validate(username: string, password: string): Promise<any> {
    console.warn(username, password);
    if (!username || !password) {
      throw new BadRequestException('请用户名和密码');
    }

    const user = await this.authService.validateUser(username, password);
    if (!user) {
      throw new BadRequestException('用户名或者密码不正确');
    }
    return user;
  }
}
在auth module 里面注入 PassportModule LocalStrategy AuthService
@Module({
  imports: [
    UsersModule,
    PassportModule
  ],
  providers: [AuthService, LocalStrategy]
  exports: [AuthService],
  controllers: [AuthController],
})
export class AuthModule {}
新建auth controller ,AuthGuard 是 @nestjs/passport 包中提供的
@Controller('auth')
export class AuthController {
  constructor(
    private readonly authService: AuthService,
    private readonly usersService: UsersService,
  ) {}

  // 登陆
  @UseGuards(AuthGuard('local'))
  @Post('login')
  async login(@Req() req) {
    return this.authService.login(req.user);
  }
}
5.下面进行 jwt 认证 (jwt对原理可以看我对另一篇文章https://blog.csdn.net/zw52yany/article/details/100081326)
首先安装passport-jwt
 npm install @nestjs/jwt passport-jwt
npm install @types/passport-jwt --save-dev
再在auth.service 文件里面加入login方法,生成jwt 并返回给客户端
...
@Injectable()
export class AuthService {
  constructor(
    private readonly usersService: UsersService,
    private readonly jwtService: JwtService,
  ) {}
  ...
  async login(user: UserEntity) {
    const payload = { username: user.name, email: user.email };
    return {
      token: this.jwtService.sign(payload),
    };
  }
}
export const jwtSecretKey = 'zw';
同时在auth.module里面注册jwt策略,注入JwtModule
@Module({
  imports: [
    UsersModule,
    PassportModule.register({ defaultStrategy: 'jwt' }),
    JwtModule.register({
      secret: jwtSecretKey,
      signOptions: { expiresIn: '1h' },  // 这里是jwt失效时间
    }),
  ],
  providers: [AuthService, LocalStrategy, JwtStrategy],
  exports: [AuthService],
  controllers: [AuthController],
})
export class AuthModule {}
- 下面进行api 的登陆认证
新建 jwt.strategy文件 validate 方法的作用是:先获得jwt解析后的payload,调用validate 方法验证用户名和密码存不存在。
@Injectable()
export class JwtStrategy extends PassportStrategy(Strategy) {
  constructor(private readonly usersService: UsersService) {
    super({
      jwtFromRequest: ExtractJwt.fromAuthHeaderAsBearerToken(),  // 从header bearer 里面获得jwt
      ignoreExpiration: false,
      secretOrKey: jwtSecretKey,
    });
  }

  async validate(payload: UserInfo) {
    const user = await this.usersService.findOneByUserName(payload.username);
    if (!user) {
      throw new BadRequestException('用户名不存在');
    }
    return { username: payload.username, email: payload.email };
  }
}
在auth module providers 里面注入 JwtStrategy
@Module({
  imports: [
    ...
  ],
  providers: [AuthService, LocalStrategy, JwtStrategy],
  exports: [AuthService],
  controllers: [AuthController],
})
export class AuthModule {}
- nest js提供了路由守卫,可以用来针对每个接口,判断用户是否登陆,对用户接口进行访问权限控制
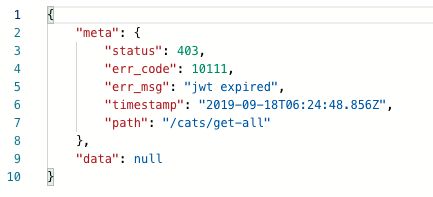
新建jwtAuth.guard.ts ,JwtAuthGuard继承AuthGuard,并做了一些错误判断
@Injectable()
export class JwtAuthGuard extends AuthGuard('jwt') {
  canActivate(
    context: ExecutionContext,
  ): boolean | Promise<boolean> | Observable<boolean> {
    const request = context.switchToHttp().getRequest();
    if (request.url === '/auth/login' || request.url === '/auth/register') {
      return true;
    } else {
      return super.canActivate(context);
    }
  }

  handleRequest(err, user, info) {
    if (err || !user) {
      if (info.message === 'jwt expired') {
        throw new JwtException(ErrorCode.jwtExpired, info.message);
      } else if (info.message === 'No auth token') {
        throw new JwtException(ErrorCode.jwtNotFound, info.message);
      } else {
        throw new JwtException(ErrorCode.jwtInvalid, info.message);
      }
    }
    return user;
  }
}
测试:
Exception
- 异常处理
nestjs/common中公开了一个内置的 HttpException 类,使用方式,直接调用基础类:
@Get()
async findAll() {
  throw new HttpException('Forbidden', HttpStatus.FORBIDDEN);
  throw new HttpException({
    status: HttpStatus.FORBIDDEN,
    error: 'This is a custom message',
  }, 403);
}
或者扩展基础类:
export class ForbiddenException extends HttpException {
  constructor() {
    super('Forbidden', HttpStatus.FORBIDDEN);
  }
}
@Get()
async findAll() {
  throw new ForbiddenException();
}
下面一些例子:在jwt对验证,过期对错误提示可以
// jwt 过期
export class JwtException extends HttpException {
  constructor(private readonly errCode, private readonly msg) {
    super(
      {
        status: errCode,
        error: msg,
      },
      403,
    );
  }
}
统一BadrEquestException 可以这样
export class BadRequestException extends HttpException {
  constructor(private readonly msg: string) {
    super(
      {
        status: HttpStatus.INTERNAL_SERVER_ERROR, // error code
        error: msg,
      },
      500, // status code
    );
  }
}
- 异常过滤器:就是一个异常中间件,捕获到所有异常进行一些处理,例如可以对抛出对异常进行统一格式化处理:
@Catch(HttpException)
export class HttpExceptionFilter implements ExceptionFilter {
  catch(exception: HttpException, host: ArgumentsHost): any {
    const ctx = host.switchToHttp();
    const response = ctx.getResponse();
    const request = ctx.getRequest();
    const status = exception.getStatus();
    console.warn(exception);
    response.status(status).json({
      meta: {
        status: exception.getStatus(),
        err_code: exception.message.status,
        err_msg: exception.message.error,
        timestamp: new Date().toISOString(),
        path: request.url,
      },
      data: null,
    });
  }
}
最后返回的异常结果就是统一格式:
拦截器
拦截器是一个请求中间件,拦截请求做一些处理,一般可以用来:
- 在函数执行之前/之后绑定额外的逻辑
- 转换从函数返回的结果
- 转换从函数抛出的异常
- 扩展基本函数行为
- 根据所选条件完全重写函数 (例如, 缓存目的)
下面一个统一response body格式的拦截器:
export interface Response<T> {
  data: T;
  meta: {
    status: number;
    err_code: number;
    err_msg: string;
    timestamp: string;
    path: string;
  };
}

// 转化请求结果
@Injectable()
export class TransformInterceptor<T>
  implements NestInterceptor<T, Response<T>> {
  intercept(
    context: ExecutionContext,
    next: CallHandler<T>,
  ): Observable<Response<T>> | Promise<Observable<Response<T>>> {
    console.log('transform...');
    return next.handle().pipe(
      map(data => ({
        data,
        meta: {
          status: null,
          err_code: null,
          err_msg: null,
          timestamp: new Date().toISOString(),
          path: null,
        },
      })),
    );
  }
}
返回结果格式如下:

参数格式验证
- 新建validation.pipe.ts
@Injectable()
export class ValidationPipe implements PipeTransform<any> {
  async transform(value, metadata: ArgumentMetadata) {
    const { metatype } = metadata;
    if (!metatype || !this.toValidate(metatype)) {
      return value;
    }
    const object = plainToClass(metatype, value);
    const errors = await validate(object);
    if (errors.length > 0) {
      let errMsg = '';
      for (const err of errors) {
        errMsg += err.constraints[Object.keys(err.constraints)[0]] + ';';
      }
      console.warn(errMsg);
      throw new BadRequestException(errMsg);
    }
    return value;
  }

  private toValidate(metatype): boolean {
    const types = [String, Boolean, Number, Array, Object];
    return !types.find(type => metatype === type);
  }
}
- 在app module中导入
@Module({
  providers: [
    {
      provide: APP_PIPE,
      useClass: ValidationPipe, // 请求参数格式验证
    }
  ]
})
export class AppModule {}
- 使用 以用户注册为例子,新建register.todo.ts
export class UserDTO {
  @IsString()
  @IsNotEmpty()
  readonly name: string;

  @IsString()
  @IsNotEmpty()
  readonly password: string;

  @IsString()
  @IsNotEmpty()
  readonly email: string;
}
然后在auth.controller中使用
// 注册
  @Post('register')
  async addUser(@Body() user: UserDTO) {
    try {
      const data = await this.usersService.addUser(user);
      return { name: data.name, email: data.email };
    } catch (e) {
      console.warn(e);
      throw new BadRequestException(e.message);
    }
  }
测试: