laravel + rabbitmq
一、安装laravel 两种方式
   1. composer global require laravel/installer

      laravel new wendao

   2. composer create-project --prefer-dist laravel/laravel wendao
二、安装rabbitmq
 1. docker pull rabbitmq:management  //拉取rabbitmq 镜像
 //启动容器
 2.docker run -d --name rockywish_rabbit -p 5672:5672 -p 15672:15672 -v /opt/workapp/data/rabbitmq/data:/var/lib/rabbitmq --hostname myRabbit -e RABBITMQ_DEFAULT_VHOST=my_vhost -e RABBITMQ_DEFAULT_USER=admin -e RABBITMQ_DEFAULT_PASS=admin cc86ffa2f398

3. 访问IP+15672 就可以看到rabbitmq的后台 使用启动容器设置的用户名admin,密码admin就可以登录
- 一定要开启对外映射5672、15672这两个端口
- 5672端口,应用程序连接
- 15672 rabbitmq后台使用
三、安装PHP扩展amqp
-
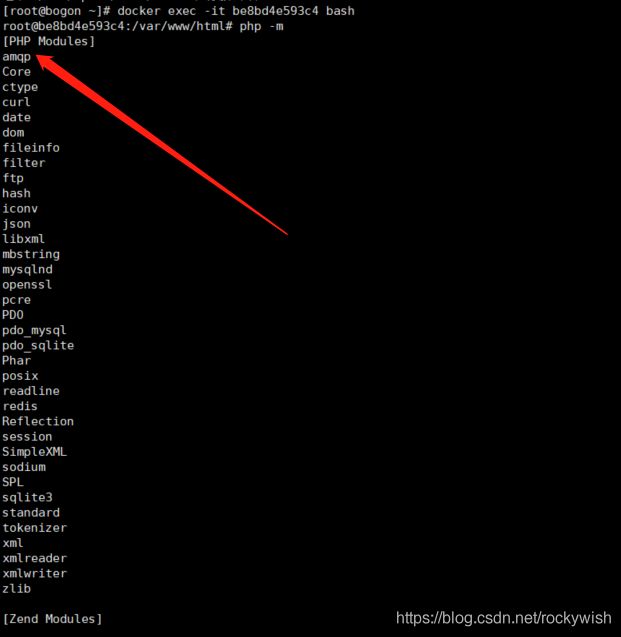
进入PHP容器:docker exec -it be8bd4e593c4 bash
-
wget -c http://pecl.php.net/get/amqp-1.10.2.tgz
-
把amqp-1.10.2.tgz 解压到 /usr/src/php/ext/
-
docker-php-ext-install amqp
-
php -m 查看是否安装成功

四、安装laravel-queue-rabbitmq1.composer require vladimir-yuldashev/laravel-queue-rabbitmq 2.修改config/queue.php文件在connections中追加
        'rabbitmq' => [

            'driver' => 'rabbitmq',
            'queue' => env('RABBITMQ_QUEUE', 'default'),
            'connection' => PhpAmqpLib\Connection\AMQPLazyConnection::class,

            'hosts' => [
                [
                    'host' => env('RABBITMQ_HOST', '192.168.159.166'),
                    'port' => env('RABBITMQ_PORT', 15672),
                    'user' => env('RABBITMQ_USER', 'admin'),
                    'password' => env('RABBITMQ_PASSWORD', 'admin'),
                    'vhost' => env('RABBITMQ_VHOST', '/'),
                ],
            ],

            'options' => [
                'ssl_options' => [
                    'cafile' => env('RABBITMQ_SSL_CAFILE', null),
                    'local_cert' => env('RABBITMQ_SSL_LOCALCERT', null),
                    'local_key' => env('RABBITMQ_SSL_LOCALKEY', null),
                    'verify_peer' => env('RABBITMQ_SSL_VERIFY_PEER', true),
                    'passphrase' => env('RABBITMQ_SSL_PASSPHRASE', null),
                ],
            ],

            /*
             * Set to "horizon" if you wish to use Laravel Horizon.
             */
            'worker' => env('RABBITMQ_WORKER', 'default'),

        ],
四、编写示例
1. 创建任务类php artisan make:job Queue
namespace App\Jobs;

use App\User;
use Illuminate\Bus\Queueable;
use Illuminate\Contracts\Queue\ShouldQueue;
use Illuminate\Foundation\Bus\Dispatchable;
use Illuminate\Queue\InteractsWithQueue;
use Illuminate\Queue\SerializesModels;
use Illuminate\Support\Facades\Log;

class Queue implements ShouldQueue
{
    use Dispatchable, InteractsWithQueue, Queueable, SerializesModels;

    private $data;

    /**
     * Create a new job instance.
     *
     * @return void
     */
    public function __construct($data)
    {
        $this->data = $data;
    }

    /**
     * Execute the job.
     *
     * @return void
     */
    public function handle()
    {
        Log::info('Handle: ' . date('Y-m-d H:i:s', time()));
        sleep(2);
        Log::info('Params: ' . json_encode($this->data));
        return json_encode($this->data);
    }
}
2. 创建控制器php artisan make:controller Queue。添加index方法
namespace App\Http\Controllers;

use App\Jobs\Queue as JobsQueue;
use App\User;
use Illuminate\Http\Request;
use Illuminate\Support\Facades\Log;

class Queue extends Controller
{
    /**
     * @Notes: 使用队列插入数据
     * @Interface index
     * @param Request $request
     * @author: zzh
     * @Time: 2020/6/11   11:20
     */
    public function index(Request $request)
    {
        Log::info('Start: ' . date('Y-m-d H:i:s', time()));
        $arr = ['time' => time(), 'id' => rand(100, 999)];
        sleep(2);
        $this->dispatch(new JobsQueue($arr));
        Log::info('End: ' . date('Y-m-d H:i:s', time()));
        return 'success';
    }


    public function insert()
    {
        sleep(2);
        $user = new User();
        $data = [
            'name' => rand(100000, 999999),
            'email' => rand(10000, 99999) . '[email protected]',
            'password' => '$2y$10$7rKsXBSoccZ4c2/9I8nb1OH7X5/i.Jvt/5ZRxE7dzwskdcCLSMGBa',
        ];
        $user->insert($data);
        return 'success';
    }

}
3. routes/api.php 下来添加路由
use Illuminate\Http\Request;
use Illuminate\Support\Facades\Route;

/*
|--------------------------------------------------------------------------
| API Routes
|--------------------------------------------------------------------------
|
| Here is where you can register API routes for your application. These
| routes are loaded by the RouteServiceProvider within a group which
| is assigned the "api" middleware group. Enjoy building your API!
|
*/

Route::middleware('auth:api')->get('/user', function (Request $request) {
    return $request->user();
});

Route::get('queue', 'Queue@index');
Route::get('index', 'Queue@insert');
4. 执行命令进行消费php artisan queue:work。访问http://localhost/api/queue
[rockywish@bogon wendao]$ php artisan queue:work
[2020-06-19 14:15:16][AqEnbeuRp2A3Sif7tyjKp6iu9qQRrXOw] Processing: App\Jobs\Queue
[2020-06-19 14:15:18][AqEnbeuRp2A3Sif7tyjKp6iu9qQRrXOw] Processed:  App\Jobs\Queue
5. 使用ab测试50请求10并发下的表现
[rockywish@bogon wendao]$ ab -n50 -c10  http://www.wendao.com/api/index
This is ApacheBench, Version 2.3 <$Revision: 1430300 $>
Copyright 1996 Adam Twiss, Zeus Technology Ltd, http://www.zeustech.net/
Licensed to The Apache Software Foundation, http://www.apache.org/

Benchmarking www.wendao.com (be patient).....done


Server Software:        nginx/1.17.10
Server Hostname:        www.wendao.com
Server Port:            80

Document Path:          /api/index
Document Length:        7 bytes

Concurrency Level:      10
Time taken for tests:   29.083 seconds
Complete requests:      50
Failed requests:        0
Write errors:           0
Total transferred:      19400 bytes
HTML transferred:       350 bytes
Requests per second:    1.72 [#/sec] (mean)
Time per request:       5816.588 [ms] (mean)
Time per request:       581.659 [ms] (mean, across all concurrent requests)
Transfer rate:          0.65 [Kbytes/sec] received

Connection Times (ms)
              min  mean[+/-sd] median   max
Connect:        0    0   0.1      0       0
Processing:  2080 4156 785.7   4150    7368
Waiting:     2080 4156 785.7   4150    7368
Total:       2080 4156 785.7   4150    7368

Percentage of the requests served within a certain time (ms)
  50%   4150
  66%   4208
  75%   4241
  80%   4244
  90%   4291
  95%   5135
  98%   7368
  99%   7368
 100%   7368 (longest request)
因为本机配置有限。直接操作和使用队列都增加2秒的延迟,主要是为了对比使用的效果

