【本文版权归微信公众号"代码艺术"(ID:onblog)所有,若是转载请务必保留本段原创声明,违者必究。若是文章有不足之处,欢迎关注微信公众号私信与我进行交流!】
1.简介
Spring Boot Admin 是一个管理和监控Spring Boot 应用程序的开源软件。Spring Boot Admin 分为 Server 端和 Client 端,Spring Boot Admin UI部分使用AngularJs将数据展示在前端。
2.工程架构
- Eureka Server:服务注册中心,端口为8761。
- Admin Server:用于对微服务系统进行统一的监控和管理。
- Admin Clinet:客户端集成Admin。
3.构建Admin Server
新建Spring Boot工程,取名为 admin-server 其完整依赖为:
    4.0.0

        org.springframework.boot
        spring-boot-starter-parent
        1.5.3.RELEASE


    com.example
    admin-server
    0.0.1-SNAPSHOT

    admin-server
    Demo project for Spring Boot


        1.8
        Dalston.RELEASE


            de.codecentric
            spring-boot-admin-server-ui
            1.5.1


            de.codecentric
            spring-boot-admin-server
            1.5.1


            org.springframework.boot
            spring-boot-starter-actuator


            org.springframework.cloud
            spring-cloud-starter-eureka


            org.jolokia
            jolokia-core


            org.springframework.boot
            spring-boot-starter-test
            test


                org.springframework.cloud
                spring-cloud-dependencies
                ${spring-cloud.version}
                pom
                import


                org.springframework.boot
                spring-boot-maven-plugin
配置application.yml,设置 management.security.enabled=false 关闭安全验证,设置Spring Boot Admin默认开启的节点.
eureka:
  client:
    service-url:
      defaultZone: http://localhost:8761/eureka/
server:
  port: 5000
spring:
  application:
    name: admin-server
  boot:
    admin:
      routes:
        endpoints: env,metrics,dump,jolokia,info,configprops,trace,logfile,refresh,flyway,liquibase,heapdump,loggers,auditevents,hystrix.stream
management:
  security:
    enabled: false
logging:
  file: "logs/boot-admin-sample.log"
在 resources 目录下建一个 logback-spring.xml文件
注解 @EnableAdminServer 开启Admin Server的功能.
@EnableEurekaClient
@EnableAdminServer
@SpringBootApplication
public class AdminServerApplication {

    public static void main(String[] args) {
        SpringApplication.run(AdminServerApplication.class, args);
    }

}
这样Spring Boot Admin工程创建完毕!
4.构建Admin Client
新建Spring Boot工程,取名为 admin-client,其完整依赖为:
    4.0.0

        org.springframework.boot
        spring-boot-starter-parent
        1.5.3.RELEASE


    com.example
    admin-client
    0.0.1-SNAPSHOT

    admin-server
    Demo project for Spring Boot


        1.8
        Dalston.RELEASE


            org.springframework.boot
            spring-boot-starter-web


            org.springframework.boot
            spring-boot-starter-actuator


            org.springframework.cloud
            spring-cloud-starter-eureka


            org.jolokia
            jolokia-core


            org.springframework.boot
            spring-boot-starter-test
            test


                org.springframework.cloud
                spring-cloud-dependencies
                ${spring-cloud.version}
                pom
                import


                org.springframework.boot
                spring-boot-maven-plugin
配置 application.yml 文件,设置日志输出路径,并关闭 Actuator 模块的安全验证。
eureka:
  client:
    service-url:
      defaultZone: http://localhost:8761/eureka/
server:
  port: 8762
spring:
  application:
    name: admin-client
management:
  security:
    enabled: false
logging:
  file: "logs/boot-admin-client.log"
在程序的启动类上加上 @EnableEurekaClient 注解,开启EurekaClient功能.
@SpringBootApplication
@EnableEurekaClient
public class AdminClientApplication {

    public static void main(String[] args) {
        SpringApplication.run(AdminClientApplication.class, args);
    }

}
5.启动程序
【本文版权归微信公众号"代码艺术"(ID:onblog)所有,若是转载请务必保留本段原创声明,违者必究。若是文章有不足之处,欢迎关注微信公众号私信与我进行交流!】
依次启动 eureka-server、admin-server 和 admin-client 工程,在浏览器访问 admin-server 的主页 http://localhost:5000/,浏览器显示界面如图:
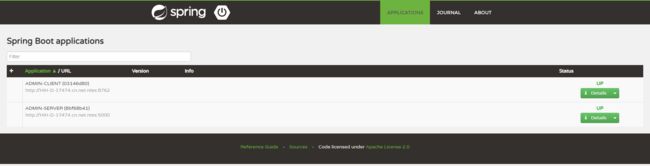
"JOURNAL"选项为服务注册、下线、剔除的时间线。
6.添加安全登录界面
Spring Boot Admin 提供了登录界面的组件,并且和 Spring Boot Security 相结合,需要用户登录才能访问。
引入依赖
    de.codecentric
    spring-boot-admin-server-ui-login
    1.5.0


     org.springframework.boot
     spring-boot-starter-security
在工程的application.yml中做以下配置,创建一个 security 的 user 用户,它的用户名为 admin ,密码为 123456,。通过 eureka.instance.metadate-map 配置带上该 security 的 user 用户信息。
security:
  user:
    name: admin
    password: 123456
eureka:
  instance:
    metadata-map:
      user.name: admin
      user.password: 123456
然后,在程序中配置 Spring Boot Security,写 SecurityConfig 的配置类,给静态资源加上 permitAll() 方法,除上述以外的资源访问需要权限认证,另外这些资源不支持 CSFR(跨站请求伪造),所以禁用掉 CSFR,最后需要开启 Http 的额基本认证,即 httpBasic() 方法。
@Configuration
public class SecurityConfig extends WebSecurityConfigurerAdapter {

    @Override
    protected void configure(HttpSecurity http) throws Exception {
        // Page with login form is served as /login.html and does a POST on /login
        http.formLogin().loginPage("/login.html").loginProcessingUrl("/login").permitAll();
        // The UI does a POST on /logout on logout
        http.logout().logoutUrl("/logout");
        // The ui currently doesn't support csrf
        http.csrf().disable();

        // Requests for the login page and the static assets are allowed
        http.authorizeRequests()
                .antMatchers("/login.html", "/**/*.css", "/img/**", "/third-party/**")
                .permitAll();
        // ... and any other request needs to be authorized
        http.authorizeRequests().antMatchers("/**").authenticated();

        // Enable so that the clients can authenticate via HTTP basic for registering
        http.httpBasic();
    }

}
重新启动 admin-server 工程,在浏览器中访问 http://localhost:5000/,输入用户名admin,密码为123456,登录即可。
参考方志朋《深入理解Spring Cloud与微服务构建》
版权声明
【本文版权归微信公众号"代码艺术"(ID:onblog)所有,若是转载请务必保留本段原创声明,违者必究。若是文章有不足之处,欢迎关注微信公众号私信与我进行交流!】