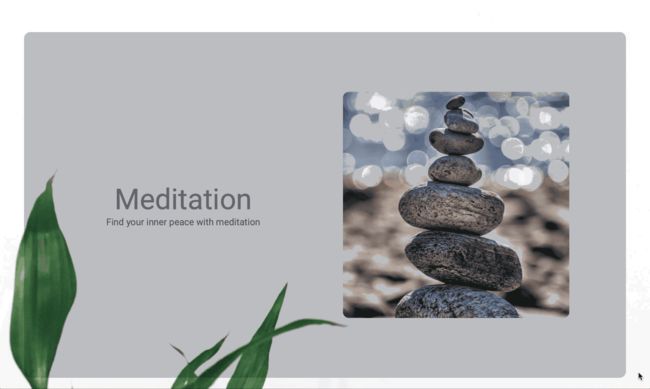
介绍
自从2018年末首次亮相以来,Flutter作为移动开发SDK越来越受欢迎,并且web作为目标,这个优秀的SDK现在可供Web开发人员使用,以创建令人惊叹的高质量Web体验,充分利用最新的Web API。
在本文中,我们将介绍如何使用Flutter for Web创建一个简单的网页,其中包括基本布局,一些文本和图像,以及一些滚动动画以增加效果。作为一个简单的例子,它不可能赢得任何UX设计挑战,但它可以用于演示目的。
环境
要使用Flutter构建Web应用程序以启动和运行工作环境,您需要安装以下工具:
- Flutter:安装页面
- Stagehand :(
$ pub global activate stagehand创建新的应用程序) - IDE:IDE或代码编辑器,例如带有Dart扩展名的VS Code
要验证您是否安装了有效的Flutter,请运行$ flutter doctor并确保下载任何缺少的扩展或其他依赖项。
这个项目的源代码可以在GitHub上找到。确保$ flutter pub get在项目目录中运行(除非您有一个支持自动解析依赖项的环境)。
项目结构
这个项目是使用命令创建的,该命令$ stagehand web-simple设置了一个空的web项目,该项目还没有将flutter_web包作为依赖项,因此我们将这些添加到项目的pubspec.yaml文件中:
name: flutter_web_example
description: A basic example app demonstrating Flutter for Web
author: Kenneth Reilly
version: 1.0.0

environment:
  sdk: '>=2.1.0 <3.0.0'

dependencies:
  flutter_web: any
  flutter_web_ui: any

dev_dependencies:
  build_runner: ^1.1.2
  build_web_compilers: ^1.0.0
  pedantic: ^1.0.0

dependency_overrides:
  flutter_web:
    git:
      url: https://github.com/flutter/flutter_web
      path: packages/flutter_web
  flutter_web_ui:
    git:
      url: https://github.com/flutter/flutter_web
      path: packages/flutter_web_ui
这个pubspec.yaml非常典型的Flutter项目,有一些用于构建Web应用程序的附加内容,以及git repo url和path的依赖性覆盖,因为flutter_web包尚未发布到pub.dartlang.org存储库并且pub将没有这些覆盖就失败了。
应用入口点
我们来看看主要的源文件lib/main.dart:
import 'package:flutter_web/material.dart';
import 'home.dart';

class FlutterWebDemo extends StatelessWidget {

  @override
  Widget build(BuildContext context) {

    return MaterialApp(
      title: 'Flutter Web Demo',
      theme: ThemeData(primarySwatch: Colors.deepPurple),
      home: HomePage(title: 'Flutter Web Demo'),
    );
  }
}
这是任何Flutter应用程序的一个相当标准的主应用程序文件,其中包含StatelessWidget的实现,它构建了一个包装HomePage小部件的MaterialApp,接下来我们将对此进行介绍。
主页
接下来我们将在lib/home.dart中查看主页:
import 'package:flutter_web/material.dart';
import 'package:flutter_web_example/background.dart';
import 'section-def.dart';
import 'section.dart';

class HomePage extends StatefulWidget {

  HomePage({ Key key, this.title }) : super(key: key);
  final String title;

  _HomePageState createState() => _HomePageState();
}

class _HomePageState extends State {

  List get _cards =>
    List.generate(sections.length, (int x)
      => Section(listenable: _controller, index: x, total: sections.length, item: sections[x]));

  ScrollController _controller = ScrollController();

  @override
  Widget build(BuildContext context) {

    return Scaffold(

      backgroundColor: Colors.black,
      body: Stack(

        children: [

          Background(
            image: AssetImage('images/image-01.jpg'),
            listenable: _controller
          ),
          Container(
            child: ListView(
              padding: EdgeInsets.only(top: 16, bottom: 64),
              children: _cards,
              controller: _controller
            )
          )
        ]
      )
    );
  }
}
这是我们进入一些真实代码的地方。该主页类延伸StatefulWidget,以允许它保持它自己的内部状态与非最终性能是可变的。有一个_cards属性,它接受导入的节定义并返回要显示的节对象列表。_controller属性包含对ScrollController的引用,ScrollController将用于驱动应用程序其余部分的动画。
此窗口小部件的构建方法返回一个Scaffold,其中包含一个Stack(用于在z轴上堆叠窗口小部件),其中Background包含ScrollController以驱动视差动画,而ListView用于显示要滚动的页面部分列表,在这种情况下,使用提供的控制器来驱动列表(而不是默认在内部创建一个)。这是用于管理Flutter中滚动效果的相当标准的配置,因为它允许创建具有自定义行为的控制器,然后用于直接驱动滚动元素,以及通过AnimatedWidget驱动任意数量的动画效果(或使用相关概念)如AnimatedBuilder)。
的背景
接下来是lib/background.dart中的网站背景:
import 'package:flutter_web/material.dart';

class Background extends AnimatedWidget {

  Background({ Key key, @required this.image, @required this.listenable })
    : super(key: key, listenable: listenable);

  final AssetImage image;
  final ScrollController listenable;

  @override
  Widget build(BuildContext context) {

    double offset = listenable.hasClients ? listenable.offset : 0;
    ScrollPosition position = listenable.hasClients ? listenable.position : null;
    double extent = (position == null) ? 1 : position.maxScrollExtent * 1.2;
    double align = (offset / extent);

    return Container(
      constraints: BoxConstraints.expand(),
      child: Image(
        image: image,
        alignment: Alignment(0, align),
        fit: BoxFit.cover
      )
    );
  }
}
的背景窗口小部件是AnimatedWidget的实现,需要一个图像和收听对象(或在这种情况下ScrollController它是实现许多类之一Listenable
)。listenable的值被传递给超类,以允许应用程序在滚动事件发生时刷新动画小部件。在构建中方法,执行计算以确定用户在ListView上滚动了多远(使用相同的ScrollController),并且将该值作为y偏移提供给图像上的对齐属性,这导致慢滚动动作与前景中的滚动内容结合使用时,会产生良好的视差效果。此外,执行各种空检查,因为当此小组件首次呈现时,控制器可能未完全初始化并准备就绪。
页面部分定义
现在让我们看一下lib/section-def.dart中的页面定义:
import 'package:flutter_web/material.dart';

class SectionDef {

  final String name;
  final String description;
  final AssetImage image;
  const SectionDef(this.name, this.description, this.image);
}

List sections = [
  const SectionDef('Meditation', "Find your inner peace with meditation", AssetImage('images/image-02.jpg')),
  const SectionDef('Beverages', "Relax with a beverage by the pool", AssetImage('images/image-03.jpg')),
  const SectionDef('Aromatherapy', "Enjoy the aroma of pure essential oils", AssetImage('images/image-04.jpg')),
  const SectionDef('Tea Time', "Have a conversation with friends over tea", AssetImage('images/image-05.jpg')),
  const SectionDef('The Works', "Treat yourself to an all-day session", AssetImage('images/image-06.jpg'))
];
该SectionDef类是与它的名称,描述和图像一起定义页部分。此文件中还包含部分定义列表,HomePage用它来创建要呈现的Section对象列表。
页面分类
最后,我们将看一下lib/section.dart中页面部分的代码:
import 'package:flutter_web/material.dart';
import 'section-def.dart';

class Content extends AnimatedWidget {

  const Content({ Key key, this.listenable, this.children, this.opacity })
    : super(key: key, listenable: listenable);

  final ScrollController listenable;
  final List children;
  final double opacity;

  @override
  Widget build(BuildContext context) {

    return Opacity(
      opacity: opacity,
      child: Container(

        padding: EdgeInsets.all(48).copyWith(bottom: 0 ),
        constraints: BoxConstraints.expand(height: 720),
        child: ClipRRect(

          borderRadius: BorderRadius.all(Radius.circular(12)),
          child: Container(

            color: Color.fromARGB(64, 0, 16, 32),
            child: Row(

              mainAxisAlignment: MainAxisAlignment.spaceEvenly,
              crossAxisAlignment: CrossAxisAlignment.center,
              children: children
            )
          )
        )
      )
    );
  }
}

class Section extends AnimatedWidget {

  const Section({ Key key, this.index, this.total, this.item, @required this.listenable })
    : super(key: key, listenable: listenable);

  final int index;
  final int total;
  final SectionDef item;
  final ScrollController listenable;

  @override
  Widget build(BuildContext context) {

    Shadow shadow = const Shadow(color: Colors.grey, blurRadius: 24, offset: Offset(12, 12));
    TextTheme theme = Theme.of(context).textTheme;
    TextStyle _titleStyle = theme.display3.copyWith( color: Colors.black45, shadows: [shadow]);
    TextStyle _descStyle = theme.display1.copyWith(fontSize: 18, color: Colors.black54, shadows: [shadow]);

    double offset = listenable.hasClients ? listenable.offset : 0;
    ScrollPosition position = listenable.hasClients ? listenable.position : null;
    double extent = (position == null || position.maxScrollExtent == null) ? 1 : position.maxScrollExtent;
    double diff = 1 - (index - ((offset / extent) * (total - 1))).abs();
    double opacity = diff.clamp(0.2, 1);

    return Content(
      listenable: listenable,
      opacity: opacity,
      children: [

        Container(
          constraints: BoxConstraints.expand(width: 400),
          child: Column(

            mainAxisAlignment: MainAxisAlignment.center,
            crossAxisAlignment: CrossAxisAlignment.center,
            children: [
              Text(item.name, style: _titleStyle),
              Text(item.description, style: _descStyle)
            ]
          ),
        ),
        Container(
          child: ClipRRect(

            borderRadius: BorderRadius.all(Radius.circular(12)),
            child: Container(

              constraints: BoxConstraints.expand(width: 440, height: 440),
              child: Image(image: item.image, fit: BoxFit.fitWidth),
            )
          ),
        )
      ]
    );
  }
}
这个文件中有两个类,Content类,它基本上是一个小实用程序小部件,用于防止在Flutter项目上快速失控的代码块的过度嵌套,以及实际的Section类本身,绘制页面部分并应用以与背景中的视差滚动效果计算类似的方式导出的不透明度。
该Section类构造函数将当前项目的index(在章节列表中的位置),total(节数),item(该部分的定义),以及* listenable(可以驱动动画)。此类根据它在节定义列表中的位置以及当前滚动位置计算它自己的不透明度。这里的目标是将不透明度在0.2(对于当前不在视图中的项目)和1.0(对于滚动到视图中的项目)之间进行缩放。这有效地来自数字1.0(最大不透明度)*减去项目与当前滚动位置之间距离的绝对值。这样,当项目在任一方向上滚动出视图时,它们的不透明度会增加。
结论
在撰写本文时,Flutter for Web目前仍在开发中,但Google的优秀人员正在努力将其合并到主要的Flutter分支中,作为iOS和Android的另一个构建目标。
随意克隆该项目的模板仓库并进行实验以了解更多信息,并查看官方Flutter for Web页面以获取更多信息以及项目的最新开发工作。
谢谢阅读!
翻译自:https://itnext.io/getting-started-with-flutter-forweb-c0647ed51b88
