一、简述linux操作系统启动流程
Linux系统的启动流程,以CentOS为例:
POST:Power On Self Test,设备开机自检
--> Boot Sequence(BIOS,MBR):读取BIOS配置,按次序查找各引导设备,第一个有引导程序信息(MBR,Master Boot Record)的设备即为启动时要用到的设备
--> Bootloader(GRUB):加载引导程序GRUB
--> kernel(ramdisk):通过ramdisk加载内核
--> rootfs(ro):以只读(ro)方式挂载临时根文件系统,加载驱动程序
--> /sbin/init(or /usr/lib/systemd/system) :将实际根文件系统从磁盘加载到内存并启动第一程序(CentOS 5,6为/sbin/init,CentOS 7为/usr/lib/systemd)
--> 读取配置文件:/etc/inittab,/etc/init/*.conf(CentOS 5,6)或/usr/lib/systemd/system/*,/etc/systemd/system/*(CentOS 7)
--> 设置默认运行级别
--> 运行系统初始化脚本,完成系统初始化
--> 关闭及启动对应级别下的服务
--> 设置登陆终端
[--> 启动图形终端]
·
二、简述grub启动引导程序配置及命令行接口详解
GRUB:GRand Unit Bootloader,它是一个多重操作系统启动管理器,可用来引导不同系统,如Windows,Linux。
GRUB的版本:
grub 0.X:grub legacy(CentOS 5,6)
grub 1.X:grub2 (CentOS 7)
grub legacy:
    stage 1:mbr
    stage 1_5:mbr之后的扇区,让stage1中的bootloader能识别stage2所在的分区上的文件系统;
    stage 2:磁盘分区(/boot/grub/)

    注:stage2及内核等通常放置于一个基本磁盘分区;否则可能无法识别(例如:/boot放置于基于LVM和软RAID方式的磁盘分区,可能无法识别)
        功用:
            1、提供菜单、并提供交互式接口
                e:编辑模式,用于编辑菜单
                c:命令模式,交互式接口;
            2、加载用户选择的内核或操作系统
                允许传递参数给内核
                可隐藏此菜单
            3、为菜单提供了保护机制
                为编辑菜单进行认证
                为启用内核或操作系统进行认证
1、grub启动引导程序的配置文件:/boot/grub/grub.conf 或/etc/grub.conf(软连接)
[root@localhost ~]# cat /boot/grub/grub.conf
# grub.conf generated by anaconda
#
# Note that you do not have to rerun grub after making changes to this file
# NOTICE:  You have a /boot partition.  This means that
#          all kernel and initrd paths are relative to /boot/, eg.
#          root (hd0,0)
#          kernel /vmlinuz-version ro root=/dev/mapper/VolGroup-lv_root
#          initrd /initrd-[generic-]version.img
#boot=/dev/sda
default=0
timeout=5
splashimage=(hd0,0)/grub/splash.xpm.gz
hiddenmenu
title CentOS (2.6.32-431.el6.x86_64)
    root (hd0,0)
    kernel /vmlinuz-2.6.32-431.el6.x86_64 ro root=/dev/mapper/VolGroup-lv_root rd_NO_LUKS rd_NO_MD rd_LVM_LV=VolGroup/lv_swap crashkernel=auto LANG=zh_CN.UTF-8 rd_LVM_LV=VolGroup/lv_root  KEYBOARDTYPE=pc KEYTABLE=us rd_NO_DM rhgb quiet
    initrd /initramfs-2.6.32-431.el6.x86_64.img
配置项:
    default=#:设定默认启动的菜单项;菜单项(title)编号从0开始;
    timeout=#:指定菜单项等待选项选择的时长;
    splashimage=(hd#,#)/PATH/TO/XPM_PIC_FILE:指明菜单背景图片文件路径;
    hiddenmenu:隐藏菜单;
    password [--md5] STRING:菜单编辑认证;
    title TITLE:定义菜单项“标题”
        root (hd#,#):grub查找stage2及kernel文件所在的设备分区:为grub的“根”
        kernel /PATH/TO/VMLINUZ_FILE [PARAMETERS]:启动的内核;
        initrd /PATH/TO/INITRAMFS_FILE:内核匹配的ramfs文件;
        password [--md5] STRING:启动选定的内核或操作系统时进行认证;
注:grub-md5-crypt命令:可生成grub配置文件可识别的密文密码字符串
2、grub程序命令行接口详解
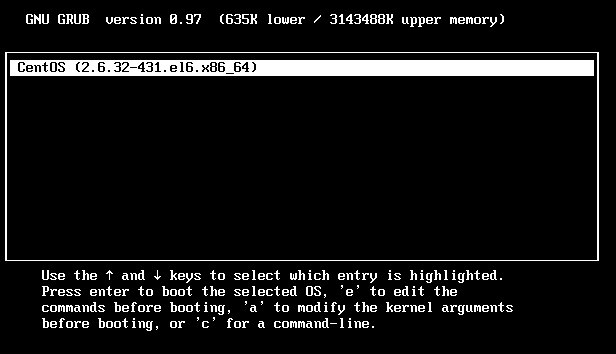
在系统引导过程中的系统选择界面时(即,进入grub引导程序的stage2时),如图:
按c键可进入grub的命令行接口,如图:
help:获取帮助列表
    help KEYWORD:详细帮助信息
find (hd#,#)/PATH/TO/SOMEFILE:查找某文件
root (hd#,#):指明哪个为根设备
kernel /PATH/TO/SOMEFILE:设定本次启动时用到的内核文件;额外还可以添加许多内核支持使用的cmdline参数;
    例如:init=/path/to/init,selinux=0
initrd /PATH/TO/INITRAMFS_FILE:设定为选定的内核提供额外文件的ramdisk
boot:引导启动选定的内核

手动在grub命令行接口启动系统:
    grub> root (hd#,#)
    grub> kernel /vmlinuz-VERSION-RELEASE ro root=/dev/DEVICE
    grub> initrd /initramfs-VERSION-RELEASE.img
    grub> boot
·
三、实现kickstart文件制作与光盘镜像制作
kickstart文件的制作——常用的两种方式
1、使用当前系统安装时生成的anaconda-ks.cfg文件作为模板,在此基础之上进行修改:
[root@localhost ~]# cp anaconda-ks.cfg ks.cfg
[root@localhost ~]# cat ks.cfg
# Kickstart file automatically generated by anaconda.

#version=DEVEL
install
cdrom
lang zh_CN.UTF-8
keyboard us
network --onboot no --device eth0 --bootproto dhcp --noipv6
rootpw  --iscrypted $6$L0sbqes6Xp1/mBYR$DECT7xbtaElxFBd.rzfzK9BiE/WC0wDtlLBJUkyzVpd8tbH9qPchMZZoCQeGr6LhY14PDn6iPsatQqVPOufYI1
firewall --service=ssh
authconfig --enableshadow --passalgo=sha512
selinux --enforcing
timezone --utc Asia/Chongqing
bootloader --location=mbr --driveorder=sda --append="crashkernel=auto rhgb quiet"
# The following is the partition information you requested
# Note that any partitions you deleted are not expressed
# here so unless you clear all partitions first, this is
# not guaranteed to work
#clearpart --all --drives=sda
#volgroup VolGroup --pesize=4096 pv.008002
#logvol / --fstype=ext4 --name=lv_root --vgname=VolGroup --grow --size=1024 --maxsize=51200
#logvol swap --name=lv_swap --vgname=VolGroup --grow --size=2048 --maxsize=2048

#part /boot --fstype=ext4 --size=500
#part pv.008002 --grow --size=1


repo --name="CentOS"  --baseurl=cdrom:sr0 --cost=100

%packages
@chinese-support
@core
@server-policy
@workstation-policy
%end
kickstart文件格式解析:
命令段:指定各种安装前配置选项,如键盘类型等;
    必备命令
    authconfig:认证方式配置
        authconfig --enableshadow --passalgo=sha512     ————本地认证(shadow)
    bootloader:定义bootloader的安装位置及相关配置
        bootloader --append=" crashkernel=auto" --location=mbr --boot-drive=sda
    keyboard:设置键盘类型
        keyboard us
    lang:语言类型
        lang zh_CN.UTF-8
    part:分区布局
        part /boot --fstype=ext4 --size=500
        volgroup VolGroup --pesize=4096 pv.008002
    rootpw:管理员密码
        rootpw  --iscrypted $6$L0sbqes6Xp1/mBYR$DECT7xbtaElxFBd.rzfzK9BiE/WC0wDtlLBJUkyzVpd8tbH9qPchMZZoCQeGr6LhY14PDn6iPsatQqVPOufYI1
    timezone:时区

    可选命令
    install OR upgrade:安装或升级;
    text:安装界面类型,text为tui,默认为GUI
    network:配置网络接口
        network --onboot no --device eth0 --bootproto dhcp --noipv6
    firewall:防火墙
        firewall --disabled:关闭
        firewall --service=ssh:启动并放开指定服务
    selinux:SElinux
        selinux --disabled
    halt、poweroff或reboot:安装完成之后的行为;
    repo:指明安装时使用的repository;
        repo --name="CentOS"  --baseurl=cdrom:sr0 --cost=100
    url:指明安装时使用的repository,但为url格式;
        url --url=http://...

程序包段:指明要安装程序包,以及包组,也包括不安装的程序包;
    %packages
    @group_name
    package
    -package
    %end
脚本段
    %pre:安装前脚本
        运行环境:运行安装介质上的微型Linux系统环境;
    %post:安装后脚本
        运行环境:安装后的系统

    补充:分区相关的其它指令
        clearpart:清空磁盘分区
            clearpart --all --drives=sda
        volgroup:创建逻辑卷组
            volgroup VolGroup --pesize=4096 pv.008002
        logvol:创建逻辑卷
            logvol / --fstype=ext4 --name=lv_root --vgname=VolGroup --grow --size=1024 --maxsize=51200
注:修改完kickstart配置文件后,可通过命令ksvalidator KS_FILE检查ks文件是否存在语法错误。
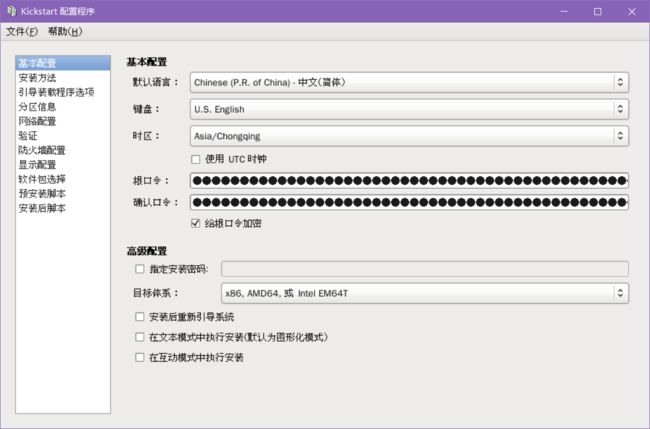
2、通过图形化工具system-config-kickstart命令制作kickstart文件:
[root@localhost ~]# system-config-kickstart
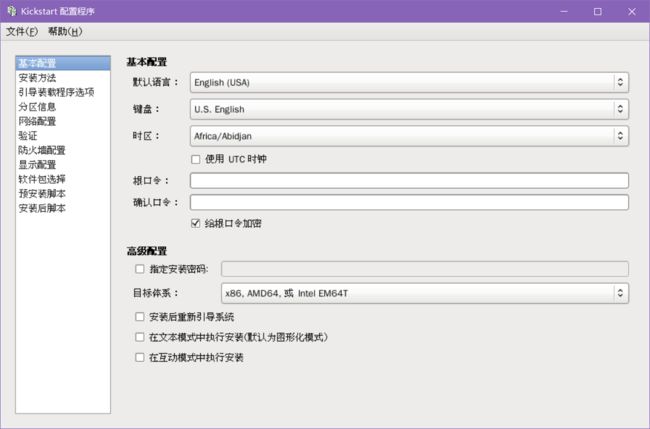
a、手动一步一步配置每一个选项中的参数:
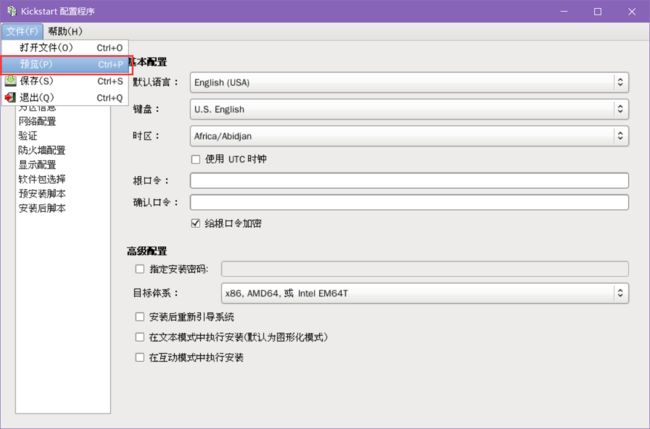
配置完成后,可在“文件”—“预览”中查看当前生成的配置文件内容,点击保存即可在指定目录下生成ks文件
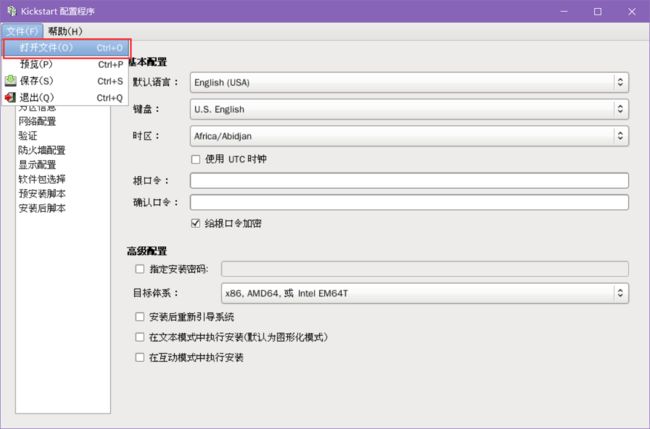
b、可打开已有的ks文件进行修改,然后保存为指定目录下的ks文件:
光盘镜像制作
mkisofs命令(genisoimage)
- create ISO9660/Joliet/HFS filesystem with optional Rock Ridge attributes
mkisofs [options] [-o filename] pathspec [pathspec ...]
或genisoimage [options] [-o filename] pathspec [pathspec ...]
常用选项:
-r :启用 rock ridge 扩展一般的 unix 系统
-R或-rock:使用Rock Ridge Extensions格式
-J或-joliet:使用Joliet格式的目录与文件名称
-T或-translation-table:建立文件名的转换表,适用于不支持Rock Ridge Extensions的系统上
-v或-verbose:执行时显示详细的信息
--no-emul-boot:Boot image is 'no emulation' image即非模拟模式启动
--boot-load-size 4:Set numbers of load sectors 即设置载入部分的数量
--boot-info-table:Patch boot image with info table 在启动的图像中显示信息
-V "STRING"或-volid<光盘ID>:指定光盘的卷册集ID(光盘名)
-c /PATH/TO/boot.cat:制作可开机光盘时,mkisofs会将开机映像文件中的全-eltorito-catalog<开机文件名称>全部内容作成一个文件
-b /PATH/TO/isolinux.bin:指定在制作可开机光盘时所需的开机映像文件
-o /PATH/TO/ISONAME.iso:生成的光盘镜像文件保存的位置
示例:
[root@localhost ~]# mkdir myboot
[root@localhost ~]# cp -r /mnt/iso/isolinux/ myboot/
[root@localhost ~]# cd myboot/
[root@localhost myboot]# cp /root/anaconda-ks.cfg ks.cfg
[root@localhost myboot]# cd
[root@localhost ~]# mkisofs -R -J -T -v --no-emul-boot --boot-load-size 4 --boot-info-table -V "CentOS 6 x86_64 boot" -c isolinux/boot.cat -b isolinux/isolinux.bin -o /root/boot.iso myboot/
I: -input-charset not specified, using utf-8 (detected in locale settings)
genisoimage 1.1.9 (Linux)
Scanning myboot/
Scanning myboot/isolinux
Excluded by match: myboot/isolinux/boot.cat
Excluded: myboot/isolinux/TRANS.TBL
Writing:   Initial Padblock                        Start Block 0
Done with: Initial Padblock                        Block(s)    16
Writing:   Primary Volume Descriptor               Start Block 16
Done with: Primary Volume Descriptor               Block(s)    1
Writing:   Eltorito Volume Descriptor              Start Block 17
Size of boot image is 4 sectors -> No emulation
Done with: Eltorito Volume Descriptor              Block(s)    1
Writing:   Joliet Volume Descriptor                Start Block 18
Done with: Joliet Volume Descriptor                Block(s)    1
Writing:   End Volume Descriptor                   Start Block 19
Done with: End Volume Descriptor                   Block(s)    1
Writing:   Version block                           Start Block 20
Done with: Version block                           Block(s)    1
Writing:   Path table                              Start Block 21
Done with: Path table                              Block(s)    4
Writing:   Joliet path table                       Start Block 25
Done with: Joliet path table                       Block(s)    4
Writing:   Directory tree                          Start Block 29
Done with: Directory tree                          Block(s)    2
Writing:   Joliet directory tree                   Start Block 31
Done with: Joliet directory tree                   Block(s)    2
Writing:   Directory tree cleanup                  Start Block 33
Done with: Directory tree cleanup                  Block(s)    0
Writing:   Extension record                        Start Block 33
Done with: Extension record                        Block(s)    1
Writing:   The File(s)                             Start Block 34
 26.71% done, estimate finish Sun Oct  7 22:32:43 2018
 53.32% done, estimate finish Sun Oct  7 22:32:43 2018
 80.01% done, estimate finish Sun Oct  7 22:32:44 2018
Total translation table size: 4701
Total rockridge attributes bytes: 1438
Total directory bytes: 2654
Path table size(bytes): 26
Done with: The File(s)                             Block(s)    18577
Writing:   Ending Padblock                         Start Block 18611
Done with: Ending Padblock                         Block(s)    150
Max brk space used 0
18761 extents written (36 MB)
[root@localhost ~]# file boot.iso
boot.iso: ISO 9660 CD-ROM filesystem data 'CentOS 6 x86_64 boot           ' (bootable)
