Semantic Segmentation--SegNet:A Deep Convolutional Encoder-Decoder Architecture..论文解读
title: Semantic Segmentation–SegNet:A Deep Convolutional Encoder-Decoder Architecture…论文解读
tags:
- Object Detection
- Semantic Segmentation
- SegNet
categories: Paper Reading
date: 2017-11-10 16:58:36
mathjax: true
description: Semantic Segmentation - SegNet,代表性的Encoder-Decoder结构,创新之处在于使用Encoder下采样时池化索引来做Decoder上采样的指引.
Semantic Segmentation简介
在解读论文之前,先看看Semantic Segmentation这个topic是干啥的。
这里引用知乎的一个提问答案:Semantic Segmentation–知乎-周博磊
图1.image classification, object detection, semantic segmentation, instance segmentation之间的关系. 摘自COCO dataset
Semantic Segmentation的目的是在一张图里分割聚类出不同物体的像素(pixel). 目前的主流框架都是基于FCN的(即Fully Convolutional Neural Networks).FCN区别于物体识别网络诸如AlexNet最主要的差别是逐像素预测(pixel-wise prediction),即每个像素点都有个probability, 而AlexNet是一张图一个prediction.
Semantic Segmentation的其他典型代表还有诸如SegNet,Dilated Convolution Net ,deconvolutionNet等。 这其中牵涉到deconvolution, dilated convolution, atrous convolution这几个概念的争论(可参考Dilated Convolutions and Kronecker Factored Convolutions介绍).
Semantic Segmentation的不足在于:虽然把图片里人所在的区域分割出来了,但是本身并没有告诉这里面有多少个人,以及每个人分别的区域。而这个就跟instance segmentation联系了起来,如何把每个人的区域都分别分割出来,是比semantic segmentation要难不少的问题.基于semantic segmentation来做instance segmentation的论文,大家可以看看Jifeng Dai最近的几篇论文:1,2. 大致做法是在dense feature map上面整合个instance region proposal/score map/RoI, 然后再分割.

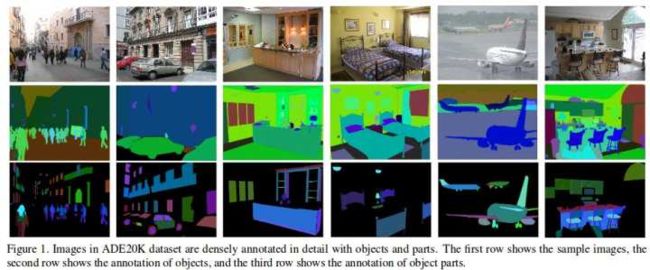
图2. Scene Parsing (MIT Scene Parsing Challenge 2016) from ADE20K dataset. 每张图的物体以及位置都标注
总结一下, instance segmentation其实是semantic segmentation和object detection殊途同归的一个结合点, 是个挺重要的研究问题. 非常期待后面能同时结合semantic segmentation和object detection两者优势的instance segmentation算法和网络结构.(Mask R-CNN等系列正在突破~~)
下面回归正题,SegNet论文解读~
SegNet论文解读
SegNet:A Deep Convolutional Encoder-Decoder Architecture for Image Segmentation
收录:PAMI2017(IEEE Transactions on Pattern Analysis and Machine Intelligence)
原文地址:SegNet
实现代码:
- github
- TensorFlow
效果图
摘自Fate-fjh Blog:
Abstract
论文提出了一个全新的全卷积的Semantic Segmentation模型:SegNet。
模型主要由:编码网络(encoder network),解码网络(decoder network)和逐像素分类器(pixel-wise classification layer)组成。SegNet的新颖之处在于decoder阶段的上采样方式,具体来说,decoder时上采样使用了encoder阶段下采样的最大池化的索引(indices)。考虑到上采样是稀疏的,再配合滤波器产生最后的分割图。
SegNet在inference期间占用的存储量和计算时间相比于其他模型(FCN,DeepLab,etc)效果都比较好。官方提供的教程地址http://mi.eng.cam.ac.uk/projects/segnet.
Introduction
Semantic Segmentation常用于道路场景分割,大多数像素属于大类,需要平滑的分割,模型要能够依据形状提取物体,这需要保留好的边界信息,从计算的角度来考虑,需要有效的存储量和计算时间。而现有的Semantic Segmentation的问题在于:最大池化和下采样会降低feature map的分辨率(即降低feature map分辨率会损失边界信息),SegNet针对这一问题设计了将低分辨率feature map映射到高分辨率的方法(利用池化索引),从而产生精确边界的分割结果。
SegNet的encoder部分使用的是VGG16的前13层(即使用预训练的VGG16做特征提取层),核心在于decoder部分,decoder对应encoder的每一层,decoder的上采样使用的时encoder下采样的索引,这样做有以下几个优点:
- 改善边界描述
- 减少end2end的训练参数
- 这样的形式可用于多种encoder-decoder架构
本文的主要贡献在于:
- 对比分析SegNet的decoder和FCN
- 在CamVid和SUN RGB-D上评估了模型
Related Work
传统的Semantic Segmentation方法:用随机森林(RF),Boosting等做类别的中心预测,用SfM提取特征,配合CRF提高预测精度。但是这些方法效果都不好,总结原因是这些方法都需要提高分类特征。
而近期深度卷积网络在分类问题上表现出色,考虑将深度网络应用到Semantic Segmentation上,例如:FCN,效果比传统方法好很多。有工作将RNN、条件随机场(CRF)引入配合decoder做预测,有助于提高边界描绘能力,并且指出了,CRF-RNN这一套可以附加到包括SegNet在内的任何深度分割模型。
现有的多尺度的深度神经网络架构的应用,常见两种形式:
- 将输入放缩为多个尺度得到相应的feature map
- 将一张图送到模型,得到不同层的feature map
**这些方法的共同想法都是使用多尺度信息将高层的feature map包含的语义信息与底层的feature map包含的精度信息融合到一起。**但是,这样方法参数多,比较难训练。(16年以后的方法都是这个方法,哈哈~)
Architecture
SegNet的网络结构如下图,总体由以下部分组成:
- 编码网络(encoder network):由13个卷积层组成(使用的时预训练的VGG16的前13层),该部分提取输入特征,用于目标分类,这就是使用预训练的VGG原理所在,至于丢弃FC层是为了保持更高的分辨率,同时也减少了参数。
- 解码网络(decoder network):每个encoder会对应一个decoder,故decoder具有13层,将低分辨率的feature map映射回和输入一样大小分类器(mask).
- 像素分类层(pixelwise classification layer):decoder的输出会送到分类层,最终为每个像素独立的产生类别概率
- encoder network
Encoder network分为5个block,每个block由Conv+BN + MaxPooling组成,MaxPooling实现下采样操作,核长为2,步长为2.
因为使用的pre-train的VGG16模型的前13层,模型的参数会减少很多(FC层没了,参数少了很多)。当然这和原始的VGG16是有区别的,如上图。卷积层使用的是`Conv + Batch Norm + ReLU`结构。
- decoder network
模型在encoder network时使用Pooling时会记录Pooling Indices(pooling前后的对应位置),在decoder network会用前面记录的位置还原,这也是论文的创新之处。 decoder network同样也为5个block,每个block由Upsampling + Conv + BN组成,需要注意的decoder阶段是没有加非线性激活的(即没有ReLU)。
- 分类层
在decoder输出上加一个卷积层,卷积核个数为分类的通道数,即每个通道代表一类分割结果
网络细致结构可看后面代码分析~
decoder变体
SegNet-Basic: SegNet的较小版本,4个encoder和4个decoder,
- encoder阶段是
LRN + (Conv+BN +ReLU + MaxPool)x4论文给出的时卷积不使用bias - decoder阶段是
(UpPool+Conv+ BN)x4 + Conv(分割层)
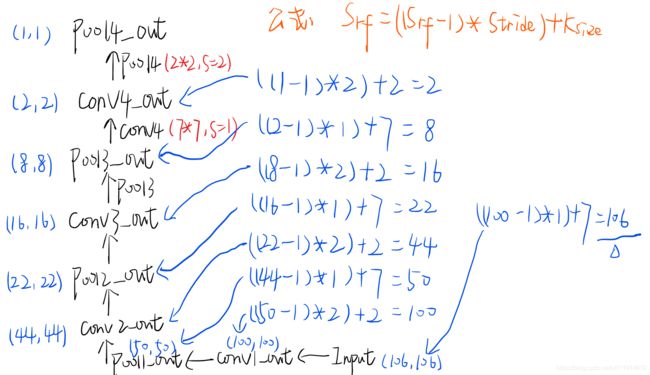
卷积核大小一直使用的时 7 × 7 7×7 7×7,最高层的feature map接收野是原图的 106 × 106 106×106 106×106大小。
这里简单讲一下接收野怎么算的(这个我在SPPNet论文分析有笔记):
对于池化层和卷积层公式为: S r f = ( ( S r f − 1 ) ∗ S t r i d e ) + K s i z e S_{rf} = ((S_{rf}-1)*Stride) + K_{size} Srf=((Srf−1)∗Stride)+Ksize其中 S r f S_{rf} Srf是从高层feature向底层feature迭代计算, S t r i d e Stride Stride为步长, K s i z e K_{size} Ksize为卷积核大小.
故从最高层的feature 1 × 1 1×1 1×1开始计算:
最终追到原图可以覆盖 106 × 106 106×106 106×106大小.
Experiment
对比SegNet和FCN实现decoder
SegNet在UpPool时使用的是index信息,直接将数据放回对应位置,后面再接Conv训练学习。这个上采样不需要训练学习(只是占用了一些存储空间)。
FCN采用transposed convolutions策略,即将feature 反卷积后得到upsampling,这一过程需要学习,同时将encoder阶段对应的feature做通道降维,使得通道维度和upsampling相同,这样就能做像素相加得到最终的decoder输出.
这里对不同类型decoder的做了如下实验:
实验设置如下表:
| 设置 | 参数 |
|---|---|
| 数据集 | CamVid |
| 数据预处理 | 局部对比归一化,Shuffle |
| 优化器 | SGD,lr=0.1,momentum=0.9 |
| batch | 12 |
| 损失函数 | 交叉熵损失,配合类别加权损失 |
| 迭代次数 | iter:1000 x epoch:33 |
| 实现工具 | Caffe |
结果如下:
| 横轴 | 参量 |
|---|---|
| 各种不同的变体 | 含义 |
| Bilinear-Interpolation | 上采样使用双线性插值,不需要学习,参数少,速度快,效果不是很好 |
| SegNet-Basic | SegNet基础版本,4个encoder层和4个decoder层,decoder阶段每个上采样后都会通过相同通道数的 7 × 7 7×7 7×7卷积核 |
| SegNet-Basic-EncoderAddition | decoder阶段上采样后的feature,加上encoder对应阶段的feature,通过卷积核把通道数降下来 |
| SegNet-Basic-SingleChannelDecoder | decoder阶段上采样后每个通道单独对应一个单通道的卷积核,这个参数少 |
| FCN-Basic | FCN基础版,反卷积后加上encoder阶段通道降维的feature,得到最终输出 |
| FCN-Basic-NoAddition | 反卷积直接得到输出,不加encoder阶段的feature了 |
| FCN-Basic-NoDimReduction | 反卷积和加上encoder阶段不降维的feature,得到最终输出 |
| FCN-Basic-NoAddition-NoDimReduction | 没看懂~ |
| 度量标准 | 含义 |
|---|---|
| 全局准确率(global accuracy(G)) | 在数据集上总体的准确率 |
| 类平均准确率(class average accuracy ©) | 平均每个类别的准确率 |
| mean intersection over union (mIoU) | 类平均IoU |
| BF | 图像的F1测量平均值 |
| 其他参数 | 含义 |
| P a r a m s ( M ) Params(M) Params(M) | 可训练参数大 |
| S t r o a g e m u l t i p l i e r Stroage \ multiplier Stroage multiplier | feature map或index存储值 |
| I n f e r t i m e Infer \ time Infer time | 取50次前向时间的平均值 |
上述实验结果:
- 当encoder的所有feature都保存下来,即
FCN-Basic-NoDimReduction,效果最佳。这主要体现在BF(语义轮廓描绘度量)值上. - 当inference的存储受限时,可适当的减少feature通道,配合decoder可得到折中的效果
- 上采样学习是比单纯的双线性插值效果要好,这强调了学习decoder的必要性。
- 相比于FCN,SegNet有更少的内存利用率和更高效的计算。
CamVid & SUN RGB-D
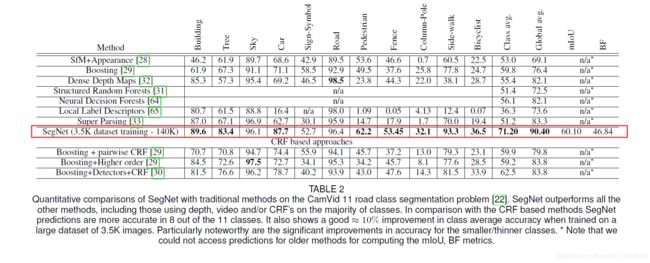
在CamVid上与传统方法相比:
与使用CRF的方法相比,SegNet具有明显的竞争力,这显示了深层架构提取特征和映射准确平滑标签的能力。
与其他深层网络相比:
在SUN RGB-D上与其他深层网络相比:
Conclusion
模型主要在于decoder阶段的upsampling使用的时encoder阶段的pooling信息,这有效的提高了内存利用率,同时提高了模型分割率。但是吧,SegNet的inference相比FCN没有显著提升,这样end-to-end的模型能力还有待提升。
更值得学习的是这篇paper的整体写作架构~
代码分析
原本准备分析论文作者Alex Kendall在github上给出的Caffe-SegNet代码的。
考虑到现在用TensorFlow的比较多,就找了一个TF-SegNet版本(这是基于TensorFlow-SegNet改进的)。
注意:这里只看了SegNet-Basic版本的~
应用层定义
直接看AirNet-layer.py,这里实现了SegNet常用层,尤其是带index的上采样。
import numpy as np
import tensorflow as tf
FLAGS = tf.app.flags.FLAGS

def unpool_with_argmax(pool, ind, name = None, ksize=[1, 2, 2, 1]):
    """
       带index的上采样
       Unpooling layer after max_pool_with_argmax.
       Args:
           pool:   max pooled output tensor
           ind:      argmax indices 下采样的index
           ksize:     ksize is the same as for the pool
       Return:
           unpool:    unpooling tensor
    """
    with tf.variable_scope(name):
        input_shape = pool.get_shape().as_list()
        output_shape = (input_shape[0], input_shape[1] * ksize[1], input_shape[2] * ksize[2], input_shape[3])

        flat_input_size = np.prod(input_shape)
        flat_output_shape = [output_shape[0], output_shape[1] * output_shape[2] * output_shape[3]]

        pool_ = tf.reshape(pool, [flat_input_size])
        batch_range = tf.reshape(tf.range(output_shape[0], dtype=ind.dtype), shape=[input_shape[0], 1, 1, 1])
        b = tf.ones_like(ind) * batch_range
        b = tf.reshape(b, [flat_input_size, 1])
        ind_ = tf.reshape(ind, [flat_input_size, 1])
        ind_ = tf.concat([b, ind_], 1)

        ret = tf.scatter_nd(ind_, pool_, shape=flat_output_shape)
        ret = tf.reshape(ret, output_shape)
        return ret
最后的分类层:
def conv_classifier(input_layer, initializer):
    '''
    最后的分类层 输出的层数由FLAGS.num_class指定
    # output predicted class number (2)
    '''
    #all variables prefixed with "conv_classifier/"
    with tf.variable_scope('conv_classifier') as scope:
        shape=[1, 1, 64, FLAGS.num_class]
        kernel = _variable_with_weight_decay('weights', shape=shape, initializer=initializer, wd=None)
        #kernel = tf.get_variable('weights', shape, initializer=initializer)
        # 再卷积,每个通道对应一类分割结果
        conv = tf.nn.conv2d(input_layer, filter=kernel, strides=[1, 1, 1, 1], padding='SAME')
        biases = _variable_on_cpu('biases', [FLAGS.num_class], tf.constant_initializer(0.0))
        conv_classifier = tf.nn.bias_add(conv, biases, name=scope.name)
    return conv_classifier
Conv+BN组合层,BN层:
def conv_layer_with_bn(initializer, inputT, shape, is_training, activation=True, name=None):
    '''
        Conv+BN组合
    '''
    in_channel = shape[2]
    out_channel = shape[3]
    k_size = shape[0]

    with tf.variable_scope(name) as scope:
        kernel = _variable_with_weight_decay('weights', shape=shape, initializer=initializer, wd=None)
        #kernel = tf.get_variable(scope.name, shape, initializer=initializer)
        conv = tf.nn.conv2d(inputT, kernel, [1, 1, 1, 1], padding='SAME')
        biases = tf.Variable(tf.constant(0.0, shape=[out_channel], dtype=tf.float32),
                       trainable=True, name='biases')
        bias = tf.nn.bias_add(conv, biases)

        if activation is True: #only use relu during encoder
            conv_out = tf.nn.relu(batch_norm_layer(bias, is_training, scope.name))
        else:
            conv_out = batch_norm_layer(bias, is_training, scope.name)
    return conv_out

def batch_norm_layer(inputT, is_training, scope):
      return tf.cond(is_training,
            lambda: tf.contrib.layers.batch_norm(inputT, is_training=True,
                           center=False, decay=FLAGS.moving_average_decay, scope=scope),
            lambda: tf.contrib.layers.batch_norm(inputT, is_training=False,
                           center=False, reuse = True, decay=FLAGS.moving_average_decay, scope=scope))
权重衰减和变量存储设置:
def _variable_with_weight_decay(name, shape, initializer, wd):
    """ Helper to create an initialized Variable with weight decay.
        Note that the Variable is initialized with a truncated normal distribution.
        A weight decay is added only if one is specified.
    Args:
        name: name of the variable
        shape: list of ints
        stddev: standard deviation of a truncated Gaussian
        wd: add L2Loss weight decay multiplied by this float. If None, weight
            decay is not added for this Variable.
    Returns:
        Variable Tensor
    """
    var = _variable_on_cpu(name, shape, initializer)

    if wd is not None:
        weight_decay = tf.multiply(tf.nn.l2_loss(var), wd, name='weight_loss')
        tf.add_to_collection('losses', weight_decay)
    return var


def _variable_on_cpu(name, shape, initializer):
    """Helper to create a Variable stored on CPU memory.
    Args:
        name: name of the variable
        shape: list of ints
        initializer: initializer for Variable
    Returns:
        Variable Tensor
    """
    with tf.device('/cpu:0'):
    #dtype = tf.float16 if FLAGS.use_fp16 else tf.float32 #added this after, cause it was in cifar model
        var = tf.get_variable(name, shape, initializer=initializer)#, dtype=dtype)
    return var
模型定义
SegNet网络结构定义:inference.py
encoder部分:
文件的Basic版本关于encoder network:
def get_weight_initializer():
    if(FLAGS.conv_init == "var_scale"):
        initializer = tf.contrib.layers.variance_scaling_initializer()
    elif(FLAGS.conv_init == "xavier"):
        initializer=tf.contrib.layers.xavier_initializer()
    else:
        raise ValueError("Chosen weight initializer does not exist")
    return initializer


def inference_basic(images, is_training):
    """
      Args:
        images: Images Tensors (placeholder with correct shape, img_h, img_w, img_d)
        is_training: If the model is training or testing
    """
    initializer = get_weight_initializer()
    img_d = images.get_shape().as_list()[3]

    '''  encoder阶段  '''
    norm1 = tf.nn.lrn(images, depth_radius=5, bias=1.0, alpha=0.0001, beta=0.75,
                         name='norm1')
    conv1 = conv_layer_with_bn(initializer, norm1, [7, 7, img_d, 64], is_training, name="conv1")
    pool1, pool1_indices = tf.nn.max_pool_with_argmax(conv1, ksize=[1, 2, 2, 1],
                            strides=[1, 2, 2, 1], padding='SAME', name='pool1')

    conv2 = conv_layer_with_bn(initializer, pool1, [7, 7, 64, 64], is_training, name="conv2")
    pool2, pool2_indices = tf.nn.max_pool_with_argmax(conv2, ksize=[1, 2, 2, 1],
                            strides=[1, 2, 2, 1], padding='SAME', name='pool2')

    conv3 = conv_layer_with_bn(initializer, pool2, [7, 7, 64, 64], is_training, name="conv3")
    pool3, pool3_indices = tf.nn.max_pool_with_argmax(conv3, ksize=[1, 2, 2, 1],
                            strides=[1, 2, 2, 1], padding='SAME', name='pool3')

    conv4 = conv_layer_with_bn(initializer, pool3, [7, 7, 64, 64], is_training, name="conv4")
    pool4, pool4_indices = tf.nn.max_pool_with_argmax(conv4, ksize=[1, 2, 2, 1],
                            strides=[1, 2, 2, 1], padding='SAME', name='pool4')
可以看到上来就是一个LRN,做数据归一化(这里想吐槽的是VGG论文里面说LRN没啥用,这encoder用的还是VGG的结构,interesting),然后就是`Conv+BN+MaxPool`来4套,这里卷积核尺寸用的比较大,都是64个$7×7$。总的来说没啥新的东西
dncoder部分:
关于decoder network::
    """  End of encoder - starting decoder """
    unpool_4 = unpool_with_argmax(pool4, ind=pool4_indices, name='unpool_4')
    conv_decode4 = conv_layer_with_bn(initializer, unpool_4, [7, 7, 64, 64], is_training, False, name="conv_decode4")

    unpool_3 = unpool_with_argmax(conv_decode4, ind=pool3_indices, name='unpool_3')
    conv_decode3 = conv_layer_with_bn(initializer, unpool_3, [7, 7, 64, 64], is_training, False, name="conv_decode3")

    unpool_2 = unpool_with_argmax(conv_decode3, ind=pool2_indices, name='unpool_2')
    conv_decode2 = conv_layer_with_bn(initializer, unpool_2, [7, 7, 64, 64], is_training, False, name="conv_decode2")

    unpool_1 = unpool_with_argmax(conv_decode2, ind=pool1_indices, name='unpool_1')
    conv_decode1 = conv_layer_with_bn(initializer, unpool_1, [7, 7, 64, 64], is_training, False, name="conv_decode1")

    # 调用分类器
    return conv_classifier(conv_decode1, initializer)
decoder整体上就是UpPool+Conv_BN的反向组合4套,配合最后的分类层,整体上还算是好理解~


