网络上对 Retrofit2 的各种介绍文章已经很多了,不过往往只是对其用法进行介绍,而缺少相应的实践,这一方面是因为网络上的免费API接口返回的数据格式和访问模式(一般都只能使用 Get 模式)有限制,另一方面是因为并不是每位开发者都会写服务端接口。这样就造成了在学习 Retrofit2 的过程中,对某些参数的作用并不能直观感受到,所以这里我就尝试着用 Nodejs 搭建了一个本地服务器,提供了几个接口用于支持 Get、Post 模式访问调用,支持文件上传和文件下载功能,返回的数据格式有 Json 对象和 Json 数组,需要的参数格式可以由使用者来自由定义
本篇文章不会对 Retrofit2 的用法进行过多介绍,重点在于介绍服务端接口的搭建以及 Retrofit2 与服务端的交互
一、服务端
服务端接口采用的是 Nodejs,采用的 IDE 是 WebStorm ,Nodejs 版本是 10.2.0
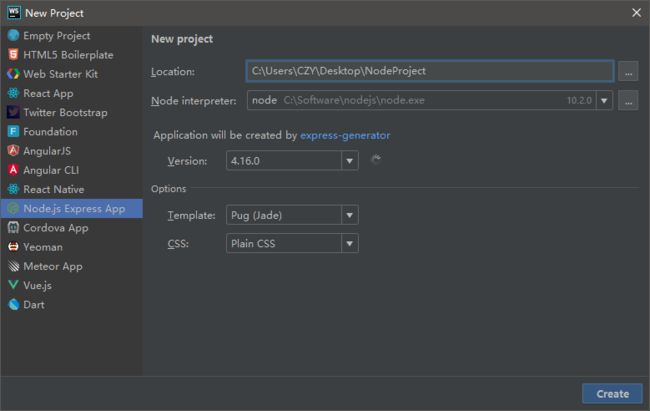
打开 WebStorm ,选择新建工程,选择 Node.js Express App 来创建一个工程
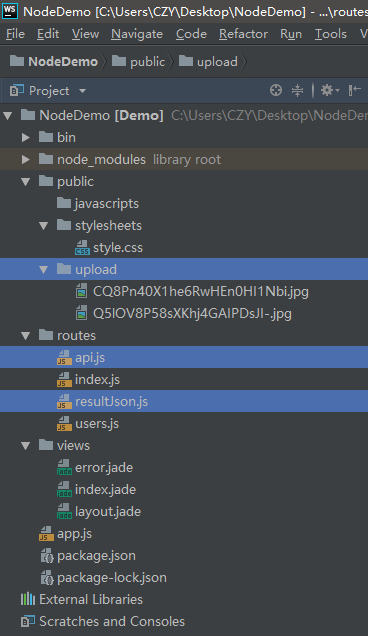
创建的工程目录如下所示,除了选中的三个文件之外,其它都是 IDE 自动为我们构建的,upload 文件夹用于存放客户端上传来的文件,resultJson.js 文件用于统一服务端返回的数据格式,api.js 文件用于存放编写的接口并启动服务器,而我们主要需要关注的也就是 api.js 文件
1.1 、resultJson.js
这里先介绍下 resultJson.js 文件,其包含的全部代码如下所示
/**
 * 有正常结果返回时
 * @param res
 * @param data
 */
exports.onSuccess = function (res, data) {
    var result = {};
    result.code = 1;
    result.msg = 'success';
    result.data = data;
    res.json(result);
};

/**
 * 当发生错误时
 * @param res
 * @param code
 * @param msg
 */
exports.onError = function (res, code, msg) {
    var error = {};
    error.code = code;
    error.msg = msg;
    res.json(error);
};

/**
 * 无数据记录
 * @param res
 */
exports.onNoRecord = function (res) {
    exports.onError(res, 1000, '无数据记录');
};

/**
 * 参数错误
 * @param res
 */
exports.onParamsError = function (res) {
    exports.onError(res, 1001, '参数错误');
};

/**
 * 系统错误
 * @param res
 */
exports.onSystemError = function (res) {
    exports.onError(res, 1002, '系统错误');
};
resultJson.js 对网络请求的各种可能结果进行了封装,统一了服务端返回的数据格式。当有正常结果返回时,调用的是 onSuccess 方法,此时返回的数据格式类似于如下所示,返回码 code 固定为 "1",,返回信息 msg 固定为 "success",data 包含实际要返回的数据
{"code":1,"msg":"success","data":{"name":"leavesC","mobile":123456}}
当传递给服务器的参数错误时,调用的是 onParamsError 方法,返回的数据格式如下所示
{"code":1001,"msg":"参数错误"}
其他非正常情况下返回的数据格式相同,仅仅是包含的返回码和返回信息值不同而已
1.2、api.js
api.js 文件包含了所有接口,这里先展示一个 Get 接口,其它接口会在使用到时陆续介绍
当中,require 函数用于加载需要的模块,就类似于 Java 中加载需要的依赖库一样。app.get() 表明该接口支持的是 Get 模式请求,访问的接口路径后缀是:“/Get/getString”,完整的访问路径是:http://localhost:1995/Get/getString
req 参数包含了客户端带来的请求参数,res 参数用于写入要向客户端返回的数据,app.listen(1995) 用于启动服务器,并指定在 1995 端口进行监听
在客户端访问该接口时,接口会打印出客户端带来的所有请求参数和请求头,以及实际生成的访问链接
这样,一个简单的 Get 接口就完成了
//require 函数用于加载需要的模块
var express = require('express');
var bodyParser = require('body-parser');
var multiparty = require('multiparty');
var resultJson = require('../routes/resultJson');
var app = express();
app.use(bodyParser.urlencoded({extended: false}));
app.use(bodyParser.json());

app.get('/Get/getString', function (req, res) {
    //请求的参数
    var query = req.query;
    for (var key in query) {
        console.log("参数 key is: ", key, " , value is: ", query[key]);
    }
    //请求头
    var headers = req.headers;
    for (var key in headers) {
        console.log("头部信息 key is: ", key, " , value is: ", headers[key]);
    }
    //链接
    console.log("Url:", req.url);

    //如果该次访问带有key值为“userName”的请求头,如果value不是“leavesC”,则认为请求的参数错误
    //如果不带有key值为“userName”的请求头,则不受影响
    //要注意,请求头的key值会被置为小写
    var userName = headers['username'];
    if (userName && userName !== 'leavesC') {
        return resultJson.onParamsError(res);
    }
    var data = {};
    data.name = 'leavesC';
    data.mobile = 123456;
    resultJson.onSuccess(res, data);
});

····

//启动服务器,并在指定的端口 1995 进行监听
app.listen(1995);
二、客户端
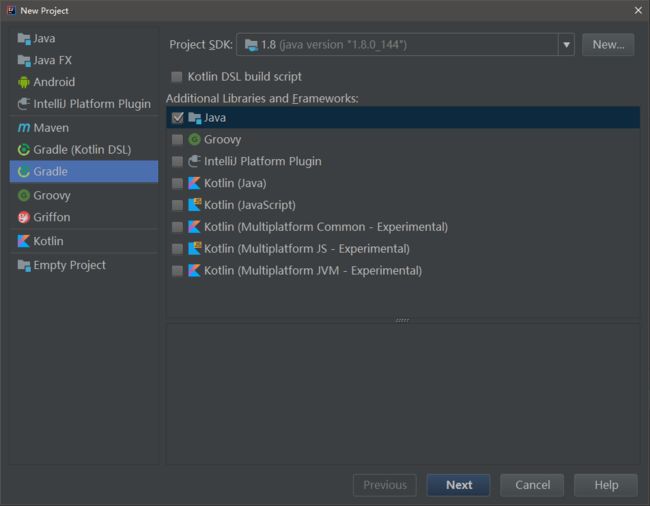
客户端使用的 IDE 是 IntelliJ IDEA,采用 Gradle 来构建工程,这样使用起来就基本与 Android Studio 一致了
引入对 Retrofit2 和 converter-gson 的支持
    implementation 'com.squareup.retrofit2:retrofit:2.4.0'
    implementation 'com.squareup.retrofit2:converter-gson:2.4.0'
Get请求
由于我是在本地搭建的服务器,所以用来构建 Retrofit 的 baseUrl 应该是指向本地 IP 地址
/**
 * 作者:chenZY
 * 时间:2018/5/29 18:53
 * 描述:https://github.com/leavesC
 */
public class HttpConfig {

    public static final String BASE_URL = "http://localhost:1995/";

}
新建 GetService 接口用于声明访问上述 Get 接口的方法,各个方法包含的参数值各不一样,根据服务端打印出的日志信息,就可以很容易地区分出各种方式之间的区别
/**
 * 作者:chenZY
 * 时间:2018/5/29 18:54
 * 描述:https://github.com/leavesC
 */
public interface GetService {

    //不带任何参数的 Get 请求
    @GET("Get/getString")
    Call getNormal();

    //携带请求参数的 Get 请求
    @GET("Get/getString")
    Call getWithQuery(@Query("name") String name, @Query("age") int age);

    //携带请求参数的 Get 请求
    @GET("Get/getString")
    Call getWithMap(@QueryMap Map map);

    //携带请求参数以及固定请求头的 Get 请求
    @GET("Get/getString")
    @Headers({"userName:leavesC"})
    Call getWithQueryAndHeaders(@Query("name") String name, @Query("age") int age);

    //携带请求参数以及请求头值不固定的 Get 请求
    @GET("Get/getString")
    Call getWithQueryAndHeader(@Header("userName") String userName, @Query("name") String name, @Query("age") int age);

    //将请求值作为链接一部分的 Get 请求
    @GET("Get/getString/{id}")
    Call getWithPath(@Path("id") int id);

    //将请求值作为链接一部分的 Get 请求,并使用 Gson Converter
    @GET("Get/getUser/{startId}/{number}")
    Call> getWithGsonConverter(@Path("startId") int startId, @Path("number") int number);

}
2.1、不带任何参数
这里看下不带任何自定义的参数与请求头的请求方式
//Get请求时不会带任何自定义的参数与请求头,访问的链接是:/Get/getString
    private static void getNormal() {
        GetService getService = buildRetrofit().create(GetService.class);
        getService.getNormal().enqueue(new Callback() {
            @Override
            public void onResponse(Call call, Response response) {
                if (response.isSuccessful()) {
                    try {
                        //返回的数据:{"code":1,"msg":"success","data":{"name":"leavesC","mobile":123456}}
                        System.out.println("onResponse body: " + response.body().string());
                    } catch (IOException e) {
                        e.printStackTrace();
                    }
                } else {
                    System.out.println("onResponse code: " + response.code());
                }
            }

            @Override
            public void onFailure(Call call, Throwable t) {
                System.out.println("onFailure: " + t.getMessage());
            }
        });
    }
此时服务端打印出来的日志信息如下所示
头部信息 key is:  host  , value is:  localhost:1995
头部信息 key is:  connection  , value is:  Keep-Alive
头部信息 key is:  accept-encoding  , value is:  gzip
头部信息 key is:  user-agent  , value is:  okhttp/3.10.0
Url: /Get/getString
客户端获得的数据如下所示
{"code":1,"msg":"success","data":{"name":"leavesC","mobile":123456}}
2.2、带上请求参数
如果在请求方法中带上注解 @Query 以及对应的请求参数,则请求参数会作为访问链接的后缀
    //Get请求时会带上请求参数,参数将作为链接的后缀,生成的链接是:/Get/getString?name=leavesC&age=24
    private static void getWithQuery() {
        GetService getService = buildRetrofit().create(GetService.class);
        getService.getWithQuery("leavesC", 24).enqueue(new Callback() {
            @Override
            public void onResponse(Call call, Response response) {
                if (response.isSuccessful()) {
                    try {
                        //返回的数据是:{"code":1,"msg":"success","data":{"name":"leavesC","mobile":123456}}
                        System.out.println("onResponse body: " + response.body().string());
                    } catch (IOException e) {
                        e.printStackTrace();
                    }
                } else {
                    System.out.println("onResponse code: " + response.code());
                }
            }

            @Override
            public void onFailure(Call call, Throwable t) {
                System.out.println("onFailure: " + t.getMessage());
            }
        });
    }
此时服务端打印出来的日志信息如下所示
参数 key is:  name  , value is:  leavesC
参数 key is:  age  , value is:  24
头部信息 key is:  host  , value is:  localhost:1995
头部信息 key is:  connection  , value is:  Keep-Alive
头部信息 key is:  accept-encoding  , value is:  gzip
头部信息 key is:  user-agent  , value is:  okhttp/3.10.0
Url: /Get/getString?name=leavesC&age=24
服务端通过 req.query 取得了客户端带来的参数信息,服务端就可以按照参数信息从数据库中取得相应的数据,从而实现按条件索引数据
getWithMap() 方法的作用与 getWithQuery() 相同,这里不赘述
2.3、带上固定请求头
getWithQueryAndHeaders() 方法则是用于携带请求参数以及固定请求头的 Get 请求
//Get请求时带上参数和请求头信息,参数将作为链接的后缀,生成的链接是:/Get/getString?name=leavesC&age=24
    //带上的Header的key是:userName,value是:leavesC
    private static void getWithQueryAndHeaders() {
        GetService getService = buildRetrofit().create(GetService.class);
        getService.getWithQueryAndHeaders("leavesC", 24).enqueue(new Callback() {
            @Override
            public void onResponse(Call call, Response response) {
                if (response.isSuccessful()) {
                    try {
                        //返回的数据是:{"code":1,"msg":"success","data":{"name":"leavesC","mobile":123456}}
                        System.out.println("onResponse body: " + response.body().string());
                    } catch (IOException e) {
                        e.printStackTrace();
                    }
                } else {
                    System.out.println("onResponse code: " + response.code());
                }
            }

            @Override
            public void onFailure(Call call, Throwable t) {
                System.out.println("onFailure: " + t.getMessage());
            }
        });
    }
此时服务端打印出来的日志信息如下所示,可以看到头部信息相比之前多出了 username,且值正是在注解中所声明的
参数 key is:  name  , value is:  leavesC
参数 key is:  age  , value is:  24
头部信息 key is:  username  , value is:  leavesC2
头部信息 key is:  host  , value is:  localhost:1995
头部信息 key is:  connection  , value is:  Keep-Alive
头部信息 key is:  accept-encoding  , value is:  gzip
头部信息 key is:  user-agent  , value is:  okhttp/3.10.0
Url: /Get/getString?name=leavesC&age=24
头部信息可用于验证访问来源,即对客户端的身份信息进行验证
在服务端我对 key 值为 userName 的头部信息的 value 值进行了判断,如果客户端包含 key 值为 userName 的头部信息,而其值不是 leavesC ,则返回的 Json 数据就会提示参数错误
修改 getWithQueryAndHeaders() 方法带有的头部信息的值
/**
 * 作者:chenZY
 * 时间:2018/5/29 18:54
 * 描述:
 */
public interface GetService {

    //携带请求参数以及固定请求头的 Get 请求
    @GET("Get/getString")
    @Headers({"userName:leavesC_2"})
    Call getWithQueryAndHeaders(@Query("name") String name, @Query("age") int age);

}
此时服务端返回的数据将是
{"code":1001,"msg":"参数错误"}
2.4、带上非固定值的请求头
用于标记非固定值请求头的注解 @Header 作用于方法参数,从而实现请求头的动态赋值
//Get请求时带上参数和非固定值的请求头,参数将作为链接的后缀,生成的链接是:/Get/getString?name=leavesC&age=24
    //带上的Header的key是:userName,value是:Hi
    private static void getWithQueryAndHeader() {
        GetService getService = buildRetrofit().create(GetService.class);
        getService.getWithQueryAndHeader("Hi", "leavesC", 24).enqueue(new Callback() {
            @Override
            public void onResponse(Call call, Response response) {
                if (response.isSuccessful()) {
                    try {
                        //返回的数据是:{"code":1,"msg":"success","data":{"name":"leavesC","mobile":123456}}
                        System.out.println("onResponse body: " + response.body().string());
                    } catch (IOException e) {
                        e.printStackTrace();
                    }
                } else {
                    System.out.println("onResponse code: " + response.code());
                }
            }

            @Override
            public void onFailure(Call call, Throwable t) {
                System.out.println("onFailure: " + t.getMessage());
            }
        });
    }
服务端打印出来的日志如下所示,和采用 @Headers 注解的方法区别不大,只是一个值是固定的,一个在运行时动态赋值
参数 key is:  name  , value is:  leavesC
参数 key is:  age  , value is:  24
头部信息 key is:  username  , value is:  Hi
头部信息 key is:  host  , value is:  localhost:1995
头部信息 key is:  connection  , value is:  Keep-Alive
头部信息 key is:  accept-encoding  , value is:  gzip
头部信息 key is:  user-agent  , value is:  okhttp/3.10.0
Url: /Get/getString?name=leavesC&age=24
2.5、指定访问路径
还有一种在链接中加上访问参数的方式,即将访问参数做为链接实际的一部分
对应的客户端方法是
    @GET("Get/getString/{id}")
    Call getWithPath(@Path("id") int id);
此时需要在服务端再写一个 Get 接口,接口路径 “/Get/getString/:id” 中的 “:id” 的意思是:只有客户端在访问接口时明确带上了参数值(不用声明Key),才会进入到此接口的回调函数里
app.get('/Get/getString/:id', function (req, res) {
    //请求的参数
    var query = req.query;
    for (var key in query) {
        console.log("参数 key is: ", key, " , value is: ", query[key]);
    }
    //请求头
    var headers = req.headers;
    for (var key in headers) {
        console.log("头部信息 key is: ", key, " , value is: ", headers[key]);
    }
    //链接
    console.log("Url:", req.url);

    var id = req.params.id;
    if (id <= 0) {
        resultJson.onParamsError(res);
    } else {
        var data = {};
        data.name = 'leavesC_' + id;
        data.mobile = 123456;
        resultJson.onSuccess(res, data);
    }
});
客户端来访问该接口
    //生成的链接是:/Get/getString/22
    private static void getWithPath() {
        GetService getService = buildRetrofit().create(GetService.class);
        getService.getWithPath(22).enqueue(new Callback() {
            @Override
            public void onResponse(Call call, Response response) {
                if (response.isSuccessful()) {
                    try {
                        //返回的数据: {"code":1,"msg":"success","data":{"name":"leavesC_22","mobile":123456}}
                        System.out.println("onResponse body: " + response.body().string());
                    } catch (IOException e) {
                        e.printStackTrace();
                    }
                } else {
                    System.out.println("onResponse code: " + response.code());
                }
            }

            @Override
            public void onFailure(Call call, Throwable t) {
                System.out.println("onFailure: " + t.getMessage());
            }
        });
    }
服务端打印出的日志信息如下所示
头部信息 key is:  host  , value is:  localhost:1995
头部信息 key is:  connection  , value is:  Keep-Alive
头部信息 key is:  accept-encoding  , value is:  gzip
头部信息 key is:  user-agent  , value is:  okhttp/3.10.0
Url: /Get/getString/22
2.6、获取Json数组
之前的几种请求方式获取到的都是 Json 对象,此处来写一个返回的数据格式是 Josn 数组的接口,每个 Json 对象对应的是如下的 Java Bean
/**
 * 作者:chenZY
 * 时间:2018/5/26 15:13
 * 描述:
 */
public class User {

    private String name;

    private String mobile;

    public User(String name, String mobile) {
        this.name = name;
        this.mobile = mobile;
    }

    ···

}
服务端接口如下所示,用于获取起始 ID 为 startId 的 number 位用户的用户信息
app.get('/Get/getUser/:startId/:number', function (req, res) {
    //请求的参数
    var query = req.query;
    for (var key in query) {
        console.log("参数 key is: ", key, " , value is: ", query[key]);
    }
    //请求头
    var headers = req.headers;
    for (var key in headers) {
        console.log("头部信息 key is: ", key, " , value is: ", headers[key]);
    }
    //链接
    console.log("Url:", req.url);

    //为了防止客户端带来的参数是非数值类型,所以此处需要对其类型进行判断
    var startId = parseInt(req.params.startId);
    var number = parseInt(req.params.number);
    console.log("startId: ", startId);
    console.log("number: ", number);
    if (!isNaN(startId) && !isNaN(number) && startId > 0 && number > 0) {
        var items = [];
        for (var index = 0; index < number; index++) {
            var item = {};
            item.name = 'leavesC_' + (startId + index);
            item.mobile = 123456;
            items.push(item);
        }
        resultJson.onSuccess(res, items);
    } else {
        resultJson.onParamsError(res);
    }
});
客户端使用 converter-gson 来对服务端返回的 Json 数组进行自动解析,由于 resultJson.js 文件统一了服务端返回的数据格式,为了不每次都写 code 和 msg 这两个参数,此时可以采用泛型来进行封装
/**
 * 作者:chenZY
 * 时间:2018/5/26 15:10
 * 描述:
 */
public class Response {

    private int code;

    private String msg;

    ···

}
如果服务端返回的 data 是 Json 对象,则使用 EntityResponse,通过泛型传入实际的 Java Bean
/**
 * 作者:chenZY
 * 时间:2018/5/26 15:11
 * 描述:
 */
public class EntityResponse extends Response {

    private T data;

    public T getData() {
        return data;
    }

    public void setData(T data) {
        this.data = data;
    }
}
如果服务端返回的 data 是 Json 数组,则使用 ListResponse,通过泛型传入实际的 Java Bean
/**
 * 作者:chenZY
 * 时间:2018/5/26 15:12
 * 描述:
 */
public class ListResponse extends Response {

    private List data;

    public List getData() {
        return data;
    }

    public void setData(List data) {
        this.data = data;
    }

}
此时在回调函数中就可以直接获取到包含在 List 中的数据了
private static void getWithGsonConverter() {
        GetService getService = buildRetrofit().create(GetService.class);
        getService.getWithGsonConverter(24, 4).enqueue(new Callback>() {
            @Override
            public void onResponse(Call> call, Response> response) {
                if (response.isSuccessful()) {
                    List userList = response.body().getData();
                    if (userList == null) {
                        System.out.println("onResponse: userList == null");
                    } else {
                        for (User user : userList) {
                            System.out.println("onResponse: " + user);
                        }
                    }
                } else {
                    System.out.println("onResponse code: " + response.code());
                }
            }

            @Override
            public void onFailure(Call> call, Throwable t) {
                System.out.println("onFailure: " + t.getMessage());
            }
        });
    }
客户端打印出来的日志如下所示
onResponse: User{name='leavesC_24', mobile='123456'}
onResponse: User{name='leavesC_25', mobile='123456'}
onResponse: User{name='leavesC_26', mobile='123456'}
onResponse: User{name='leavesC_27', mobile='123456'}
Post请求
服务端 Post 接口的写法与 Get 接口类似,主要的区别在于客户端 Post 的参数获取方式
app.post('/Post/postUser', function (req, res) {
    var body = req.body;
    for (var key in body) {
        console.log("body 参数 key is: ", key, " , value is: ", body[key]);
    }
    //请求头
    var headers = req.headers;
    for (var key in headers) {
        console.log("headers 头部信息 key is: ", key, " , value is: ", headers[key]);
    }
    //链接
    console.log("Url:", req.url);

    var data = {};
    data.name = 'leavesC';
    data.mobile = 123456;
    resultJson.onSuccess(res, data);
});
客户端新建 PostService 接口用于声明访问 Post 接口的方法,各个方法包含的参数值各不一样,根据服务端打印出的日志信息来区分出各种方式之间的区别
@FormUrlEncoded 注解表示请求头是一个 Form 表单,对应的是客户端访问接口时 key 值为 “content-type” 的请求头值
/**
 * 作者:chenZY
 * 时间:2018/5/29 18:54
 * 描述:https://github.com/leavesC
 */
public interface PostService {

    @FormUrlEncoded
    @POST("Post/postUser")
    Call postWithField(@Field("name") String name, @Field("mobile") String mobile);

    @FormUrlEncoded
    @POST("Post/postUser")
    Call postWithFieldMap(@FieldMap Map map);

    @POST("Post/postUser")
    Call postWithBody(@Body User user);

}
private static void postWithField() {
        PostService postService = buildRetrofit().create(PostService.class);
        postService.postWithField("czy", "123456").enqueue(new Callback() {
            @Override
            public void onResponse(Call call, Response response) {
                if (response.isSuccessful()) {
                    try {
                        //返回的数据:{"code":1,"msg":"success","data":{"name":"leavesC","mobile":123456}}
                        System.out.println("onResponse body: " + response.body().string());
                    } catch (IOException e) {
                        e.printStackTrace();
                    }
                } else {
                    System.out.println("onResponse code: " + response.code());
                }
            }

            @Override
            public void onFailure(Call call, Throwable t) {
                System.out.println("onFailure: " + t.getMessage());
            }
        });
    }
服务端打印出来日志如下所示,可以看到客户端携带过去的参数值,此外,头部信息 "content-type" 的值即对应客户端接口方法的 @FormUrlEncoded 注解
body 参数 key is:  name  , value is:  czy
body 参数 key is:  mobile  , value is:  123456
headers 头部信息 key is:  content-type  , value is:  application/x-www-form-urlencoded
headers 头部信息 key is:  content-length  , value is:  22
headers 头部信息 key is:  host  , value is:  localhost:1995
headers 头部信息 key is:  connection  , value is:  Keep-Alive
headers 头部信息 key is:  accept-encoding  , value is:  gzip
headers 头部信息 key is:  user-agent  , value is:  okhttp/3.10.0
Url: /Post/postUser
通过 @FieldMap 与 @Body 注解的方式来传递参数的方式与 @Field 相同,Retrofit 会遍历参数包含的所有字段,以此来生成要传递的参数,这里就不再赘述
上传文件
上传文件时携带参数
这里来模拟客户端上传图片到服务端的操作,同时携带参数值
app.post('/uploadPhoto', function (req, res) {
    var body = req.body;
    for (var key in body) {
        console.log("body 参数 key is: ", key, " , value is: ", body[key]);
    }
    //请求头
    var headers = req.headers;
    for (var key in headers) {
        console.log("headers 头部信息 key is: ", key, " , value is: ", headers[key]);
    }
    //链接
    console.log("Url:", req.url);

    //生成multiparty对象,并配置上传目标路径
    var form = new multiparty.Form({uploadDir: '../public/upload/'});
    //fields 包含了传递来了的参数值
    //files 则代表上传到服务端的文件对象
    //此处会在后台自动将客户端传来的文件保存到指定文件夹下,处理结果通过回调函数进行通知
    form.parse(req, function (err, fields, files) {
        if (err) {
            resultJson.onSystemError(res);
        } else {
            console.log("fields : ", fields);
            console.log("files : ", files);
            var filesContent = files['photo'][0];
            var data = {};
            data.filePath = filesContent.path;
            resultJson.onSuccess(res, data);
        }
    });
});
客户端新建 UploadService 接口用于声明上传文件的方法,@Multipart 注解表示请求体是一个支持文件上传的 Form 表单,对应的是客户端访问接口时 key 值为 “content-type” 的请求头
此外,在方法参数中使用到了三个 @Part 注解 ,第一个用于注解要上传的文件对象,剩下两个用于标明在上传文件的同时要携带的请求参数
/**
 * 作者:chenZY
 * 时间:2018/5/29 18:55
 * 描述:
 */
public interface UploadService {

    @Multipart
    @POST("uploadPhoto")
    Call uploadPhoto(@Part MultipartBody.Part photo, @Part("userName") RequestBody username, @Part("password") RequestBody password);

}
图片放在工程的 resources 文件夹下
private static void uploadPhoto() {
        UploadService uploadService = buildRetrofit().create(UploadService.class);
        File file = new File("..\\JavaRetrofit\\src\\main\\resources\\images\\lufei.jpg");
        RequestBody photoRequestBody = RequestBody.create(MediaType.parse("application/octet-stream"), file);
        //设置Content-Disposition:form-data; name="photo"; filename="lufei.jpg"
        MultipartBody.Part photo = MultipartBody.Part.createFormData("photo", file.getName(), photoRequestBody);
        RequestBody userName = RequestBody.create(MediaType.parse("text/plain"), "leavesC");
        RequestBody password = RequestBody.create(MediaType.parse("text/plain"), "123456");
        uploadService.uploadPhoto(photo, userName, password).enqueue(new Callback() {
            @Override
            public void onResponse(Call call, Response response) {
                if (response.isSuccessful()) {
                    try {
                        System.out.println("onResponse body: " + response.body().string());
                    } catch (IOException e) {
                        e.printStackTrace();
                    }
                } else {
                    System.out.println("onResponse code: " + response.code());
                }
            }

            @Override
            public void onFailure(Call call, Throwable t) {
                System.out.println("onFailure: " + t.getMessage());
            }
        });
    }
运行上传文件的代码后,服务端输出的日志信息如下所示
headers 头部信息 key is:  content-type  , value is:  multipart/form-data; boundary=3b8bf455-620a-4250-8f3d-8079df43d090
headers 头部信息 key is:  content-length  , value is:  224722
headers 头部信息 key is:  host  , value is:  localhost:1995
headers 头部信息 key is:  connection  , value is:  Keep-Alive
headers 头部信息 key is:  accept-encoding  , value is:  gzip
headers 头部信息 key is:  user-agent  , value is:  okhttp/3.10.0
Url: /uploadPhoto
fields :  { userName: [ 'leavesC' ], password: [ '123456' ] }
files :  { photo:
   [ { fieldName: 'photo',
       originalFilename: 'lufei.jpg',
       path: '..\\public\\upload\\eKPBTufrJs24ybaoOA2HQ3Aj.jpg',
       headers: [Object],
       size: 224115 } ] }
服务端返回的数据如下所示
{"code":1,"msg":"success","data":{"filePath":"..\\public\\upload\\lfCMVA2VXLNN8XaRmpl-9nE7.jpg"}}
此时可以看到服务端工程的 upload 文件夹中多出了一张随机命名的图片
多文件上传
这里来实现多个文件同时上传
由于此处客户端在实现多文件上传时使用了不同的参数配置,所以服务端需要采用不同的数据解析方式,因为新开了一个接口
app.post('/uploadFileDouble', function (req, res) {
    var body = req.body;
    for (var key in body) {
        console.log("body 参数 key is: ", key, " , value is: ", body[key]);
    }
    //请求头
    var headers = req.headers;
    for (var key in headers) {
        console.log("headers 头部信息 key is: ", key, " , value is: ", headers[key]);
    }
    //链接
    console.log("Url:", req.url);

    //生成multiparty对象,并配置上传目标路径
    var form = new multiparty.Form({uploadDir: '../public/upload/'});
    //fields 包含了传递来了的参数值
    //files 则代表上传到服务端的文件对象
    //此处会在后台自动将客户端传来的文件保存到指定文件夹下,处理结果通过回调函数进行通知
    form.parse(req, function (err, fields, files) {
        if (err) {
            resultJson.onSystemError(res);
        } else {
            console.log("fields : ", fields);
            console.log("files : ", files);
            var filesContent = files['photos'];
            var items = [];
            for (var index in filesContent) {
                var item = {};
                item.filePath = filesContent[index].path;
                items.push(item);
            }
            resultJson.onSuccess(res, items);
        }
    });
});
客户端上传多文件的接口方法使用 @PartMap 注解进行标记,使用 Map 容纳多个需要上传的文件表单
/**
 * 作者:chenZY
 * 时间:2018/5/29 18:55
 * 描述:
 */
public interface UploadService {

    @Multipart
    @POST("uploadFileDouble")
    Call uploadFileDouble(@PartMap Map files);

}
private static void uploadFileDouble() {
        UploadService uploadService = buildRetrofit().create(UploadService.class);
        Map photoMap = new HashMap<>();

        File file = new File("..\\JavaRetrofit\\src\\main\\resources\\images\\lufei.jpg");
        RequestBody photoRequestBody = RequestBody.create(MediaType.parse("application/octet-stream"), file);
        photoMap.put("photos\"; filename=\"" + file.getName(), photoRequestBody);

        file = new File("..\\JavaRetrofit\\src\\main\\resources\\images\\mingren.jpg");
        photoRequestBody = RequestBody.create(MediaType.parse("application/octet-stream"), file);
        photoMap.put("photos\"; filename=\"" + file.getName(), photoRequestBody);

        uploadService.uploadFileDouble(photoMap).enqueue(new Callback() {
            @Override
            public void onResponse(Call call, Response response) {
                if (response.isSuccessful()) {
                    try {
                        System.out.println("onResponse body: " + response.body().string());
                    } catch (IOException e) {
                        e.printStackTrace();
                    }
                } else {
                    System.out.println("onResponse code: " + response.code());
                }
            }

            @Override
            public void onFailure(Call call, Throwable t) {
                System.out.println("onFailure: " + t.getMessage());
            }
        });
    }
运行程序,可以看到 upload 文件夹下多出了两张不同的图片,服务端输出的日志如下所示
headers 头部信息 key is:  content-type  , value is:  multipart/form-data; boundary=5c3fcbbb-dd78-4854-ad12-3c4ae3fd1f02
headers 头部信息 key is:  content-length  , value is:  347838
headers 头部信息 key is:  host  , value is:  localhost:1995
headers 头部信息 key is:  connection  , value is:  Keep-Alive
headers 头部信息 key is:  accept-encoding  , value is:  gzip
headers 头部信息 key is:  user-agent  , value is:  okhttp/3.10.0
Url: /uploadFileDouble
fields :  {}
files :  { photos:
   [ { fieldName: 'photos',
       originalFilename: 'mingren.jpg',
       path: '..\\public\\upload\\HsvSfjgKtLL3gAqwrxRFk5G-.jpg',
       headers: [Object],
       size: 123255 },
     { fieldName: 'photos',
       originalFilename: 'lufei.jpg',
       path: '..\\public\\upload\\bicNIvOD3ZcBe8EgqmSd9SFf.jpg',
       headers: [Object],
       size: 224115 } ] }
客户端接收到的数据如下所示
{"code":1,"msg":"success","data":[{"filePath":"..\\public\\upload\\HsvSfjgKtLL3gAqwrxRFk5G-.jpg"},{"filePath":"..\\public\\upload\\bicNIvOD3ZcBe8EgqmSd9SFf.jpg"}]}
下载文件
express 对文件的下载操作进行了高度封装,所以服务器对外提供文件下载功能的方法可能要比你想的简单得多
此处直接将待下载的文件指向了 uplaod 文件夹中的一张图片
app.get('/downloadFile', function (req, res) {
    //文件的存储路径
    var filePath = '../public/upload/Anoj-VQ-cd_vkw9_O5ErSSG6.jpg';
    //设置文件下载时显示的文件名,如不设置则使用原始的文件名
    var fileName = 'leavesC.jpg';
    res.download(filePath, fileName);
});
客户端新建 DownloadService 用于声明提供下载功能的方法。为了支持大文件下载,此处使用了 @Streaming 注解,避免了将整个文件读取进内存里从而在 Android 系统中造成 OOM
/**
 * 作者:chenZY
 * 时间:2018/5/30 13:54
 * 描述:
 */
public interface DownloadService {

    @Streaming
    @GET
    Call downloadFile(@Url String fileUrl);

}
可以看到,此处将下载来的文件直接写到了电脑桌面上,使用的文件读写方法是由 okIo 包提供的
private static void downloadFile() {
        DownloadService downloadService = buildRetrofit().create(DownloadService.class);
        Call call = downloadService.downloadFile("downloadFile");
        call.enqueue(new Callback() {
            @Override
            public void onResponse(Call call, Response response) {
                if (response.isSuccessful()) {
                    BufferedSink sink = null;
                    try {
                        File file = new File("C:\\Users\\CZY\\Desktop\\Hi.jpg");
                        sink = Okio.buffer(Okio.sink(file));
                        sink.writeAll(response.body().source());
                        System.out.println("onResponse : success");
                    } catch (Exception e) {
                        e.printStackTrace();
                    } finally {
                        try {
                            if (sink != null) {
                                sink.close();
                            }
                        } catch (IOException e) {
                            e.printStackTrace();
                        }
                    }
                } else {
                    System.out.println("onResponse code: " + response.code());
                }
            }

            @Override
            public void onFailure(Call call, Throwable t) {
                System.out.println("onFailure: " + t.getMessage());
            }
        });
    }
此外,上述代码如果在 Android 系统中运行还有个问题,由于回调函数 Callback 是在主线程中回调的,所以如果直接在回调函数中进行长时间的 IO 读写操作,可能会造成 ANR,此处需要注意
Retrofit2 与 服务端之间的实例讲解到这里也就结束了,此处除了提供客户端的源代码外,我也将服务端整个工程打包在了一起,欢迎下载
我的 GitHub 主页:leavesC -> https://github.com/leavesC
项目主页:Retrofit2Samples -> https://github.com/leavesC/Retrofit2Samples


