VM下Ubuntu操作系统的安装与相关配置
- 准备阶段
- 安装VMware
- 在VM中安装Ubuntu
- 安装必要依赖和配置
- 安装VMtools
- 更换国内源
- 安装搜狗输入法
- 安装vim依赖
- 安装gcc(C语言程序编译器)和g++(c++)
- 第一行代码
- 博主结语
准备阶段
安装VMware
我们按照的虚拟机一般选择Virtual Box或者VM,博主安装的是VM,都可以的,两种软件都是为虚拟机服务的,只不过VM下载的的东西比较多,Virtual box的话下载的东西少,但是够用了,说那么多给出VM的下载地址VMware Workstation15,点击即可进入下载界面,里面有windows版本和MAC版本的,看你自己的系统而定。下载完以后就是傻瓜式的安装,一直点击下一步就欧克了。只不过到最后的时候,需要输入许可证,大家进去输入许可证就好了,直接用就行了:VG5HH-D6E04-0889Y-QXZET-QGUC8。
在VM中安装Ubuntu
1.下载ubuntuLTS镜像,我这提供了最新版本18.04的下载地址,当然大家也可以根据需要下载其它版本的:https://ubuntu.com/download/desktop
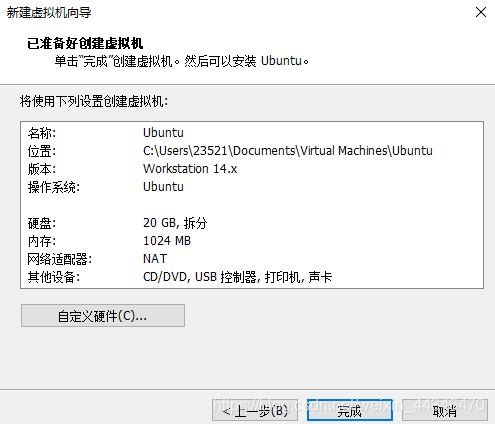
3.为了简便,选择典型即可,之后点击下一步
4.点击安装程序光盘镜像文件,选择你在上面下载的ubuntu镜像文件,选择完以后再点击“稍后安装操作系统”,再点击下一步。

5.选择Linux,然后版本看自己下载的镜像文件的版本而定,如果你下载的镜像文件是32位的话,版本就选择Ubuntu,如果是64位的话,就选择Ubuntu 64位的。

6.之后你选择你想要存储的位置,然后定义一下你下载的虚拟机名称
7.之后进入指定磁盘文件的界面,默认系统的选择即可,直接下一步。

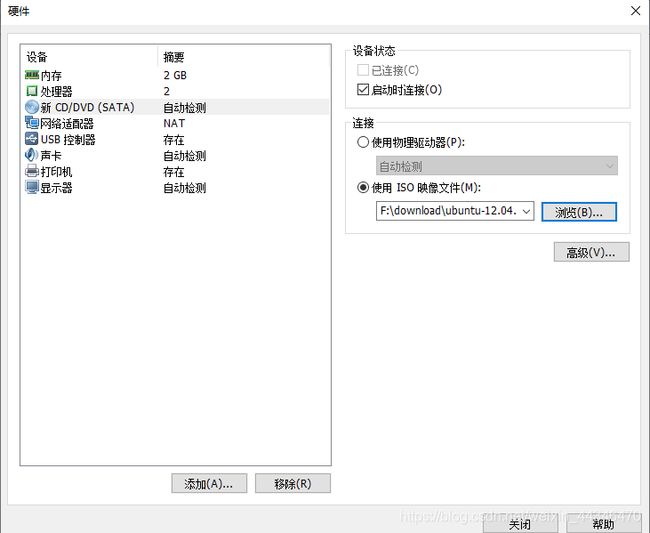
9.内存选择2GB,处理器数量1个,每个处理器内核数量为2.
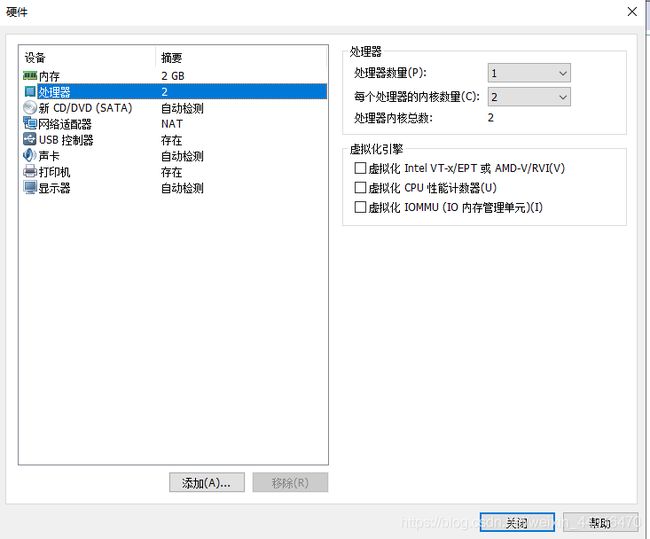
打印机的话一般不需要,直接点击,选择移除就可以了。
10.选择“新CD/DVD(SATA)",点击使用ISO映像文件,选择你之前下载的ubuntu镜像文件即可。
12.之后VM的”我的计算机“下面就会出现你创建的虚拟机的名称,然后点击这个,选择打开虚拟机即可。
13.之后会进入安装ubuntu的界面,选择你想要的语言版本,点击下载即可。
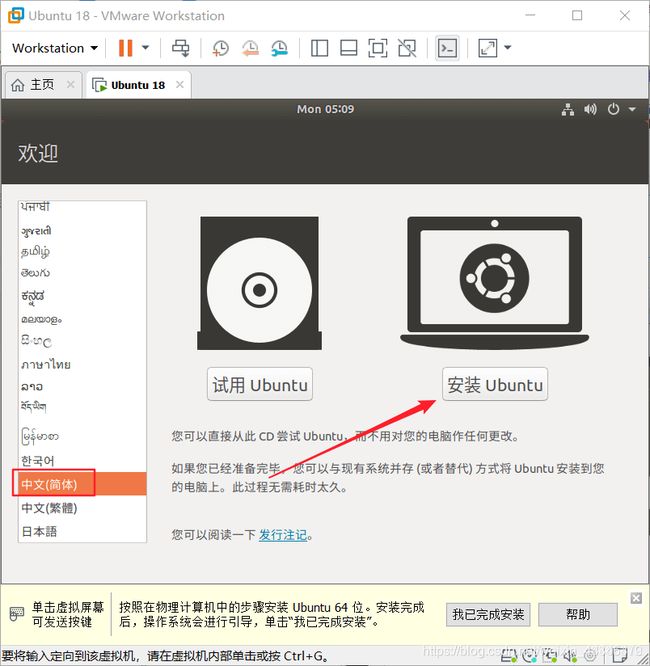
之后会进入键盘布局,选择汉语或者英语
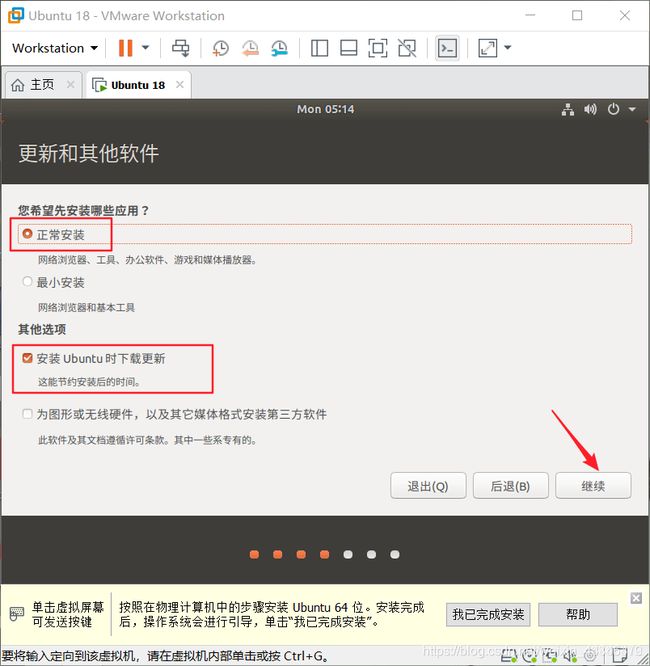
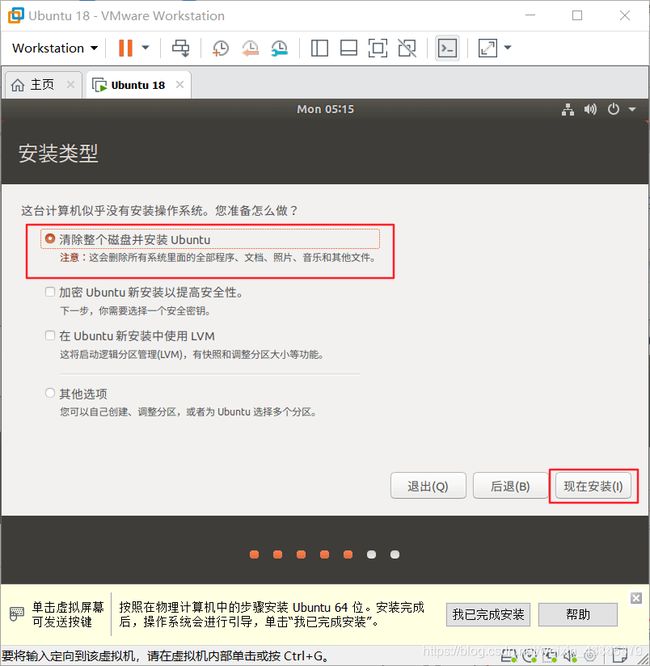
18.最后进入了安装界面,耐心等待即可,若干个小时后就会安装成功了。

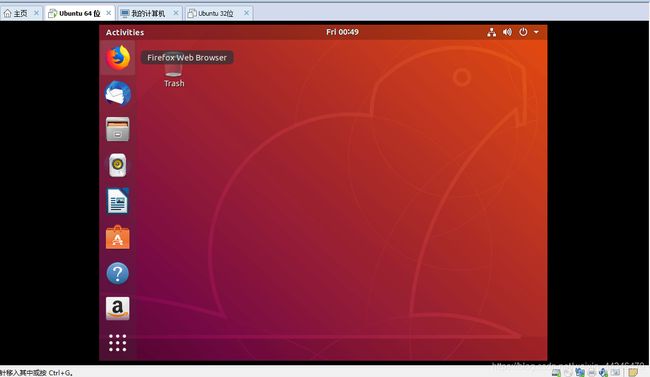
安装完以后重启即可。之后会进入一下界面,恭喜你安装成功!!!
安装必要依赖和配置
安装VMtools
为什么要安装VMtools呢?因为这个很方便,第一可以支持虚拟机和本地机之间的复制粘贴,在虚拟机里面的复制内容可以粘贴到本地机上面,很奈斯。然后安装这个以后,本地机还可以和虚拟机之间共享文件。
1.首先按ctrl+alt+t打开终端。
2.在VM上选择该虚拟机,并且在VM的菜单上选择虚拟机->安装VMtools
3.按理来说,里面虚拟机的界面会弹出一个VMtools的文件:
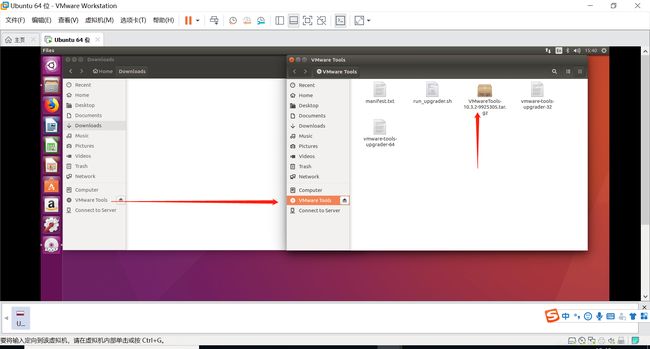
如果说没有跳出这个文件,就可以尝试先关闭虚拟机,然后在你安装VMWare的目录下找到linux.iso文件。然后把这个文件复制到你原来挂载的那个iso文件的目录下,然后选择虚拟机,点击编辑虚拟机,在CD/DVD选项中,把挂在的光驱改成linux.iso,然后重启,再选择重新安装VMtools即可以看到跳出的VMtools文件。
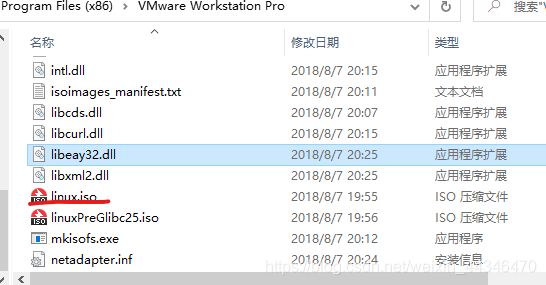
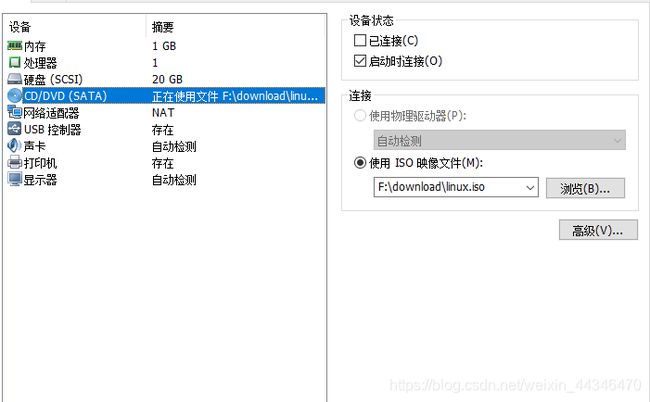
拓展:教你如何随时切换用户模式:
以root身份登陆终端,如果说你安装虚拟机以后,第一次使用root登陆的话,就必须得创建你的root用户,输入sudo passwd root, 之后会叫你输入密码和确认密码,设置root用户的登陆密码,这个密码是看不见的,所以你输入的时候看见没有一点点的东西很正常,继续输入就行。之后会显示设置成功,再输入su root进入root模式即可,如果说你想切换为原来的普通用户模式,就可以输入su 你自己的用户名.示例如下:
liujunchi@ubuntu:~$ sudo passwd root
[sudo] password for liujunchi:
Enter new UNIX password:
Retype new UNIX password:
passwd: password updated successfully
liujunchi@ubuntu:~$ su root
Password:
root@ubuntu:/home/liujunchi# su liujunchi
liujunchi@ubuntu:~$
这个只是演示,下一步的时候你还是得进入root模式
4.点击跳出来的VMtools文件,选择里面的VMtools巴拉巴拉什么.gz文件,复制一下,然后在home文件夹里面建立一个VMtools文件,复制到这个文件中。之后在当前文件夹下右键点击,选择在终端中打开。解压这个什么gz文件,之后会在目录下看到一个vmware-tools-distrib文件,cd到这个文件夹,ls查看文件,发现有一个vmware-install.pl文件,之后安装VMtools工具即可。
输入以下示例:
liujunchi@ubuntu:~/VMtools$ ls
VMwareTools-10.2.5-8068393.tar.gz
liujunchi@ubuntu:~/VMtools$ tar zpxf VMwareTools-10.2.5-8068393.tar.gz
liujunchi@ubuntu:~/VMtools$ ls
VMwareTools-10.2.5-8068393.tar.gz  vmware-tools-distrib
liujunchi@ubuntu:~/VMtools$ cd vmware-tools-distrib
liujunchi@ubuntu:~/VMtools/vmware-tools-distrib$ ls
bin  caf  doc  etc  FILES  INSTALL  installer  lib  vgauth  vmware-install.pl
liujunchi@ubuntu:~/VMtools/vmware-tools-distrib$ sudo ./vmware-install.pl
输入完以后,要进入root权限,然后输入密码,后面会出现:
open-vm-tools packages are available from the OS vendor and VMware recommends
using open-vm-tools packages. See http://kb.vmware.com/kb/2073803 for more
information.
Do you still want to proceed with this installation? [yes] y

INPUT: [y]

A previous installation of VMware Tools has been detected.

The previous installation was made by the tar installer (version 4).
。。。。。。下面还有
之后就是要输入yes/no的就输入yes,不需要的就一直enter下去,然后就可以安装成功了,安装成功以后会出现:
To enable advanced X features (e.g., guest resolution fit, drag and drop, and
file and text copy/paste), you will need to do one (or more) of the following:
1. Manually start /usr/bin/vmware-user
2. Log out and log back into your desktop session
3. Restart your X session.

Enjoy,

--the VMware team

Found VMware Tools CDROM mounted at /media/liujunchi/VMware Tools. Ejecting
device /dev/sr0 ...
安装成功!!!
更换国内源
你会发现在ubuntu系统中下载东西都特别慢,那是因为它默认的下载源是国外的服务器,若要提高速度,则必须得更换为我们国内的下载源:
1.首先备份当前的源(要输入你设置的root的密码):sudo cp /etc/apt/sources.list /etc/apt/sources_init.list
2.更换阿里云的源,输入sudo gedit /etc/apt/sources.list打开源配置文件,进入以后,全部删了里面的内容,然后复制下面阿里云源的内容:
deb http://mirrors.aliyun.com/ubuntu/ xenial main
deb-src http://mirrors.aliyun.com/ubuntu/ xenial main

deb http://mirrors.aliyun.com/ubuntu/ xenial-updates main
deb-src http://mirrors.aliyun.com/ubuntu/ xenial-updates main

deb http://mirrors.aliyun.com/ubuntu/ xenial universe
deb-src http://mirrors.aliyun.com/ubuntu/ xenial universe
deb http://mirrors.aliyun.com/ubuntu/ xenial-updates universe
deb-src http://mirrors.aliyun.com/ubuntu/ xenial-updates universe

deb http://mirrors.aliyun.com/ubuntu/ xenial-security main
deb-src http://mirrors.aliyun.com/ubuntu/ xenial-security main
deb http://mirrors.aliyun.com/ubuntu/ xenial-security universe
deb-src http://mirrors.aliyun.com/ubuntu/ xenial-security universe
换源以后,保存文件内容,然后退出。
3.输入命令更新源:sudo apt-get update
4.复损坏的软件包,尝试卸载出错的包,重新安装正确版本的:sudo apt-get -f install以后你安装什么东西出了问题,都可以输入这个命令进行修复。
5.更新软件:sudo apt-get upgrade
更新源完毕!!!!
安装搜狗输入法
1.首先进入以下网站下载Linux版的搜狗输入法:https://pinyin.sogou.com/linux/。进入网站后可以在左上角看到下载的选项以及当前搜狗支持的Ubuntu版本,里面有64和32位的,看你安装的虚拟机什么版本,下载什么,一般是下载文档存储。
2.下载的包默认存储在Downloads文档里面,转到Downloads文档查看:cd Downloads/,之后ls查看文件可以发现搜狗的deb包:sogoupinyin_2.3.1.0112_amd64.deb
然后利用sudo dpkg -i sogoupinyin_2.3.1.0112_amd64.deb安装搜狗输入法即可c
3.发现会报错,因为缺少fcitx包,因此需要安装
-
添加fcitx源:
sudo add-apt-repository ppa:fcitx-team/nightly -
更新源列表:
sudo apt-get update -
下载安装fcitx包:
sudo apt-get install fcitx -
如果按照还报错,则可以输入:
sudo apt-get install fcitx下载需要并且缺少的依赖包 -
安装其它依赖包:
$ sudo apt-get install fcitx-table-all $ sudo apt-get install fcitx-config-gtk $ sudo apt-get install im-swit -
fcitx安装成功后就可以直接利用上面的dkpg指令安装搜狗的deb包,安装结束后还不能直接使用,需要重新启动Ubuntu才能调出搜狗输入法。
点击‘+’
取消”only show current language“,然后输入pingyin,就会看到一个Sougou pingtin,选择这个,并且点击ok即可,之后按shift,就会显示出搜狗拼音的图标了,然后可以正常输入中文和英文。

搜狗输入法安装完毕!!!
安装vim依赖
1.安装vim:sudo apt-get install vim
如果出现以下问题:
Reading package lists... Done
Building dependency tree
Reading state information... Done
Some packages could not be installed. This may mean that you have
requested an impossible situation or if you are using the unstable
distribution that some required packages have not yet been created
or been moved out of Incoming.
The following information may help to resolve the situation:

The following packages have unmet dependencies:
 vim : Depends: vim-common (= 2:7.4.1689-3ubuntu1.3) but 2:8.0.1453-1ubuntu1.1 is to be installed
E: Unable to correct problems, you have held broken packages.
则说明安装有点问题。
2.检测vim安装是否成功:vim -v
结果出现了:
Command 'vim' not found, but can be installed with:

sudo apt install vim
sudo apt install vim-gtk3
sudo apt install vim-tiny
sudo apt install neovim
sudo apt install vim-athena
sudo apt install vim-gtk
sudo apt install vim-nox
3.解决问题,卸载原有的vim-common:sudo apt-get remove vim-common
4.卸载成功后,重新安装vim即可成功:sudo apt-get install vim.之后会询问yes/no,选择yes即可。
vim安装成功!!!
安装gcc(C语言程序编译器)和g++(c++)
1.输入:sudo apt-get install build-essential
2.安装gcc:sudo apt-get install gcc
3.安装g++:sudo apt-get install g++.发现输入之后会出现:
Reading package lists... Done
Building dependency tree
Reading state information... Done
Some packages could not be installed. This may mean that you have
requested an impossible situation or if you are using the unstable
distribution that some required packages have not yet been created
or been moved out of Incoming.
The following information may help to resolve the situation:

The following packages have unmet dependencies:
 g++ : Depends: g++-5 (>= 5.3.1-3~) but it is not going to be installed
E: Unable to correct problems, you have held broken packages.
发现是更新的源有问题,我们之前更新的是阿里云的源,没错,但是我们的Ubuntu(我自己的)是18.04版本的,而我查看了一下,自己在上面更新的源是16.04版本的,因此得换成对应版本了,这个bug给力,查了我好久,进入网址阿里云源,进入ubuntu选项的界面,找到对应版本的源,复制粘贴,按照上面讲的重新更新一下就行,把sources.list文件里面改成你复制的源即可。
博主安装的Ubuntu是18.04版本的,因此复制了18.04版本对应的源,当然,里面还有16.04,14.04版本的,大家看看自己安装的版本复制粘贴吧
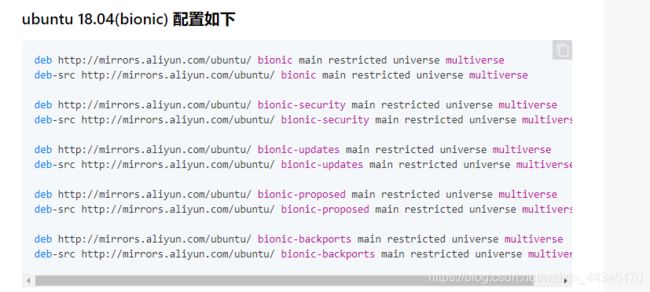
4.之后再更新源:sudo apt-get update,然后更新软件sudo apt-get upgrade。最后输入上面的sudo apt-get install g++即可成功安装。
5.检测gcc和g++的安装:gcc -v和g++ -v,吐过出现对应版本,则恭喜你安装成功。
第一行代码
接下来我们在虚拟机Ubuntu系统里编写我们的第一行C语言代码吧。
1.在对应的文件夹里(可以cd到某个你建立的文件夹),我是直接在总文件夹里面创建了一个c文件:touch hello.c
然后咱们就可以在对应的文件夹里面看到这样一个hello.c文件,点击进去进行编辑,敲完代码进行保存即可:
#include
int main(){

   printf("hello world!\n");

}
2.在这个c文件对应的目录下打开终端,输入gcc hello.c -o hello,对这个文件进行编译,编译成hello文件,在对应文件夹里也可以看见。然后输入./hello就可以看到对应的运行结果。

liujunchi@ubuntu:~$ touch hello.c
liujunchi@ubuntu:~$ gcc hello.c -o hello
liujunchi@ubuntu:~$ ./hello
hello world!
liujunchi@ubuntu:~$
博主结语
现在,你可以在linux系统的ubuntu下运行你的第一行C语言代码,很有成就感吧,这只是刚刚开始,我们只是安装了部分的依赖,以后使用Linux的过程中会用到越来越多的东西,会安装越来越多的依赖,我们后续的使用过程会得去熟悉各种文件操作指令,shell编程等等,这篇文章只是初步介绍,博主会陆续更新Linux操作系统的文章,欢迎大家关注!!!谢谢观看!!
最后,欢迎大家关注我的个人博客,在下所有的文章都是从个人博客导入进来的,文章会首先更新在个人博客里。希望我的博客能够给大家带来收获!

