Android使用 argb, 矩阵,像素点对图片进行修改
刚开始研究图片修改,去网上查了点方法,然后写了个小 demo, 写下本篇博客,总结一下最基本修改图片的方式,希望对大家有帮助.
我将用下面2种方式来修改我们的图片,以及叙述下图片为何会有变化.
- ColorMatrix
- RGBA~利用自带的方法修改色调,饱和度,亮度来修改图片
- 矩阵~利用矩阵计算得到新的矩阵修改图片
像素点~根据原像素点数组,经过计算得到新的像素点数组,再重新绘制图片
上面这些不太明白没关系,只是抽重点讲一下,真正的内容在下面,需要记住的关键字已经标记出来了,矩阵 Matrix, 像素点等,下面会配合代码以及图片实例来详细讲一下,加深印象.
1.ColorMatrix
从名字就能知道,颜色矩阵,为改变图片颜色所使用的矩阵,要熟悉一个新的类,最好的方法就是去看它的源码,贴上源码,还好不是很长.
/*
 * Copyright (C) 2007 The Android Open Source Project
 *
 * Licensed under the Apache License, Version 2.0 (the "License");
 * you may not use this file except in compliance with the License.
 * You may obtain a copy of the License at
 *
 *      http://www.apache.org/licenses/LICENSE-2.0
 *
 * Unless required by applicable law or agreed to in writing, software
 * distributed under the License is distributed on an "AS IS" BASIS,
 * WITHOUT WARRANTIES OR CONDITIONS OF ANY KIND, either express or implied.
 * See the License for the specific language governing permissions and
 * limitations under the License.
 */

package android.graphics;

import java.util.Arrays;

/**
 * 4x5 matrix for transforming the color and alpha components of a Bitmap.
 * The matrix can be passed as single array, and is treated as follows:
 *
 *
 *  [ a, b, c, d, e,
 *    f, g, h, i, j,
 *    k, l, m, n, o,
 *    p, q, r, s, t ]
 *
 *
 * When applied to a color [R, G, B, A], the resulting color
 * is computed as:
 *
 *
 *
 *   R’ = a*R + b*G + c*B + d*A + e;
 *   G’ = f*R + g*G + h*B + i*A + j;
 *   B’ = k*R + l*G + m*B + n*A + o;
 *   A’ = p*R + q*G + r*B + s*A + t;
 *
 *
 * That resulting color [R’, G’, B’, A’]
 * then has each channel clamped to the 0 to 255
 * range.
 *
 *
 *
 * The sample ColorMatrix below inverts incoming colors by scaling each
 * channel by -1, and then shifting the result up by
 * 255 to remain in the standard color space.
 *
 *
 *
 *   [ -1, 0, 0, 0, 255,
 *     0, -1, 0, 0, 255,
 *     0, 0, -1, 0, 255,
 *     0, 0, 0, 1, 0 ]
 */
@SuppressWarnings({ "MismatchedReadAndWriteOfArray", "PointlessArithmeticExpression" })
public class ColorMatrix {
    private final float[] mArray = new float[20];

    /**
     * Create a new colormatrix initialized to identity (as if reset() had
     * been called).
     */
    public ColorMatrix() {
        reset();
    }

    /**
     * Create a new colormatrix initialized with the specified array of values.
     */
    public ColorMatrix(float[] src) {
        System.arraycopy(src, 0, mArray, 0, 20);
    }

    /**
     * Create a new colormatrix initialized with the specified colormatrix.
     */
    public ColorMatrix(ColorMatrix src) {
        System.arraycopy(src.mArray, 0, mArray, 0, 20);
    }

    /**
     * Return the array of floats representing this colormatrix.
     */
    public final float[] getArray() { return mArray; }

    /**
     * Set this colormatrix to identity:
     *
     * [ 1 0 0 0 0   - red vector
     *   0 1 0 0 0   - green vector
     *   0 0 1 0 0   - blue vector
     *   0 0 0 1 0 ] - alpha vector
     *
     */
    public void reset() {
        final float[] a = mArray;
        Arrays.fill(a, 0);
        a[0] = a[6] = a[12] = a[18] = 1;
    }

    /**
     * Assign the src colormatrix into this matrix, copying all of its values.
     */
    public void set(ColorMatrix src) {
        System.arraycopy(src.mArray, 0, mArray, 0, 20);
    }

    /**
     * Assign the array of floats into this matrix, copying all of its values.
     */
    public void set(float[] src) {
        System.arraycopy(src, 0, mArray, 0, 20);
    }

    /**
     * Set this colormatrix to scale by the specified values.
     */
    public void setScale(float rScale, float gScale, float bScale,
                         float aScale) {
        final float[] a = mArray;

        for (int i = 19; i > 0; --i) {
            a[i] = 0;
        }
        a[0] = rScale;
        a[6] = gScale;
        a[12] = bScale;
        a[18] = aScale;
    }

    /**
     * Set the rotation on a color axis by the specified values.
     *
     * axis=0 correspond to a rotation around the RED color
     * axis=1 correspond to a rotation around the GREEN color
     * axis=2 correspond to a rotation around the BLUE color
     *
     */
    public void setRotate(int axis, float degrees) {
        reset();
        double radians = degrees * Math.PI / 180d;
        float cosine = (float) Math.cos(radians);
        float sine = (float) Math.sin(radians);
        switch (axis) {
        // Rotation around the red color
        case 0:
            mArray[6] = mArray[12] = cosine;
            mArray[7] = sine;
            mArray[11] = -sine;
            break;
        // Rotation around the green color
        case 1:
            mArray[0] = mArray[12] = cosine;
            mArray[2] = -sine;
            mArray[10] = sine;
            break;
        // Rotation around the blue color
        case 2:
            mArray[0] = mArray[6] = cosine;
            mArray[1] = sine;
            mArray[5] = -sine;
            break;
        default:
            throw new RuntimeException();
        }
    }
.
.
.
}
从注释中看到,这个是个4*5的矩阵与[R, G, B, A]相乘,然后得到新的 R,G,B,A 值.看个公式图,会比较清楚一点.
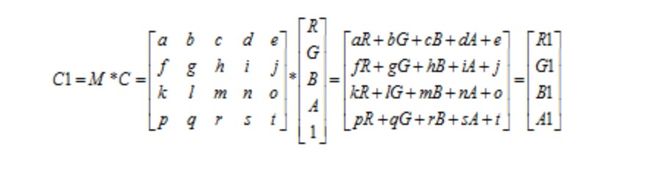
由此可见,通过颜色矩阵修改了原图像的RGBA值,从而达到了改变图片颜色效果的目的。并且,通过所示的运算可知,
颜色矩阵M的第一行参数abcde决定了图像的红色成分,
第二行参数fghij决定了图像的绿色成分,
第三行参数klmno决定了图像的蓝色成分,
第四行参数pqrst决定了图像的透明度,
第五列参数ejot是颜色的偏移量。
这里用一张图片来说明一下何为 rgba.
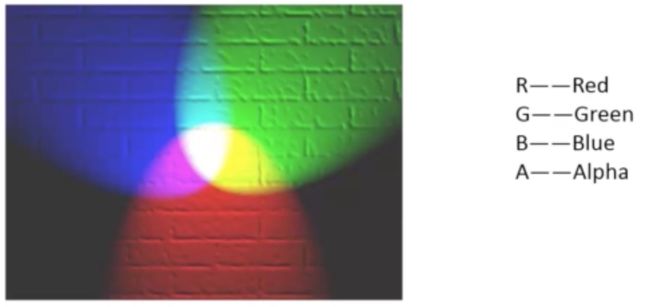
基本的三色调,配上了 alpha 透明度,最常使用到的地方就是PS了,我们图片也不例外需要这些元素.
继续来看源码,先看构造法,了解 ColorMatrix 构造需要什么条件,总共就3个方法.
无参数方法,则构建对象之后,会先调用 reset() 方法,重置成最原始的状态,我们来调整参数值,得到新的矩阵,修改图片;
float[],ColorMatrix这2个方法则是直接传入了已经计算好的值.本文主要用的是无参数的构造方法.
还有 setScale,setRotate,setSaturation,postConcat 等方法,将在下文配合代码一起讲解.
1.1 RGBA
- 色调
ColorMatrix A = new Matrix();
A.setRotate(axis,degree);
其中 n 的值从源码中就可以看到分为0-RED(红),1-GREEN(绿),2-BLUE(蓝),degree 就是对当前色值进行修改的度. - 饱和度
ColorMatrix B = new Matrix();
B.setSaturation(sat);
sat是饱和度的值. - 亮度
ColorMatrix C = new Matrix();
c.setScale(rScale,gScale, bScale,aScale);
上述三种方法调用完之后,我们只是对三种属性分别进行了修改
而对图片修改呢,则需要一个完整的矩阵
则需要下面的方法,将3个值糅在一起,形成一个新的矩阵.
ColorMatrix D = new Matrix();
D.postConcat(A);
D.postConcat(B);
D.postConcat(C);
这样就是完整的利用 rgba 值来修改图片.附上代码
/**
     * 利用 rgba 来修改图片
     * @param bm            所需修改的图片
     * @param hue           色调值
     * @param saturation    饱和度
     * @param lum           亮度
     * @return              修改完成的图片
     */
public static Bitmap getHandleImageForARGB(Bitmap bm, float hue, float saturation, float lum) {
        Bitmap bmp = Bitmap.createBitmap(bm.getWidth(), bm.getHeight(), Bitmap.Config.ARGB_8888);
        Canvas canvas = new Canvas(bmp);
        Paint paint = new Paint(Paint.ANTI_ALIAS_FLAG);

        //色调 0-R 1-G 2-B
        ColorMatrix hueMatrix = new ColorMatrix();
        hueMatrix.setRotate(0, hue);
        hueMatrix.setRotate(1, hue);
        hueMatrix.setRotate(2, hue);

        //饱和度
        ColorMatrix satMatrix = new ColorMatrix();
        satMatrix.setSaturation(saturation);

        //亮度
        ColorMatrix lumMatrix = new ColorMatrix();
        lumMatrix.setScale(lum, lum, lum, 1);

        //将色调,饱和度,亮度全糅合要一起
        ColorMatrix imageMatrix = new ColorMatrix();
        imageMatrix.postConcat(hueMatrix);
        imageMatrix.postConcat(satMatrix);
        imageMatrix.postConcat(lumMatrix);

        paint.setColorFilter(new ColorMatrixColorFilter(imageMatrix));
        canvas.drawBitmap(bm, 0, 0, paint);
        return bmp;
    }
这里我们需要用到我们熟悉的Canvas,以及Paint画笔,将我们的图片重新绘制出来,什么样的Paint呢?
就是经过setRotate,setSaturation,setScale之后利用postConcat方法得到新的ColorMatrix
这样我们画笔所需要的Paint完备了,接下来就可以在画布上面画出我们的bitmap了.
我把这个方法放到一个叫**ImageHelper**的类中,这样直接调用即可.
| 正确 | 错误 |
|---|---|
 |
 |
| 进度条拖动时正确的效果 | 莫名出现的黑屏 |
 |
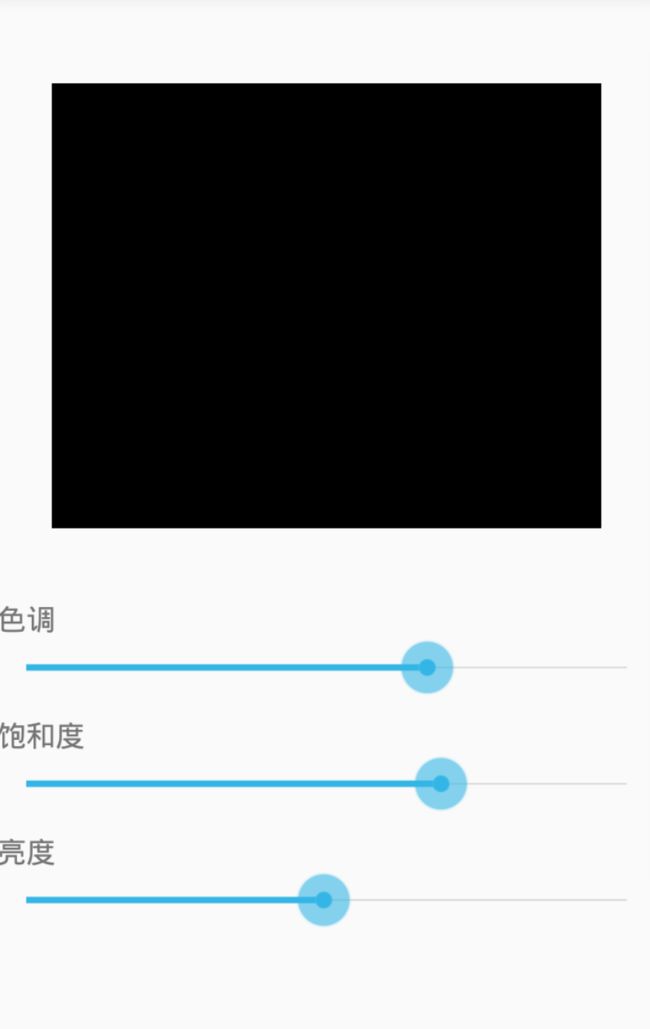 |
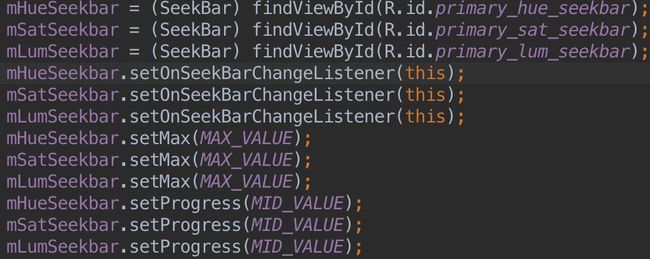
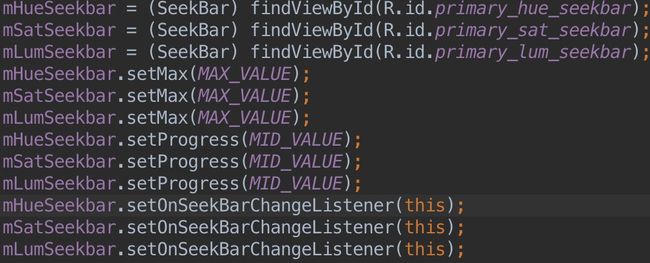
右边是我第一次写的时候发现的bug,拖动进度条的时候莫名的出现黑屏,当时以为是值传递错误,尝试了各种方法,例如打log,传入值判断等等,依然黑屏.
后来在机(删)缘(了)巧(重)合(写)下,就修改成了左边部分代码那样.......运行正常了!!!黑屏也不见了!!!我就只是把监听事件写在前面了而已.

不管怎么样,bug是解决了,具体的原因后面再去探讨,碰到此类问题的朋友也可以去了解一下为什么.本文不做深究.
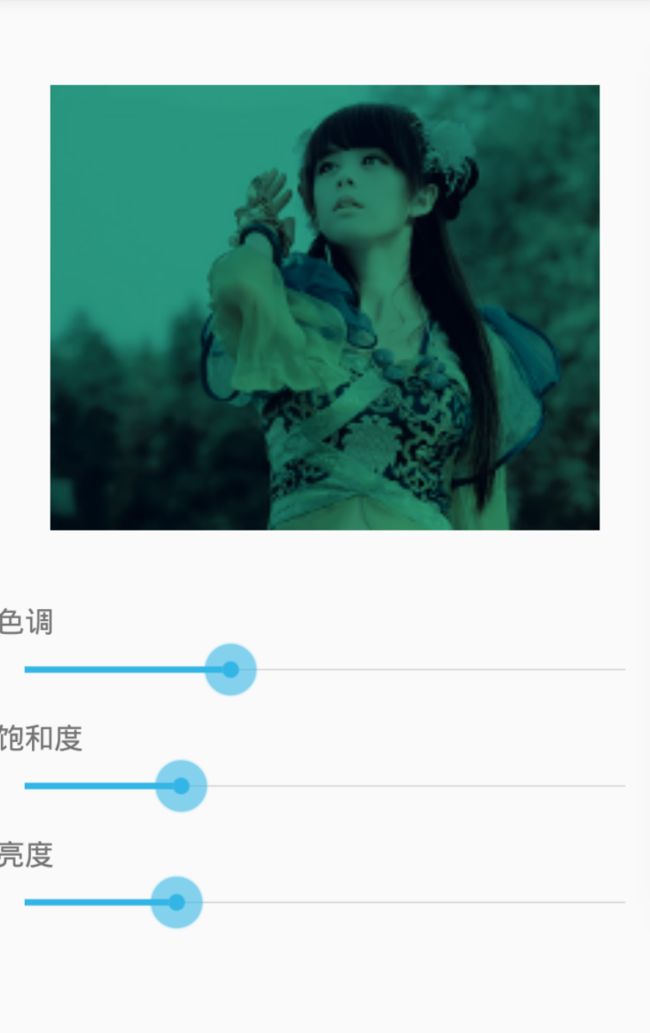
看到配图之中,有一个修改的图片以及3个进度条,拖动进度条,时时修改图片.
进度条的值我们设置为0-255,默认进度条居中,设置为127.
当进度条拖动之后对应的progress值也就发生改变,我们获得到progress值后进过公式计算.
具体操作我们放在进度条的onProgressChanged中处理.
.
.
.
private static final int MAX_VALUE = 255;
private static final int MID_VALUE = 127;
.
.
.
@Override
    public void onProgressChanged(SeekBar seekBar, int progress, boolean fromUser) {
        switch (seekBar.getId()) {
            case R.id.primary_hue_seekbar:
            //获得色调
                mHue = (progress - MID_VALUE) * 1.0f / MID_VALUE * 180;
                break;
            case R.id.primary_sat_seekbar:
            //获得饱和度
                mSat = progress * 1.0f / MID_VALUE;
                break;
            case R.id.primary_lum_seekbar:
            //获得亮度
                mLum = progress * 1.0f / MID_VALUE;
                break;
        }
        mImageview.setImageBitmap(ImageHelper.getHandleImageForARGB(mBitmap, mHue, mSat, mLum));
    }
这样就可以拖动进度条而时时修改图片了.
1.2 矩阵
这里就直接用上效果图来讲解吧.
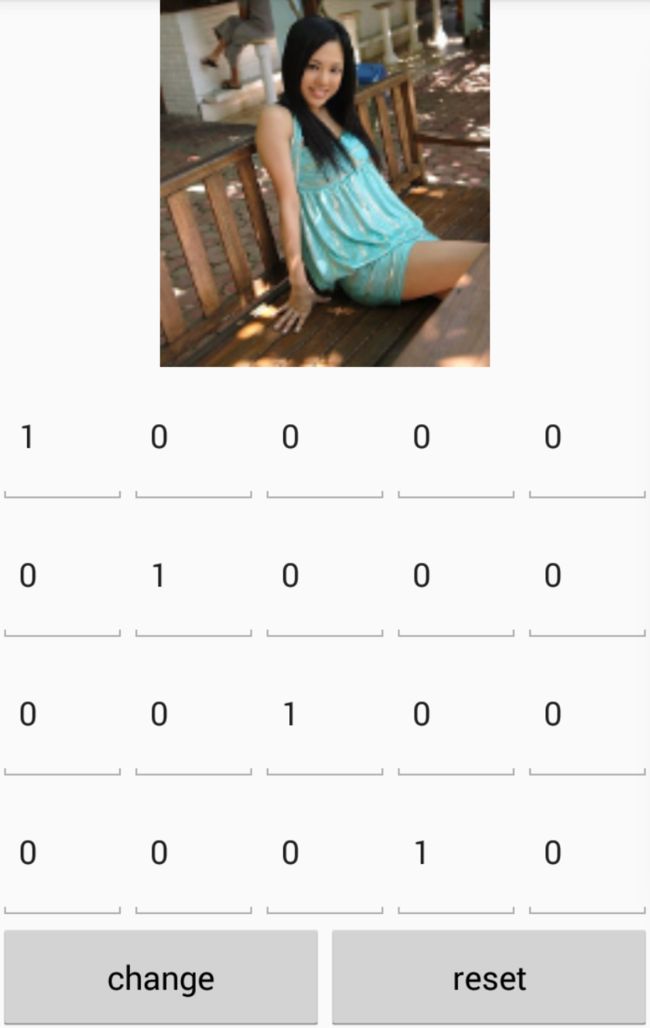
下方的20个edittext就是代表上面那个矩阵公式,忘了的朋友可以往上面翻一翻.
private float[] mColorMatrix = new float[20];

private void setImageMatrix() {
        Bitmap bmp = Bitmap.createBitmap(mBitmap.getWidth(), mBitmap.getHeight(),
                Bitmap.Config.ARGB_8888);
        ColorMatrix colorMatrix = new ColorMatrix();
        colorMatrix.set(mColorMatrix);

        Canvas canvas = new Canvas(bmp);
        Paint paint = new Paint(Paint.ANTI_ALIAS_FLAG);
        paint.setColorFilter(new ColorMatrixColorFilter(colorMatrix));
        canvas.drawBitmap(mBitmap, 0, 0, paint);
        mImageview.setImageBitmap(bmp);
    }
这里直接用到set(float[] f)的方法将mColorMatrix直接传入,就不用像1.1那样一个一个值设置过去.
这里用到的方法可以点击进入源码,传入float数组即可,非常简单,而得到新的bitmap和上面一下,需要画布画笔来绘制.
在网上查阅资料的时候,看到别人分享的一个实现图片怀旧效果的算法,直接看图片吧,各个值也在图片上可以看到.
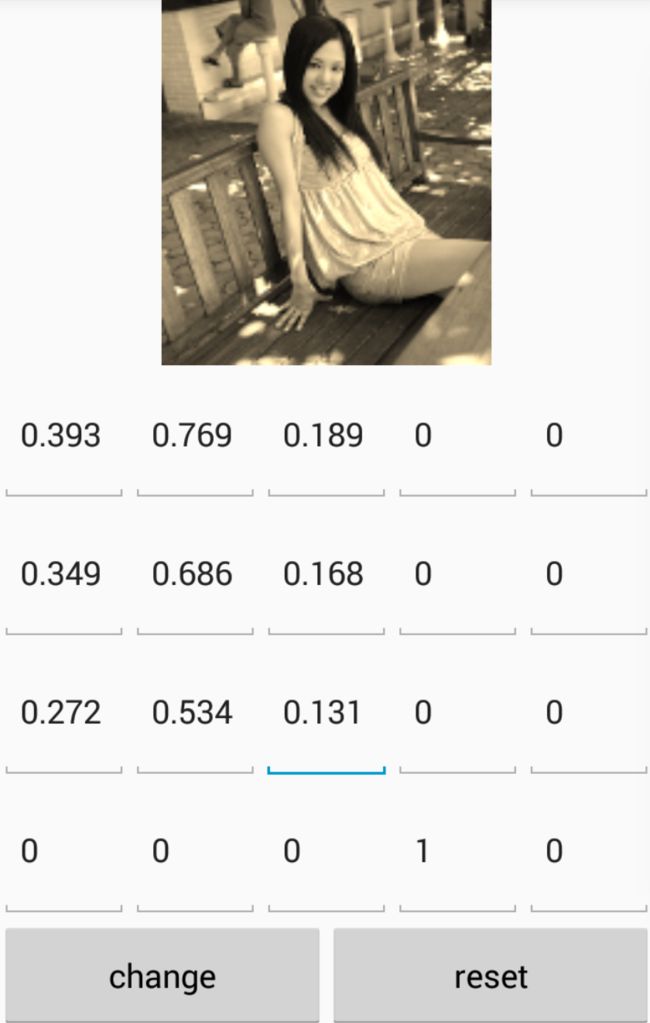
这样就实现了怀旧风格图片的效果了.这些数值可不是凭空编出来的,都是有算法专家去算出来的,所以说,学好数理化,走遍天下都不怕!
2 像素点
像素的基本概念可以去百度百科看一下,这里我们只需要知道图片是有一个像素点数组组成的,而我们要修改图片,则需要对这个数组进行修改,形成一个新的数组,然后在赋给图片即可.
获得图片像素点数组的方法:
        int width = bm.getWidth();
        int height = bm.getHeight();
        int color;
        int r, g, b, a;

        int[] oldPx = new int[width * height];
        int[] newPx = new int[width * height];
        bm.getPixels(oldPx, 0, width, 0, 0, width, height);

        for (int i = 0; i < width * height; i++) {
            color = oldPx[i];
            r = Color.red(color);
            g = Color.green(color);
            b = Color.blue(color);
            a = Color.alpha(color);
       }
在贴上几个算法公式,达到一些特定的效果.
- 底片效果
bmp.r = 255-bmp.r;
bmp.g = 255-bmp.g;
bmp.b = 255-bmp.b; - 浮雕效果
bmp.r = bmpBefore.r - bmp.r+127;
bmp.g = bmpBefore.g - bmp.g+127;
bmp.b = bmpBefore.b - bmp.b+127; 老照片效果
bmp.r = (int) (0.393 * bmp.r + 0.769 * bmp.g + 0.189 * bmp.b);
bmp.g = (int) (0.349 * bmp.r + 0.686 * bmp.g + 0.168 * bmp.b);
bmp.b = (int) (0.272 * bmp.r + 0.534 * bmp.g + 0.131 * bmp.b);实际效果如下图所示:
第一次写这么长的博客,如果哪里写的不清楚,请多包涵!!!
附上github地址:地址