express+nodejs编程
参考:nodejs菜鸟入门
一、初体验
server.js
/**
 * Created by CHENGVI on 7/15/2016.
 */
var http = require("http"),
    //URL模块可以读取URL、分析诸如hostname、port之类的信息
    url  = require("url");

//传入 route (回调函数)
function start(route) {
    function onRequest(request, response) {
        var pathname = url.parse(request.url).pathname;
        console.log("请求 "+pathname+" ,事件");

        route(pathname);

        response.writeHead(200, {"Content-Type": "text/plain"});
        response.write("Hi NodeJS");
        response.end();
    }

    http.createServer(onRequest).listen(8080);
    console.log("成功的提示:httpd start @8080");
}
exports.start = start;
router.js
/**
 * Created by CHENGVI on 7/15/2016.
 */
function route(pathname) {
    console.log("请求路径是:" + pathname);
}
exports.route = route;
index.js
/**
 * Created by CHENGVI on 7/15/2016.
 */
var server = require("./server");
var router = require("./router");
server.start(router.route);
显示:
首先我们在cmd中敲:node index.js
命令行显示:

这里出现了乱码,前面的问号应该就是“成功的提示”
然后我在浏览器输入http://localhost:8080/显示如下:

紧接着输出的应该就是“请求/事件”以及“请求路径是:/”
处理流程:
首先我们用node index.js时,会处理index.js的代码:
var server = require("./server");
var router = require("./router");
server.start(router.route);
前面两句话是依赖不用管它,处理的语句是第三句,就是调用了server.start()方法,并且传入router.route这个回调函数,于是就执行server.start()方法:
function start(route) {
    function onRequest(request, response) {
        var pathname = url.parse(request.url).pathname;
        console.log("请求 "+pathname+" ,事件");

        route(pathname);

        response.writeHead(200, {"Content-Type": "text/plain"});
        response.write("Hi NodeJS");
        response.end();
    }

    http.createServer(onRequest).listen(8080);
    console.log("成功的提示:httpd start @8080");
}
在刚开始没有在浏览器输入http://localhost:8080/时,没有请求,所以function onRequest()方法不被执行,于是只输出“成功的提示:http start @8080”,当输入这个网址之后,有了请求,首先输出“请求/事件”,然后执行route()方法:
function route(pathname) {
    console.log("请求路径是:" + pathname);
}
这个route方法输出“请求路径是:/”
二、函数编程
创建一个requestHandler.js模块
/**
 * Created by CHENGVI on 7/15/2016.
 */
function  start() {
    console.log("chu li qing qiu"+"start"+"kai qi");
    //return "start";
}
function upload(){
    console.log("chu li qing qiu"+"upload"+ " kai qi");
    //return " upload";
}
exports.start=start;
exports.upload=upload;
进行对象传递:
将一系列请求处理程序通过一个对象handle来传递,并且需要使用松耦合将handle注入到route()函数中
1、先将这个对象引入到主文件index.js中
/**
 * Created by CHENGVI on 7/15/2016.
 */
var server = require("./server"),
    router = require("./router"),
    requestHandlers = require("./requestHandlers");

var handle = {};
handle["/"] = requestHandlers.start;
handle["/start"] = requestHandlers.start;
handle["/upload"] = requestHandlers.upload;

server.start(router.route, handle);
2、将handle给服务器server.js
/**
 * Created by CHENGVI on 7/15/2016.
 */
var http=require("http"),
    url=require("url");

function start(route,handle){
    function onRequest(request,response){
        var pathname = url.parse(request.url).pathname;
        console.log("qing qiu"+pathname+"xiang ying");

       route(handle,pathname);
        response.writeHead(200,{"Content-Type": "text/plain"});
        response.write("hi, Vivien");
        response.end();
    }
    http.createServer(onRequest).listen(8080);
    console.log("cheng gong : httpd start @8080");
}

exports.start = start;
3、router.js
function route(handle,pathname){
    console.log("route"+pathname);
    if(typeof handle[pathname]==='function'){
          handle[pathname]();
    }else{
        console.log(" zhao bu dao lu jing"+pathname);
        return "not found"
    }
}
exports.route=route;
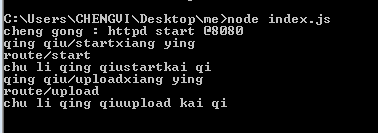
在cmd中敲入node index.js之后,在浏览器输入http://localhost:8080/start,运行结果

再访问http://localhost:8080/upload

三、传递数据
1、用post请求提交给服务器文本区中的内容:requestHandler.js
/**
* Created by CHENGVI on 7/15/2016.
*/
function start(response,postData) { //其实start方法没有用到postData这个参数,但是为了和upload保持一致要加上
console.log("chu li qing qiu"+"start"+"kai qi");
var body=''+
''+
''charset=UTF-8" />'+
''+
''+
'+
''+
''+
''+
''+
'';
response.writeHead(200,{"Content-Type":"text/html"}); //注意这里的类型是"text/html"
response.write(body);
response.end();
}
function upload(response,postData){
console.log("chu li qing qiu "+"upload"+ " kai qi");
response.writeHead(200,{"Content-Type" : "text/plain"});
response.write("upload data" + decodeURIComponent(postData));
response.end();
}
exports.start=start;
exports.upload=upload;2、通过在request对象上注册监听器来实现这些时间的触发,以及回调,request对象是每次接收到http请求的时候,就会把该对象传递给onRequest回调函数
request.addListener("data", function(chunk) {
  // called when a new chunk of data was received
});

request.addListener("end", function() {
  // called when all chunks of data have been received
});
因为获取所有来自请求的数据,然后将这些数据交给应用层处理,应该是http服务器要做到的事情,所以上面的函数处理可以放到server.js中,然后将接收到的数据传递给请求路由和请求处理器,让他们来进行进一步的处理
server.js
/**
 * Created by CHENGVI on 7/15/2016.
 */
var http=require("http"),
    url=require("url");

function start(route,handle){
    function onRequest(request,response){
        var postData ='';
        var pathname = url.parse(request.url).pathname;
        console.log("qing qiu"+pathname+"xiang ying");

        request.setEncoding('UTF-8');

        request.addListener('data',function(postDataChunk){
            postData =+ postDataChunk;
            console.log("shou dao shujukuai"+postDataChunk+".");
        })

        request.addListener('end',function(){
            route(handle,pathname,response,postData);
        })

    }
    http.createServer(onRequest).listen(8080);
    console.log("cheng gong : httpd start @8080");
}

exports.start = start;
3、接下来,需要在/upload页面展示用户输入的内容,将postData传递给请求处理程序router.js
function route(handle,pathname,response,postData){
    console.log("route"+pathname);
    if(typeof handle[pathname]==='function'){
          handle[pathname](response,postData);
    }else{
        console.log(" zhao bu dao lu jing"+pathname);
         //"not found"
        response.writeHead(404, {"Content-Type": "text/plain"});
        response.write("404 Not found");
        response.end();
    }
}
exports.route=route;
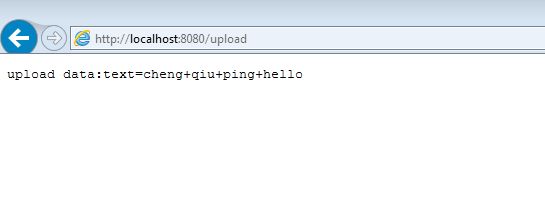
运行结果:
http://localhost:8080/start

输入值:

提交:

我们大都时候要的只是text本身,可以通过querystring得到:
var querystring=require('querystring')
function start(response, postData) {
console.log("chu li qing qiu 'start' kai qi.");
var body = ''+
''+
'"Content-Type" content="text/html; '+
'charset=UTF-8" />'+
''+
''+
''+
''+
'';
response.writeHead(200, {"Content-Type": "text/html"});
response.write(body);
response.end();
}
function upload(response, postData) {
console.log("chu li qing qiu 'upload' kai qi .");
response.writeHead(200, {"Content-Type": "text/plain"});
response.write("upload data:" + querystring.parse(decodeURIComponent(postData)).text);
response.end();
}
exports.start = start;
exports.upload = upload;四、上传图片
需要用到的外部模块:需要用到外部模块: Felix Geisendörfer 开发的 node-formidable 模块
用 NPM 包管理器安装:
npm install formidable1、 requestHandlers.js 添加图片展示模块,修改上传模块
var querystring = require('querystring');
//可将文件读取到服务器中
fs = require('fs');
//解析上传文件数据
formidable = require("formidable");
function start(response, request) {
console.log("chuliqingqiu'start' kaiqi.");
var body = ''+
''+
''charset=UTF-8" />'+
''+
''+
''+
''+
'';
response.writeHead(200, {"Content-Type": "text/html"});
response.write(body);
response.end();
}
function upload(response, request) {
console.log("处理请求 'upload' 开启.");
var form = new formidable.IncomingForm();
console.log("加载解析");
form.parse(request, function(error, fields, files) {
console.log("解析完成");
var is = fs.createReadStream(files.upload.path); //获得数据流,这里的path就是上传的文件路径,与用户上传文件的路径相同
var os = fs.createWriteStream("./1.png"); //把数据流写入1.png,这里的1.png才是我们临时存储的路径
is.pipe(os);
is.on('end',function(){
fs.unlinkSync(files.upload.path); //同步版的unlink,删除文件操作
});
//fs.renameSync(files.upload.path, "./tmp/test.png");
response.writeHead(200, {"Content-Type": "text/html"});
response.write("收到图片:
");
response.write(" "); //这里的/show表示请求/show
response.end();
});
}
function show(response) {
console.log("处理请求 'show' 开启.");
fs.readFile("./1.png", "binary", function(error, file) {
if(error) {
response.writeHead(500, {"Content-Type": "text/plain"});
response.write(error + "\n");
response.end();
} else {
response.writeHead(200, {"Content-Type": "image/png"});
response.write(file, "binary");
response.end();
}
});
}
exports.start = start;
exports.upload = upload;
exports.show = show;
"); //这里的/show表示请求/show
response.end();
});
}
function show(response) {
console.log("处理请求 'show' 开启.");
fs.readFile("./1.png", "binary", function(error, file) {
if(error) {
response.writeHead(500, {"Content-Type": "text/plain"});
response.write(error + "\n");
response.end();
} else {
response.writeHead(200, {"Content-Type": "image/png"});
response.write(file, "binary");
response.end();
}
});
}
exports.start = start;
exports.upload = upload;
exports.show = show;2、 index.js 添加新的请求处理到 路由映射表
/**
 * Created by CHENGVI on 7/15/2016.
 */
var server = require("./server");
var router = require("./router");
var requestHandlers=require("./requestHandle");

var handle = {};
handle["/"] = requestHandlers.start;
handle["/start"] = requestHandlers.start;
handle["/upload"] = requestHandlers.upload;
handle["/show"] = requestHandlers.show;

server.start(router.route,handle);
3、server.js 移除对postData的处理以及request.setEncoding (这部分node-formidable自身会处理),转而采用将request对象传递给请求路由的方式:
var http = require("http"),
    url  = require("url");

function start(route, handle) {
    function onRequest(request, response) {
        var postData = '',
            pathname = url.parse(request.url).pathname;
        console.log("qingqiu "+pathname+" xaingying");
        route(handle,pathname,response,request);
    }

    http.createServer(onRequest).listen(8080);
    console.log("chenggong:httpd start @8080");
}

exports.start = start;
4、 router.js 不需要传递postData了,而要传递request对象
function route(handle, pathname, response, request) {
    console.log("route qingqiulujing:" + pathname);
    if (typeof handle[pathname] === 'function') {
        handle[pathname](response, request);
    } else {
        console.log("找不到路径 " + pathname);
        response.writeHead(404, {"Content-Type": "text/plain"});
        response.write("404 Not found");
        response.end();
    }
}

exports.route = route;
可以查看原链接的gif效果图
