pix2pix(一)制作样本对并进行训练与测试
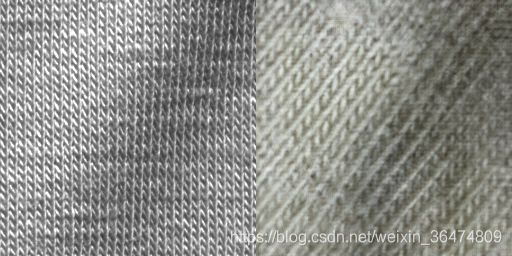
目的:我们通过cycleGAN生成了一些样本对,挑选出较好的样本对,想要在pix2pix上进行实验。
参考:https://github.com/junyanz/pytorch-CycleGAN-and-pix2pix/blob/master/docs/datasets.md
目录
一、数据集创建方法
1.1 A和B的描述
1.2 文件夹与子文件夹
1.3 命名规范
1.4 创建数据集
二、对已有的数据集进行处理
2.1 数据集生成
创建子文件夹AB
图片结合并写入
2.2 数据集读入模型
2.3 make_dataset_aligned.py
创建相应的文件夹
结合写入相应的图片
三、我们对数据集的预处理
3.1 旋转增扩
3.2 批量挑选写入文件夹并重命名
3.3 最终的数据集
四、训练
4.1 combine_A_and_B.py
4.2 训练
4.3 测试
一、数据集创建方法
1.1 A和B的描述
pix2pix需要配对的样本对。
We provide a python script to generate pix2pix training data in the form of pairs of images {A,B}, where A and B are two different depictions of the same underlying scene. For example, these might be pairs {label map, photo} or {bw image, color image}. Then we can learn to translate A to B or B to A:
作者通过python程序可以通过图像对{A,B}产生相应的训练数据,A,B为不同场景下的相同的景色。我们希望能从A迁移到B,或者能从B迁移到A。
1.2 文件夹与子文件夹
Create folder /path/to/data with subfolders A and B. A and B should each have their own subfolders train, val, test, etc. In /path/to/data/A/train, put training images in style A. In /path/to/data/B/train, put the corresponding images in style B. Repeat same for other data splits (val, test, etc).
创建文件夹的时候应当数据集里面,放两个文件夹,A,B,然后A中设置子文件夹与B中设置的子文件夹对应,比如train, val, test。
1.3 命名规范
Corresponding images in a pair {A,B} must be the same size and have the same filename, e.g., /path/to/data/A/train/1.jpg is considered to correspond to /path/to/data/B/train/1.jpg
A和B中的文件必须有相同的文件名称。比如文件夹A中为1.jpg,文件夹B中与之对应的也应为1.jpg。这点很重要。(如果实现这点,我们可能需要相应的python脚本)
1.4 创建数据集
数据集按照上面的要求创建之后,运行命令行:
python datasets/combine_A_and_B.py --fold_A /path/to/data/A --fold_B /path/to/data/B --fold_AB /path/to/data此命令行将源域和目标域图像combine each pair of images (A,B) into a single image file,可以用于训练。
二、对已有的数据集进行处理
前面的数据集按照要求排列之后,运行combine_A_and_B.py进行创建。
2.1 数据集生成
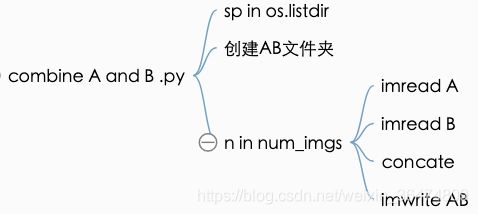
combine_A_and_B.py将不同文件夹之中的图片结合到一起。
创建子文件夹AB
splits = os.listdir(args.fold_A)

for sp in splits:
    img_fold_A = os.path.join(args.fold_A, sp)
    img_fold_B = os.path.join(args.fold_B, sp)
    img_list = os.listdir(img_fold_A)
    if args.use_AB:
        img_list = [img_path for img_path in img_list if '_A.' in img_path]

    num_imgs = min(args.num_imgs, len(img_list))
    print('split = %s, use %d/%d images' % (sp, num_imgs, len(img_list)))
    img_fold_AB = os.path.join(args.fold_AB, sp)
    if not os.path.isdir(img_fold_AB):
        os.makedirs(img_fold_AB)
    print('split = %s, number of images = %d' % (sp, num_imgs))
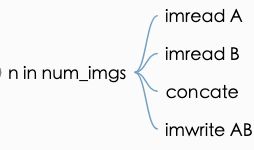
图片结合并写入
    for n in range(num_imgs):
        name_A = img_list[n]
        path_A = os.path.join(img_fold_A, name_A)
        if args.use_AB:
            name_B = name_A.replace('_A.', '_B.')
        else:
            name_B = name_Ai
        path_B = os.path.join(img_fold_B, name_B)
        if os.path.isfile(path_A) and os.path.isfile(path_B):
            name_AB = name_A
            if args.use_AB:
                name_AB = name_AB.replace('_A.', '.')  # remove _A
            path_AB = os.path.join(img_fold_AB, name_AB)
            im_A = cv2.imread(path_A, cv2.CV_LOAD_IMAGE_COLOR)
            im_B = cv2.imread(path_B, cv2.CV_LOAD_IMAGE_COLOR)
            im_AB = np.concatenate([im_A, im_B], 1)
            cv2.imwrite(path_AB, im_AB)
2.2 数据集读入模型
直接从AB路径之中读取,然后将之前concate的图片截成A与B,最后return
        # read a image given a random integer index
        AB_path = self.AB_paths[index]
        AB = Image.open(AB_path).convert('RGB')
        # split AB image into A and B
        w, h = AB.size
        w2 = int(w / 2)
        A = AB.crop((0, 0, w2, h))
        B = AB.crop((w2, 0, w, h))

        # apply the same transform to both A and B
        transform_params = get_params(self.opt, A.size)
        A_transform = get_transform(self.opt, transform_params, grayscale=(self.input_nc == 1))
        B_transform = get_transform(self.opt, transform_params, grayscale=(self.output_nc == 1))

        A = A_transform(A)
        B = B_transform(B)

        return {'A': A, 'B': B, 'A_paths': AB_path, 'B_paths': AB_path}
2.3 make_dataset_aligned.py
此程序作用类似于combine_A_and_B.py,作用从代码看上去一致,但是不知道为什么又单独设出来?
创建相应的文件夹
文件夹有testA,testB,trainA,trainB,test,train
if __name__ == '__main__':
    import argparse
    parser = argparse.ArgumentParser()
    parser.add_argument(
        '--dataset-path',
        dest='dataset_path',
        help='Which folder to process (it should have subfolders testA, testB, trainA and trainB'
    )
    args = parser.parse_args()

    dataset_folder = args.dataset_path
    print(dataset_folder)

    test_a_path = os.path.join(dataset_folder, 'testA')
    test_b_path = os.path.join(dataset_folder, 'testB')
    test_a_file_paths = get_file_paths(test_a_path)
    test_b_file_paths = get_file_paths(test_b_path)
    assert(len(test_a_file_paths) == len(test_b_file_paths))
    test_path = os.path.join(dataset_folder, 'test')

    train_a_path = os.path.join(dataset_folder, 'trainA')
    train_b_path = os.path.join(dataset_folder, 'trainB')
    train_a_file_paths = get_file_paths(train_a_path)
    train_b_file_paths = get_file_paths(train_b_path)
    assert(len(train_a_file_paths) == len(train_b_file_paths))
    train_path = os.path.join(dataset_folder, 'train')
结合写入相应的图片
def align_images(a_file_paths, b_file_paths, target_path):
    if not os.path.exists(target_path):
        os.makedirs(target_path)

    for i in range(len(a_file_paths)):
        img_a = Image.open(a_file_paths[i])
        img_b = Image.open(b_file_paths[i])
        assert(img_a.size == img_b.size)

        aligned_image = Image.new("RGB", (img_a.size[0] * 2, img_a.size[1]))
        aligned_image.paste(img_a, (0, 0))
        aligned_image.paste(img_b, (img_a.size[0], 0))
        aligned_image.save(os.path.join(target_path, '{:04d}.jpg'.format(i)))
三、我们对数据集的预处理
https://blog.csdn.net/wuguangbin1230/article/details/71119955/
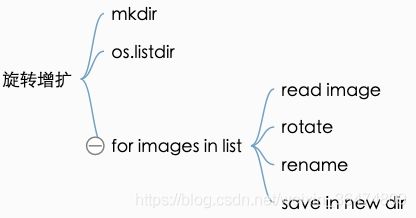
3.1 旋转增扩
python /Users/Desktop/trainingSet/pired-images/rotate_augment.py
编写下面代码,实现对python数据集的增扩,相当于创建子文件夹,然后将每张图片的四个角度旋转的图片写入。
# -*- coding: utf-8 -*
"""
Created by Xingxiangrui on 2019.4.8
This code is created to augment pix2pix image pairs by rotate
"""
import matplotlib.pyplot as plt
import numpy as np
from PIL import Image
import os

#image source directory
source_dir="/Users/Desktop/trainingSet/pired-images/tear/"
target_dir="/Users/Desktop/trainingSet/pired-images/tear/augmented-tear/"
if not os.path.isdir(target_dir):
    os.makedirs(target_dir)

#images list in source directory
source_imgs_list = os.listdir(source_dir)
print source_imgs_list

#for each image in the images list
for source_img_name in source_imgs_list:
    if '.png' in source_img_name:
        print(source_img_name)

        #read images
        path_source_img = os.path.join(source_dir, source_img_name)
        src_img = Image.open(path_source_img)  # 读取的图像显示的
        #src_img.show()

        #rotate 0
        rotated_img = src_img.rotate(0)
        target_img_name="tear_r0_"+source_img_name
        path_target_img=os.path.join(target_dir, target_img_name)
        print(path_target_img)
        rotated_img.save(path_target_img)
        # rotate 90
        rotated_img = src_img.rotate(90)
        target_img_name="tear_r90_"+source_img_name
        path_target_img=os.path.join(target_dir, target_img_name)
        print(path_target_img)
        rotated_img.save(path_target_img)
        # rotate 180
        rotated_img = src_img.rotate(180)
        target_img_name="tear_r180_"+source_img_name
        path_target_img = os.path.join(target_dir, target_img_name)
        print(path_target_img)
        rotated_img.save(path_target_img)
        # rotate 270
        rotated_img = src_img.rotate(270)
        target_img_name="tear_r270_"+source_img_name
        path_target_img = os.path.join(target_dir, target_img_name)
        print(path_target_img)
        rotated_img.save(path_target_img)
我们在tear与normal文件夹内做此增扩,因为这两个文件夹内样本数较少。
3.2 批量挑选写入文件夹并重命名
python /Users/Desktop/trainingSet/pired-images/pix2pix_paired_rename_gen.py
# -*- coding: utf-8 -*
"""
Created by Xingxiangrui on 2019.4.9
This code is created to make pix2pix image pairs to
folder A and B with the same filename
"""
import matplotlib.pyplot as plt
import numpy as np
from PIL import Image
import os

#iamge paths
#------------here need to be changed--------source image dir--------------------
dir_paired_images="/Users/Desktop/trainingSet/pix2pix-nor2cott/convex-cave/"
dir_train_A="/Users/Desktop/trainingSet/pix2pix-nor2cott/A/train/"
dir_train_B="/Users/Desktop/trainingSet/pix2pix-nor2cott/B/train/"

#for each image
paired_imgs_list = os.listdir(dir_paired_images)
print paired_imgs_list
for source_image_name in paired_imgs_list:
    if '.png' in source_image_name:
        path_source_img = os.path.join(dir_paired_images, source_image_name)
        src_img = Image.open(path_source_img)
        # ------------here need to be changed------iamge filename prefix-------------------
        full_image_name="lam20idt0_convex_"+source_image_name
        # fake B in /B/train
        if '_fake_B' in full_image_name:
            target_image_name=full_image_name.replace('_fake_B','')
            path_train_B=os.path.join(dir_train_B, target_image_name)
            print(path_train_B)
            src_img.save(path_train_B)
        # real_A in /A/train
        if '_real_A' in full_image_name:
            target_image_name = full_image_name.replace('_real_A', '')
            path_train_A = os.path.join(dir_train_A, target_image_name)
            print(path_train_A)
            src_img.save(path_train_A)
3.3 最终的数据集
我们挑选了287对样本,处理后生成入文件夹。
- pix2pix-nor2cott/B/train/
- pix2pix-nor2cott/A/train/
四、训练
4.1 combine_A_and_B.py
训练前数据准备This will combine each pair of images (A,B) into a single image file, ready for training.
命令行如下:单显卡服务器
env/bin/python /home/xingxiangrui/pytorch-CycleGAN-and-pix2pix/datasets/combine_A_and_B.py --fold_A /home/xingxiangrui/pytorch-CycleGAN-and-pix2pix/datasets/pix2pix-nor2cott/A --fold_B /home/xingxiangrui/pytorch-CycleGAN-and-pix2pix/datasets/pix2pix-nor2cott/B --fold_AB /home/xingxiangrui/pytorch-CycleGAN-and-pix2pix/datasets/pix2pix-nor2cott/AB四显卡服务器:
python datasets/combine_A_and_B.py --fold_A datasets/pix2pix-nor2cott/A --fold_B datasets/pix2pix-nor2cott/B --fold_AB datasets/pix2pix-nor2cott/AB
报错:ImportError: No module named 'cv2'
解决:pip install opencv-python
报错: File "/home/xingxiangrui/pytorch-CycleGAN-and-pix2pix/datasets/combine_A_and_B.py", line 45, in
im_A = cv2.imread(path_A, cv2.CV_LOAD_IMAGE_COLOR)
AttributeError: module 'cv2' has no attribute 'CV_LOAD_IMAGE_COLOR'
解决:将代码中 CV_LOAD_IMAGE_COLOR 改为 IMREAD_COLOR
im = cv2.imread('link_to_file', cv2.IMREAD_COLOR)运行成功:单显卡服务器
[xingxiangrui@xxxxxxx ~]$ env/bin/python /home/xingxiangrui/pytorch-CycleGAN-and-pix2pix/datasets/combine_A_and_B.py --fold_A /home/xingxiangrui/pytorch-CycleGAN-and-pix2pix/datasets/pix2pix-nor2cott/A --fold_B /home/xingxiangrui/pytorch-CycleGAN-and-pix2pix/datasets/pix2pix-nor2cott/B --fold_AB /home/xingxiangrui/pytorch-CycleGAN-and-pix2pix/datasets/pix2pix-nor2cott/AB
[fold_A] =  /home/xingxiangrui/pytorch-CycleGAN-and-pix2pix/datasets/pix2pix-nor2cott/A
[fold_B] =  /home/xingxiangrui/pytorch-CycleGAN-and-pix2pix/datasets/pix2pix-nor2cott/B
[fold_AB] =  /home/xingxiangrui/pytorch-CycleGAN-and-pix2pix/datasets/pix2pix-nor2cott/AB
[num_imgs] =  1000000
[use_AB] =  False
split = test, use 0/0 images
split = test, number of images = 0
split = train, use 287/287 images
split = train, number of images = 287
运行成功:四显卡服务器:
(torch) [[email protected] cyclegan_pix2pix]$ python datasets/combine_A_and_B.py --fold_A datasets/pix2pix-nor2cott/A --fold_B datasets/pix2pix-nor2cott/B --fold_AB datasets/pix2pix-nor2cott/AB
[num_imgs] =  1000000
[fold_AB] =  datasets/pix2pix-nor2cott/AB
[fold_B] =  datasets/pix2pix-nor2cott/B
[use_AB] =  False
[fold_A] =  datasets/pix2pix-nor2cott/A
split = train, use 287/287 images
split = train, number of images = 287
split = test, use 0/0 images
split = test, number of images = 0
运行后datasets/pix2pix-nor2cott/AB文件夹内多了287张样本,且看到是两个拼在一起。
4.2 训练
命令行例子:
Example:
Train a CycleGAN model:
python train.py --dataroot ./datasets/maps --name maps_cyclegan --model cycle_gan
Train a pix2pix model:
python train.py --dataroot ./datasets/facades --name facades_pix2pix --model pix2pix --direction BtoA
我们看到datasets/facades/train中直接为拼接好的图片,因此我们需要相应的dataroot设置为:datasets/pix2pix-nor2cott/AB
python train.py --dataroot ./datasets/pix2pix-nor2cott/AB --name nor2cott_pick_pix2pix --model pix2pix --direction AtoB
继续迭代:
python train.py --dataroot ./datasets/pix2pix-nor2cott/AB --name nor2cott_pick_pix2pix --model pix2pix --direction AtoB --continue_train
(torch) [[email protected] cyclegan_pix2pix]$ python train.py --dataroot ./datasets/pix2pix-nor2cott/AB --name nor2cott_pick_pix2pix --model pix2pix --direction AtoB
----------------- Options ---------------
               batch_size: 1
                    beta1: 0.5
          checkpoints_dir: ./checkpoints
           continue_train: False
                crop_size: 256
                 dataroot: ./datasets/pix2pix-nor2cott/AB	[default: None]
             dataset_mode: aligned
                direction: AtoB
              display_env: main
             display_freq: 400
               display_id: 1
            display_ncols: 4
             display_port: 8097
           display_server: http://localhost
          display_winsize: 256
                    epoch: latest
              epoch_count: 1
                 gan_mode: vanilla
                  gpu_ids: 0
                init_gain: 0.02
                init_type: normal
                 input_nc: 3
                  isTrain: True                          	[default: None]
                lambda_L1: 100.0
                load_iter: 0                             	[default: 0]
                load_size: 286
                       lr: 0.0002
           lr_decay_iters: 50
                lr_policy: linear
         max_dataset_size: inf
                    model: pix2pix                       	[default: cycle_gan]
               n_layers_D: 3
                     name: nor2cott_pick_pix2pix         	[default: experiment_name]
                      ndf: 64
                     netD: basic
                     netG: unet_256
                      ngf: 64
                    niter: 100
              niter_decay: 100
               no_dropout: False
                  no_flip: False
                  no_html: False
                     norm: batch
              num_threads: 4
                output_nc: 3
                    phase: train
                pool_size: 0
               preprocess: resize_and_crop
               print_freq: 100
             save_by_iter: False
          save_epoch_freq: 5
         save_latest_freq: 5000
           serial_batches: False
                   suffix:
         update_html_freq: 1000
                  verbose: False
----------------- End -------------------
dataset [AlignedDataset] was created
The number of training images = 285
initialize network with normal
initialize network with normal
model [Pix2PixModel] was created
---------- Networks initialized -------------
[Network G] Total number of parameters : 54.414 M
[Network D] Total number of parameters : 2.769 M
-----------------------------------------------
WARNING:root:Setting up a new session...
create web directory ./checkpoints/nor2cott_pick_pix2pix/web...
(epoch: 1, iters: 100, time: 0.138, data: 0.094) G_GAN: 0.779 G_L1: 21.866 D_real: 0.719 D_fake: 0.658
(epoch: 1, iters: 200, time: 0.137, data: 0.001) G_GAN: 1.429 G_L1: 19.615 D_real: 0.843 D_fake: 0.678
End of epoch 1 / 200 	 Time Taken: 29 sec
learning rate = 0.0002000
(epoch: 2, iters: 15, time: 0.136, data: 0.001) G_GAN: 2.371 G_L1: 22.009 D_real: 0.090 D_fake: 0.200
(epoch: 2, iters: 115, time: 0.344, data: 0.001) G_GAN: 1.958 G_L1: 14.707 D_real: 1.041 D_fake: 0.122
(epoch: 2, iters: 215, time: 0.138, data: 0.001) G_GAN: 1.581 G_L1: 16.808 D_real: 1.339 D_fake: 0.063
End of epoch 2 / 200 	 Time Taken: 26 sec
。。。
4.3 测试
命令行样例
python test.py --dataroot ./datasets/facades --name facades_pix2pix --model pix2pix --direction BtoA注意,test之中的文件必须为训练一样的AB域拼在一起的图像。所以不妨把A中图像拷入B中 cp all_fault_text.zip ../../B/test/
然后,生成测试数据集 python datasets/combine_A_and_B.py --fold_A datasets/pix2pix-nor2cott/A --fold_B datasets/pix2pix-nor2cott/B --fold_AB datasets/pix2pix-nor2cott/AB
测试: python test.py --dataroot datasets/pix2pix-nor2cott/AB --name nor2cott_pick_pix2pix --model pix2pix --direction AtoB --num_test 479


