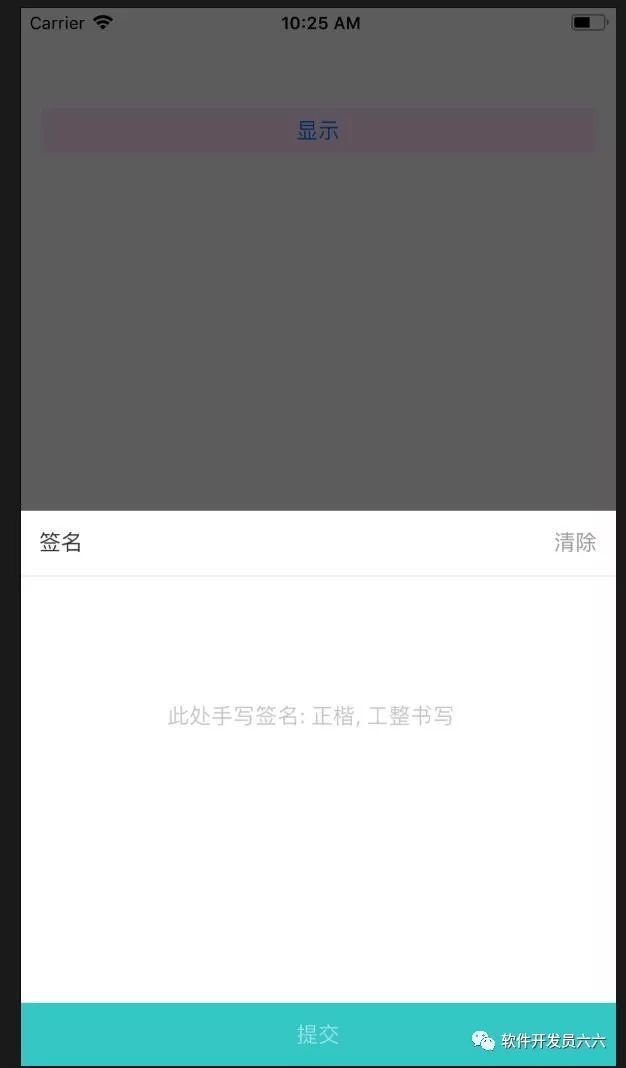
简介
现在很多项目在完善信息或者注册信息的时候,或者支付这一方面,都希望用户手写签名,这样既可以保证是用户亲自签名的,保证该记录是用用户操作的,而不是别人操作的.所以手写签字这个还是比较重要的.下面就是通过QuartzCore来绘制签名.QuartzCore是iOS的核心动画框架.
绘制
1定义一个结构体
1
2
3
4
5
6
staticCGPoint midpoint(CGPoint p0,CGPoint p1) {
return(CGPoint) {
(p0.x + p1.x) /2.0,
(p0.y + p1.y) /2.0
};
}
2添加手势
UIPanGestureRecognizer *pan = [[UIPanGestureRecognizer alloc] initWithTarget:self action:@selector(pan:)];
pan.maximumNumberOfTouches = pan.minimumNumberOfTouches =1;
[self addGestureRecognizer:pan];
3开始绘制
CGPoint currentPoint = [pan locationInView:self];
CGPoint midPoint = midpoint(previousPoint, currentPoint);
NSLog(@"获取到的触摸点的位置为--currentPoint:%@",NSStringFromCGPoint(currentPoint));
[self.currentPointArr addObject:[NSValue valueWithCGPoint:currentPoint]];
self.hasSignatureImg = YES;
CGFloat viewHeight = self.frame.size.height;
CGFloat currentY = currentPoint.y;
if(pan.state ==UIGestureRecognizerStateBegan) {
[path moveToPoint:currentPoint];
}elseif(pan.state ==UIGestureRecognizerStateChanged) {
[path addQuadCurveToPoint:midPoint controlPoint:previousPoint];
}
if(0<= currentY && currentY <= viewHeight)
{
if(max ==0&&min ==0)
{
max = currentPoint.x;
min = currentPoint.x;
}
else
{
if(max <= currentPoint.x)
{
max = currentPoint.x;
}
if(min>=currentPoint.x)
{
min = currentPoint.x;
}
}
}
previousPoint = currentPoint;
//记得调用,及时刷新视图
[self setNeedsDisplay];
4获取绘制视图,在进行一系列处理就好
if(UIGraphicsBeginImageContextWithOptions !=NULL)
{
UIGraphicsBeginImageContextWithOptions(self.bounds.size,NO, [UIScreen mainScreen].scale);
}else{
UIGraphicsBeginImageContext(self.bounds.size);
}
[self.layer renderInContext:UIGraphicsGetCurrentContext()];
UIImage *image =UIGraphicsGetImageFromCurrentImageContext();
UIGraphicsEndImageContext();
//绘制成图
image = [self imageBlackToTransparent:image];
NSLog(@"width:%f,height:%f",image.size.width,image.size.height);
//截取图片
UIImage *img = [self cutImage:image];
//压缩图片
self.SignatureImg = [self scaleToSize:img];
5附上处理的方法
1.绘制成图
- (UIImage*) imageBlackToTransparent:(UIImage*) image
{
// 分配内存
constintimageWidth = image.size.width;
constintimageHeight = image.size.height;
size_t bytesPerRow = imageWidth *4;
uint32_t* rgbImageBuf = (uint32_t*)malloc(bytesPerRow * imageHeight);
// 创建context
CGColorSpaceRef colorSpace =CGColorSpaceCreateDeviceRGB();
CGContextRef context = CGBitmapContextCreate(rgbImageBuf, imageWidth, imageHeight,8, bytesPerRow, colorSpace,
kCGBitmapByteOrder32Little | kCGImageAlphaNoneSkipLast);
CGContextDrawImage(context, CGRectMake(0,0, imageWidth, imageHeight), image.CGImage);
// 遍历像素
intpixelNum = imageWidth * imageHeight;
uint32_t* pCurPtr = rgbImageBuf;
for(inti =0; i < pixelNum; i++, pCurPtr++)
{
// if ((*pCurPtr & 0xFFFFFF00) == 0) //将黑色变成透明
if(*pCurPtr ==0xffffff)
{
uint8_t* ptr = (uint8_t*)pCurPtr;
ptr[0] =0;
}
//改成下面的代码,会将图片转成灰度
/*uint8_t* ptr = (uint8_t*)pCurPtr;
// gray = red * 0.11 + green * 0.59 + blue * 0.30
uint8_t gray = ptr[3] * 0.11 + ptr[2] * 0.59 + ptr[1] * 0.30;
ptr[3] = gray;
ptr[2] = gray;
ptr[1] = gray;*/
}
// 将内存转成image
CGDataProviderRef dataProvider = CGDataProviderCreateWithData(NULL, rgbImageBuf, bytesPerRow * imageHeight,/*ProviderReleaseData**/NULL);
CGImageRef imageRef = CGImageCreate(imageWidth, imageHeight,8,32, bytesPerRow, colorSpace,
kCGImageAlphaLast | kCGBitmapByteOrder32Little, dataProvider,
NULL,true,kCGRenderingIntentDefault);
CGDataProviderRelease(dataProvider);
UIImage* resultUIImage = [UIImage imageWithCGImage:imageRef];
// 释放
CGImageRelease(imageRef);
CGContextRelease(context);
CGColorSpaceRelease(colorSpace);
// free(rgbImageBuf) 创建dataProvider时已提供释放函数,这里不用free
returnresultUIImage;
}
2.截图图片
CGRect rect ;
//签名事件没有发生
if(min ==0&&max ==0)
{
rect =CGRectMake(0,0,0,0);
}
else//签名发生
{
rect =CGRectMake(min-3,0, max-min+6,self.frame.size.height);
}
CGImageRef imageRef =CGImageCreateWithImageInRect([image CGImage], rect);
UIImage * img = [UIImage imageWithCGImage:imageRef];
//添加水印
UIImage *lastImage = [self addText:img text:self.showMessage];
CGImageRelease(imageRef);
[self setNeedsDisplay];
3.压缩
//压缩图片,最长边为128(根据不同的比例来压缩)
- (UIImage *)scaleToSize:(UIImage *)img {
CGRect rect ;
CGFloat imageWidth = img.size.width;
//判断图片宽度
if(imageWidth >=128)
{
rect =CGRectMake(0,0,128, self.frame.size.height);
}
else
{
rect =CGRectMake(0,0, img.size.width,self.frame.size.height);
}
CGSize size = rect.size;
UIGraphicsBeginImageContext(size);
[img drawInRect:rect];
UIImage* scaledImage =UIGraphicsGetImageFromCurrentImageContext();
UIGraphicsEndImageContext();
//此处注释是为了防止该签名图片被保存到本地
// UIImageWriteToSavedPhotosAlbum(scaledImage,nil, nil, nil);
[self setNeedsDisplay];
returnscaledImage;
}
剩下的,都是一些细节问题,根据不同的项目进行不同的修改就好.
自己做的demo效果
