C++ 11 并发编程学习记录
文章目录
- 1、join,detach区别
- 2、临时变量传值
- 2.1、一般类型引用传值正确
- 2.2 类构造函数使用引用参数错误
- 2.3 隐式转换传值错误
- 3、减少一次拷贝
- 3.1 使用std::ref()函数
- 3.2 使用智能指针
- 4、lock、unlock、lock_guard的使用
1、join,detach区别
join:表示将子线程加入父线程,当子线程运行完,才运行父线程,一般情况下使用这个函数,出错的概率小
detach:表示父子线程分离,分离后子线程由守护线程管理,内存清理工作等等都是在后台进行,所以问题会很多,慎用
两个函数不能同时使用,可以使用joinable()函数来判断是否已经进行过join 或者detach了
运行下面代码看看结果
#include
#include
using namespace std;

class newClass {
private:
	int t_a;
public:
	newClass(int a) :t_a(a) {
		cout << "构造函数" << endl;
	}
	newClass(const newClass &tmp) :t_a(tmp.t_a) {
		cout << "拷贝构造函数" << endl;
	}
	~newClass() {
		cout << "析构函数" << endl;
	}
	void operator ()() {
		cout << "test 1: " << t_a << endl;
		cout << "test 2: " << t_a << endl;
		cout << "test 3: " << t_a << endl;
		cout << "test 4: " << t_a << endl;
		cout << "test 5: " << t_a << endl;
	}
};

int main()
{
	int c = 23;
	newClass t(c);
	thread myobj(t);
	if (myobj.joinable()) {
		cout << "thread joinable true" << endl;
		//myobj.detach();
		myobj.join();
	}
	cout << "main thread 1" << endl;
	cout << "main thread 2" << endl;
	cout << "main thread 3" << endl;
	cout << "main thread 4" << endl;

	return 0;
}
下图表示join函数的运行结果,需要子线程运行完后才运行父线程,顺序跟代码的顺序固定

下图表示detach函数运行的结果,很混乱

2、临时变量传值
2.1、一般类型引用传值正确
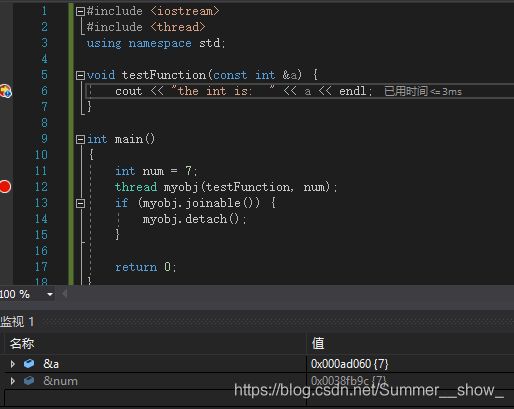
//这个是正确的,我们可以调试看到a  num是不同的地址的,可见,thread类会将数据进行拷贝一次
#include
#include
using namespace std;

void testFunction(const int &a) {
	cout << "the int is:  " << a << endl;
}

int main()
{
	int num = 7;
	thread myobj(testFunction, num);
	if (myobj.joinable()) {
		myobj.detach();
	}
	return 0;
}
2.2 类构造函数使用引用参数错误
/*
下面代码使用detach
子线程使用的是主线程的局部变量的引用,所以有可能提前析构了这个局部变量,导致子线程无法使用对应的对象
可能会出现如下截图的结果
*/
#include
#include
using namespace std;

class newClass {
private:
	int *t_a;
public:
	newClass(int* a) :t_a(a) {
		cout << "构造函数" << endl;
	}
	newClass(const newClass &tmp) :t_a(tmp.t_a) {
		cout << "拷贝构造函数" << endl;
	}
	~newClass() {
		cout << "析构函数" << endl;
	}
	void operator ()() {
		cout << "test 1: " << *t_a << endl;
		cout << "test 2: " << *t_a << endl;
		cout << "test 3: " << t_a << endl;
		cout << "test 4: " << t_a << endl;
		cout << "test 5: " << t_a << endl;
	}
};

int main()
{
	int c = 23;
	newClass t(&c);
	thread myobj(t);
	if (myobj.joinable()) {
		myobj.detach();
		//myobj.join();
	}
	cout << "main thread 1" << endl;
	cout << "main thread 2" << endl;
	cout << "main thread 3" << endl;
	cout << "main thread 4" << endl;

	return 0;
}

2.3 隐式转换传值错误
//下面代码中,如果将注释打开,或许可以看得到hello world 的打印结果
//因为是使用了临时变量,可能是被销毁了,这个是比较基本的C++语法
#include
#include
using namespace std;

void testFunction(const char *str) {
	cout << "the str is:  " << str << endl;
}

int main()
{

	thread myobj(testFunction,"hello world");
	if (myobj.joinable()) {
		myobj.detach();
	}
	/*cout << "main thread 1" << endl;
	cout << "main thread 2" << endl;
	cout << "main thread 3" << endl;
	cout << "main thread 4" << endl;*/

	return 0;
}
//下面代码使用string进行隐式转换同样会出现一样的问题,可以自己尝试运行一下代码,以及下面注释的代码
#include
#include
using namespace std;

void testFunction(string str) {
	cout << "the str is:  " << str.c_str() << endl;
}

int main()
{
	const char* mystr = "hello world";
	thread myobj(testFunction, mystr);
	if (myobj.joinable()) {
		myobj.detach();
	}
	/*cout << "main thread 1" << endl;
	cout << "main thread 2" << endl;
	cout << "main thread 3" << endl;
	cout << "main thread 4" << endl;*/

	return 0;
}
//解决办法:显示转换即可
thread myobj(testFunction, string("hello world"));
下面代码中的
thread myobj(testFunction, newClass(8));
newClass就是string类,数字8就是代表hello world
通过显示转换,运行代码可以看得到有两次构造,一次使用赋值构造,一次使用拷贝构造(thread对象会进行拷贝一次)


验证代码:发现构建临时变量的时候是在主线程中进行的
注意:这里传递类变量的时候,函数中使用引用来接受数据,可以减少一次构建
		否则多出来的一次构建又到子线程中去了,可能会导致某些问题
#include
#include
using namespace std;

class newClass {
public:
	int t_a;
	newClass(int a) :t_a(a) {
		cout << "构造函数  " << this << " 线程 " << this_thread::get_id() << endl;
	}
	newClass(const newClass &tmp) :t_a(tmp.t_a) {
		cout << "拷贝构造函数  " << this << " 线程 " << this_thread::get_id() << endl;
	}
	~newClass() {
		cout << "析构函数  " << endl;
	}
};

void testFunction(const newClass& tmp) {
	cout << "the str is:  " << " 线程 " << this_thread::get_id() << tmp.t_a << endl;
}

int main()
{
	cout << "主线程 " << this_thread::get_id() << endl;
	thread myobj(testFunction, newClass(8));
	if (myobj.joinable()) {
		myobj.detach();
	}

	return 0;
}
3、减少一次拷贝
一旦少了一次拷贝,很明显,此时一定要使用join函数,如果使用detach这个时候回出现主线程退出了,子线程还在工作的情况,造成内存泄漏
3.1 使用std::ref()函数
传递引用就可以少一次拷贝
#include
#include
using namespace std;

class newClass {
public:
	int t_a;
	newClass(int a) :t_a(a) {
		cout << "构造函数  " << this << " 线程 " << this_thread::get_id() << endl;
	}
	newClass(const newClass &tmp) :t_a(tmp.t_a) {
		cout << "拷贝构造函数  " << this << " 线程 " << this_thread::get_id() << endl;
	}
	~newClass() {
		cout << "析构函数  " << endl;
	}
};

void testFunction(const newClass& tmp) {
	cout << "the str is:  " << " 线程 " << this_thread::get_id() << tmp.t_a << endl;
}

int main()
{
	newClass myclass(80);
	cout << "主线程 " << this_thread::get_id() << endl;
	thread myobj(testFunction, std::ref(myclass));
	if (myobj.joinable()) {
		myobj.join();
	}

	return 0;
}
3.2 使用智能指针
#include
#include
using namespace std;

class newClass {
public:
	int t_a;
	newClass(int a) :t_a(a) {
		cout << "构造函数  " << this << " 线程 " << this_thread::get_id() << endl;
	}
	newClass(const newClass &tmp) :t_a(tmp.t_a) {
		cout << "拷贝构造函数  " << this << " 线程 " << this_thread::get_id() << endl;
	}
	~newClass() {
		cout << "析构函数  " << endl;
	}
};

void testFunction(unique_ptr tmp) {
	cout << "the str is:  " << " 线程 " << this_thread::get_id() << tmp->t_a << endl;
}

int main()
{
	unique_ptr a(new newClass(10));
	cout << "主线程 " << this_thread::get_id() << endl;
	thread myobj(testFunction, std::move(a));
	if (myobj.joinable()) {
		myobj.join();
	}

	return 0;
}
4、lock、unlock、lock_guard的使用
//模板lock_guard是在构造函数调用lock函数,在析构的时候调用unlock函数

#include
#include
#include
#include
using namespace std;

class newClass {
public:
	void ProcessOne() {
		for (int i = 0; i < 100; i++) {
			std::lock_guard t_gd(my_mutex1);
			num.push_back(i);
			cout << "One One One One" << endl;
		}
	}

	void ProcessTwo() {
		for (int i = 0; i < 100; i++) {
			my_mutex1.lock();
			if (!num.empty()) {
				num.pop_front();
			}
			cout << "Two Two Two " << endl;
			my_mutex1.unlock();
		}
	}
private:
	list num;
	mutex my_mutex1, my_mutex2;
};


int main()
{
	newClass tmp;
	thread myobj1(&newClass::ProcessOne, std::ref(tmp));
	thread myobj2(&newClass::ProcessTwo, std::ref(tmp));
	myobj1.join();
	myobj2.join();
	return 0;
}
如果是多个锁,那么需要很多个lock与unlock,需要我们很细心的去写,并且实际项目中也建议这样子写,但是还是有另外的一种方便的方式,作为备用,其中std::adopt_lock表示标记已经锁上了
#include
#include
#include
#include
using namespace std;

class newClass {
public:
	void ProcessOne() {
		for (int i = 0; i < 100; i++) {
			std::lock(my_mutex1, my_mutex2);
			std::lock_guard t_gd1(my_mutex1, std::adopt_lock);
			std::lock_guard t_gd2(my_mutex2, std::adopt_lock);
			num.push_back(i);
			cout << "One One One One" << endl;
		}
	}

	void ProcessTwo() {
		for (int i = 0; i < 100; i++) {
			std::lock(my_mutex1, my_mutex2);
			std::lock_guard t_gd1(my_mutex1, std::adopt_lock);
			std::lock_guard t_gd2(my_mutex2, std::adopt_lock);
			if (!num.empty()) {
				num.pop_front();
			}
			cout << "Two Two Two " << endl;
		}
	}
private:
	list num;
	mutex my_mutex1, my_mutex2;
};


int main()
{
	newClass tmp;
	thread myobj1(&newClass::ProcessOne, std::ref(tmp));
	thread myobj2(&newClass::ProcessTwo, std::ref(tmp));
	myobj1.join();
	myobj2.join();
	return 0;
}