03 nginx+tomcat实现动态+静态资源分离,实现日记收集
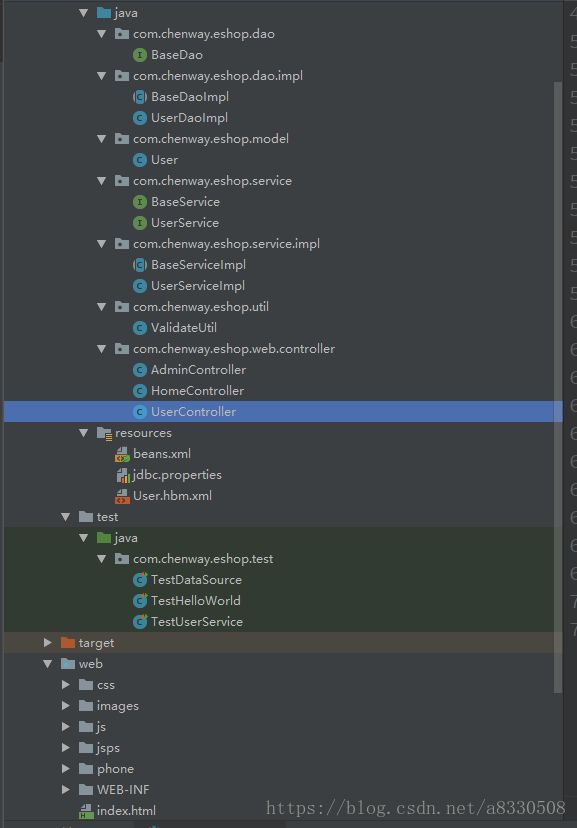
在本项目中目录结构如下:
在本项目中,实现静态和动态资源的分离,静态的文件交给nginx处理,nginx对静态文件的处理比tomcat不是只快了一点,并且nginx的使用对项目并发能力有很大的提升。以下是个人安装搭建nginx+tomcat过程:
个人环境:
window10:nginx+tomcat
虚拟机s128:nginx+tomcat
虚拟机s129:nginx+tomcat
虚拟机s130:nginx+tomcat
虚拟机s131:nginx+tomcat
其中window10上安装nginx作为反向代理服务器,将静态资源请求转发给s128-s131,讲动态资源访问转发给tomcat集群
以下是搭建集群步骤:
1.在window10上直接安装解压即刻
2.在centos上安装nginx
1)先使用sudo yum install gcc 安装G++依赖库
2)使用sudo yum install pcre-static.x86_64
或者手动通过源代码编译安装:
tar -xzvf pcre-8.32.tar.tz -C ~解压
cd ~/pcre-8.32 进入目录
sudo ./configure --prefix=/soft/pcre-8.32 配置
3)以上依赖库安装好后安装nginx:
使用sudo yum install nginx 安装 (该方法经常出错)
或者手动通过源代码编译安装(使用该项)
tar -xzvf nginx-1.6.3.tar.tz -C ~
cd ~/nginx-1.6.3
sudo ./configure --prefix=/soft/nginx-1.6.3 --without-http_gzip_module
sudo make && make install
sudo ldconfig
4).配置环境变量
[/etc/profile]
...
export PATH=$PATH:/soft/nginx-1.6.3/sbin
5).启动nginx服务器
$>cd /soft/nginx-1.6.3/sbin
$>sudo ./nginx //启动服务器
6).停止服务器
$>sudo ./nginx -s stop //停止服务器
$>sudo ./nginx -s reload //重新加载服务器
$>sudo ./nginx -s reopen //重新打开服务器
$>sudo ./nginx -s quit //退出服务器
通过浏览器访问nginx网页,出现nginx欢迎页面。
http://s128:80/ http://s129:80/ http://s130:80/ http://s131:80/
接下来搭建tomcat服务器,很简单,只需将window10上安装好的tomcat整个文件夹复制粘贴过去就行。
配置window10上的nginx反向代理服务器:
加粗字体为需要更改的地方,自己根据自己情况设置:
在[nginx/conf/nginx.conf]:
#user nobody;
worker_processes 1;
#error_log logs/error.log;
#error_log logs/error.log notice;
#error_log logs/error.log info;
#pid logs/nginx.pid;
events {
worker_connections 1024;
}
http {
include mime.types;
default_type application/octet-stream;
#log_format main '$remote_addr - $remote_user [$time_local] "$request" '
# '$status $body_bytes_sent "$http_referer" '
# '"$http_user_agent" "$http_x_forwarded_for"';
#access_log logs/access.log main;
sendfile on;
#tcp_nopush on;
#keepalive_timeout 0;
keepalive_timeout 65;
#gzip on;
upstream nginx_servers{
server 192.168.231.201:80 max_fails=2 fail_timeout=2 weight=1;
server 192.168.231.202:80 max_fails=2 fail_timeout=2 weight=4;
server 192.168.231.203:80 max_fails=2 fail_timeout=2 weight=4;
server 192.168.231.204:80 max_fails=2 fail_timeout=2 weight=4;
}
upstream tomcat_servers{
server 192.168.231.201:9090 weight=1;
server 192.168.231.202:9090 weight=4;
server 192.168.231.203:9090 weight=4;
server 192.168.231.204:9090 weight=4;
}
server {
listen 80;
server_name localhost;
access_log off ;
location ~* \.(png|html|js|css)$ {
proxy_pass http://nginx_servers;
}
location / {
proxy_pass http://tomcat_servers;
}
}
}
另外在s128-s131中的nginx的servername需要修改成具体的ip:
[nginx/conf/nginx.conf]
http{
...
log_format main '$remote_addr,$remote_user,$time_local,$request,'
'$status,$body_bytes_sent,$http_referer,'
'$http_user_agent,$http_x_forwarded_for';
access_log logs/access.log main;
server{
...
server-name 192.168.231.201;
...
}
}
通过浏览器访问s128:80,查看日志生成的数据
部署war到mysql集群:
1.需要将项目导成war包之前需要在pom.xml文件中引入插件:
2.
3.将项目导成war包,分发到s12 - s131四台主机的/soft/tomcat/webapps/eshop.war位置
4..启动tomcat服务器
$>xcall.sh "/soft/tomcat/bin/startup.sh"
5.访问web程序
部署静态资源到nginx集群
1.复制web目录到eshop目录
2.删除jsps和WEB-INF子目录,只留js+css|images|phone
3.分发eshop文件夹到所有nginx/html/下
$>cd /soft/nginx/html
$>xsync.sh eshop //不要加/
4.通过浏览器查看
[win10]
http://localhost:80/eshop/phone/iphone7.html
5.查看nginx集群上的log信息实现日记收集

