springboot +springsecurity+redis 实现登录验证 session 共享
我们知道 springsecurity 是spring 家族中一个安全登录框架 简介的话 大家可以去百度搜索一下 我这就不一一介绍了 主要是懒
废话不多说 直接上代码 需要的pom 文件 我这里用的是redis +mybatis plus +mysql +springboot +springsecurity+spring-seesion
    4.0.0

        org.springframework.boot
        spring-boot-starter-parent
        2.2.0.RELEASE


    com.example
    demo
    0.0.1-SNAPSHOT
    demo
    Demo project for Spring Boot


        1.8


            org.springframework.boot
            spring-boot-starter-web


            commons-lang
            commons-lang
            2.4


            commons-beanutils
            commons-beanutils
            1.9.3


            com.alibaba
            fastjson
            1.2.39


            mysql
            mysql-connector-java
            runtime


            com.baomidou
            mybatisplus-spring-boot-starter
            1.0.5


            com.baomidou
            mybatis-plus
            2.3.3


            org.springframework.boot
            spring-boot-starter-security


            org.springframework.boot
            spring-boot-starter-data-redis


            org.springframework.session
            spring-session-data-redis
            2.0.4.RELEASE


            org.projectlombok
            lombok
            true


            commons-httpclient
            commons-httpclient
            3.1
            system
            ${project.basedir}/src/main/resources/libs/commons-httpclient-3.1.jar


            commons-codec
            commons-codec
            3.1
            system
            ${project.basedir}/src/main/resources/libs/commons-codec-1.12.jar


            test

                test


            stage

                stage


            dev

                true


                dev


                org.springframework.boot
                spring-boot-maven-plugin

                    true


                src/main/resources
                true

                    application.propertits
                    application-${profileActive}.propertits


                src/main/resources
                true

                    application.propertits
                    application-${profileActive}.propertits
                    *.xml
1创建一个springboot项目 引入上述pom 文件

我在这里是根据不同的环境 用不同 的配置文件 来
配置文件
#spring.profiles.active=dev
server.port=9998

spring.datasource.url = jdbc:mysql://127.0.0.1/test?serverTimezone=UTC&useSSL=false&allowPublicKeyRetrieval=true
serverTimezone=UTC&useSSL=false&allowPublicKeyRetrieval=true
spring.datasource.username =root
spring.datasource.password =root
spring.datasource.driverClassName = com.mysql.cj.jdbc.Driver


# MyBatis-plus 配置
mybatis-plus.mapper-locations=classpath:/mybatis/*Mapper.xml
mybatis-plus.global-config.id-type=2
mybatis-plus.global-config.field-strategy=2
mybatis-plus.global-config.db-column-underline=true
mybatis-plus.global-config.refresh-mapper=true
mybatis-plus.global-config.logic-delete-value=0
mybatis-plus.global-config.logic-not-delete-value=1
mybatis-plus.configuration.map-underscore-to-camel-case=true
mybatis-plus.configuration.cache-enabled=false

spring.redis.host=127.0.0.1
spring.redis.port=6379
spring.redis.database=1
#spring.redis.password=
spring.redis.poolMaxTotal=50
## 连接池中的最大空闲连接
spring.redis.poolMaxIdle=25
## 连接池最大阻塞等待时间(使用负值表示没有限制)
spring.redis.poolMaxWait=-1
我们需要在application 启动处加入这个注解 这个注解的主要作用就是讲sessio 存到redis 中 从而实现seeion 共享 注解里面的参数 是值 60秒后失效 也就是说你需要重新登录 一般都设置1800 秒 就是30分钟 这里我是用来做测试的
下面是springsecurity 相关代码 首先 创建一个
WebSecurityConfig 文件@Configuration
public class WebSecurityConfig extends WebSecurityConfigurerAdapter{
@Bean
public SessionRegistry getSessionRegistry(){
SessionRegistry sessionRegistry=new SessionRegistryImpl();
return sessionRegistry;
}
@Autowired
private CustomAccessDeineHandler customAccessDeineHandler;
@Autowired
private CustomAuthenticationEntryPoint customAuthenticationEntryPoint;
@Autowired
private FailureHandler failureHandler;
@Autowired
private SuccessHandler successHandler;
@Override
protected void configure(AuthenticationManagerBuilder auth) throws Exception {
super.configure(auth);
}
@Override
protected void configure(HttpSecurity http) throws Exception {
//String[] passUrls = {"/login.html"};
/*String[] sendUrls = new String[aProperty.getSignVerifyPath().size()];
aProperty.getSignVerifyPath().toArray(sendUrls);*/
//关闭跨站检测
http.csrf().disable()
.authorizeRequests()
//配置免登url
//.antMatchers(passUrls).permitAll()
//其余拦截
.anyRequest().authenticated()
.and().formLogin()
//指定登录页的路径
.loginPage("/login.html")
//指定自定义form表单请求的路径
.loginProcessingUrl("/test/form")
//成功进入一个handler 失败进入一个handler 可以自己定义 只需要 实现相关接口
.successHandler(successHandler).failureHandler(failureHandler).permitAll();
//未登录
http.exceptionHandling().authenticationEntryPoint(customAuthenticationEntryPoint);
//无权访问
http.exceptionHandling().accessDeniedHandler(customAccessDeineHandler);
//登出清除session
http.logout().logoutUrl("/logout").invalidateHttpSession(true);
http.sessionManagement().invalidSessionStrategy(new InvalidSessionStrategy() {
@Override
public void onInvalidSessionDetected(HttpServletRequest httpServletRequest, HttpServletResponse httpServletResponse) throws IOException {
httpServletResponse.setContentType("application/json;charset=utf-8");
PrintWriter out = httpServletResponse.getWriter();
out.write(JSONObject.toJSONString("身份失效了"));
out.flush();
out.close();
}
}).maximumSessions(1); //这个地方可以设置一个账号每次能几个人登录同时登录 将maximumSessions 去掉那就是没限制 这个方我默认的是一个账号每次都一个人登录
}
@Override
public void configure(WebSecurity web) {
//这个免拦截 能免 所有Security 中的拦截器 antMatchers(passUrls).permitAll() 这个免拦截 只是免当前拦截器
web.ignoring().antMatchers("/login.html");
}
}失败进入的FailureHandler
@Component
public class FailureHandler implements AuthenticationFailureHandler {
    @Override
    public void onAuthenticationFailure(HttpServletRequest httpServletRequest, HttpServletResponse httpServletResponse, AuthenticationException e) throws IOException, ServletException {
        httpServletResponse.setContentType("text/javascript;charset=utf-8");
        PrintWriter out = httpServletResponse.getWriter();
        out.write("登录失败");
        out.flush();
        out.close();
    }
}
成功进入的handle
@Component
public class SuccessHandler  implements AuthenticationSuccessHandler {
    @Override
    public void onAuthenticationSuccess(HttpServletRequest httpServletRequest, HttpServletResponse httpServletResponse, Authentication authentication) throws IOException, ServletException {
        httpServletResponse.setContentType("text/javascript;charset=utf-8");
        PrintWriter out = httpServletResponse.getWriter();
        //这个地方我们可以加入每次登录菜单 的权限给前端返回过去
        out.write("登录成功");
        out.flush();
        out.close();
    }
最后一步 这个方法
认证是由 AuthenticationManager 来管理的,但是真正进行认证的是 AuthenticationManager 中定义的 AuthenticationProvider。AuthenticationManager 中可以定义有多个 AuthenticationProvider。当我们使用 authentication-provider 元素来定义一个 AuthenticationProvider 时,如果没有指定对应关联的 AuthenticationProvider 对象,Spring Security 默认会使用 DaoAuthenticationProvider。DaoAuthenticationProvider 在进行认证的时候需要一个 UserDetailsService 来获取用户的信息 UserDetails,其中包括用户名、密码和所拥有的权限等。所以如果我们需要改变认证的方式,我们可以实现自己的 AuthenticationProvider;如果需要改变认证的用户信息来源,我们可以实现 UserDetailsService。
我们可以重写这个方法
@Configuration
public class Provider implements AuthenticationProvider {

    @Override
    public Authentication authenticate(Authentication authentication) throws AuthenticationException {
        UsernamePasswordAuthenticationToken token = (UsernamePasswordAuthenticationToken) authentication;
        HttpServletRequest httpServletRequest = ((ServletRequestAttributes) RequestContextHolder.getRequestAttributes()).getRequest();
        System.out.println(token.getName()--能获取到登录的账号);
        System.out.println(token.getName());
        System.out.println(token.getCredentials().toString()--能获取到登录的密码);
        System.out.println(token.getCredentials().toString());
/*
        UserDetails userDetails = userDetailsService.loadUserByUsername(token.getName());
*/
        Collection authorities = new ArrayList();
        User userDetails = new User("admin", "123", authorities);//这个地方我们可以连接数据库用来对密码进行验证
        if (userDetails == null) {
            throw new UsernameNotFoundException("找不到该用户");
        }
        /*if(!userDetails.getPassword().equals(token.getCredentials().toString()))
        {*/
         if(!userDetails.getPassword().equals(token.getCredentials().toString())){
            throw new BadCredentialsException("密码错误");
         }
        return new UsernamePasswordAuthenticationToken(userDetails,userDetails.getPassword(),userDetails.getAuthorities());
    }

    @Override
    public boolean supports(Class authentication) {
        return  UsernamePasswordAuthenticationToken.class.equals(authentication);
    }
}
UsernamePasswordAuthenticationToken继承AbstractAuthenticationToken实现Authentication
所以当在页面中输入用户名和密码之后首先会进入到UsernamePasswordAuthenticationToken验证(Authentication),
然后生成的Authentication会被交由AuthenticationManager来进行管理
而AuthenticationManager管理一系列的AuthenticationProvider,
而每一个Provider都会通UserDetailsService和UserDetail来返回一个
以UsernamePasswordAuthenticationToken实现的带用户名和密码以及权限的Authentication
这个时候我们就可以看效果了
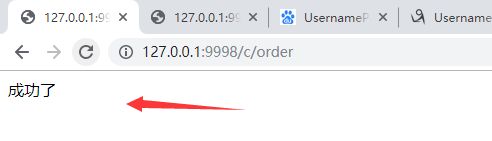
在不登陆之前我们直接访问接口

除了上诉配置那个免拦截的 地址 剩下的 任何一个地址都需要登录后才能进行访问
这个适合我们打开登录地址

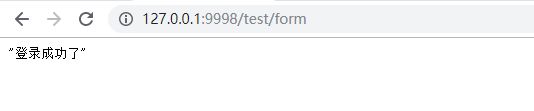
这个时候我们看登录成功了
再次访问刚才那个接口
然后我们查看reids 中的数据
我们现redis 中已经有session 了 这个时候就代表成功了 然后我们把redis 给清除掉

再次访问

上诉中我不是设置了一个账号只能一个用户登录这个时候我们同样的账号在seeion 没有过期之前换个浏览器登录 然后在刷新原先账号登录的地方 会提示一下错误

意思翻译一下
![]()
文字描述
参考博客 https://blog.csdn.net/lifeifei2010/article/details/78787558
https://www.cnblogs.com/softidea/p/6716807.html
https://blog.csdn.net/u014572215/article/details/80309161
如有侵权 请联系作者删除。++++++++++++