SpringCloud技术指南系列(十)配置管理之自建配置中心(spring-cloud-config-server的使用)
一、概述
Spring Boot应用的配置文件有多种:
- 我们可以将配置内容写入application.yml
- 设置多个profile,也可以用多个application-{profile}.properties文件配置
- 命令行参数
- 自定义配置文件
- 配置中心
详细可以查看《SpringBoot入门建站全系列(二十三)配置文件优先级及常用配置方式》.
以上,除了配置中心,其他方式都不能动态去改变配置,并且生效,只有配置中心可以动态修改配置并生效。当然,并不是所有配置都能生效的,Spring加载后不再变化的配置,是不可能动态改变的,比如启动参数、zuul/gateway代理转发配置.
《SpringCloud技术指南系列(八)配置管理之Consul配置中心》,讲述了如何使用consul做配置中心对配置进行管理。
《SpringCloud技术指南系列(九)配置管理之Zookeeper配置中心》,讲述了如何使用zookeeper做配置中心。
本篇讲述如何自建配置中心,以GitHub为配置管理中心,使用spring-cloud-config-server建立配置中心。
代码可以在SpringBoot组件化构建https://www.pomit.cn/java/spring/springcloud.html中的IConfigServer和IconfigClient组件中查看,并下载。
首发地址:
品茗IT-同步发布
如果大家正在寻找一个java的学习环境,或者在开发中遇到困难,可以
target="_blank">
加入我们的java学习圈,点击即可加入
,共同学习,节约学习时间,减少很多在学习中遇到的难题。
二、建立配置中心
因为配置管理在git上,首先要选择你的git,我选择的是github.
2.1 引入依赖
需要引入spring-boot-starter-web和spring-cloud-config-server.
依赖如下:
    4.0.0

        cn.pomit
        springcloudwork
        0.0.1-SNAPSHOT

    IConfigServer
    IConfigServer
    http://maven.apache.org


        UTF-8
        UTF-8
        1.8
        2.6


            org.springframework.boot
            spring-boot-starter-web


            org.springframework.cloud
            spring-cloud-config-server
父模块pom文件可以在https://www.pomit.cn/spring/SpringCloudWork/pom.xml获取。
2.2 配置文件
这里使用yaml文件写配置,配置文件application.yml:
application.yml:
server:
   port: 8888
spring:
   application:
      name: ConfigServer
   cloud:
      config:
         server:
            git:
               # 配置git仓库地址
               uri: https://github.com/ffch/ConfigServerTest.git
               # 访问git仓库的用户名
               username: ffch
               # 访问git仓库的用户密码 如果Git仓库为公开仓库,可以不填写用户名和密码,如果是私有仓库需要填写
               password:
               #支持带{application}和{profile}({label}如果需要)占位符的搜索路径
               search-paths: '{application}'
         # 配置仓库的分支,可不配
         label: master
这里,表示配置中心建立在8888端口,名字是ConfigServer。
另外,需要配置git地址、用户名、密码;
spring.cloud.config.label 指定分支。默认是master;
spring.cloud.config.server.search-paths是寻找配置文件的路径,{application}表示uri下的对应的应用名称(客户端)下找配置文件。{profile}表示uri下的对应的环境(客户端)下找配置文件。
2.3 启动
使用main直接启动即可。
ConfigServerApplication:
package cn.pomit.springbootwork.config.server;

import org.springframework.boot.SpringApplication;
import org.springframework.boot.autoconfigure.SpringBootApplication;
import org.springframework.cloud.config.server.EnableConfigServer;

@EnableConfigServer
@SpringBootApplication
public class ConfigServerApplication {
    public static void main(String[] args) {
        SpringApplication.run(ConfigServerApplication.class, args);
    }
}
2.4 映射查询
配置中心将github上的配置文件以下面这些格式也映射。
如,映射{application}-{profile}.properties文件:
/{application}/{profile}/[{label}]
/{label}/{application}-{profile}.properties
/{application}-{profile}.properties
/{label}/{application}-{profile}.yml
/{application}-{profile}.yml
如:访问http://127.0.0.1:8888/ConfigClient/dev,返回
{"name":"ConfigClient","profiles":["dev"],"label":null,"version":"8d6f304f47055752be51e35ec74aceb40ea0c26d","state":null,"propertySources":[{"name":"https://github.com/ffch/ConfigServerTest.git/ConfigClient/ConfigClient-dev.properties","source":{"git.value":"456asdasdada"}}]}
它查找的是配置的github地址下的ConfigClient目录下的ConfigClient-dev.properties文件(我的配置)。
三、客户端使用配置中心
3.1 引入依赖
需要引入spring-boot-starter-web和spring-cloud-starter-config.
spring-cloud-config-server是不会自动刷新配置的,自动刷新需要配置git的webhook,感觉略麻烦,但是我们可以手动刷新,手动刷新需要使用spring-boot-starter-actuator
依赖如下:
    4.0.0

        cn.pomit
        springcloudwork
        0.0.1-SNAPSHOT

    IConfigClient
    IConfigClient
    http://maven.apache.org


        UTF-8
        UTF-8
        1.8
        2.6


            org.springframework.boot
            spring-boot-starter-web


            org.springframework.cloud
            spring-cloud-starter-config


            org.springframework.boot
            spring-boot-starter-actuator
父模块pom文件可以在https://www.pomit.cn/spring/SpringCloudWork/pom.xml获取。
3.2 配置文件
这里使用yaml文件写配置,配置文件分为两个,bootstrap.yml和application.yml:
bootstrap.yml的优先级高于application.yml。
配置中心的相关配置必须放在bootstrap.yml中,否则无效。
bootstrap.yml:
server:
   port: 8814
spring:
   application:
      name: ConfigClient
   profiles:
      active: loc
   cloud:
      config:
         uri: http://localhost:8888 # 对应config-server地址,默认值http://localhost:8888
         profile: dev # 对应ConfigServer获取的配置文件的{profile}
         label: master # 对应ConfigServer获取的配置文件的{label},即Git仓库分支支
#手动刷新配使用
management:
  endpoints:
    web:
      exposure:
        #加载所有的端点,默认只加载了info、health
        include: '*'
这里面,包含了端口、应用名、配置中心信息。
spring.application.name是标识了应用名。
spring.profiles.active 是激活的环境,这个指的是你本地的环境相关的配置文件。
spring.cloud.config.uri是配置中心的地址,默认是http://localhost:8888。
spring.cloud.config.profile配置中心对应的环境,可以和spring.profiles.active相同,也可以不同,从配置中心拿配置以该属性为准。
spring.cloud.config.label是git仓库分支,默认master
application.yml:
application.yml中仍可以配置一些常用配置,我这里啥都没写。
application-loc.yml:
env: loc

loc:
   value: hasadasdasdasdad
application-loc.yml中我配置了一个loc.value的值。
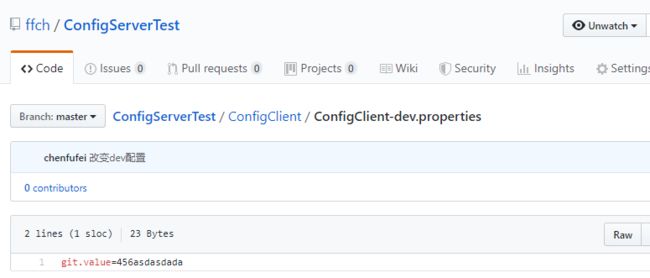
远程配置文件:
如下图所示,我在GitHub上只配置了git.value一个属性:
3.3 启动
ConfigClientApplication :
package cn.pomit.springbootwork.config.client;

import org.springframework.boot.SpringApplication;
import org.springframework.boot.autoconfigure.SpringBootApplication;

@SpringBootApplication
public class ConfigClientApplication {
    public static void main(String[] args) {
        SpringApplication.run(ConfigClientApplication.class, args);
    }
}
3.4 属性注入
直接使用@Value属性注入即可。如果要手动刷新,记得加上@RefreshScope注解。
ConfigInfoService :
package cn.pomit.springbootwork.config.client.service;

import org.springframework.beans.factory.annotation.Value;
import org.springframework.cloud.context.config.annotation.RefreshScope;
import org.springframework.stereotype.Service;

@RefreshScope
@Service
public class ConfigInfoService {
    @Value("${git.value}")
    private String gitValue;
    @Value("${loc.value}")
    private String locValue;

    public String locValue() {
        System.out.println(locValue);
        return locValue;
    }

    public String gitValue() {
        System.out.println(gitValue);
        return gitValue;
    }

}
3.5 测试web
ConsulConfigRest:
package cn.pomit.springbootwork.config.client.web;

import org.springframework.beans.factory.annotation.Autowired;
import org.springframework.web.bind.annotation.RequestMapping;
import org.springframework.web.bind.annotation.RequestMethod;
import org.springframework.web.bind.annotation.RestController;

import cn.pomit.springbootwork.config.client.model.ResultModel;
import cn.pomit.springbootwork.config.client.service.ConfigInfoService;

@RestController
@RequestMapping("/configTest")
public class ConsulConfigRest {
    @Autowired
    ConfigInfoService configInfoService;

    @RequestMapping(value = "/locValue", method = { RequestMethod.GET })
    public ResultModel locValue() {
        return ResultModel.ok(configInfoService.locValue());
    }

    @RequestMapping(value = "/gitValue", method = { RequestMethod.GET })
    public ResultModel gitValue() {
        return ResultModel.ok(configInfoService.gitValue());
    }
}
3.6 注意事项
客户端读取远程配置依赖的配置是spring.cloud.profile,而不是spring.profiles.active;
本地配置仍是按照spring.profiles.active读取;
config-server地址不写或yml格式写错,默认都是http://localhost:8888
不会自动刷新,使用spring-boot-starter-actuator并配置后,可以手动刷新。http://127.0.0.1:8814/actuator/refresh (不同的actuator版本略有不同)
3.7 使用到的实体
ResultModel:
详细完整的实体,可以访问品茗IT-博客《SpringCloud技术指南系列(十)配置管理之自建配置中心(spring-cloud-config-server的使用)》进行查看
品茗IT-博客专题:https://www.pomit.cn/lecture.html汇总了Spring专题、Springboot专题、SpringCloud专题、web基础配置专题。
快速构建项目
Spring项目快速开发工具:
一键快速构建Spring项目工具
一键快速构建SpringBoot项目工具
一键快速构建SpringCloud项目工具
一站式Springboot项目生成
Mysql一键生成Mybatis注解Mapper
Spring组件化构建
SpringBoot组件化构建
SpringCloud服务化构建
喜欢这篇文章么,喜欢就加入我们一起讨论SpringBoot使用吧!

