AliOS Things 笔记
[TOC]
1技术架构总览
1.1架构概述
从底部到顶部,AliOS Things包括:
- 板级支持包(BSP):主要由SoC供应商开发和维护
- 硬件抽象层(HAL):比如WiFi和UART
- 内核:包括Rhino实时操作系统内核、Yloop, VFS, KV 存储
- 协议栈:包括TCP/IP协议栈(LwIP),uMesh网络协议栈
- 安全:安全传输层协议(TLS),可信服务框架(TFS)、可信运行环境(TEE)
- AOS API:提供可供应用软件和中间件使用的API
- 中间件:包括常见的物联网组件和阿里巴巴增值服务中间件
- 示例应用:阿里自主开发的示例代码,以及通过了完备测试的应用程序(比如Alinkapp)
所有的模组都已经被组织成组件,且每个组件都有自己的.mk文件,用于描述它和其它组件间的依赖关系,方便应用开发者按需选用。
结构框图

文件夹结构
| 文件夹名称 | 内容描述 |
|---|---|
| board | 评估板(如STM32L496G-Discovery) |
| build | 编译框架 |
| device | 连接MCU/SoC的外设,比如支持使用AT命令的WiFi系列模组 |
| example | 代码示例,通过了完备测试的应用程序(比如Alink) |
| framework | IoT 通用组件 |
| include | 系统头文件 |
| kernel | 包括Rhino和协议栈 |
| platform | 芯片架构支持的相关文件 |
| security | 包括TLS,TFS, TEE在内的安全组件 |
| tools | 命令行界面(CLI)和用于建立远程设备中心的testbed工具 |
| utility | IoT通用软件库,比如 cJSON |
| test | UT测试用例 |
2快速开始
2.1配置环境
在一台 Ubuntu 14.04 LTS 64-bit PC 上
sudo apt-get install -y python
sudo apt-get install -y gcc-multilib
sudo apt-get install -y libssl-dev libssl-dev:i386
sudo apt-get install -y libncurses5-dev libncurses5-dev:i386
sudo apt-get install -y libreadline-dev libreadline-dev:i386
sudo apt-get install -y python-pip
sudo apt-get install -y minicom
2.2安装 aos-cube
首先, 用 python 包管理器 pip 来安装 aos-cube 和相关的依赖包在全局环境,以便于后续使用 AliOS Things Studio 进行开发。
$ pip install setuptools
$ pip install wheel
$ pip install aos-cube
请确认pip环境是基于 Python 2.7 的。如果遇到权限问题,可能需要 sudo 来执行。
如果在线安装aos-cube失败,可以下载源码安装,方法如下:
- 先下载你要安装的包,并解压(aos-cube-0.2.46.tar.gz)
$ cd aos-cube-0.2.46$ python setup.py build$ python setup.py install
2.3下载代码并编译运行
git clone https://github.com/alibaba/AliOS-Things.git
cd AliOS-Things
aos make helloworld@linuxhost
./out/helloworld@linuxhost/binary/[email protected]
2.4效果
可以看见 app_delayed_action 在1秒时启动,每5秒触发一次。
 [   0.000] AOS [application_start#15] : application started.
 [   1.000] AOS [app_delayed_action#9] : helloworld app_delayed_action:9 app_task
 [   6.000] AOS [app_delayed_action#9] : helloworld app_delayed_action:9 app_task
 [  11.000] AOS [app_delayed_action#9] : helloworld app_delayed_action:9 app_task
 [  16.000] AOS [app_delayed_action#9] : helloworld app_delayed_action:9 app_task
 [  21.000] AOS [app_delayed_action#9] : helloworld app_delayed_action:9 app_task
3 编译过程
3.1 aos
2.2小结安装了aos-cube,aos-cube封装了一系列 AliOS Things使用的 Python包。
官方注解如下:
aos command line tool for repositories version control, publishing and updating code from remotely hosted repositories, and invoking aos own build system and export functions, among other operations
aos 用法如下:
[naiquanhu@naiquanhu-VirtualBox AliOS-Things]$ aos --help
usage: aos [-h] [--version]             ...

Code management tool for aos - https://code.aliyun.com/aos/aos
version 0.2.46

Use 'aos  -h|--help' for detailed help.
Online manual and guide available at https://code.aliyun.com/aos/aos-cube

optional arguments:
  -h, --help   show this help message and exit
  --version    print version number and exit

Commands:

    new        Create new aos program or component
    ls         List cube info, default components info
    import     Import program from URL
    add        Add component from AOS_SDK_PATH or URL
    rm         Remove component
    deploy     Find and add missing components and source codes
    codes      Import the optional component from the remote repository
    publish    Publish program or component
    update     Update to branch, tag, revision or latest
    sync       Synchronize aos component references
    status     Show version control status

    make       Make aos program/component
    scons      Make aos program/component by scons
    makelib    Compile static library

    config     Tool configuration

    upload     Upload aos image
    monitor    Serial port monitor

    devices    List devices on serial ports

    upgrade    Upgrade aos-cube to latest
    help       This help screen
看一下aos程序内容:
which aos
/usr/local/bin/aos
vi /usr/local/bin/aos
#!/usr/bin/python
# EASY-INSTALL-ENTRY-SCRIPT: 'aos-cube==0.2.46','console_scripts','aos'
__requires__ = 'aos-cube==0.2.46'
import sys
from pkg_resources import load_entry_point

if __name__ == '__main__':
    sys.exit(
        load_entry_point('aos-cube==0.2.46', 'console_scripts', 'aos')()
    )
/usr/local/bin/aos会调用aos-cube-0.2.46/aos/aos.py
3.2 aos调用make过程
aos make helloworld@linuxhost
该命令会首先进入aos/aos.py中的main()
def _run_make(arg_list):
    #install dependent toolchains
    _install_toolchains(sys.argv[2:])

    # check operating system
    host_os = get_host_os()
    if host_os == None:
        error('Unsupported Operating System!')

    #cd to aos root_dir
    ret, original_dir = cd_aos_root()
    if ret != 'success':
        error("not in AliOS-Things source code directory")

    make_cmds = {
        'Win32': 'cmd/win32/make.exe',
        'Linux64': 'cmd/linux64/make',
        'Linux32': 'cmd/linux32/make',
        'OSX': 'cmd/osx/make'
        }
    tools_dir = os.path.join(os.getcwd(), 'build').replace('\\', '/')
    make_cmd = os.path.join(tools_dir, make_cmds[host_os])

    # Run make command
    make_cmd_str = ' '.join([make_cmd, 'HOST_OS=' + host_os, 'TOOLS_ROOT=' + tools_dir] + list(arg_list))
    popen(make_cmd_str, shell=True, cwd=os.getcwd())
    if os.path.isdir(original_dir): os.chdir(original_dir)

def make_build(make_args):
    # aos new program
    if os.path.isfile(os.path.join(os.getcwd(), Cfg.file)):
        ...
        with cd(os_path):
            ...
            _run_make(['-e', '-f build/Makefile', make_args, app_dir, build_dir])
    else:
        # aos source code
        _run_make(['-e', '-f build/Makefile', make_args])

# Make command
@subcommand('make',
            help='Make aos program/component',
            description="Make aos program/component.")
def make():
    ...
    args = sys.argv[2:]
    ...
    make_args = ' '.join(args)
    for arg in args:
        if '@' in arg:
            targets = arg.split('@')
            ...
            board = targets[1]
            if board in get_scons_enabled_boards():
                scons_build(args)
            else:
                make_build(make_args)

            return
    #aos make clean go here
    make_build(make_args)

def main():
    ...
    # Parse/run command
    if len(sys.argv) <= 1:
        help_()
        sys.exit(1)
    ...
    pargs, remainder = parser.parse_known_args()
    status = 1

    try:
        ...
        status = pargs.command(pargs)
    except ProcessException as e:
    ...
    sys.exit(status or 0)


if __name__ == "__main__":
    main()
简单来说,调用关系如下:
aos make helloworld@linuxhost
    |-- make()
        |-- make_build()
            |-- _run_make(arg_list)
                |-- popen(make_cmd_str, shell=True, cwd=os.getcwd())
变量的值:
build_dir = 'BUILD_DIR=./out/'
app_dir = 'APPDIR=./'
make_args = helloworld@linuxhost
arg_list = ['-e', '-f build/Makefile', make_args, app_dir, build_dir]
make_cmd = ./build/cmd/linux64/make
make_cmd_str = make_cmd + 'HOST_OS=Linux64' + 'TOOLS_ROOT=./build' + + list(arg_list)
其中,popen是Python的标准库中的subprocess包的类,用来fork一个子进程并运行一个外部程序,进入 ./build/Makefile
3.3 make入口
build/Makefile是make的主入口,传入的参数有:
HOST_OS=Linux64
TOOLS_ROOT=./build
BUILD_DIR=./out/
APPDIR=./
make_args = helloworld@linuxhost
我们先来看看build/Makefile中的一些关键内容:
export SOURCE_ROOT ?= ./  #AliOS-Things 的根目录
export MAKEFILES_PATH := $(SOURCE_ROOT)/build   #MAKEFILES_PATH = ./build
export SCRIPTS_PATH := $(SOURCE_ROOT)/build/scripts  #SCRIPTS_PATH = ./build/scripts
MAKEFILE_TARGETS := clean

#define BUILD_STRING, AOS toolchain commands on different hosts
include $(MAKEFILES_PATH)/aos_host_cmd.mk #./build/aos_host_cmd.mk
接着看一下文件./build/aos_host_cmd.mk:
TOOLS_ROOT ?= $(SOURCE_ROOT)build #TOOLS_ROOT = ./build
COMPILER_ROOT ?=$(TOOLS_ROOT)/compiler #COMPILER_ROOT = ./build/compiler
OPENOCD_PATH      := $(TOOLS_ROOT)/OpenOCD/${HOST_OS}/ #OPENOCD_PATH = ./build/OpenOCD/Linux64/
OPENOCD_CFG_PATH  := $(MAKEFILES_PATH)/OpenOCD/${HOST_OS}/ #OPENOCD_CFG_PATH = ./build/OpenOCD/Linux64/
JTAG         ?= jlink_swd
BUILD_DIR    ?= out
...
COMMON_TOOLS_PATH := $(TOOLS_ROOT)/cmd/linux64/
#COMMON_TOOLS_PATH = ./build/cmd/linux64/
export SHELL       = $(COMMON_TOOLS_PATH)dash #SHELL = ./build/cmd/linux64/dash
OPENOCD_FULL_NAME := "$(OPENOCD_PATH)bin/openocd"
#OPENOCD_FULL_NAME = ./build/OpenOCD/Linux64/bin/openocd
ECHO              := echo
PERL              := $(shell which perl)
PYTHON            := $(shell which python)
CLEAN_COMMAND     := "$(COMMON_TOOLS_PATH)rm" -rf $(BUILD_DIR)
#CLEAN_COMMAND = "./build/cmd/linux64/rm" -rf out
MKDIR              = "$(COMMON_TOOLS_PATH)mkdir" -p $1
#MKDIR = "./build/cmd/linux64/mkdir" -p $1
RMDIR              = "$(COMMON_TOOLS_PATH)rm" -rf $1
#RMDIR = "./build/cmd/linux64/rm" -rf $1
CPDIR              = "$(COMMON_TOOLS_PATH)cp" -rf $1 $2
#CPDIR = "./build/cmd/linux64/cp" -rf $1 $2
TRUE_CMD          := true
FALSE_CMD         := false
RM      := "$(COMMON_TOOLS_PATH)rm$(EXECUTABLE_SUFFIX)" -f
#RM = "./build/cmd/linux64/rm" -f
CP      := "$(COMMON_TOOLS_PATH)cp$(EXECUTABLE_SUFFIX)" -f
#CP = "./build/cmd/linux64/cp" -f
MAKE    := "$(COMMON_TOOLS_PATH)make$(EXECUTABLE_SUFFIX)"
#MAKE = "./build/cmd/linux64/make"
BIN2C   := "$(COMMON_TOOLS_PATH)bin2c$(EXECUTABLE_SUFFIX)"
#BIN2C = "./build/cmd/linux64/bin2c"
CURRENT_TIME = $(shell $(DATE) +%Y%m%d.%H%M)
SHOULD_I_WAIT_FOR_DOWNLOAD := $(filter download, $(MAKECMDGOALS))
#因为MAKECMDGOALS = helloworld@linuxhost,所以 SHOULD_I_WAIT_FOR_DOWNLOAD = null
BUILD_STRING ?= $(strip $(filter-out $(MAKEFILE_TARGETS) download run total, $(MAKECMDGOALS)))
#BUILD_STRING = "helloworld@linuxhost"
BUILD_STRING_TO_DIR = $(subst .,/,$(1))
#BUILD_STRING_TO_DIR = null
DIR_TO_BUILD_STRING = $(subst /,.,$(1))
#DIR_TO_BUILD_STRING = null
CLEANED_BUILD_STRING := $(BUILD_STRING)
#CLEANED_BUILD_STRING = "helloworld@linuxhost"
OUTPUT_DIR   := $(BUILD_DIR)/$(CLEANED_BUILD_STRING)$(MBINS)
#OUTPUT_DIR = "out/helloworld@linuxhost"
AUTO_COMPONENT_DIR := $(OUTPUT_DIR)/auto_component
#AUTO_COMPONENT_DIR = "out/helloworld@linuxhost/auto_component"
主要设置了一些和host os相关的参数。
接着build/Makefile文件继续看,由于IDE = null,则COMPILER = null
include $(MAKEFILES_PATH)/aos_toolchain_gcc.mk
AUTO_COMPONENT = $(AUTO_COMPONENT_DIR)/auto_component.mk
#AUTO_COMPONENT = "out/helloworld@linuxhost/auto_component/auto_component.mk"
TEST_COMPONENT_COLLECTION = $(AUTO_COMPONENT_DIR)/test_collection.default
#TEST_COMPONENT_COLLECTION = "out/helloworld@linuxhost/auto_component/test_collection.default"

$(AUTO_COMPONENT): $(TEST_COMPONENT_COLLECTION)
    $(QUIET)$(PYTHON) $(MAKEFILES_PATH)/scripts/auto_component.py $(AUTO_COMPONENT_DIR)

$(TEST_COMPONENT_COLLECTION):
    $(QUIET)$(PYTHON) $(MAKEFILES_PATH)/scripts/gen_test_collection.py $(AUTO_COMPONENT_DIR) $(TEST_COMPONENT_COLLECTION)
设置完一些变量的值后,执行2条python指令:
python ./build/scripts/gen_test_collection.py ./out/helloworld@linuxhost/auto_component ./out/helloworld@linuxhost/auto_component/test_collection.default

python ./build/scripts/auto_component.py ./out/helloworld@linuxhost/auto_component
命令:
aos make helloworld@linuxhost
该命令最先调用的targe是main_app:
main_app: $(OUTPUT_DIR)/config.mk $(YOS_SDK_PRE_APP_BUILDS) $(MAKEFILES_PATH)/aos_target_build.mk
    $(if $(BINS_ERROR), $(call BINS_EXIT))
    $(if $(MBINS_ERROR), $(call MBINS_EXIT))
    $(QUIET)$(ECHO) Build AOS Now
    $(QUIET)$(ECHO) TOOLCHAIN_PATH=$(TOOLCHAIN_PATH)
    $(QUIET)$(call MKDIR, $(OUTPUT_DIR)/binary)
    $(QUIET)$(call MKDIR, $(OUTPUT_DIR)/modules)
    $(QUIET)$(call MKDIR, $(OUTPUT_DIR)/libraries)
    $(QUIET)$(call MKDIR, $(OUTPUT_DIR)/resources)
    $(QUIET)$(PYTHON) $(MAKEFILES_PATH)/scripts/gen_auto_code.py $(OUTPUT_DIR)/config.mk $(AUTO_COMPONENT_DIR)
    $(QUIET)$(MAKE) -r $(JOBSNO) $(SILENT) -f $(MAKEFILES_PATH)/aos_target_build.mk $(CLEANED_BUILD_STRING) $(PASSDOWN_TARGETS)
    $(QUIET)$(ECHO) Build complete
main_app又依赖$(OUTPUT_DIR)/config.mk,即out/helloworld@linuxhost/config.mk,所以先调用build/aos_target_config.mk生成out/helloworld@linuxhost/config.mk,完成后,主要做了两件事:
- /usr/bin/python .//build/scripts/gen_auto_code.py out/helloworld@linuxhost/config.mk out/helloworld@linuxhost/auto_component
根据out/helloworld@linuxhost/config.mk生成out/helloworld@linuxhost/auto_component下的文件。 - ./build/cmd/linux64/make -r -j4 -f .//build/aos_target_build.mk helloworld@linuxhost
进入./build/aos_target_build.mk 继续编译。
4 第一个应用Hello World
4.1 创建工程目录及源文件
$ mkdir ./example/helloworld
$ cd ./example/helloworld
创建文件helloworld.c helloworld.mk
#helloworld.mk
NAME := helloworld              ## 指定应用名称
$(NAME)_SOURCES := helloworld.c ## 指定使用的源文件
#$(NAME)_DEFINES += LOCAL_MACRO ## 定义局部符号
GLOBAL_DEFINES += AOS_NO_WIFI   ## 定义全局符号
$(NAME)_COMPONENTS := yloop cli  ## 指定依赖的组件,本例使用yloop cli组件
ifeq ($(BENCHMARKS),1)
$(NAME)_COMPONENTS  += benchmarks
GLOBAL_DEFINES      += CONFIG_CMD_BENCHMARKS
endif
helloworld.c
static void app_delayed_action(void *arg)
{
    LOG("helloworld %s:%d %s\r\n", __func__, __LINE__, aos_task_name());
    aos_post_delayed_action(5000, app_delayed_action, NULL);
}

int application_start(int argc, char *argv[])
{
    LOG("application started.");
    aos_post_delayed_action(1000, app_delayed_action, NULL);
    aos_loop_run();
    return 0;
}
编译运行参见2.3节。
5 Ubuntu下环境配置
5.1 下载安装Jlink
SEGGER官网下载最新jlink驱动,网址 https://www.segger.com/downloads/jlink
Select J-Link Software and Documentation Pack for Linux.
$ sudo dpkg -i JLink_Linux_V634_x86_64.deb
$ ls /opt/SEGGER/
JLink  JLink_V634
设置环境JLink的环境变量:
vi ~/.bashrc
export JLINK_HOME=/opt/SEGGER/JLink
export PATH=${PATH}:${JLINK_HOME}
5.2 下载安装GNU ARM Embedded Toolchain
download toolchain for Linux, URL: https://launchpad.net/gcc-arm-embedded/+download
解压后放入目录:/opt/gcc-arm-none-eabi-5_4-2016q3
设置环境Toolchain的环境变量:
vi ~/.bashrc
export ARM_TOOLCHAIN_HOME=/opt/gcc-arm-none-eabi-5_4-2016q3
export PATH=${PATH}:${ARM_TOOLCHAIN_HOME}/bin/:${JLINK_HOME}
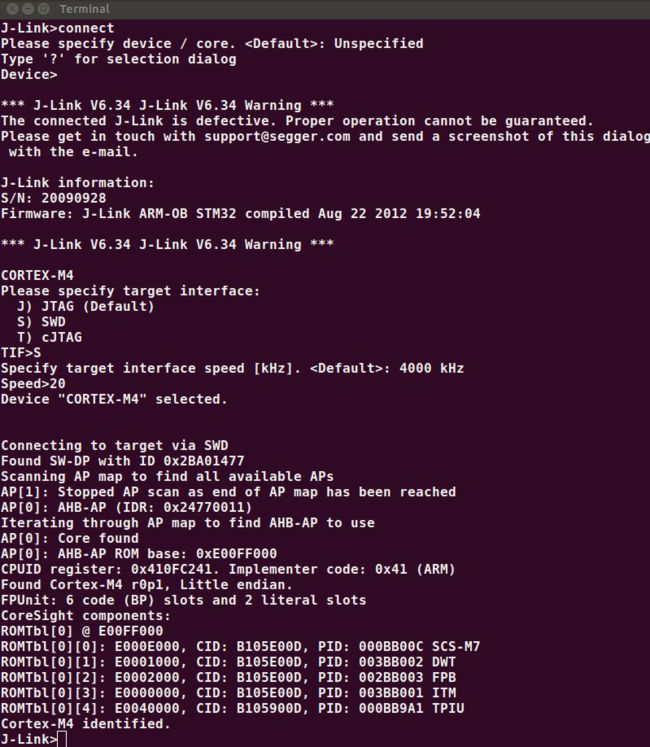
5.3 连接开发板
$ JLinkExe
J-Link>connect
Device>CORTEX-M4
TIF>S
Speed>20
5.4 下载代码
下载代码到RAM中运行:
J-Link>loadbin firmware.bin 0x1fff0000
J-Link>setpc 0x1fff01fd
J-Link>g
可以整理为脚本:
xxx.jlink
loadbin firmware.bin 0x1fff0000
setpc 0x1fff01fd
g
#q  #退出jlink
在控制台窗口中输入 JLink xxx.jlink 即可。