1. 简介
代码分离是 webpack 中最引人注目的特性之一。此特性能够把代码分离到不同的 bundle 中,然后可以按需加载或并行加载这些文件。代码分离可以用于获取更小的 bundle,以及控制资源加载优先级,如果使用合理,会极大影响加载时间。
2. 入口分离
我们看下面这种情况:
// index.js

import _ from 'lodash';
import './another-module';

console.log(
    _.join(['index', 'module', 'loaded!'], ' ')
);
const div = document.createElement('div');
div.innerText = 'first screen content';
document.getElementById('root').appendChild(div);
// another-module.js

import _ from 'lodash';
import $ from 'jquery';

console.log(
    _.join(['another', 'module', 'loaded!'], ' ')
);
$('body').click(() => {
    $('body').css('background', 'green')
});
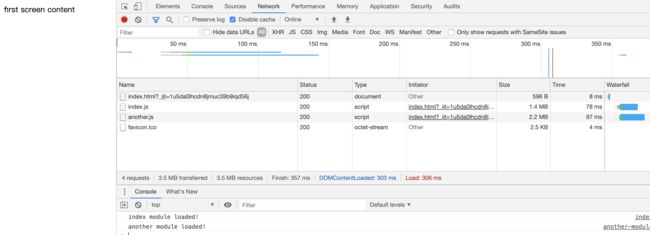
npm run dev 打包后如下:
可以看到,虽然 index 展示的时候不需要 another-module,但两者最终被打包到同一个文件输出,这样的话有两个缺点:
- index 和 another-module 逻辑混合到一起,增大了需要下载的包的体积。如果此时 index 是首屏必须的逻辑,那么由于包体增大,延迟了首屏展示时间。
- 修改 index 或者 another-module 逻辑,都会导致最终输出的文件被改变,用户需要重新下载和当前改动无关的模块内容。
解决这两个问题,最好的办法,就是将无关的 index 和 another-module 分离。如下:
    entry: {
        index: "./src/index.js",
        another: "./src/another-module.js"
    },
// index.js

// index.js

import _ from 'lodash';

console.log(
    _.join(['index', 'module', 'loaded!'], ' ')
);
const div = document.createElement('div');
div.innerText = 'first screen content';
document.getElementById('root').appendChild(div);
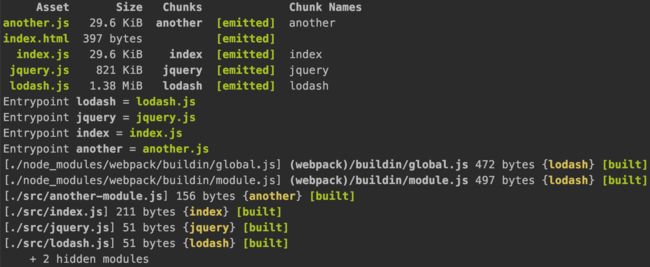
打包后如下:
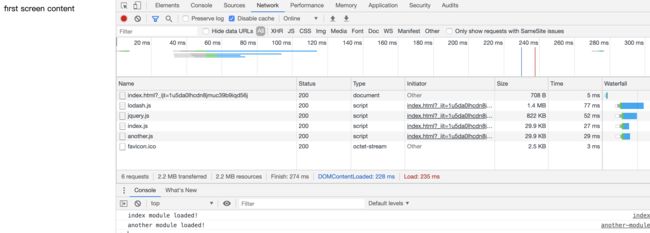
可以看到,首屏加载的资源 index 明显变小了,可是加载时间反而延长了。这是由于 another 被并行加载,而且 index 和 another 的总体大小增大了很多。仔细分析,可以发现 lodash 模块被分别打包到了 index 和 another。我们按照上面的思路,继续将三方库 lodash 和 jquery 也分离出来:
// index.js

console.log(
    _.join(['index', 'module', 'loaded!'], ' ')
);
const div = document.createElement('div');
div.innerText = 'first screen content';
document.getElementById('root').appendChild(div);
// another-module.js

console.log(
    _.join(['another', 'module', 'loaded!'], ' ')
);
$('body').click(() => {
    $('body').css('background', 'green')
});
// jquery.js

import $ from 'jquery';
window.$ = $;
// lodash.js

import _ from 'lodash';
window._ = _;
可以看到,jquery 和 lodash 被分离后,index 和 another 显著变小,而第三方模块基本上是很少改变的,也就是当某个业务模块改变时,我们只需要重新上传新的业务模块代码,用户更新的时候也只需要更新较小的业务模块代码。不过可以看到,这里仍然有两个缺点:
- 手动做代码抽取非常麻烦,我们需要自己把握分离的先后顺序,以及手动指定入口。
- 首次进入且没有缓存的时候,由于并行的资源较多,并没有减少首屏加载的时间,反而可能延长了这个时间。
下面我们来尝试解决这两个问题。
3. 代码自动抽取
SplitChunksPlugin插件可以将公共的依赖模块提取到已有的入口 chunk 中,或者提取到一个新生成的 chunk。
3.1 代码自动抽取
让我们使用这个插件,将之前的示例中重复的 lodash 模块 和 jquery 模块抽取出来。(ps: 这里 webpack4 已经移除了 CommonsChunkPlugin 插件,改为 SplitChunksPlugin 插件了)。
// index.js
import _ from 'lodash';

console.log(
    _.join(['index', 'module', 'loaded!'], ' ')
);
const div = document.createElement('div');
div.innerText = 'first screen content';
document.getElementById('root').appendChild(div);
// another-module.js
import _ from 'lodash';
import $ from 'jquery';

console.log(
    _.join(['another', 'module', 'loaded!'], ' ')
);
$('body').click(() => {
    $('body').css('background', 'green')
});
    optimization: {
        splitChunks: {
            chunks: 'all'
        }
    }
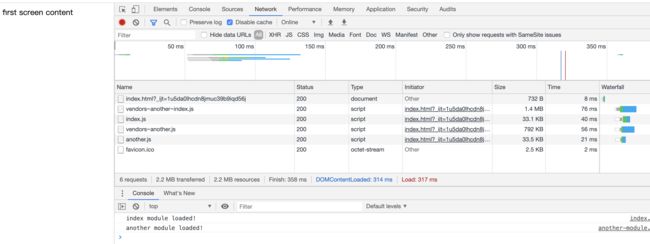
可以看到,两个公共模块各自被自动抽取到了新生成的 chunk 中。
3.2 SplitChunksPlugin 配置参数详解
SplitChunksPlugin 默认配置如下:
module.exports = {
  //...
  optimization: {
    splitChunks: {
      chunks: 'async',
      minSize: 30000,
      minRemainingSize: 0,
      maxSize: 0,
      minChunks: 1,
      maxAsyncRequests: 6,
      maxInitialRequests: 4,
      automaticNameDelimiter: '~',
      automaticNameMaxLength: 30,
      cacheGroups: {
        defaultVendors: {
          test: /[\\/]node_modules[\\/]/,
          priority: -10
        },
        default: {
          minChunks: 2,
          priority: -20,
          reuseExistingChunk: true
        }
      }
    }
  }
};
各项缺省时会自动取默认值,也就是如果传入:
module.exports = {
  //...
  optimization: {
    splitChunks: {}
  }
};
等同于全部取默认值。下面我们来看一下每一项的含义。首先修改一下源文件,抽取 log-util 模块:
// log-util.js
export const log = (info) => {
    console.log(info);
};

export const err = (info) => {
    console.log(info);
};
// index.js
import _ from 'lodash';
import { log } from './log-util';

log(
    _.join(['index', 'module', 'loaded!'], ' ')
);
const div = document.createElement('div');
div.innerText = 'first screen content';
document.getElementById('root').appendChild(div);
// another-module.js
import _ from 'lodash';
import $ from 'jquery';
import { log } from './log-util';

log(
    _.join(['another', 'module', 'loaded!'], ' ')
);
$('body').click(() => {
    $('body').css('background', 'green')
});
3.2.1 splitChunks.chunks
chunks 有三个值,分别是:
async: 异步模块(即按需加载模块,默认值)
initial: 初始模块(即初始存在的模块)
all: 全部模块(异步模块 + 初始模块)
因为更改初始块会影响 HTML 文件应该包含的用于运行项目的脚本标签。我们可以修改该配置项如下(这里对 cacheGroups 做了简单的修改,是为了方便后续的比较,大家简单理解为,node_modules 的模块,会放在 verdors 下,其他的会放在 default 下即可,后面会有更详细的解释):
    optimization: {
        splitChunks: {
            chunks: 'all',
            cacheGroups: {
                defaultVendors: {
                    test: /[\\/]node_modules[\\/]/,
                    priority: -10
                },
                default: {
                    minChunks: 1,
                    priority: -20,
                    reuseExistingChunk: true
                }
            }
        }
    }
3.2.2 splitChunks.minSize
生成块的最小大小(以字节为单位)。
    optimization: {
        splitChunks: {
            chunks: 'all',
            minSize: 800000,
            cacheGroups: {
                defaultVendors: {
                    test: /[\\/]node_modules[\\/]/,
                    priority: -10
                },
                default: {
                    minChunks: 1,
                    priority: -20,
                    reuseExistingChunk: true
                }
            }
        }
    }
可以看到 lodash 并没有从 index 中拆出,lodash 和 jquery 从another 拆出后一起被打包在一个公共的 vendors~another 中。这是由于如果 lodash 和 jquery 单独拆出后 jquery 是不到 800k 的,无法拆成单独的两个 chunk。
    optimization: {
        splitChunks: {
            chunks: 'all',
            minSize: 0,
            cacheGroups: {
                defaultVendors: {
                    test: /[\\/]node_modules[\\/]/,
                    priority: -10
                },
                default: {
                    minChunks: 1,
                    priority: -20,
                    reuseExistingChunk: true
                }
            }
可以看到每个模块都被分离了出来。
3.2.3 splitChunks.minRemainingSize
在 webpack 5 中引入了该选项,通过确保分割后剩余块的最小大小超过指定限制,从而避免了零大小的模块。在“开发”模式下默认为0。对于其他情况,该选项默认为 minSize 的值。所以它不需要手动指定,除非在需要采取特定的深度控制的情况下。
3.2.4 splitChunks.maxSize
使用 maxSize 告诉 webpack 尝试将大于 maxSize 字节的块分割成更小的部分。每块至少是 minSize 大小。该算法是确定性的,对模块的更改只会产生局部影响。因此,它在使用长期缓存时是可用的,并且不需要记录。maxSize只是一个提示,当模块大于 maxSize 时可能不会分割也可能分割后大小小于 minSize。
当块已经有一个名称时,每个部分将从该名称派生出一个新名称。取决于值optimization.splitChunks.hidePathInfo,它将从第一个模块名或其散列派生一个
key。
需要注意:
- maxSize比maxInitialRequest/ maxasyncrequest具有更高的优先级。实际的优先级是maxInitialRequest/maxAsyncRequests < maxSize < minSize。
- 设置maxSize的值将同时设置maxAsyncSize和maxInitialSize的值。
maxSize选项用于HTTP/2和长期缓存。它增加了请求数,以便更好地进行缓存。它还可以用来减小文件大小,以便更快地重建。
    optimization: {
        splitChunks: {
            chunks: 'all',
            minSize: 0,
            maxSize: 30000,
            cacheGroups: {
                defaultVendors: {
                    test: /[\\/]node_modules[\\/]/,
                    priority: -10
                },
                default: {
                    minChunks: 1,
                    priority: -20,
                    reuseExistingChunk: true
                }
            }
        }
    }
可以看到,defaultVendors anotherindex~ 又分离出了 defaultVendors anotherindex ._node_modules_lodash_lodash.js2ef0e502.js 和 defaultVendors anotherindex~._node_modules_webpack_buildin_g.js。
3.2.5 splitChunks.minChunks
代码分割前共享一个模块的最小 chunk 数,我们来看一下:
optimization: {
        splitChunks: {
            chunks: 'all',
            minSize: 10,
            minChunks: 2,
            cacheGroups: {
                defaultVendors: {
                    test: /[\\/]node_modules[\\/]/,
                    priority: -10
                },
                default: {
                    minChunks: 1,
                    priority: -20,
                    reuseExistingChunk: true
                }
            }
        }
    }
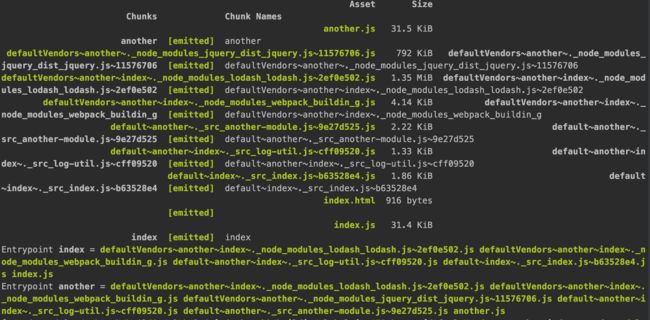
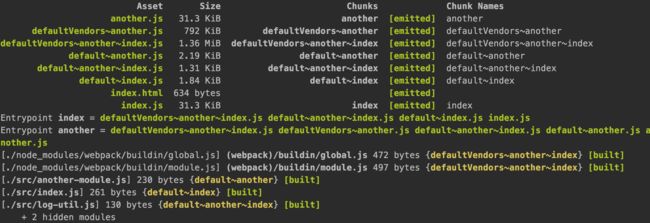
可以看到, jquery 由于引用次数小于 2,没有被单独分离出来。如果改为 3,
    optimization: {
        splitChunks: {
            chunks: 'all',
            minSize: 10,
            minChunks: 3,
            cacheGroups: {
                defaultVendors: {
                    test: /[\\/]node_modules[\\/]/,
                    priority: -10
                },
                default: {
                    minChunks: 1,
                    priority: -20,
                    reuseExistingChunk: true
                }
            }
        }
    }
可以看到, jquery 和 lodash 由于引用次数小于 3,都没有被单独分离出来。
3.2.6 splitChunks.maxAsyncRequests
按需加载时的最大并行请求数。
3.2.7 splitChunks.maxInitialRequests
一个入口点的最大并行请求数。
3.2.8 splitChunks.automaticNameDelimiter
默认情况下,webpack将使用块的来源和名称来生成名称(例如: vendors~main.js)。此选项允许您指定用于生成的名称的分隔符。。
3.2.9 splitChunks.automaticNameMaxLength
插件生成的 chunk 名称所允许的最大字符数。防止名称过长,增大代码和传输包体,保持默认即可。
3.2.10 splitChunks.cacheGroups
缓存组可以继承和/或覆盖splitChunks中的任何选项。但是test、priority和reuseExistingChunk只能在缓存组级配置。若要禁用任何缺省缓存组,请将它们设置为false。
3.2.10.1 splitChunks.cacheGroups.{cacheGroup}.test
控制此缓存组选择哪些模块。省略它将选择所有模块。它可以匹配绝对模块资源路径或块名称。当一个 chunk 名匹配时,chunk 中的所有模块都被选中。
optimization: {
        splitChunks: {
            chunks: 'all',
            minSize: 0,
            minChunks: 1,
            cacheGroups: {
                log: {
                    test(module, chunks) {
                        // `module.resource` contains the absolute path of the file on disk.
                        // Note the usage of `path.sep` instead of / or \, for cross-platform compatibility.
                        return module.resource &&
                            module.resource.indexOf('log') > -1;
                    }
                },
                defaultVendors: {
                    test: /[\\/]node_modules[\\/]/,
                    priority: -10
                },
                default: {
                    minChunks: 1,
                    priority: -20,
                    reuseExistingChunk: true
                }
            }
        }
    }
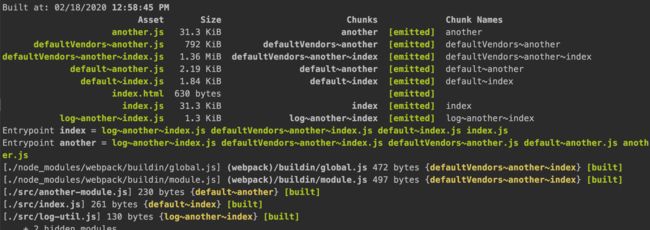
可以看到,log-util 模块被匹配到了 log anotherindex chunk。
3.2.10.2 splitChunks.cacheGroups.{cacheGroup}.priority
一个模块可以属于多个缓存组。该优化将优先选择具有较高优先级的缓存组。默认组具有负优先级,以允许自定义组具有更高的优先级(默认值为0的自定义组)。
optimization: {
        splitChunks: {
            chunks: 'all',
            minSize: 0,
            minChunks: 1,
            cacheGroups: {
                log: {
                    test(module, chunks) {
                        // `module.resource` contains the absolute path of the file on disk.
                        // Note the usage of `path.sep` instead of / or \, for cross-platform compatibility.
                        return module.resource &&
                            module.resource.indexOf('log') > -1;
                    },
                    priority: -20,
                },
                defaultVendors: {
                    test: /[\\/]node_modules[\\/]/,
                    priority: -10
                },
                default: {
                    minChunks: 1,
                    priority: -15,
                    reuseExistingChunk: true
                }
            }
        }
    }
可以看到 log 缓存组下不会输出了,事实上,比 default 的 prioity 低的缓存组都是不会输出的。
3.2.10.3 splitChunks.cacheGroups.{cacheGroup}.reuseExistingChunk
如果当前 chunk 包含已经从主包中分离出来的模块,那么它将被重用,而不是生成一个新的 chunk。这可能会影响 chunk 的结果文件名。
3.3 小结
可以看到,提取公共代码单独输出后,我们加载资源的时间并没有变短,因为带宽是一定的,并行资源过多,反而会增加 http 耗时。我们获得的主要好处是,充分利用了缓存,这对于用户资源更新时有很大的好处,不过也需要衡量公共代码提取的条件,防止负优化。这里一般使用默认的四个条件即可(至于作用的模块我们可以改为 all):
- 新的 chunk 可以被共享,或者是来自 node_modules 文件夹
- 新的 chunk 大于30kb(在 min + gz 压缩之前)
- 当按需加载 chunk 时,并行请求的最大数量小于或等于 6
- 初始页面加载时并行请求的最大数量将小于或等于 4
4. 动态引入和懒加载
我们进一步考虑,初始的时候并行了这么多资源,导致加载时间变慢,那么其中是否所有的资源都是需要的呢。显然不是的。这里我们其实是想先加载首屏逻辑,然后点击 body 时才去加载 another-module 的逻辑。
首先,webpack 资源是支持动态引入的。当涉及到动态代码拆分时,webpack 提供了两个类似的技术。对于动态导入,第一种,也是优先选择的方式是,使用符合 ECMAScript 提案 的 import() 语法。第二种,则是使用 webpack 特定的 require.ensure。更推荐使用第一种,适应范围更大。
而在用户真正需要的时候才去动态引入资源,也就是所谓的懒加载了。
我们作如下修改:
// index.js
import _ from 'lodash';
import { log } from './log-util';

log(
    _.join(['index', 'module', 'loaded!'], ' ')
);
const div = document.createElement('div');
div.innerText = 'first screen content';
document.getElementById('root').appendChild(div);
document.body.addEventListener('click', () => {
    import ('./another-module').then(anotherModule => {
        anotherModule.default.run();
    });
});
// another-module.js
import _ from 'lodash';
import $ from 'jquery';
import { log } from './log-util';
const anotherModule = {
    run() {
        log(
            _.join(['another', 'module', 'loaded!'], ' ')
        );
        $('body').css('background', 'green');
    }
};

export default anotherModule;
    optimization: {
        splitChunks: {
            chunks: 'all',
            minSize: 0,
            minChunks: 1,
            cacheGroups: {
                defaultVendors: {
                    test: /[\\/]node_modules[\\/]/,
                    priority: -10
                },
                default: {
                    minChunks: 1,
                    priority: -20,
                    reuseExistingChunk: true
                }
            }
        }
    }
打包后如下:
可以看到,another 的辅助加载和 log,lodash 逻辑被提前加载,但是模块内部逻辑和 jquery 模块都被单独拎出来了,且并没有加载。
点击body后,该部分内容才被加载并执行。这样就能有效提升首屏加载速度。
如果我们想改变异步加载包的名称,可以使用 magic-comment,如下:
document.body.addEventListener('click', () => {
    import (/* webpackChunkName: "anotherModule" */ './another-module').then(anotherModule => {
        anotherModule.default.run();
    });
});
打包发现:
但是尴尬地是,由于新增了 another-module,和 another 相同的部分被打包并且提前加载了,导致我们的懒加载策略失效了,这个坑大家要注意。
5. 预拉取和预加载
我们考虑一下这个问题,懒加载虽然减少了首屏加载时间,但是在交互操作或者其他异步渲染的响应。我们该如何解决这个问题呢?
webpack 4.6.0+增加了对预拉取和预加载的支持。
预拉取: 将来某些导航可能需要一些资源
预加载: 在当前导航可能需要一些资源
假设有一个主页组件,它呈现一个LoginButton组件,然后在单击后按需加载一个LoginModal组件。
// LoginButton.js
//...
import(/* webpackPrefetch: true */ 'LoginModal');
这将导致 被附加在页面的头部,指示浏览器在空闲时间预拉取login-modal-chunk.js文件。
ps:webpack将在加载父模块后立即添加预拉取提示。
Preload 不同于 prefetch:
- 一个预加载的块开始与父块并行加载。预拉取的块在父块完成加载后启动。
- 预加载块具有中等优先级,可以立即下载。在浏览器空闲时下载预拉取的块。
- 一个预加载的块应该被父块立即请求。预拉取的块可以在将来的任何时候使用。
- 浏览器支持是不同的。
让我们想象一个组件 ChartComponent,它需要一个巨大的图表库。它在渲染时显示一个 LoadingIndicator,并立即按需导入图表库:
// ChartComponent.js
//...
import(/* webpackPreload: true */ 'ChartingLibrary');
当使用 ChartComponent 的页面被请求时,还会通过请求图表库块。假设页面块更小,完成速度更快,那么页面将使用 LoadingIndicator 显示,直到已经请求的图表库块完成。这将对加载时间有一定优化,因为它只需要一次往返而不是两次。特别是在高延迟环境中。
ps: 不正确地使用 webpackPreload 实际上会损害性能,所以在使用它时要小心。
对于本文所列的例子,显然更符合预拉取的情况,如下:
document.body.addEventListener('click', () => {
    import (/* webpackPrefetch: true */ './another-module').then(anotherModule => {
        anotherModule.default.run();
    });
});
图示资源,提前被下载好,在点击的时候再去下载资源时就可以直接使用缓存。
document.body.addEventListener('click', () => {
    import (/* webpackLoad: true */ './another-module').then(anotherModule => {
        anotherModule.default.run();
    });
});
6. 小结
本文内容比较多,统合了多个章节,而且内容上有很大的不一致。如果大家有同步看视屏,应该也会发现之前也有很多不一致的地方。学习记录切忌照本宣科,多查资料,多实践,才能有更多收获。
参考
https://webpack.js.org/guides/code-splitting/#root
https://www.webpackjs.com/guides/code-splitting/
Webpack 的 Bundle Split 和 Code Split 区别和应用
https://webpack.js.org/plugins/split-chunks-plugin/
手摸手,带你用合理的姿势使用webpack4
webpack4 splitChunks的reuseExistingChunk选项有什么作用


